jjo192
-
Posts
10 -
Joined
-
Last visited
jjo192's Achievements
")


-
That is a real shame. I am looking into how to use this: CPUID Spoofer As a means of maybe spoofing the CPU to appear as something more genuine. After running the Intel Processor Diagnostic Tool it reports these CPUs fail on 'BrandID' I wonder if being able to change any of this would yield results. But I fear spoofing at the OS Level might not be enough or possible at all. I do know individuals have been able to make the RTX 3080 installable with this Laptop by changing the DeviceID for it to the Clevo X170 DeviceID in the bios. I am aware it is a different situation, but I believe that any spoofing would need to happen at the BIOS/EC level to even have a chance of yielding anything. Or if there is a way to find and disable this check in the BIOS or EC. Effectively these CPUs pose as something similar to ES or QS CPUs. I wonder if anyone has G-Sync working with an ES/QS or these FBA1440 CPUs at all. In a desktop for example? Might shed some light on whether it is just in general a no go with ES, QS or these FBA1440 CPUs, or Clevo specifically. If anyone has spoofed CPUIDs before I'd be interested to know more about it.
-
I have a QTJ1 CPU in my P775TM1 and G-Sync is not available, it does come back when an i5 8400 is installed. It actually re-installs the GPU under a slighty different DeviceID but it allows for use of Gsync. My question is, is there possible an additional edit in the BIOS, EC, Vbios or whatever it might be to bypass this scheck or even a means of spoofing CPUID to get Gsync working with these CPUs. Not asking you specifically haha just in general but in reference to this comment.
-
P750DM-(G) Dsanke BIOS does not work with BGA1440 CPUs
jjo192 replied to Alex69's topic in Sager & Clevo
Yes, I just dropped to 0.800v at 1797mhz and got 80w as a test. But that is as far as I'd go. 1847mhz at 0.850v feels comfortable being that 1847mhz is what the specified frequency for the card is. Have looked at RLECViewer before just never used it but will check it out again. -
P750DM-(G) Dsanke BIOS does not work with BGA1440 CPUs
jjo192 replied to Alex69's topic in Sager & Clevo
No particular fan settings, just default. There seems to be a big difference from 0.950v to 0.850v. 0.950v just gave me 130w and then 0.850v gave me 90w. -
P750DM-(G) Dsanke BIOS does not work with BGA1440 CPUs
jjo192 replied to Alex69's topic in Sager & Clevo
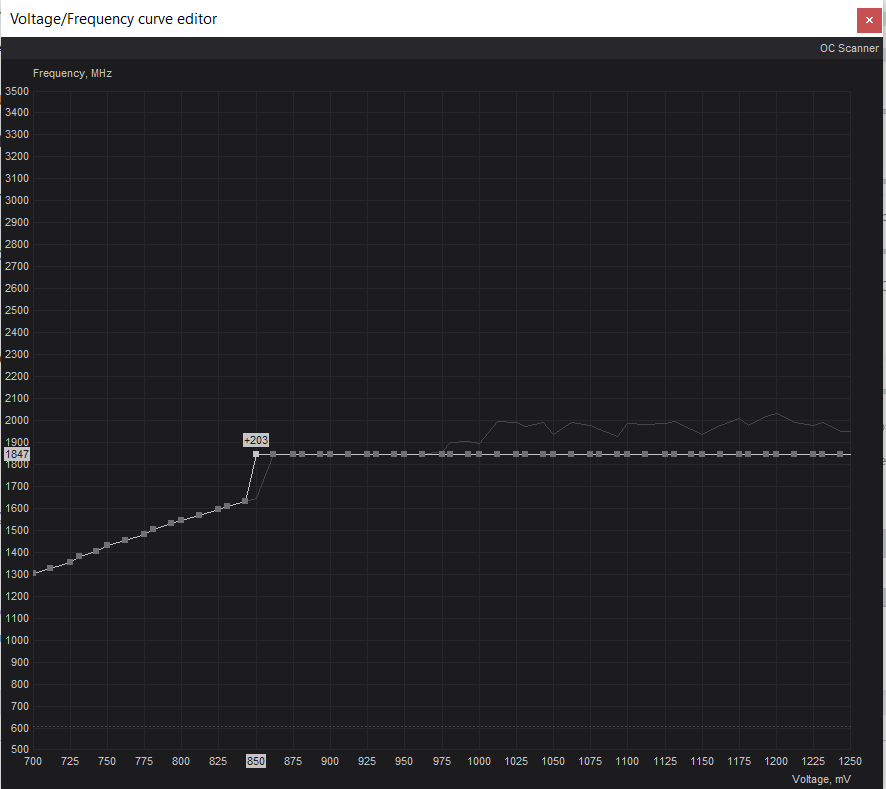
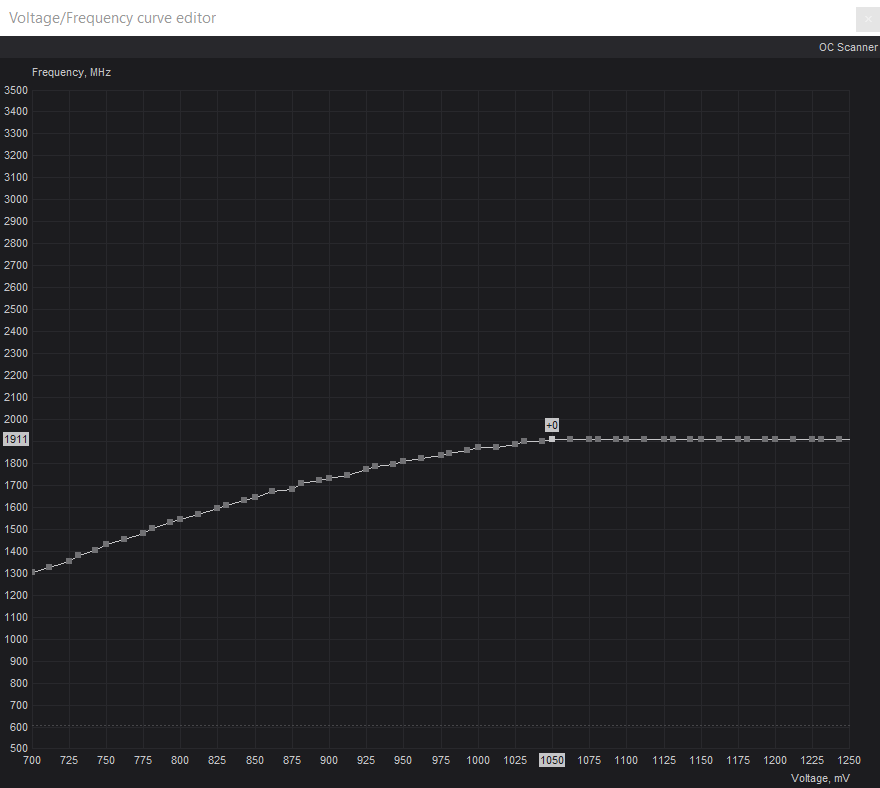
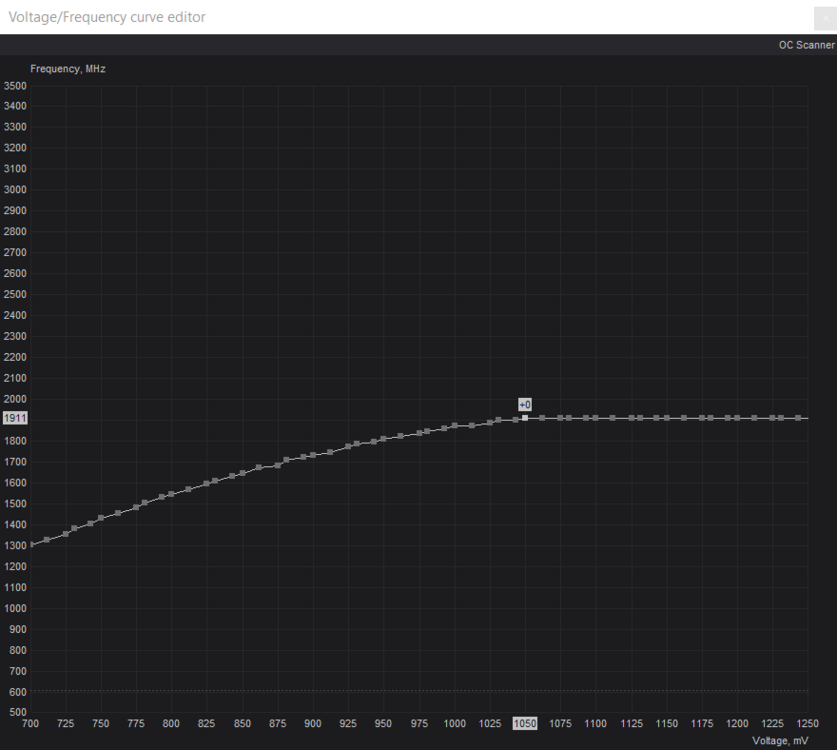
Yes I have found that method for the thermal pads to be quite useful. Okay I have just done a test. 192w seemed really high to me. I thought it was your combined CPU and GPU draw. I disabled my undervolting for my GPU and ran a stress test and it does infact reach around 170-190w. My undervolted GPU bairly breaks 110w on a stress test and wouldn't get anywhere near 71c on a stress test with the CPU being idle. When I game my GPU, which is also a GTX 1080 in the P775DM3, will run around 90w. Here is my curve editor in MSI afterburner: I have moved the frequency down to 1847Mhz from the original 1911Mhz (very little loss) and for me that will be stable on 0.850v (the sweat spot). Which brings this card from >180w down to <100w. Try that if your up for it and I think you will be a huge difference. This is what my curve editor looks like at default, it will achieved 1911Mhz but only when it reaches 1.050v mininum and may go upto 1.250v That difference from 1.050 - 1.250 down to 0.850v is almost a 50% decrease in power consumption for a less that 3% drop in performance. Edit: Yes, the one with the IHS.
-
P750DM-(G) Dsanke BIOS does not work with BGA1440 CPUs
jjo192 replied to Alex69's topic in Sager & Clevo
I actually bought my P775DM3 as a faulty unit with the intent to fix it. The issue stated was that it overheated, and it did, big time. That was because the thermal pads on the CPU and GPU side of the heatsink were double stacked and too high, meaning the chips where not making contact. I pulled off all the thermal pads and tested it and it made the correct contact, heat was better. Then I put the first layer back on, tested it, perfect again. From there I used a whiteboard pen to mark the VRAM chips, mosfets and everything else that was supposed to be making contact with the heatsink on both the CPU and GPU side. From there I just built the pads up on the heatsink to the corresponding chips until the thermal pad got the pen mark to confirm contact. The laptop then began to boot with low fan speeds and now the temperatures are what the should be. So maybe see if that is the issue. With the mutant CPU I have, it is slightly taller than an normal LGA 1151 CPU, but actually I didnt need to get add thermal pads, they just got swashed less. Yes I think that is basically the case with the laptop CPUs, tweaked desktop versions. So I don't fancy $170 for a small increase. No, no link. I am in the process of designing it and haven't shared anything online. But I will be on the lookout for the one you saw. Even though when gaming I only reach 72c both CPU and GPU at max, I want the built a slighty over the top cooler for the fun of it and have it run at super low temps. The P775DM3 is stationary, so I don't mind its size, I have a smaller laptop for travel. -
P750DM-(G) Dsanke BIOS does not work with BGA1440 CPUs
jjo192 replied to Alex69's topic in Sager & Clevo
80w is a bit of a guess really to be honest. I am going with it because the i9-9980HK is a 45w TDP and up to 5Ghz. Admittedly that is obviously 5Ghz on a single core and TDP doesn't mean much when it comes to this. Maybe 85w -95w, maybe lower its tough to know. I have tried looking for people who have tested the i9-9980HK but I mainly find overclocking. My other guess is the i9-9980HK will have the same breaking point somewhere around 4-4.5Ghz all core where it jumps from 70w to 120w over 1-2 multiplier increases. I am actually building a custom heatsink for the P775DM3, re-designing the back in CAD to 3D print it. It will give the laptop that back bulge you see in other gaming laptops but it's a bit of fun. I just find with CPUs, obviously the wattage does not increase in the same increments as you'd expect, so in reverse for undervolting it has the desired effect. Take a 5Ghz all core cpu at 150w, underclock that to 4Ghz all cores you would expect to get 120w at 80% of the clock, but you don't, you get it at around 100w, then add in a -100mv offset and then you look at 85w. I did exactly this on a CPU, can't remeber what it was now. I always like to find that sweet spot, where lowering the clocks start to significantly decrease the overall wattage. I do see alot of people gear towards getting the highest Ghz possible, but 3.5Ghz all cores has never given me an issue with PC gaming, emulation dependings on that %Ghz all core performance. I played with the i7-8700K a while ago with my P750DM3. If I remember correctly I ran that at 3.5Ghz all cores and -100mv and it was at 55w and at 4.0Ghz all cores it was 75w ish. 4.2Ghz all core, and again it started to get up there, 4,2Ghz was around 90w. -
P750DM-(G) Dsanke BIOS does not work with BGA1440 CPUs
jjo192 replied to Alex69's topic in Sager & Clevo
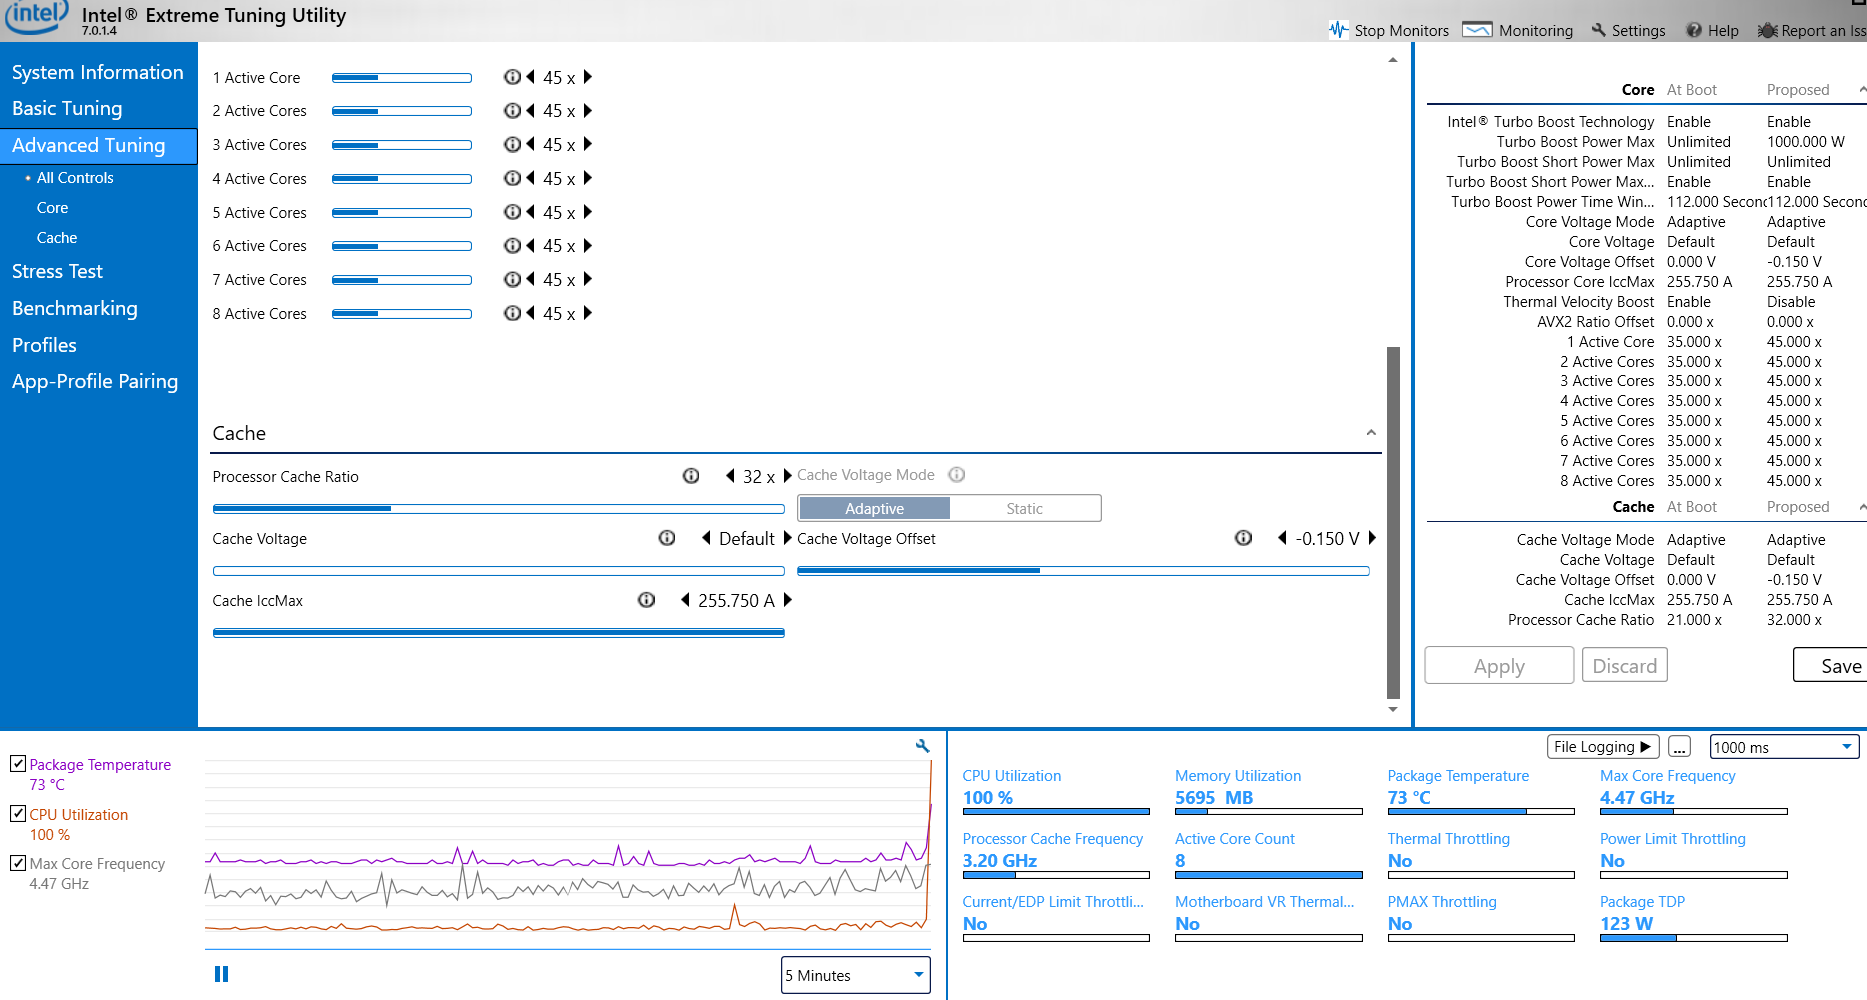
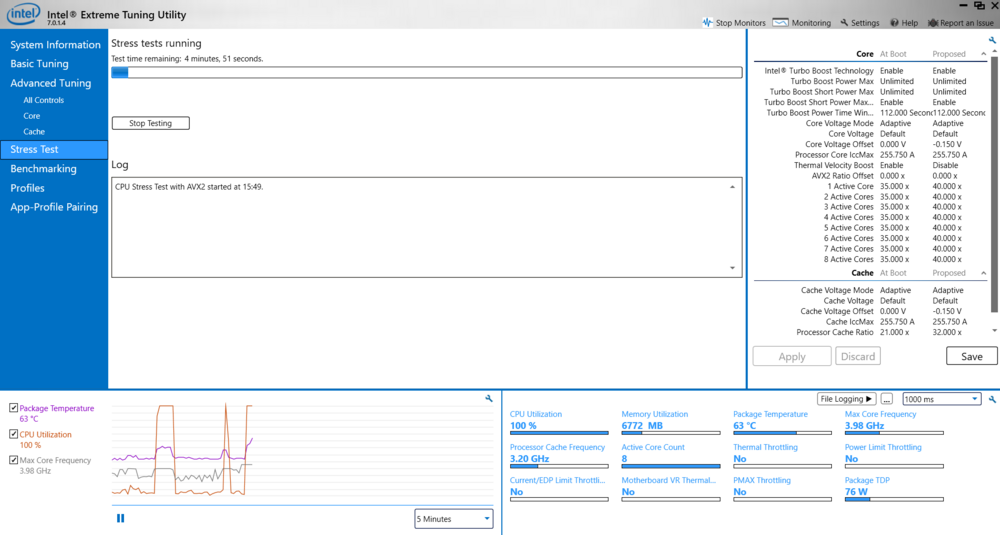
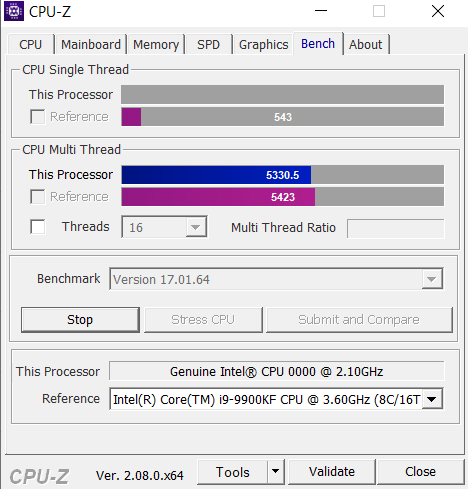
So I would say I'm more of a stable undercloker/undervolter, my GPU is undervolted by 33% (voltage, performance is still 100%) to help with heat and I undervolted the CPU. So I run the CPU at 3.5Ghz / 3.2Ghz for the Cache Ratio and -150mv for the voltage offset. This gives the following result under full load in XTU: 54 Watts is the result. In my case I can run at -170mv and 2.1Ghz for the Cache Ratio and achieve around 45w. But the increase of the Cache Ratio to 3.2Ghz gives a worthwhile increase in FPS for emulation and -170mv can cause an issue every now and then and is not alot of difference from -150mv which is super stable. As for temperature that is just the CPU. The heatsink in my case is the joint CPU/GPU heatsink. So for gaming it is highter than 51c when the GPU heats up too under the same heatsink, but gaming doesn't use 100%. So it sits around 65c when gaming alongisde the GPU that runs at around the same. Next is the CPU with the same config, but at 4.0Ghz with Cache Ratio remaining at 3.2Ghz 76 Watts is the draw this time and under gaming conditions its around 73c. Lastly at 4.5Ghz: This is where the CPU starts to fall away. Anything after 4.2Ghz starts to go up in Watts rapidly per Multiplier increase. So 4.0 - 4.2 is a peak sweet spot for all cores. This is the bench compared to a i9-9900KF for reference running at 4.5Ghz all cores. So nearly matching but far more power draw, so not really on par all around. In conclusion. I got this CPU for £65 / $82. It's not quite an i9-9900KF, but it is still an 8 core / 16 thread CPU for a good price. There is also a version of the mutant CPU that is a laptop i9-9980HK fitted for the LGA 1151 socket for a bit more money that I want to get that I feel will run closer to 4.5Ghz all cores under 80 watts. But honestly this CPU is great for the price I have not had any issues at all, consider it a 4.0-4.2Ghz all core CPU. Finally, interestingly Windows 11's upgrade detects it as a compatible CPU. So it is Windows 11 compatible even though it technically reads as 'Genuine Intel 0000' so thats a bonus if your into Windows 11.

-
P750DM-(G) Dsanke BIOS does not work with BGA1440 CPUs
jjo192 replied to Alex69's topic in Sager & Clevo
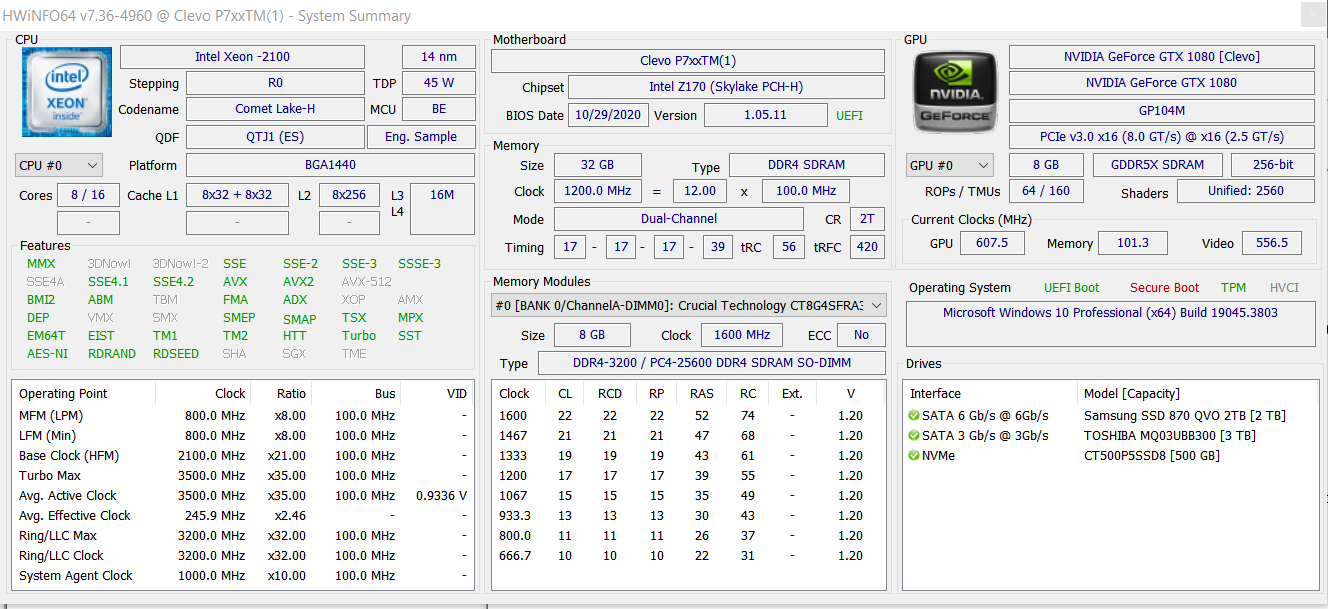
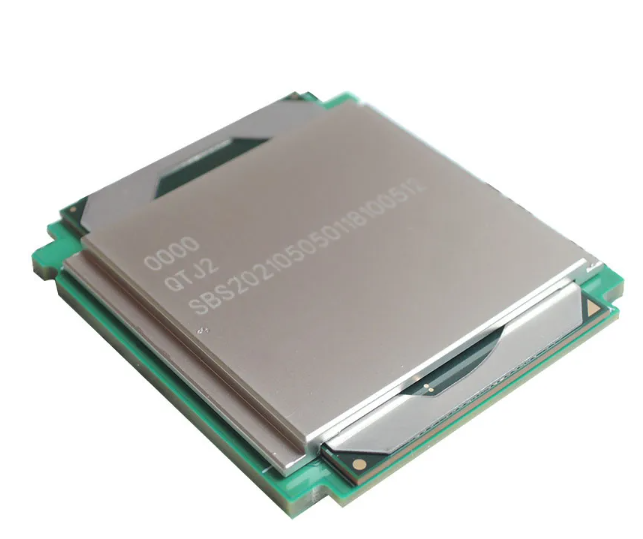
Can maybe look at dismantling for a photo but won't rush to do it. For the socket if you have this one: Just take the metal socket brace off the board and use the 3 according screw holes: If you have this version, (which I do) You will need to take the metal socket brace off and use washers to slightly raise the metal socket brace and screw it back This is the result: As you can see the CPU is 8 Cores / 16 Threads and a BGA1440. The Motherboard is also recognised as a TM1, not DM3 even though it is still Z170 Skylake chipset which is what the P7XXDM3 is. So this BIOS is basically all the features of the TM1 added to the P775DM2/3 / P750DM2/3 etc including RTX support for RTX2060/70/80, the RTX heatsink is required though.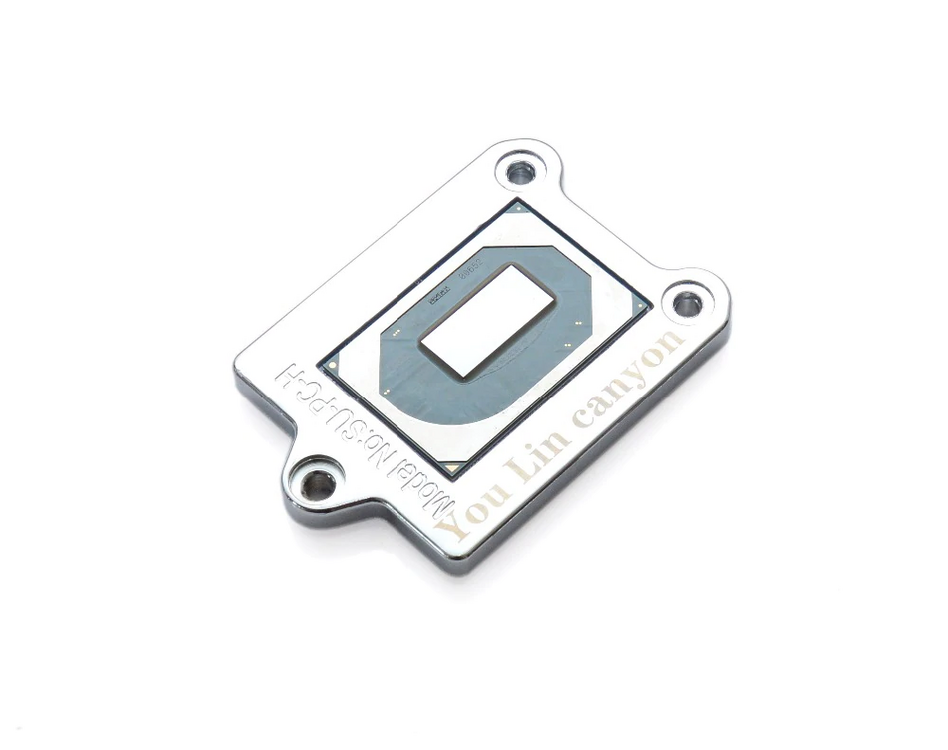


-
P750DM-(G) Dsanke BIOS does not work with BGA1440 CPUs
jjo192 replied to Alex69's topic in Sager & Clevo
Hi, not sure if you still need the advise or not. I have a P775DM3 and have used a P750DM3. I used this for both. I am using an 8 core 16 thread mutant 1440 CPU. This is the P7xxTM1 version ported to work on DM3. This gives 8 core support in the bios. I had issues with other versions breaking the Thunderbolt and USB-C ports, this does not break them. I had lots of issues initially with these. But the main thing that fixed my issue was the set the default RAM frequency in CoffeeTime to 2133mhz. Then boot initially with 1 RAM module. Good luck. Edit: Correct BIOS updated. P7xxTM1.rar