Goophy69
-
Posts
17 -
Joined
-
Last visited
Goophy69's Achievements
")


-
Didn't know they would use different heat sinks; with the heatsink added, I better just look for one that came with dGPU since the overall cost of parts likely exceeds the initial savings of buying an iGPU-only machine. I''m only interested in 17" models; dGPUs are compatible between 15" and 17" but from memory I came across a GPU upgrade post that said they use different vBIOS that have different power-limits. Should be an easy fix to flash the 17" vBIOS into a card that came from a 15" machine anyway. I read the specs sheet / service manual, noticed they have AMD options too, didn't really check if they use different heatsink.. (if really desperate, could search various service tag numbers and check their factory configs, lookup the heatsink DPNs etc..) with the 3+ parts needed for adding or changing(between A and N), I'm leaning toward buying one that came with Nvidia anyway. At this point I'm looking at either 7720 or 7740 too. 7720 for the old docking port that I already have, 7740 has Turing while 7730 has Pascal.. Anyway, not an urgent need, somewhat reluctant to spend too much on a computer these days (hardware performance already exceeded my daily needs), just keeping an eye on various auctions 🫠
-
Anyone knows what parts needed to add a discrete GPU for Dell Precision 7730? Any difference between 7730 and 7740, difference between Nvidia and AMD cards? From some brief search, the heat sink appears to be the same. Machines shipped with only the intel graphic will have a filler/blank board in place of the discrete card; this "blank" board also connects the HDMI and mDP ports on the rear side of the machine. So for the machines shipped with only intel graphic, does the heat sink (the gpu part of it) has thermal paste and pads applied? Pending list of parts needed: 2x interconnect thing with 2 screws (since the filler has 1 already, and the real gpu card needs 3) potentially some thermal pads and paste. the power cable by the looks of it? Anything else? Considering buying an used laptop, which could be a 7730/7740 without discrete GPU; wanna get a feel of what's needed to add discrete gpu (for future upgrade). Thanks anyway
-
Precision M6700 owner's thread
Goophy69 replied to Aaron44126's topic in Pro Max & Precision Mobile Workstation
I have this dremel stylus from years ago when it was the only few options available. then the market was flooded with all kinds of gadgets, lithium powered stuff.. now you can get something similar in the $10~30 range; even dremel itself now sells their cordless tool for $35 retail price, technology advances so quick 😂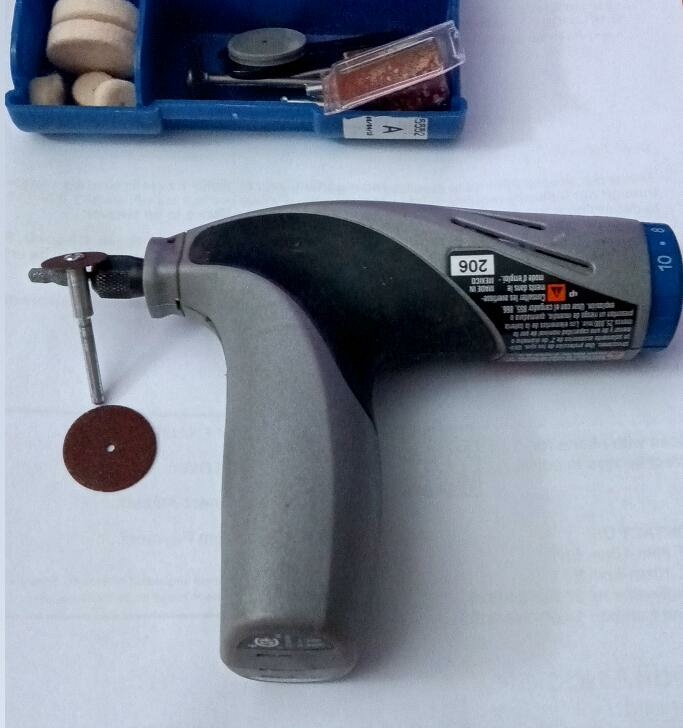
-
Precision M6700 owner's thread
Goophy69 replied to Aaron44126's topic in Pro Max & Precision Mobile Workstation
using some abrasive disk to cut a - with hand works too if electrical not feasible. Tape is soft so probably won't work; the screw cap is probably too small for tape to adhere to. not sure about regular super glue, normally not strong enough either. those acrylic/epoxy type (2-component, cold-weld putty, etc.) in theory should do the job, might need some prep work like scratching the screw cap for a better adhesion etc.. Still think making a - on the existing + is by far the easiest; I had successes with this method on stripped large head hinge and touch pad screws (those 1/4" diameter head with 1.2~2mm thread 2mm long screws with tiny +) Those $10~20 cordless rotary tools powered by 18650 work great on this type of work, easier to maneuver; 120v is too heavy. Can also cover the surrounding with a few sheets of thick paper / glasses cleaning cloth, tape them in place, they can withstand the few occasional slips. -updated- depending on how badly stripped that screw is, and how tightly it's screwed, tape between the screwdriver and groove might work, worth a try. before cutting wheel, can try cold-weld putty too. The putty doesn't need to stick to the screwdriver very firmly, but needs to stick to the screw head to create a good "thick" layer for the new groove to take place. When cured, the screwdriver essentially drives the putty layer. Plastic film around the screw head can "shield" out the surrounding in case the putty gets squeezed beyond the round screw head. The liquid type glue-like 2-component epoxy works too; though this one really binds the screwdriver to the screw. -
Precision M6700 owner's thread
Goophy69 replied to Aaron44126's topic in Pro Max & Precision Mobile Workstation
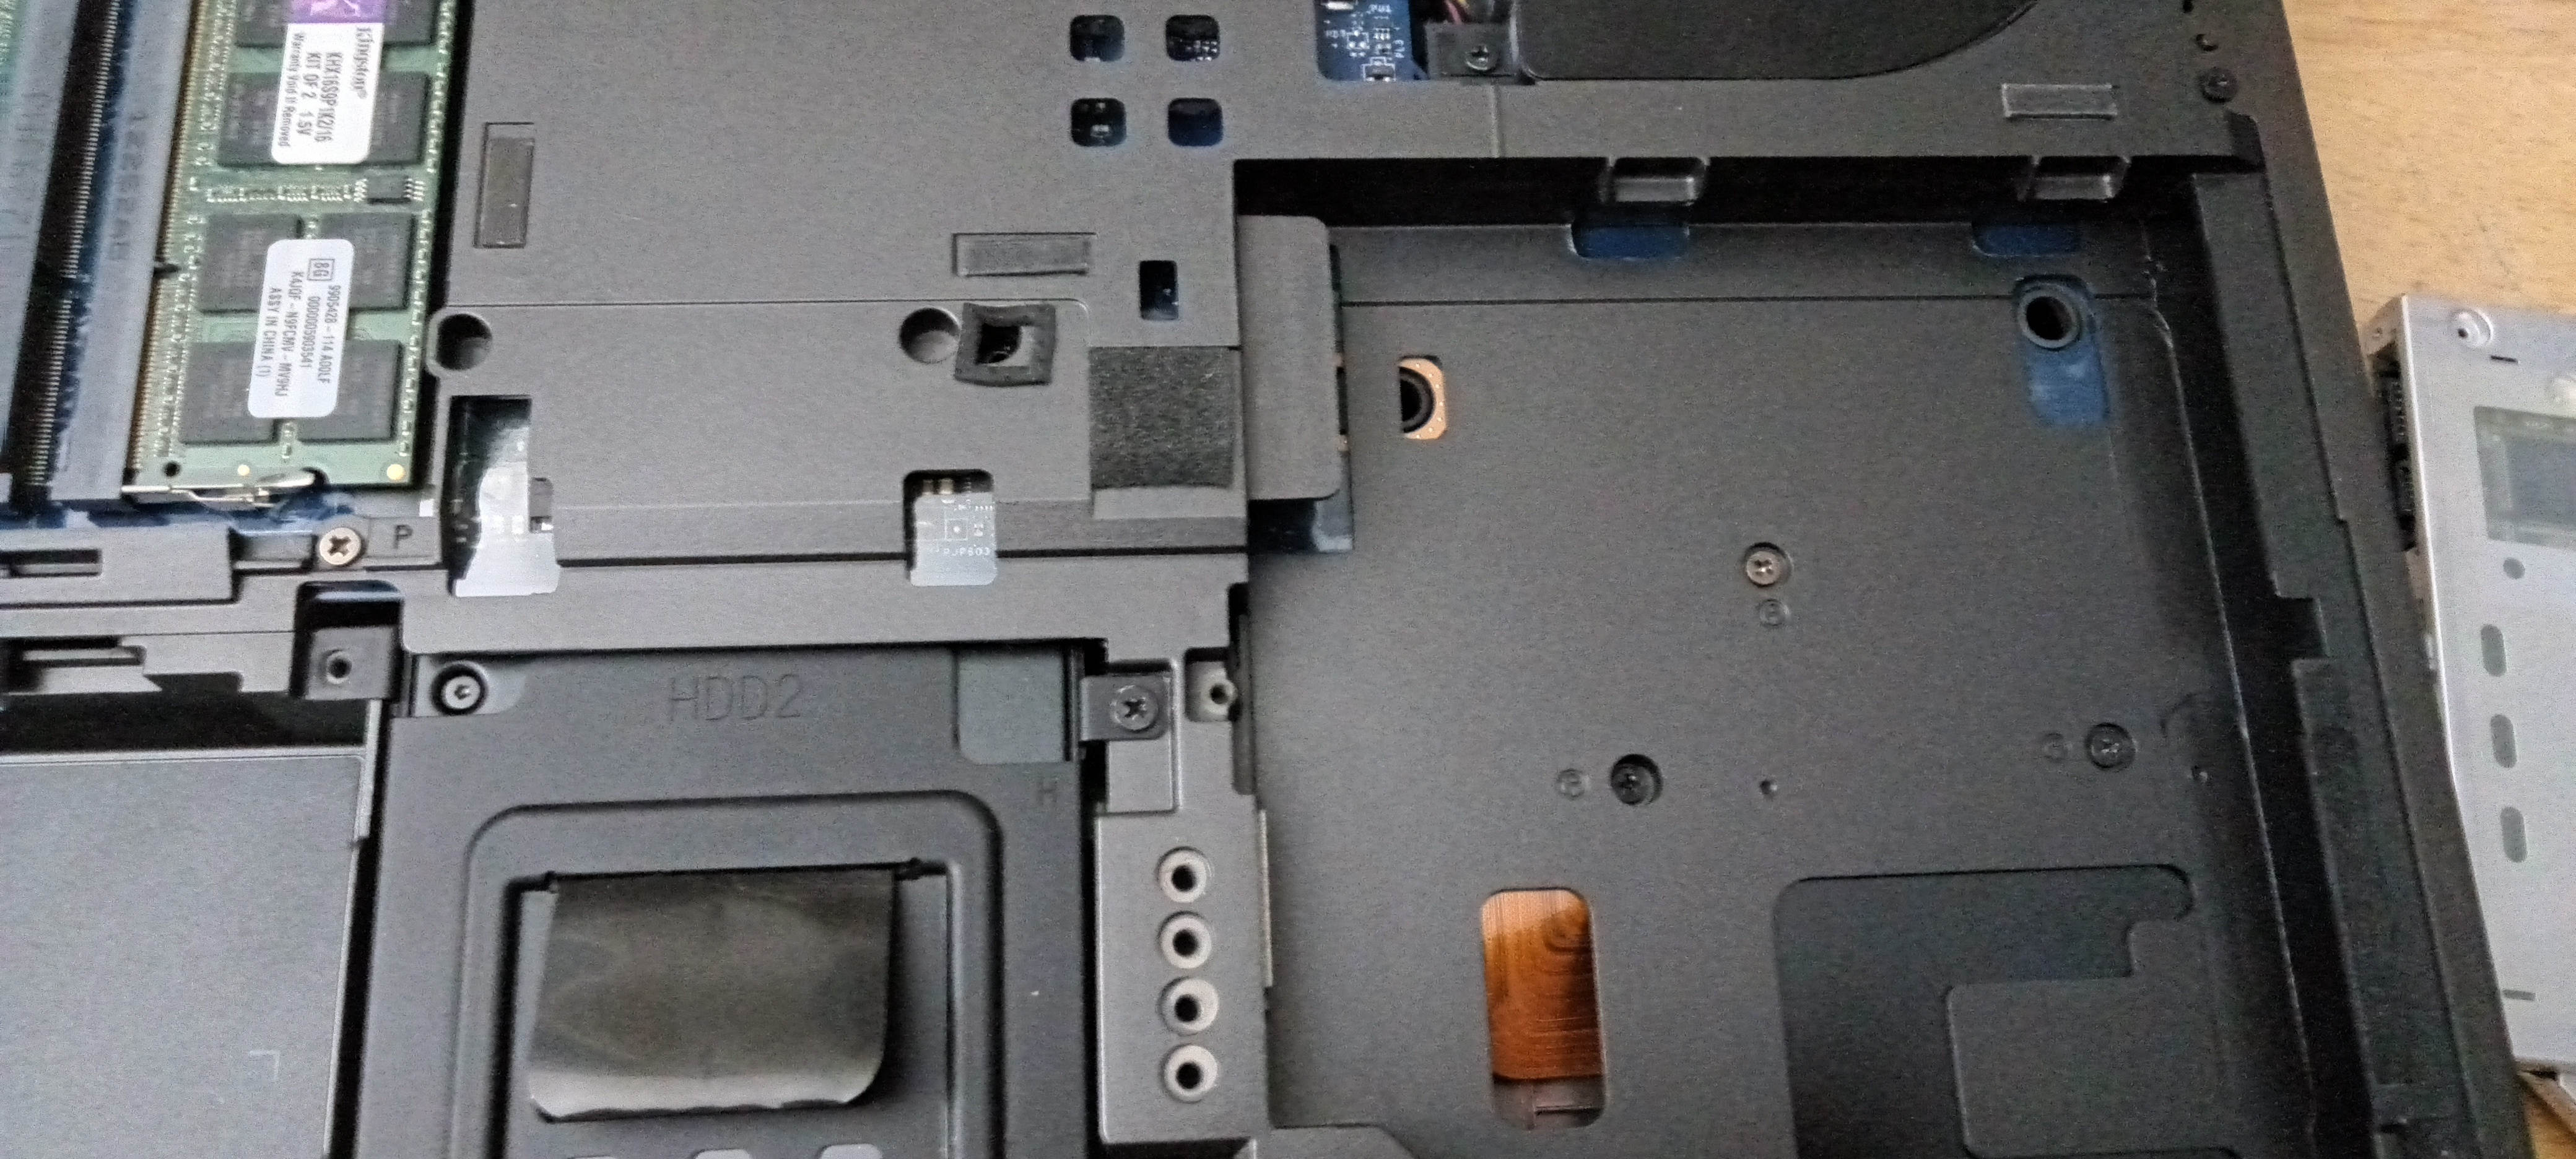
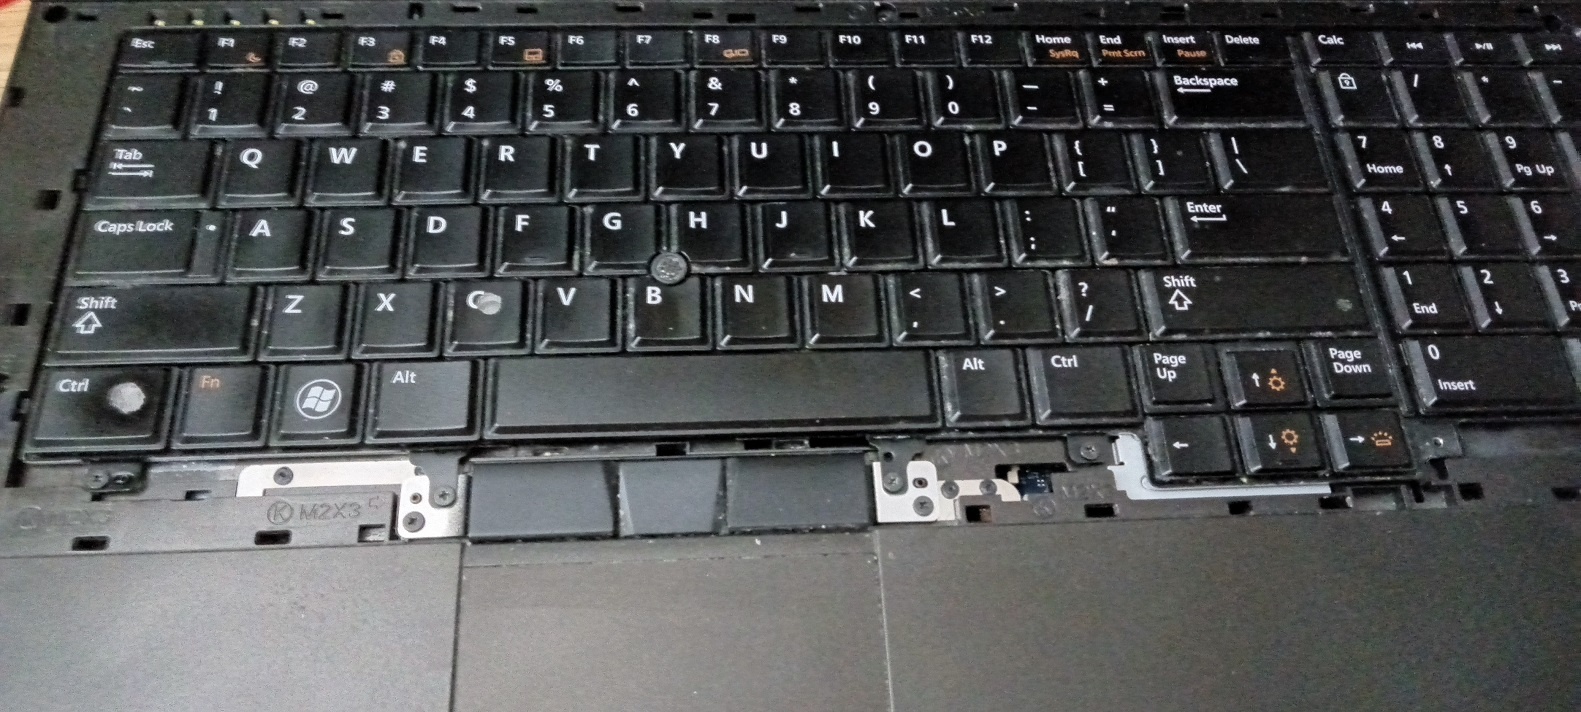
System has a reboot pending anyway so I checked the bottom and keyboard. Back of the keyboard is indeed sealed with drain hole on the bottom left corner (top left on picture cause it's flipped up), that cut-out corresponds to the channel hole on the bottom left corner, that hole goes to the optical bay, the hole in the top right corner of the optical compartment. (the hole inside the little square form guard between the optical and memory also looks suspicious, but I don't see anything near that location on the keyboard) The seam around the keyboard is not sealed so if you have the laptop tilt, hum, this could actually help the water to overflow onto the motherboard...😅 If you cut the power quick enough (before it flows to anything that impacts the voltage), and dry everything completely before the next power up (and before the residue can have a more permanent impact on the electronics, like rust), it should be fine. Pure alcohol can absorb water, then evaporate together, can somewhat help to accelerate the drying. Good luck anyway. -updated- for a stripped small screw, the regular extract tool won't work. my favorite is light-duty thin dremel or maybe heavy duty utility knife to deepen the +, or just make a fresh deep -, then regular screw driver will work.😏


-
Precision M6700 owner's thread
Goophy69 replied to Aaron44126's topic in Pro Max & Precision Mobile Workstation
Yes the M6700 does have this design. For water, I would still disassemble at least the keyboard and likely palmrest too to examine if any liquid gets onto the motherboard. I mean the seam around the keyboard is NOT sealed, so the water could have leaked through.. hair dryer, sunny day outside for a full afternoon etc should take care of the residue. water only. sticky syrup-like stuff would need alcohol -updated- From memory I saw a suspicious hold on the bottom, and the back of the keyboard has plastic sheet sealed, all signs of water protection, but can't recall seeing that hole on the keyboard.. Might need to disconnect the keyboard to check. -
Precision M6700 owner's thread
Goophy69 replied to Aaron44126's topic in Pro Max & Precision Mobile Workstation
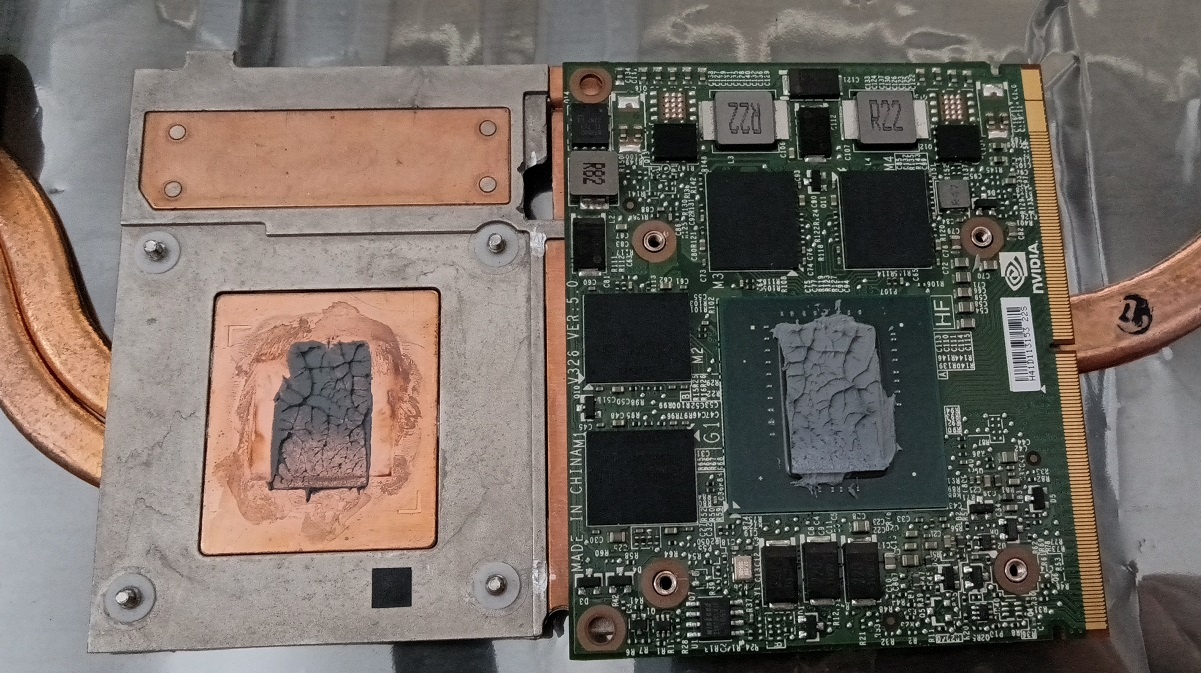
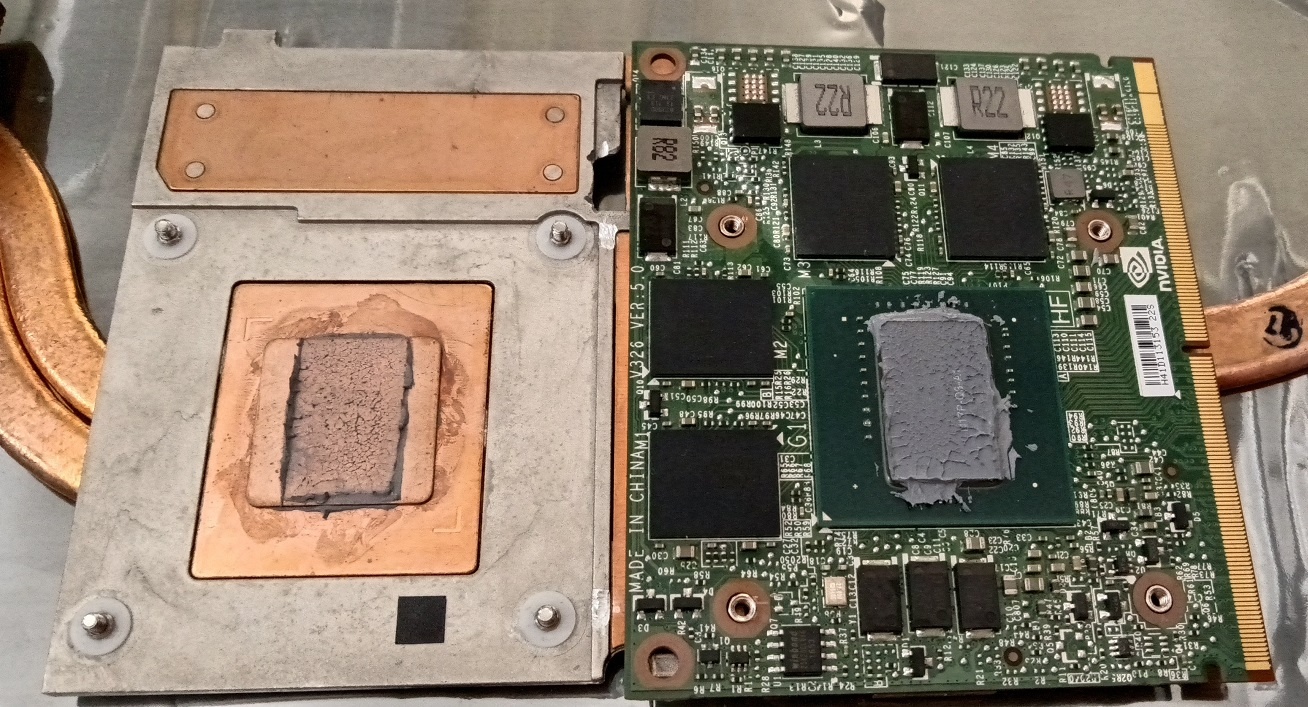
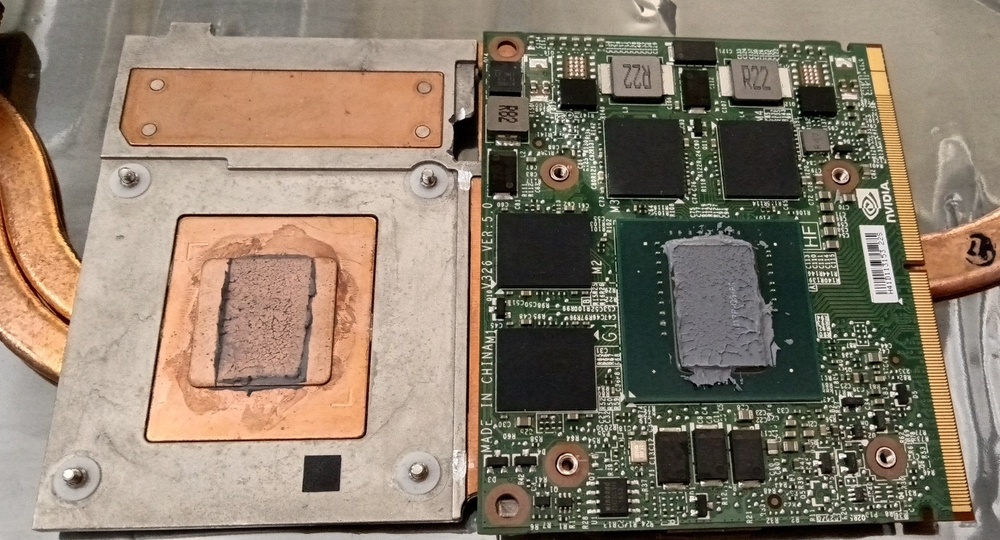
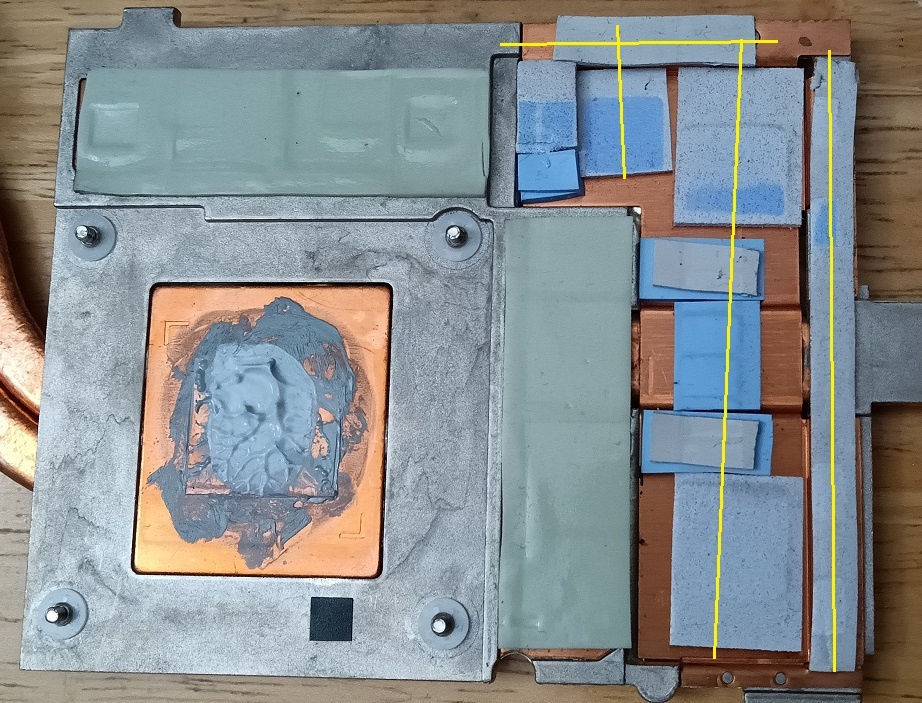
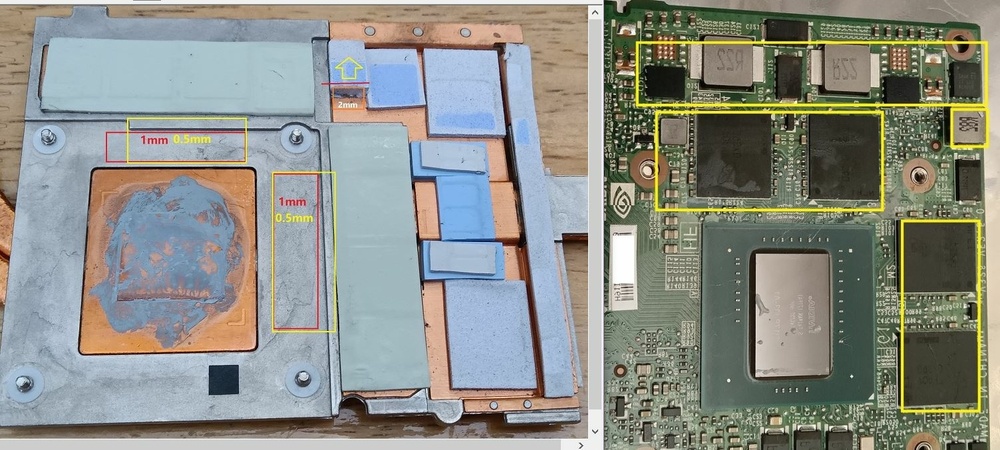
Some correction: After a few more trial and errors, I realized that when tightening the screws, the heatsink won't touch the core evenly. The core imprint on the copper looks like this: The tallest R82 seems to the culprit at my first glance, so Dremel time.. However, after sacrificing the heatsink, the core and copper still don't mate evenly.. This time appears to be one of the R22 that sits somewhat higher..phew.. After some brainstorming for a solution I found some copper plates from like 10-years ago when they were used on north and south bridges, time flies 😂 Adding a 0.5mm plate to the heatsink effectively raises the core a little, giving more room for the pads on other chips. Now the paste makes a perfect imprint I also tried a 0.75mm plate, but the 0.5mm seems to be enough (core touching copper, and still leaving a gap between the heatsink and other components). Adding a copper pad also makes the Dremeling unnecessary. Wasn't really an easy upgrade by now; result not bad anyway. Didn't know the old copper pads can still find their use nowadays.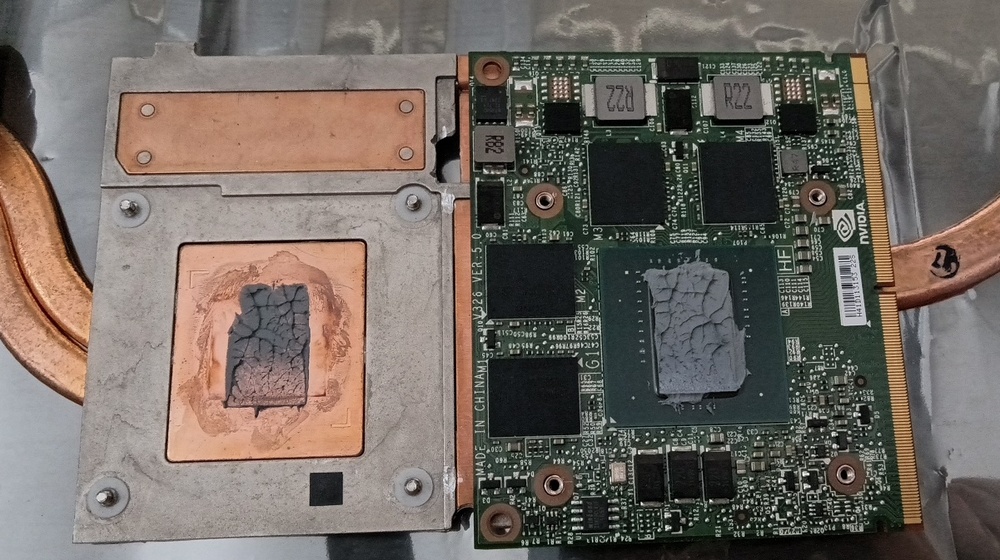
-
Precision M6700 owner's thread
Goophy69 replied to Aaron44126's topic in Pro Max & Precision Mobile Workstation
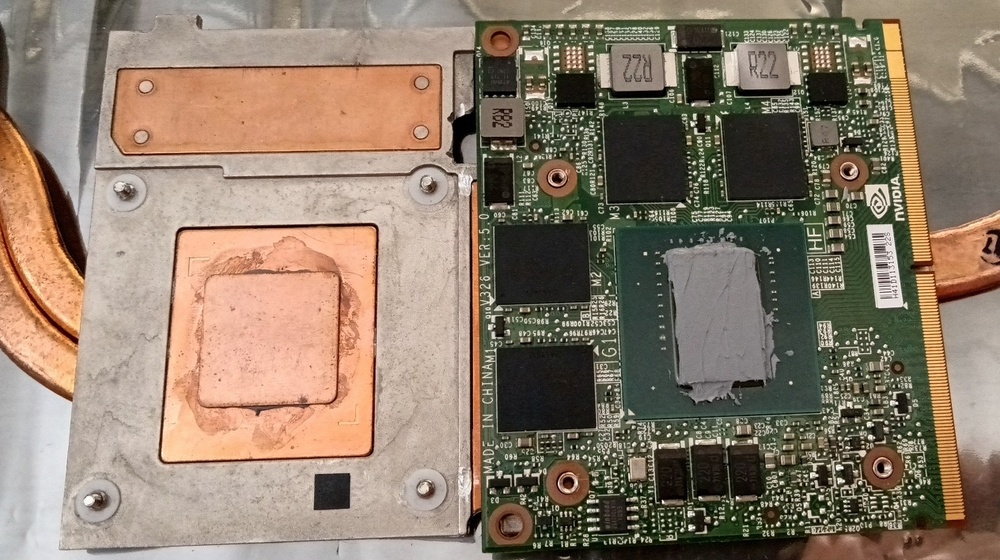
The caps between the R22 on the K5000M likely don't need thermal pads; the 3 caps on the M2200 are likely air cooled too. Just to confirm, the Nvidia heatsink on Precision 7520 has a little cut out on the heatsink for the 3 caps, maybe just due to the height of the caps but I don't see any height difference from the top of the cap to the green PCB plane of the core. Maybe that cut-out is for some extra air flow? Might just put a thermal pad on the tantalum as well. Looking at the lump of grease after separating the heatsink from the M2200, I'm suspecting the copper didn't really touch the die all the way down. The impress of the R22 on the pad also feels a little too hard. The stock vRAM pads on the K5000m heatsink are 1mm, might be better to substitute them with 0.5mm pads, so the copper should make a better contact with the core. This pretty much wraps up the upgrade. Hopefully this opens the door for other MXM 3a cards for future upgrades.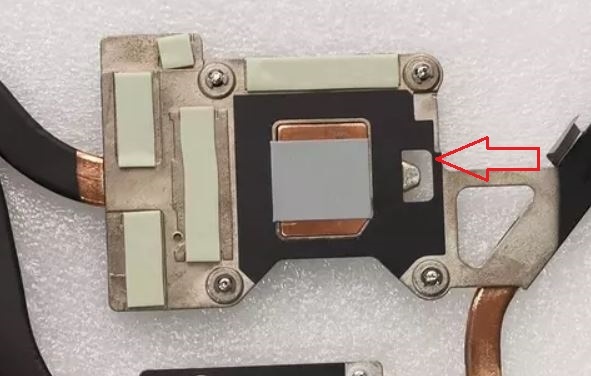
-
Precision M6700 owner's thread
Goophy69 replied to Aaron44126's topic in Pro Max & Precision Mobile Workstation
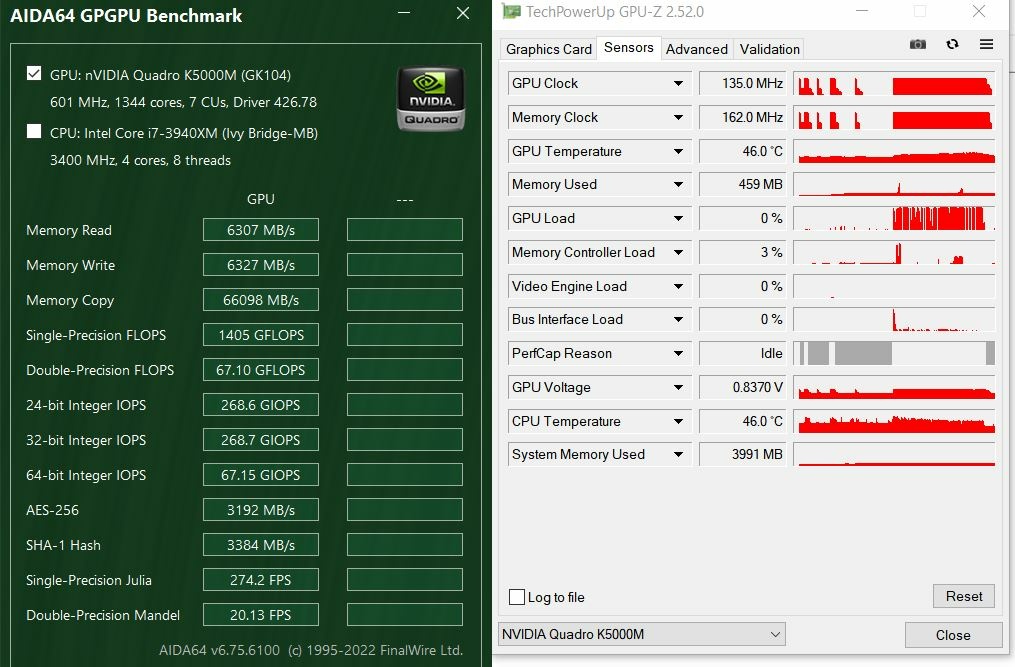
Just for comparison sake, here's the benchmark for K5000M idle at 35W GPU loaded at 110W CPU+GPU at 138 CPU+FPU+GPU at 155 Overall still a very nice upgrade even though a smaller size card 😃 Another 3 pictures just for future reference. Please excuse the crudity of the thermal grease; just wanted to put something there for a quick boot test, and not fry it before it thermal shut-down.😂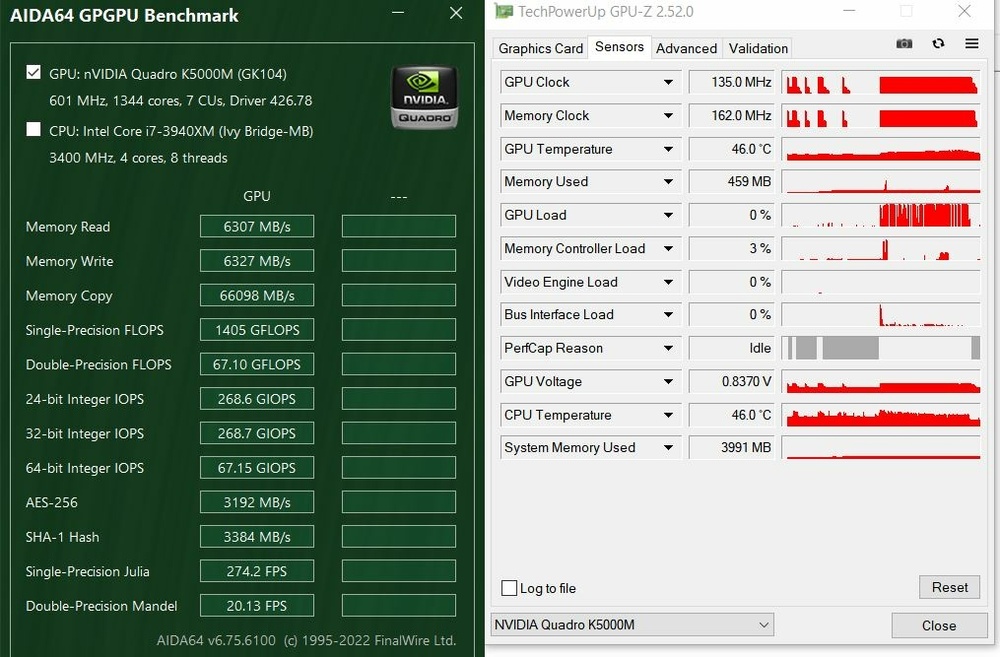

-
Precision M6700 owner's thread
Goophy69 replied to Aaron44126's topic in Pro Max & Precision Mobile Workstation
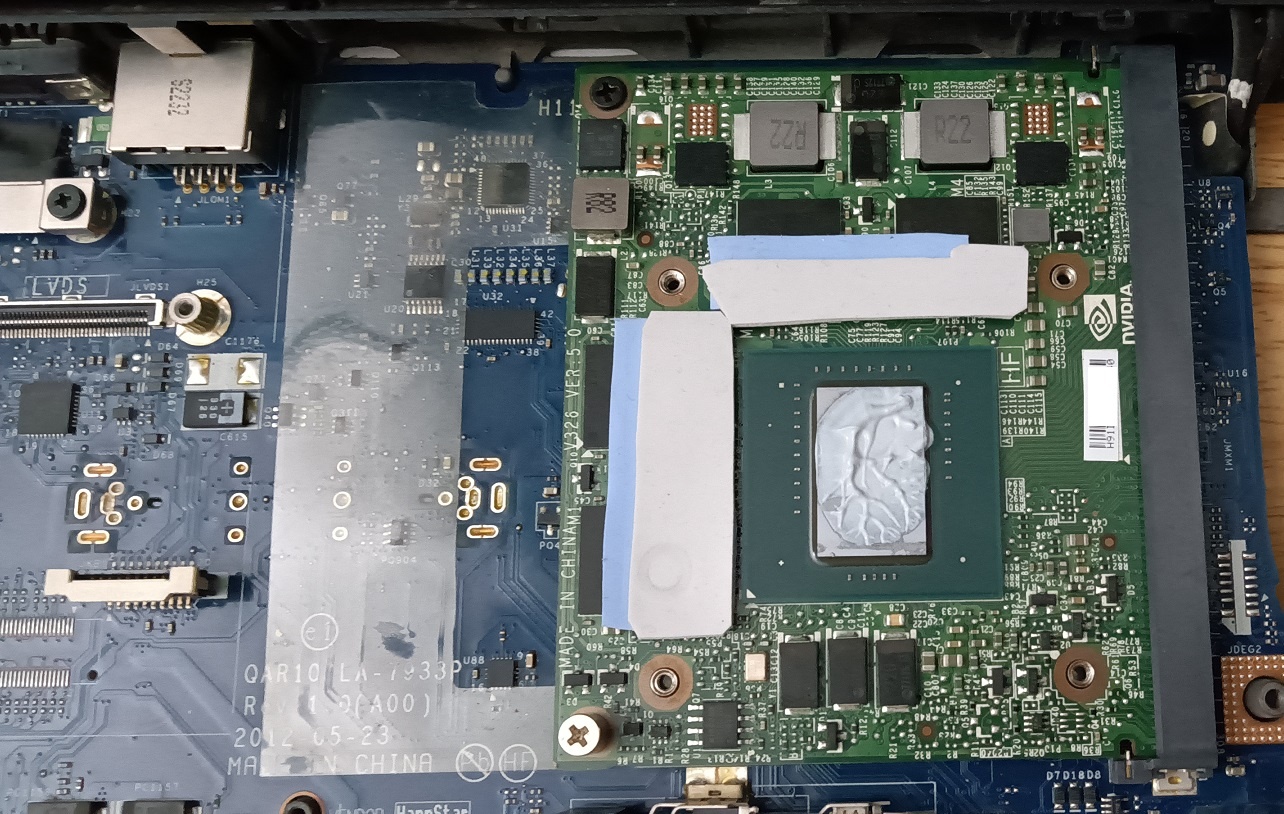
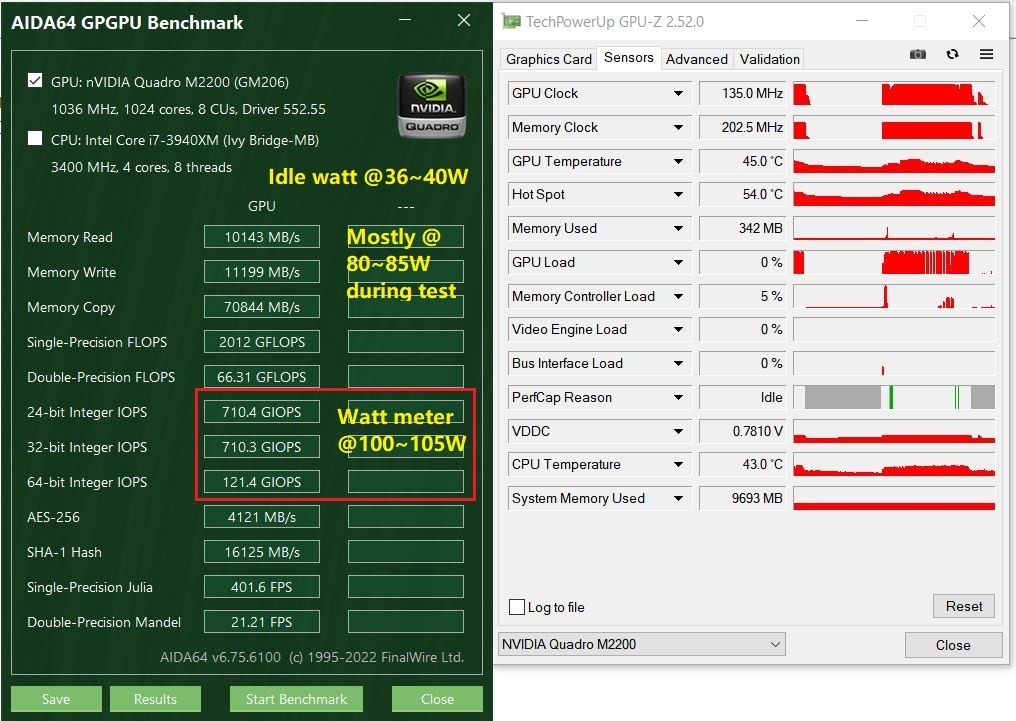
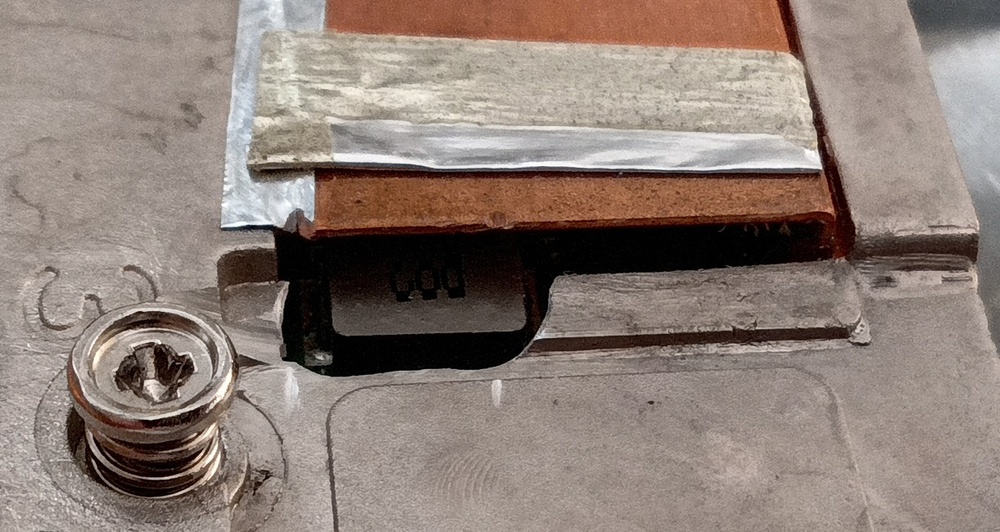
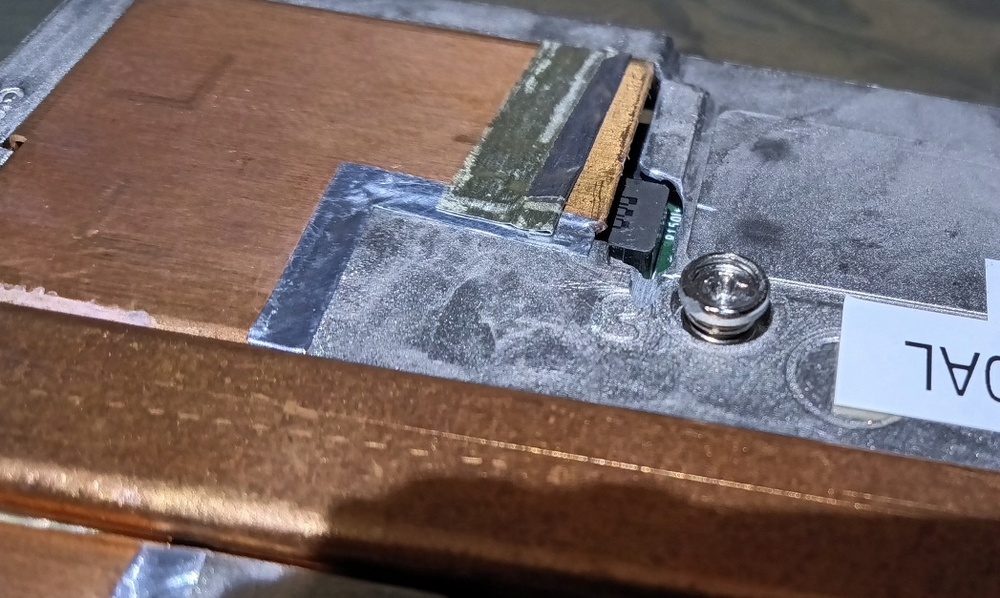
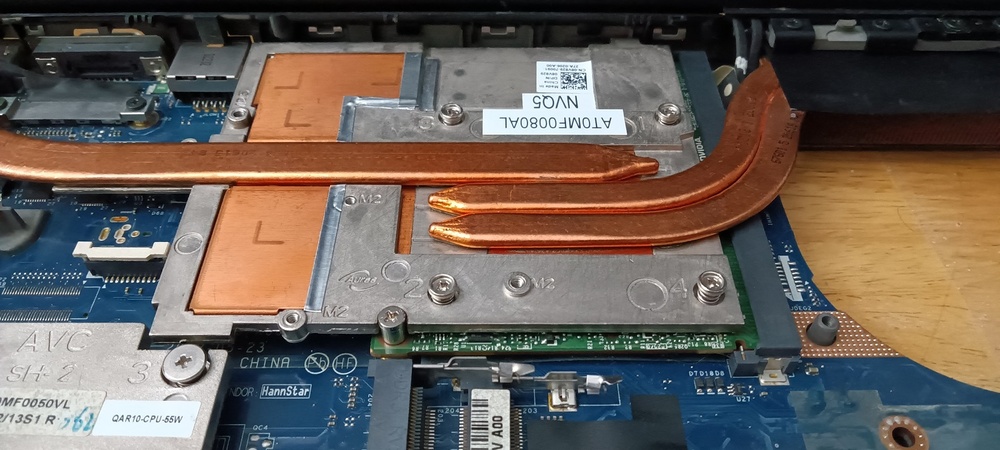
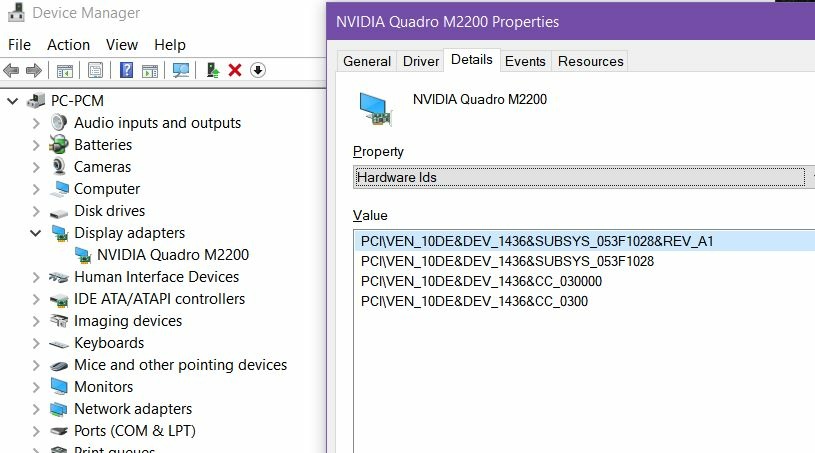
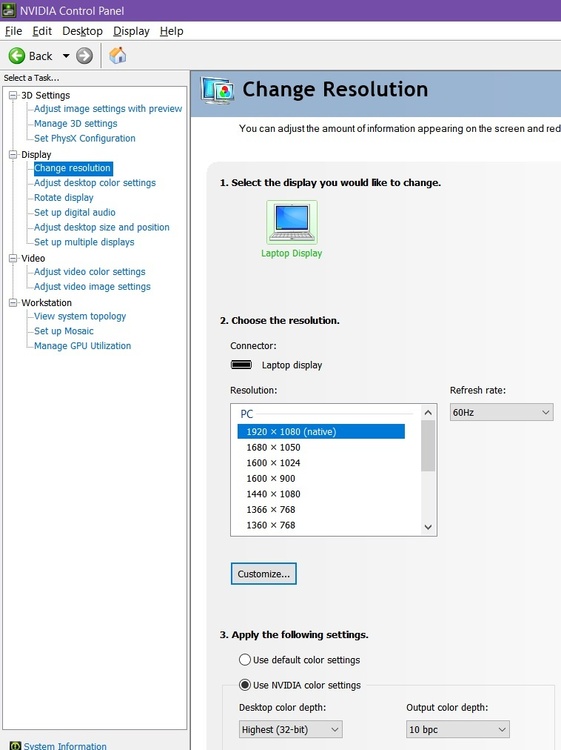
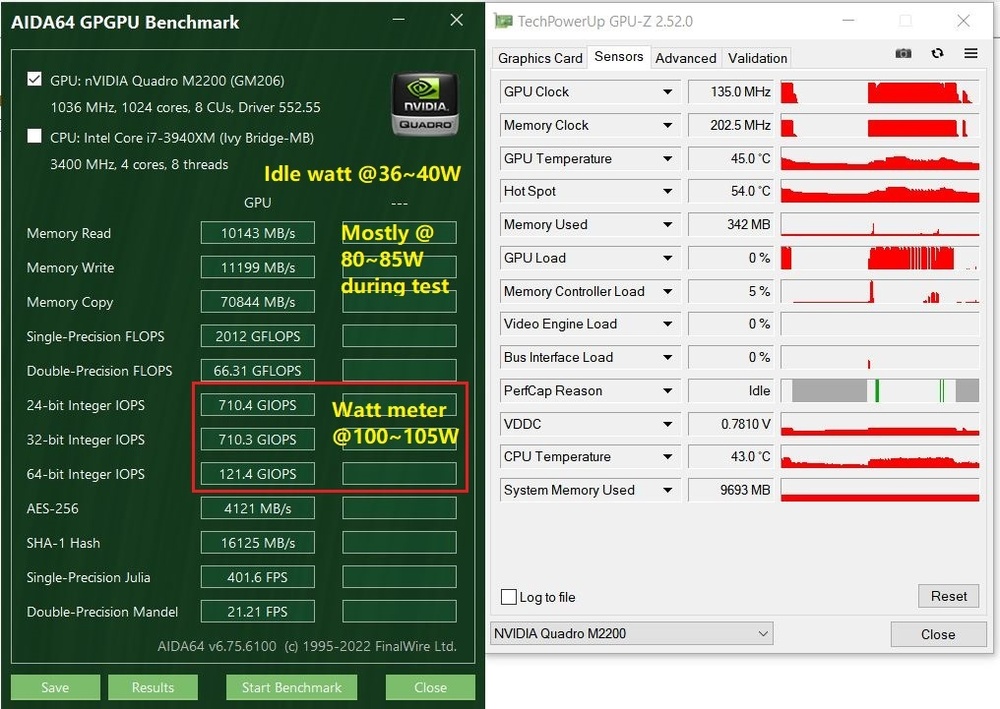
Update on the M2200 (GM206 chipset, MXM 3A smaller size card, Dell version DPN 7024K). Card arrived today, K5000M out, M2200 in without any issue. No need to mod heatsink, chassis, or inf file; the latest driver from Nvidia website installs just fine. The only real mod required is the thermal pads. The location of the vRAMs are a bit off, need to add more or fold-and-reuse the old one. Load tested about ~10 seconds, seems okay. (haven't redone the grease so just functional test for now) Both CPU and GPU fans auto control fine. Overall, an easy upgrade. BIOS shows unknown video card with correct amount of vRAM Heat sink with old thermal pads for K5000M (missing a strip on the top edge that's stuck on the card) The modification needed is 1.5~2mm for the new vRAM. I used 1mm + 0.5mm (the only thickness I have available atm) that seem to mate fine. Could probably move the old vRAM pads a little toward the core, and cut a strip to stack on the lower plane. Should have enough since there are only two RAM chips instead of 4. Also needed to push the arrowed piece upward about 2mm and put a 2mm pad for the R82. (keep the really thick old pad for the FET). The rest can be discarded. GPU-Z before driver re-install (the old driver for K5000m didn't work automatically) After driver re-re-install: 10bit setting appears working on latest driver: Brief benchmark/load test, For brief load testing with AIDA64, with the CPU,FPU and GPU all 3 ticked, watt meter settles at 125W. Sadly forgot to run some tests with the K5000m; from memory it was like 175W with CPU+GPU loaded. Looks like a few transient PerfCap during the benchmark, reason PWR..🥲 Maybe hitting the 55W limit? Might just install the K5000m back and run a benchmark just for comparison.. Still need to cleanup the old pads, and re-paste anyway. --updated 7/5/24-- in normal use the GPU appears to work fine, steady at ~75W on load. I'm suspecting that the vBIOS of the card was designed for 7520 which probably has 50W thermal design and 75W boost hard limit on vBIOS. The transient PWR PerfCap is likely due to a software setting limit in the vBIOS. It already outperforms the k5000m on every aspect, so I'm going with it as is. Tip for thermal pad, get some 0.3mm ahead of time 🤪
-
Precision M6700 owner's thread
Goophy69 replied to Aaron44126's topic in Pro Max & Precision Mobile Workstation
I went through this (sort of) just a month ago, feel free to check the posts just above yours. The easiest is M5000M. The newer may have extra work. I was planning to get the M3000M since I don't really need the higher power GPU and vRAM but just the newer encoder and decoder, but later decided to order a M2200 (smaller size card) to just give it a try. The M2200 has GM206 chipset instead of GM204, and various online documents hinting that the GM206 has better decoder than the GM204. The card is still on the mail, should be arriving Monday~Tuesday this upcoming week. Logically a smaller MXM-A card should work in a MXM-B slot, just need attention on the heatsink, height/thickness on various components, etc. Will see how it goes anyway. If you're after the raw GPU power, it would be GeForce 980M / Quadro M5000M or the newer RTX / Quadro equivalent stuff. The wiki links above have a nice list. M6700 indeed has a socket, replaceable CPU; though I think for the 3rd generation CPUs only (2nd Gen likely works too though no real incentive to install a 2nd Gen in the M6700). 4th Gen also has socket version (you can upgrade from something like 4700MQ to the 4920/4940MX for example), but I don't think a 4th gen CPU would wok in M6700, can't seem to find any confirmation. If memory serves, couldn't recall any success on this subject either (across various product line). Not much performance improvement between 3940XM vs 4940MX anyway. I think 3940XM (or the lower tier 3920XM) is the maximum that the M6700 can take. -
Precision M6700 owner's thread
Goophy69 replied to Aaron44126's topic in Pro Max & Precision Mobile Workstation
From quick online searching the GM204 might have the so-called partial H265 support. Sounds like a combination of hardware + software.. I'd love to go with Pascal P3000, but the VBIOS with M6800 requirement is a bit overkill, and the possible instability. So for now I'm just waiting for a good deal on M3000M 🫠 I upgraded the display to the 10bit IPS panel so the intel graphic is auto-disabled by the BIOS; can't use the internal graphic sadly. -
Precision M6700 owner's thread
Goophy69 replied to Aaron44126's topic in Pro Max & Precision Mobile Workstation
Great hint, will give this a try after the M3/4/5000M upgrade. Was searching through 7780/7770/7760 all the way down to 7710.. 7740 seems to be a sweet spot ~$350~400 a nice CPU and GPU upgrade as well as tons of speed upgrade for peripherals. but well, can't resist a $30 easy upgrade for now.🫠 -
Precision M6700 owner's thread
Goophy69 replied to Aaron44126's topic in Pro Max & Precision Mobile Workstation
I just searched RTX 3000 MXM looks like there is a Dell Alienware version that looks like the same shape even though slightly different layout on the capacitors stuff (those would be covered by thermal pads so probably no sanding needed). But the $300+ price is show stopper 😑 M5000M is selling for $130+ while M3000M is ~$35 and M4000M is ~$65 The M3 and M4 both outperform K5000M (well, M3 is a little behind on texture but not much that I'd worry about), so am leaning toward M3 and M4 for now. Didn't know the Geforce equivalent would be cheaper. Quick search looks like 970M is ~$80 while 980M is ~$150 both more expensive than M4000M and M5000M, back to M3 and M4 for now.. Thanks for the quick response BTW 👍 Now pretty much settling with M3/M4 depending on price -
Precision M6700 owner's thread
Goophy69 replied to Aaron44126's topic in Pro Max & Precision Mobile Workstation
Correction, CPU is 3940XM not MX (the previous generation has MX) System is Win10 (so switching to pure uefi boot is no longer an issue..with Win7 CSM must be enabled for system to load). Now just trying to do a sanity check between M3000M/M4000M and P3000. Thanks in advance for any tips 🫡