Teo
-
Posts
41 -
Joined
-
Last visited
Recent Profile Visitors
650 profile views


Teo's Achievements
")


-
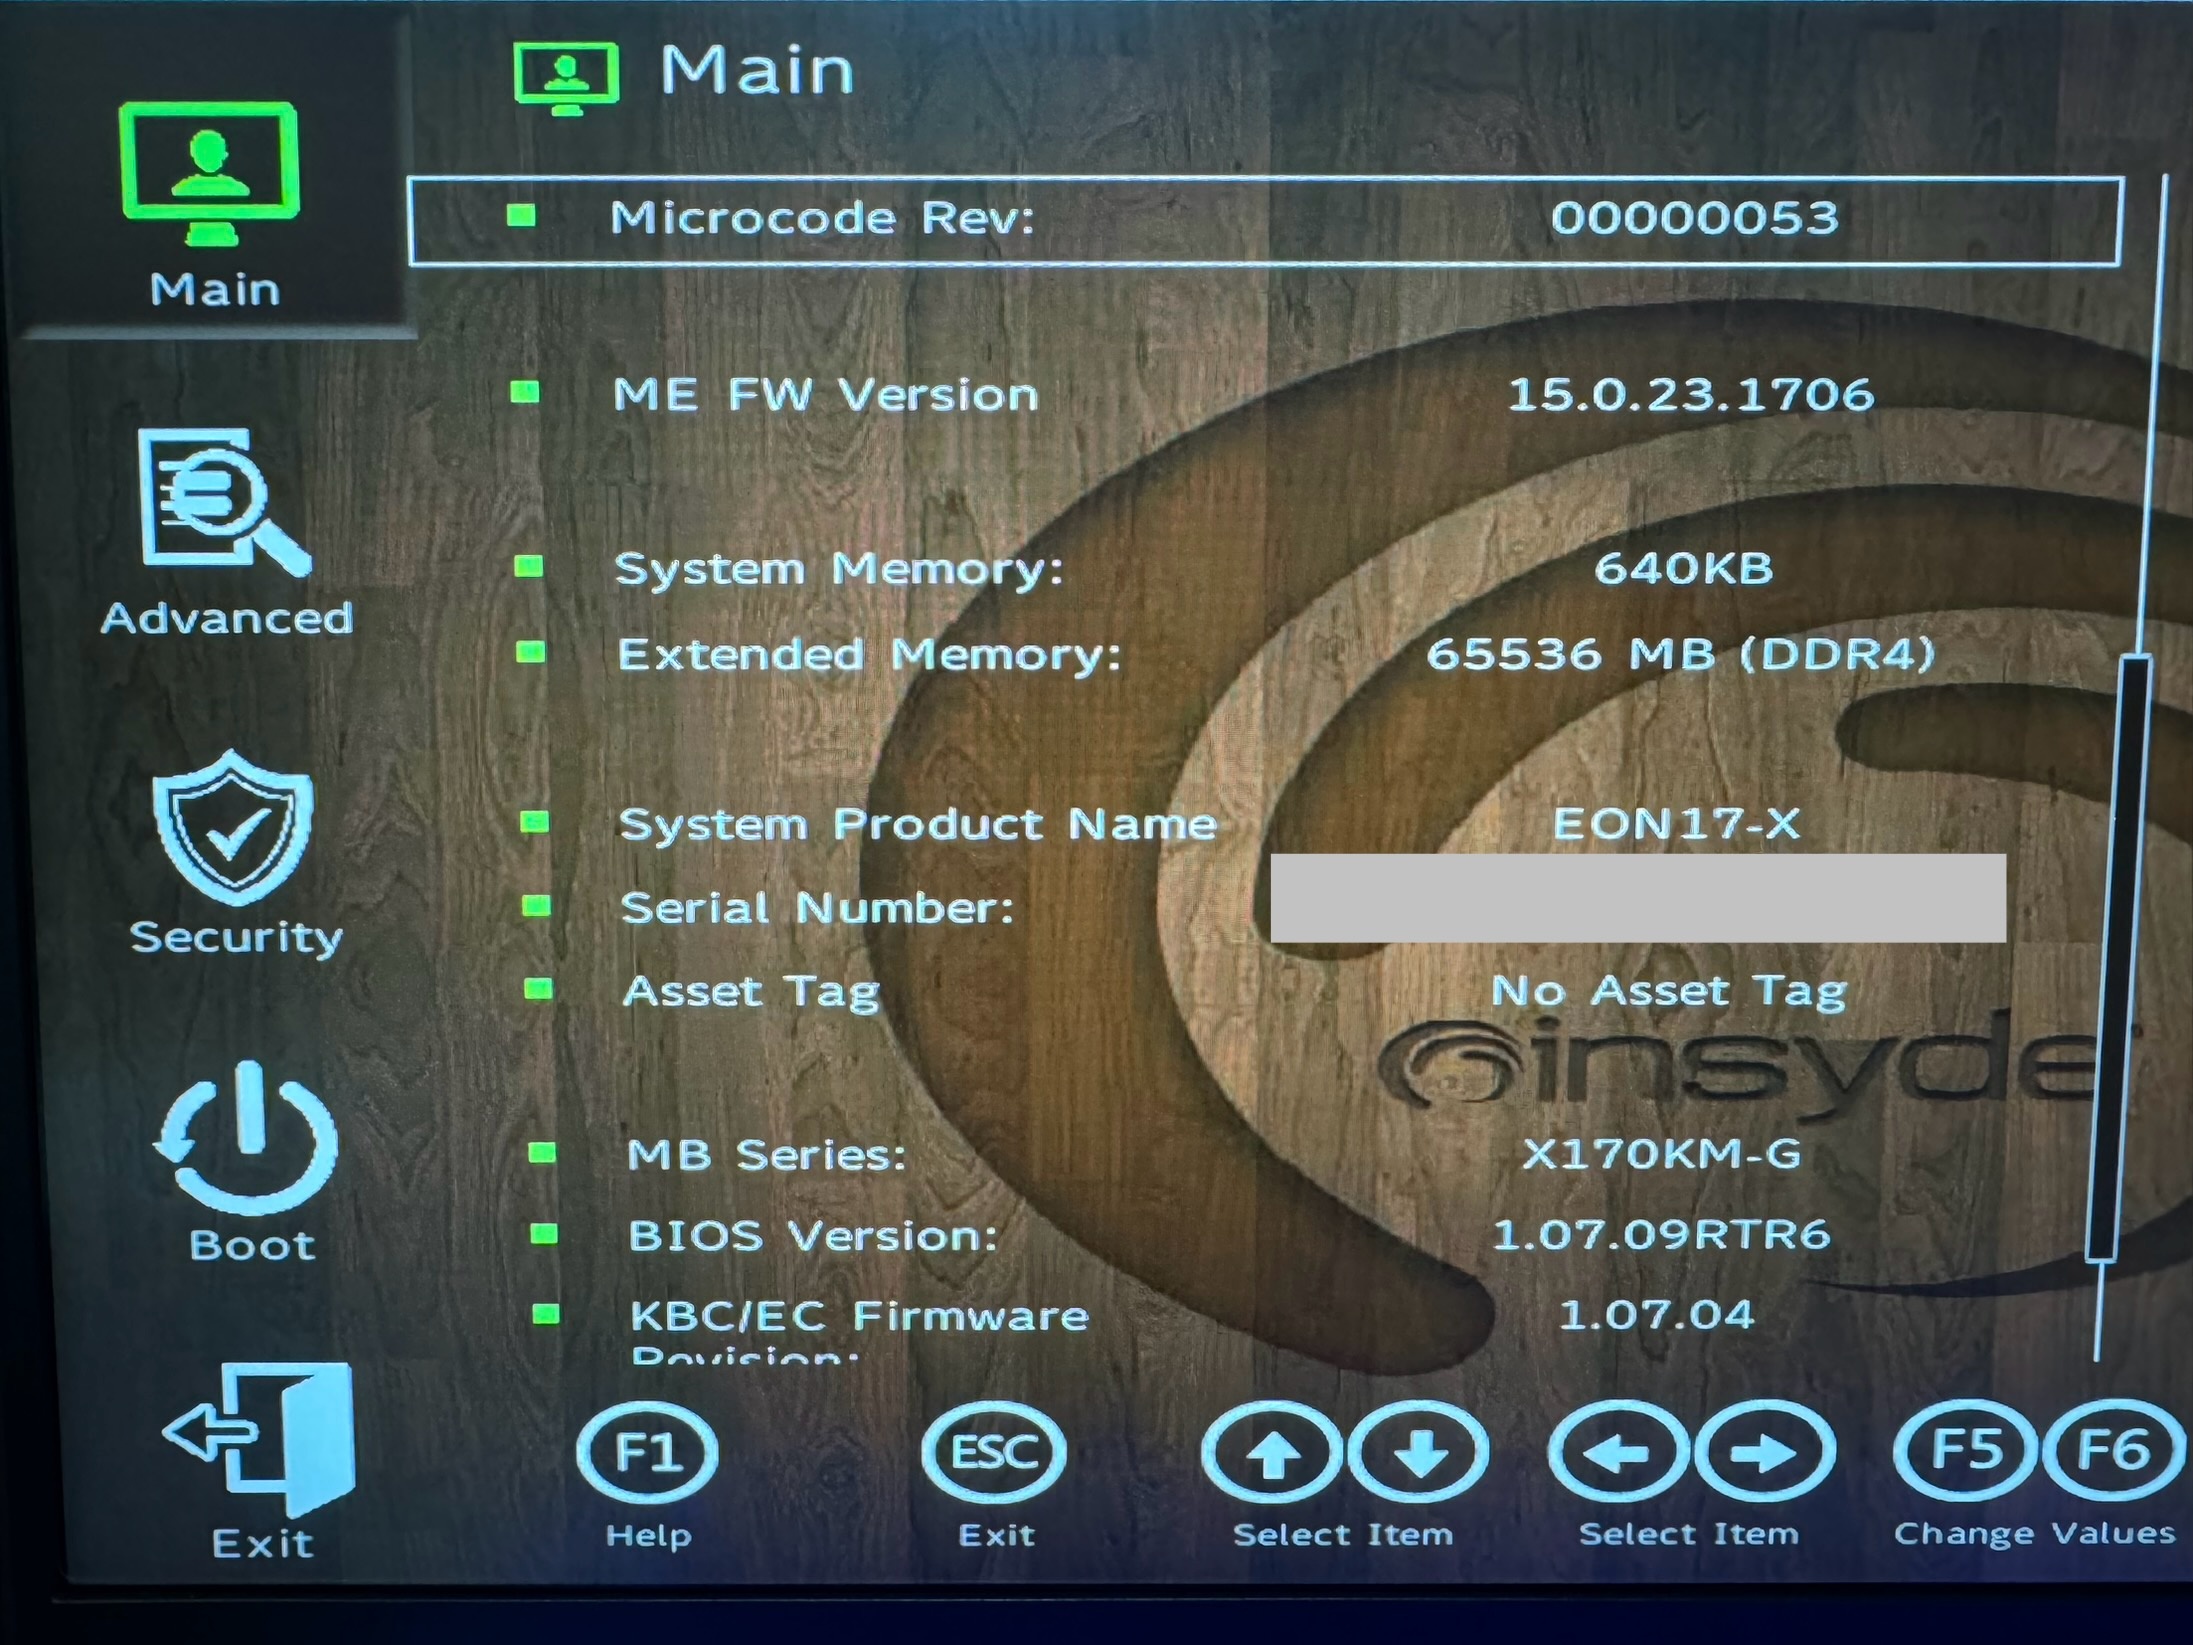
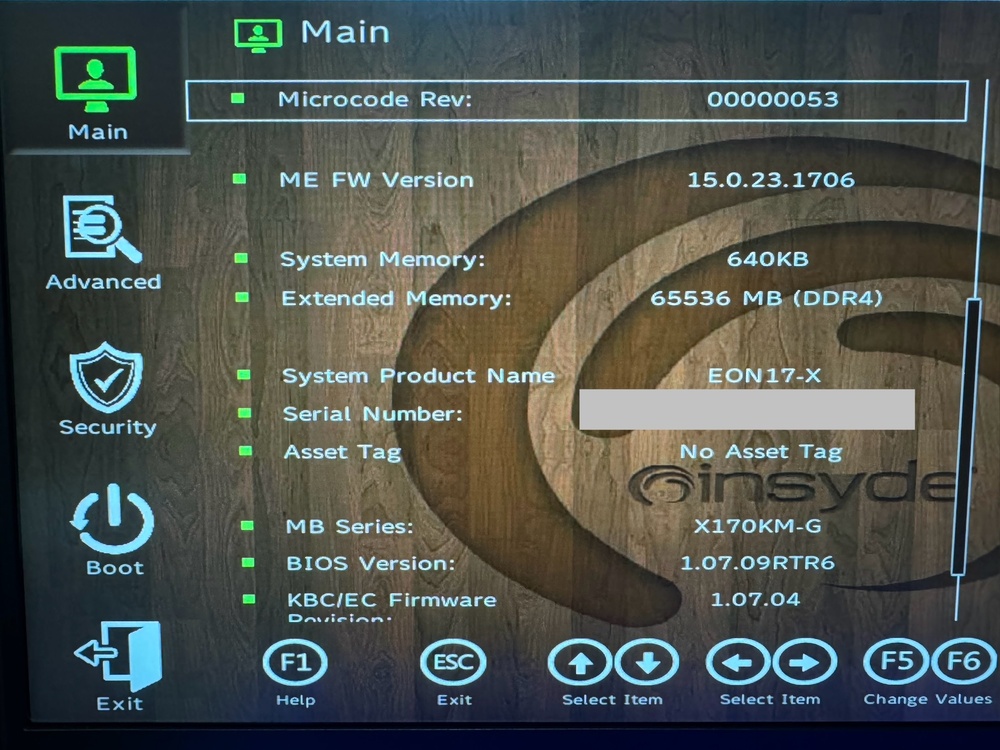
Hi yes you can under volt on XMG 1.07.09RTR bios, I have undervolt it with Throttlestop. VT-D can also be disable on UEFI BIOS MENU. If it doesn’t work for you, you can always downgrade with your Bios update file. good luck.
-
@SamSTG44 check please on the main forum for “Official Clevo X170KM-G Tread” Is all posted there or click this link for the last Benchmark results.
-
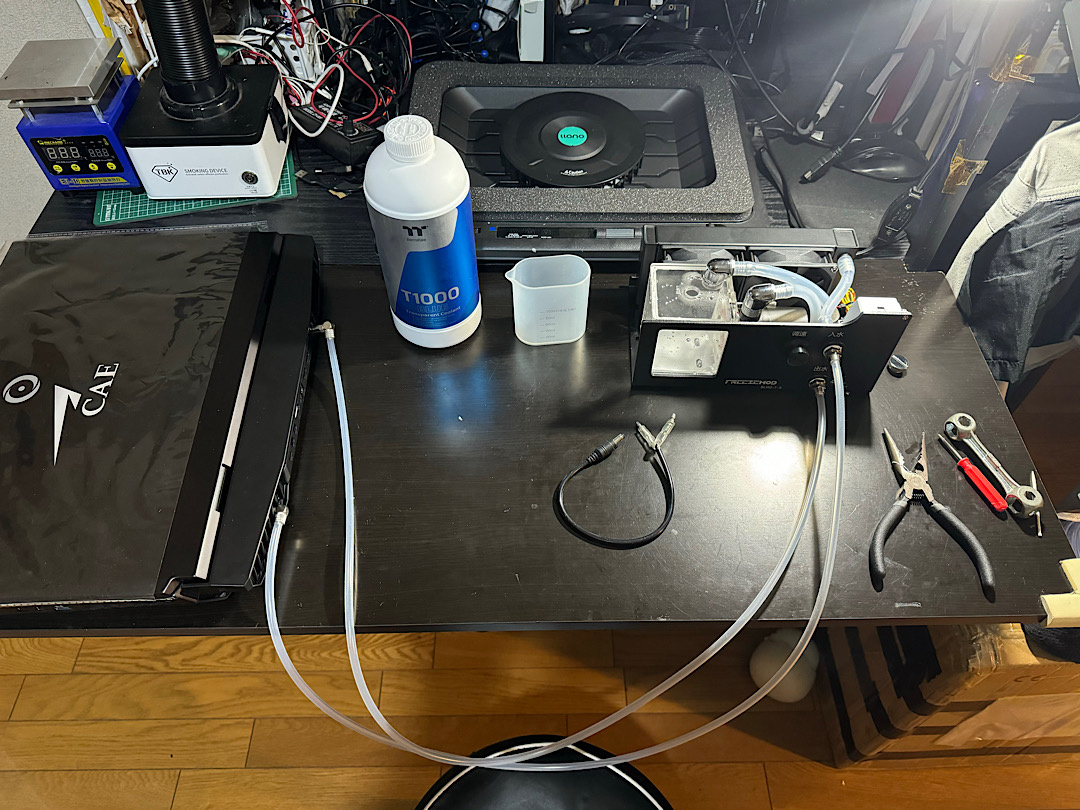
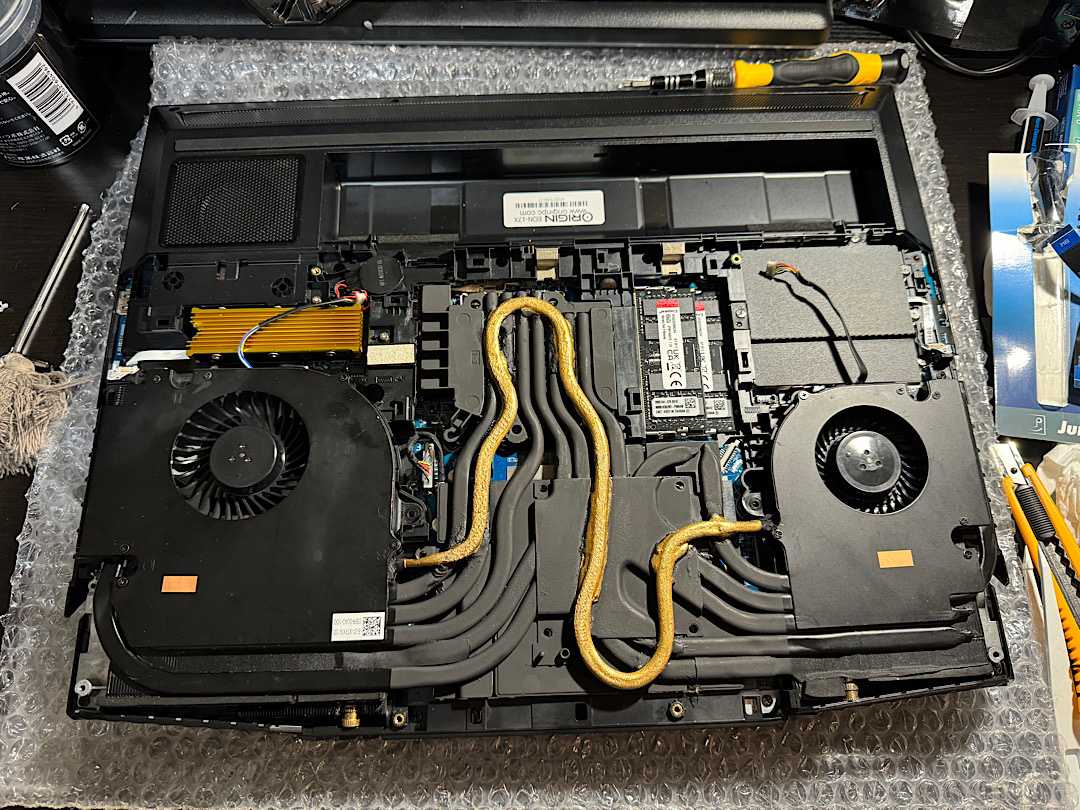
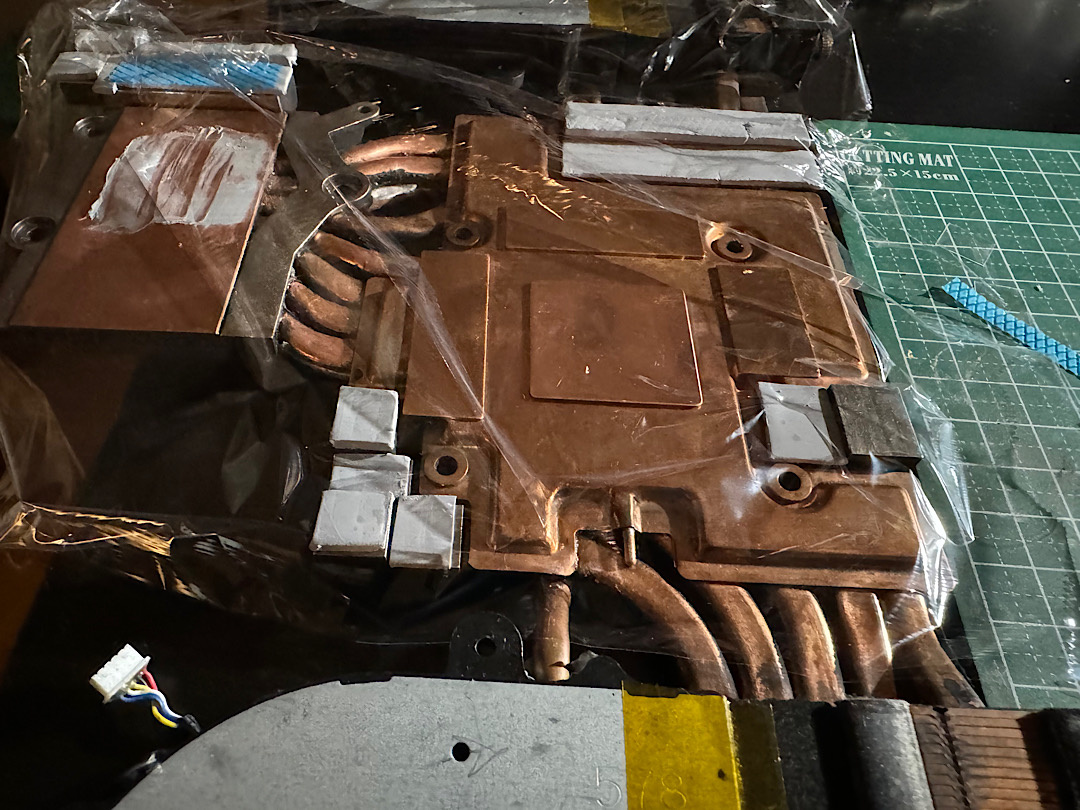
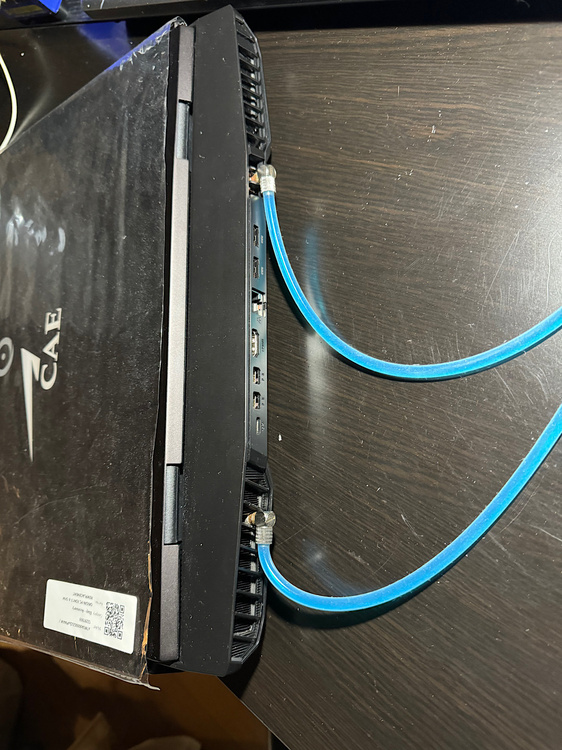
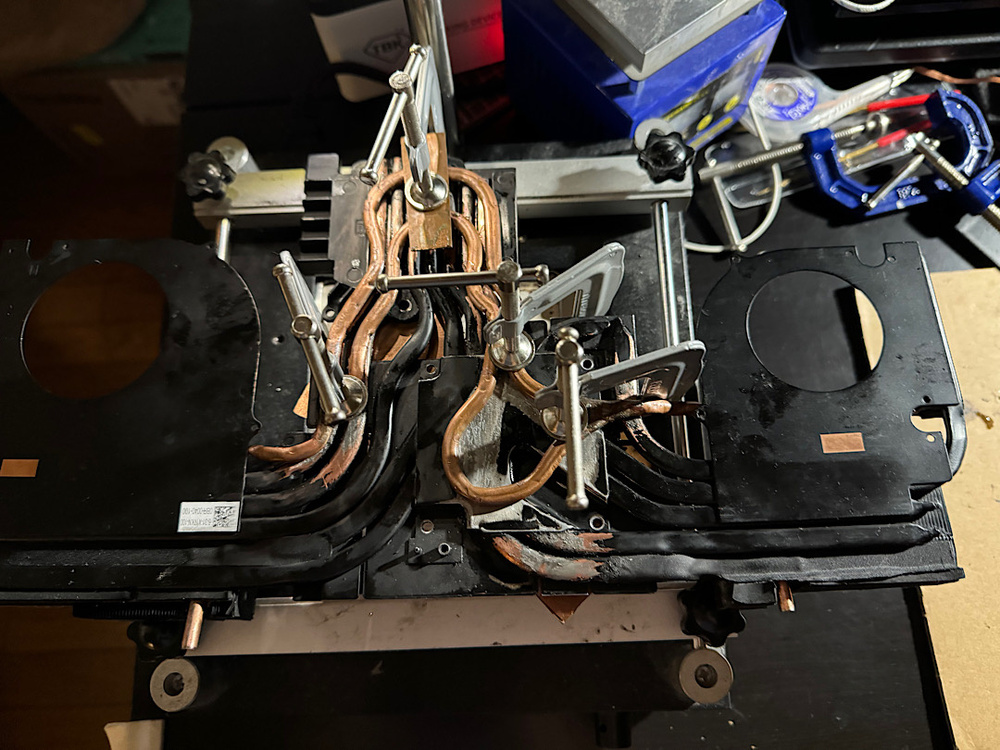
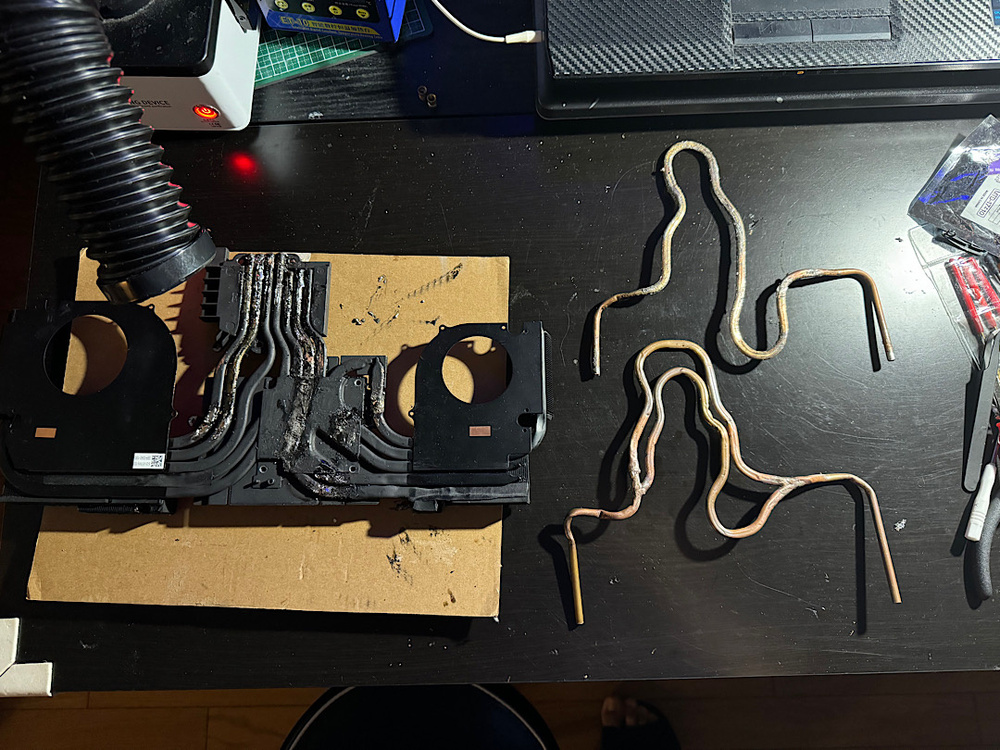
Hi Sorry I really misunderstood your first question, better fans and quieter 🤔 I haven’t heard anything likely in the forum, better thermal paste, metal liquid or PTM7950 pad and de-liding CPU is the only thing I can come up, but this model laptop won’t ever ran quieter, it has a hot CPU no commonly made for laptop is for PC. That’s kind of impossible. Although you can run quieter laptop by using Hybrid System (switch automatically iGPU instead of dedicated GPU when not needed, that requires unlocked BIOS MENU) and setting up power mode for “Entertainment”, on higher performance it won’t be quieter. About watercooler, you can make your own though, if you know how to and have some solder machine. I made my own Watercooler because that 3rd party company who made that watercooler is no so efficient and is too expensive. With less than $10 dollars you can make your own. it requires some experience and a lot of patience but the reward is greater. If like you can Buy your own copper pipes, connectors, silicone tube and a simple waterpump and cools better than factory. (My own Watercooler) First model - 1 pipe water cooler system 2nd model - 2 copper pipes watercooler system. (Made a joint, much better, so I don’t have to use 4 pipes for intake and exit. (the good thing is that I can close the Bottom Cover. A flat pipe of 3mm is necessary to properly close the bottom lid of the laptop if you want to carry it around. ) Aliexpress - has some fast and easy solution to apply a new water cooler. This must be soldered not cold solder or metal glue.


- 5 replies
-
- 1
-

-
- x170kmg
- origin eon17-x
- (and 7 more)
-
I think I know what you mean, sorry for the question but how do they call the other keyboards that the RGB light can be individually assigned? Yes we do have the same Laptop model. 👍🏻 I hope can you get a good keyboard from the store.
-
Must be the #1. I hope there is not a different version of it for Origin X-170KM-G I haven’t gotten that far analyzing it, I really can’t tell. I haven’t bought any replacement or spares for my laptop. I only have dissembled a couple of time. It is weird that none of the seller can’t be more specific which model to use “A” or “B” keyboard. I cannot guarantee anything, the best way it will be to open the laptop and confirm by yourself, it can be a hit miss. The bottom has 8 screws and the keyboard 2 from within. It has indicator where which one is the keyboard screw. It has some pressure clips just try to push the keyboard out from inside of casing under fan base you can see the keyboard back or from the top try to pull it out. Just be careful dont put too much strength to it, and be careful with ribbon cable, they are kind of short. All the best.

-
Hi @Sephiran what’s your laptop model? if is the x170km-g I believe all have the 4zone RBG keyboard, but I can be wrong. About the other one I have never seen it. For I can see on any seller they have mentioned that also works for both laptops X-170km-g and x-170SM, so maybe the difference will be on the vendor side. Mine is Origin model and it has the 4zone RGB keyboard that comes with 3 wide ribbon flex cables, the #2 RGB back light (1 slim and the other wide ribbon) it would not work on mine. Is better if you can contact the store you got it and check or ask what’s the vendors name. There is so many.
-
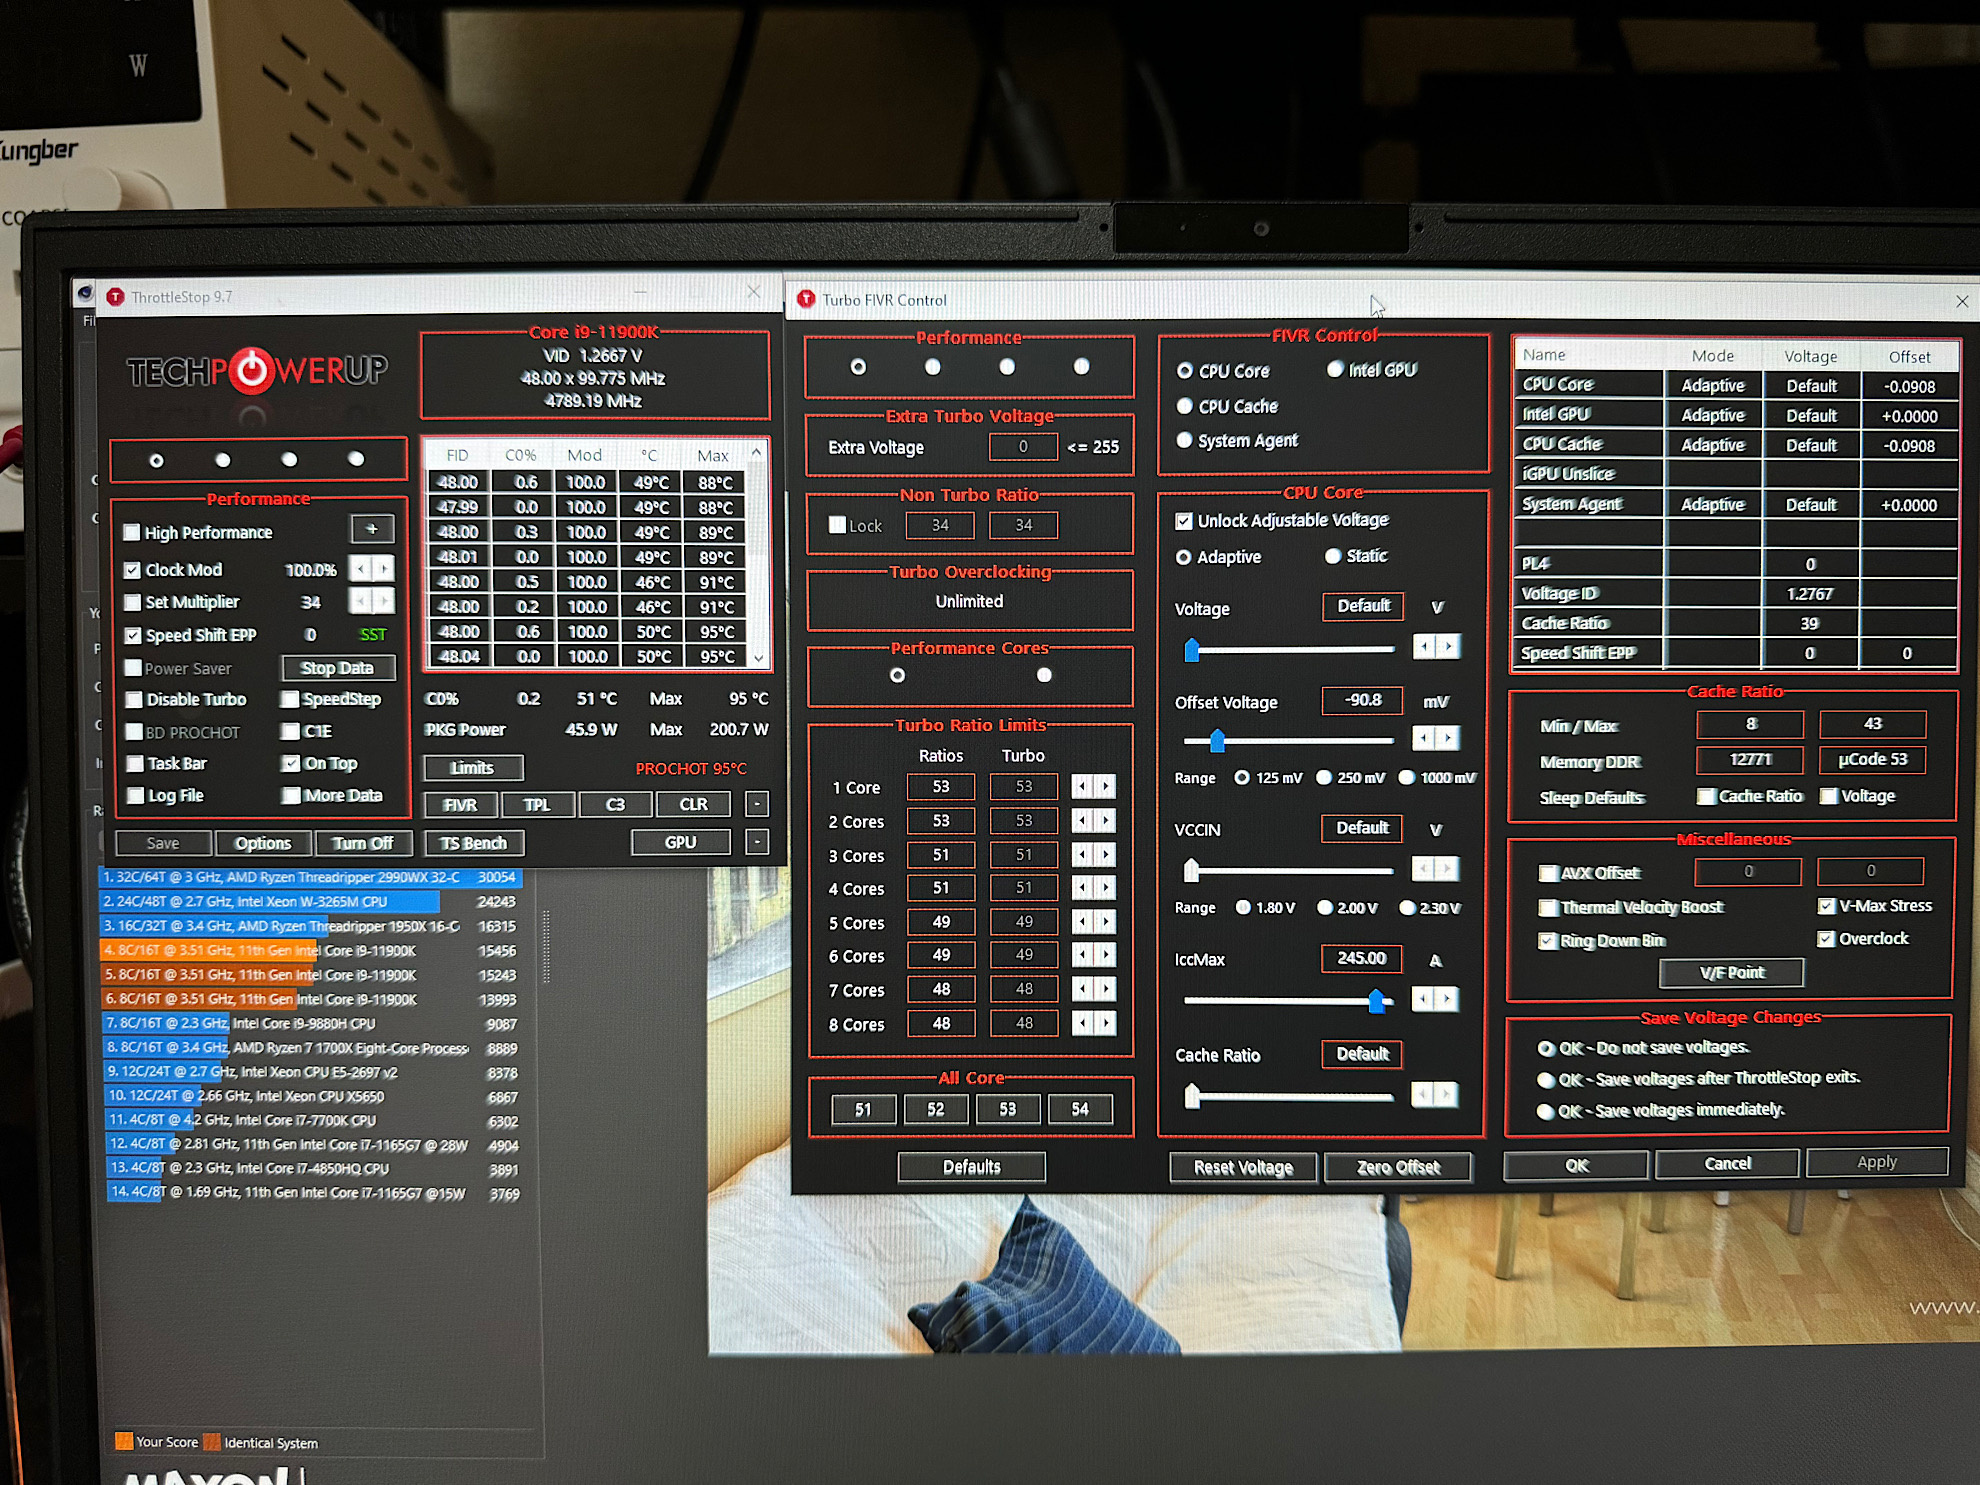
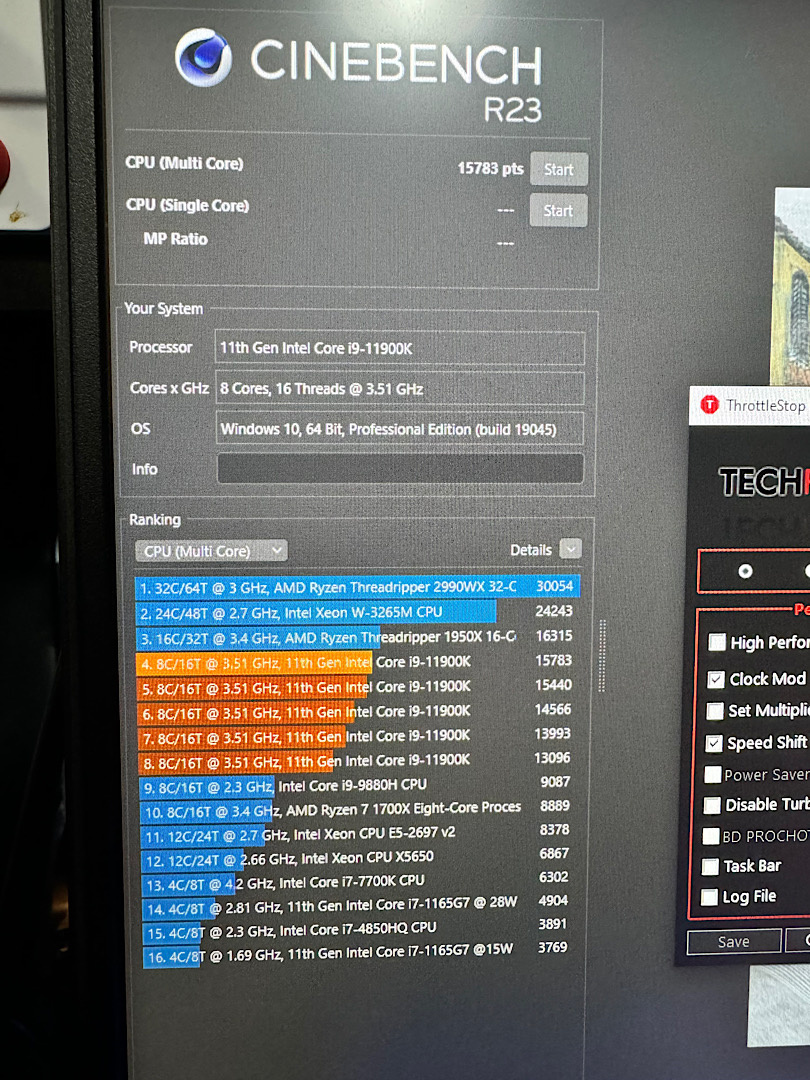
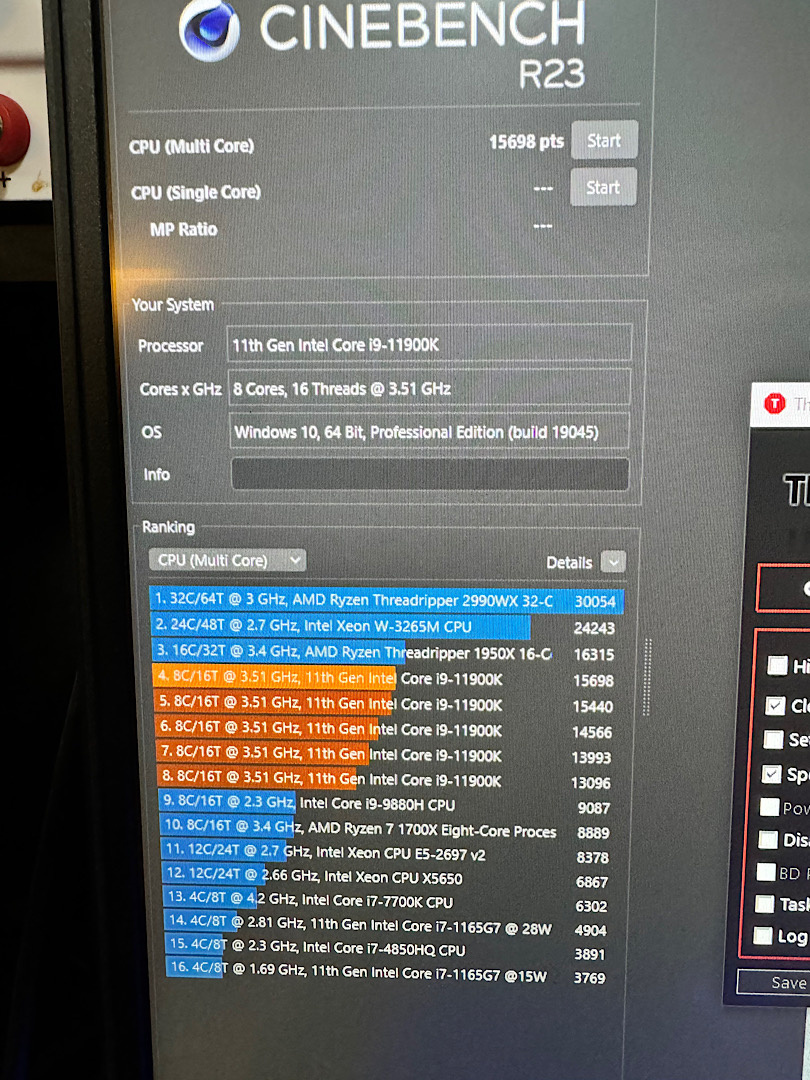
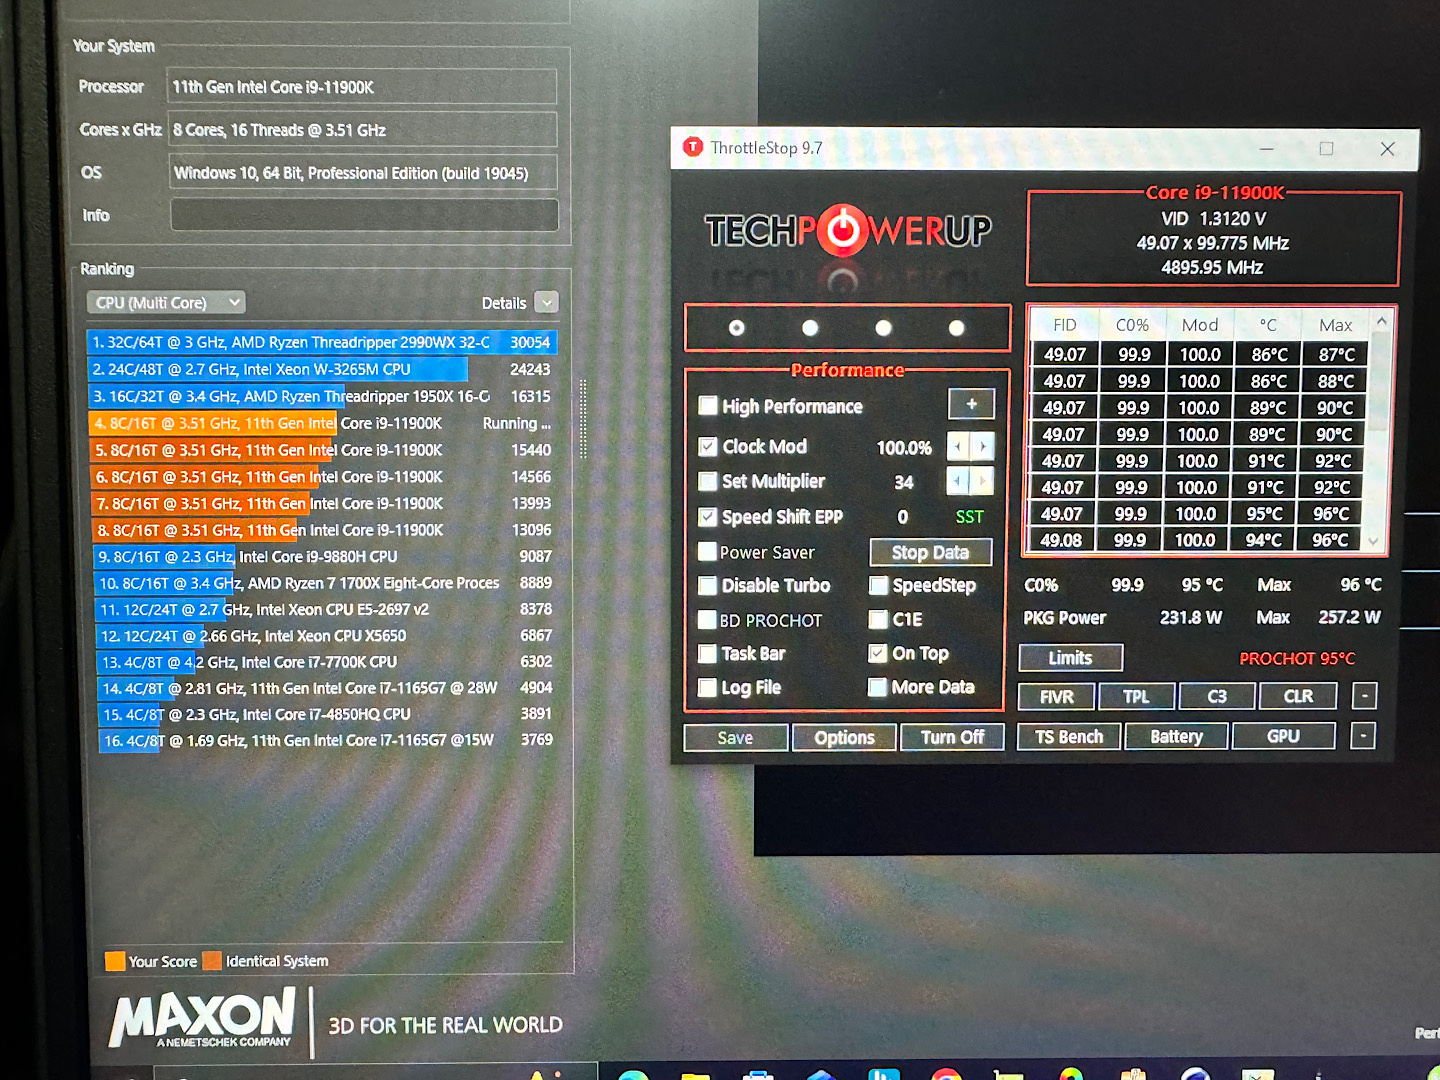
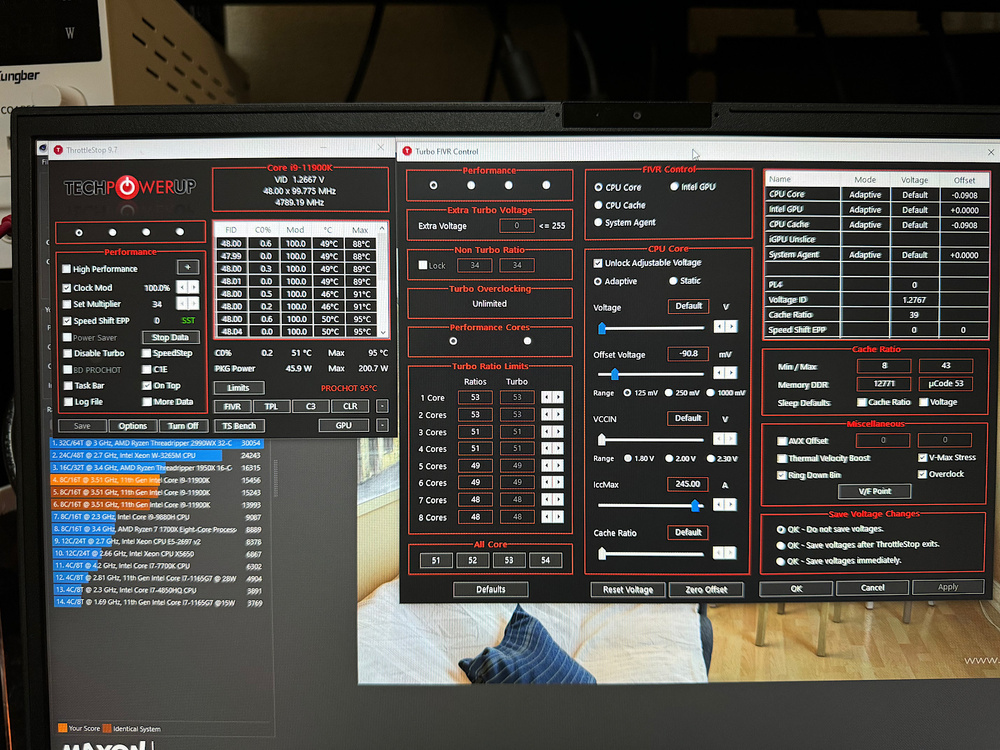
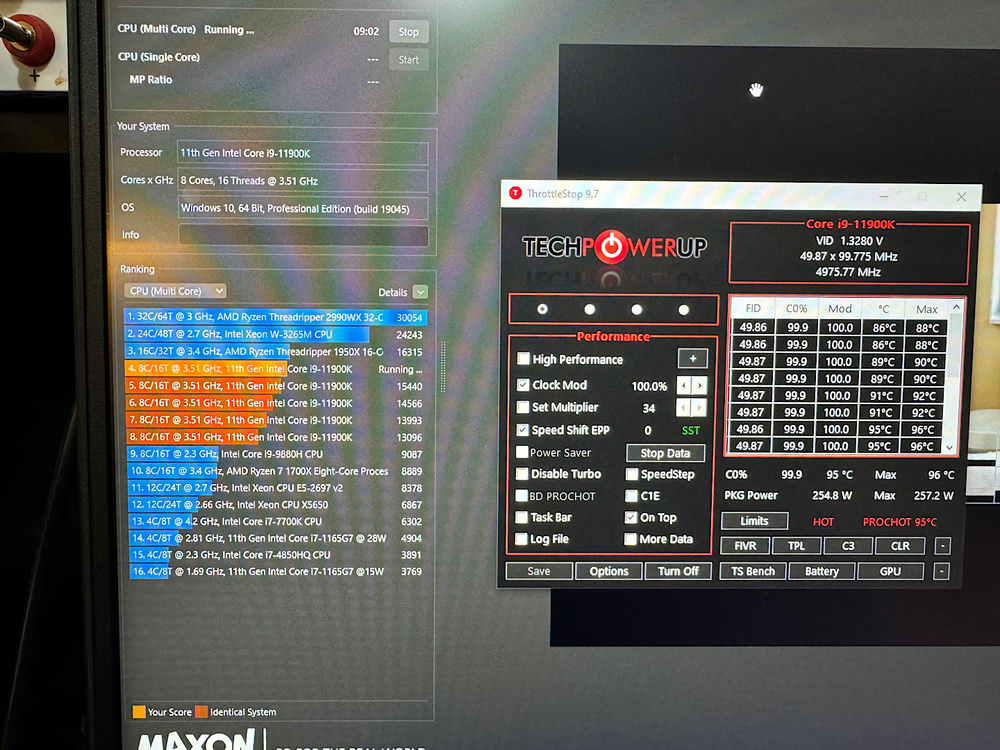
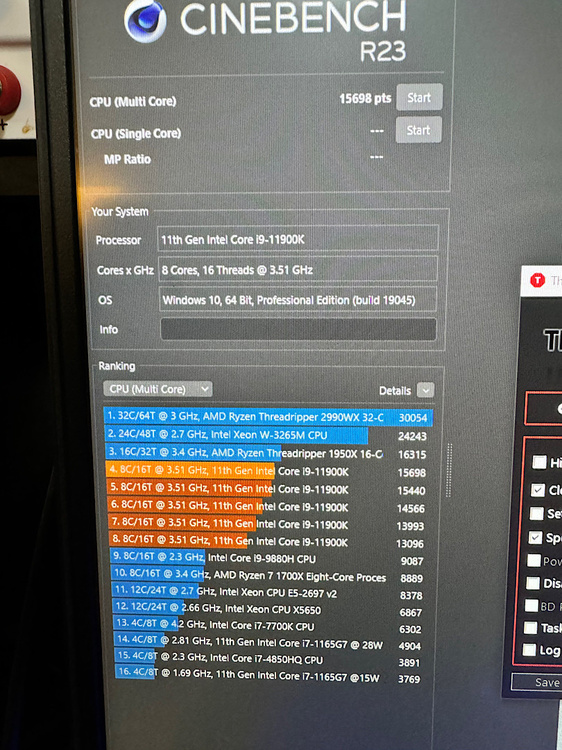
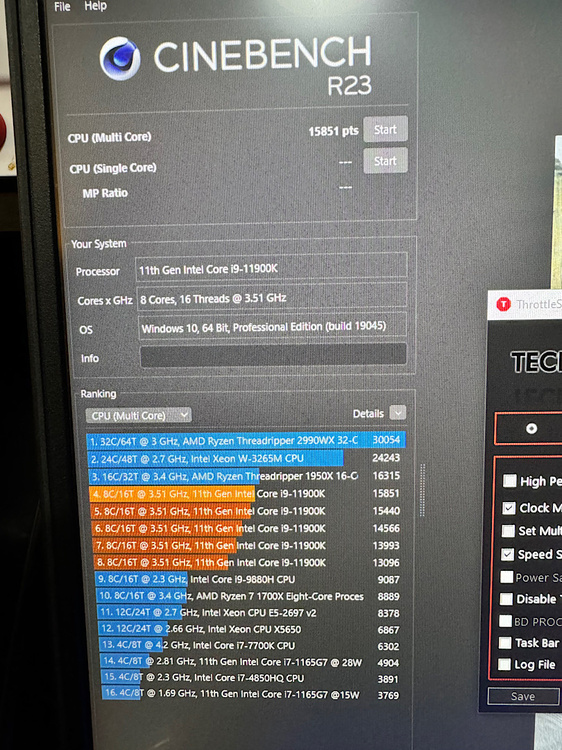
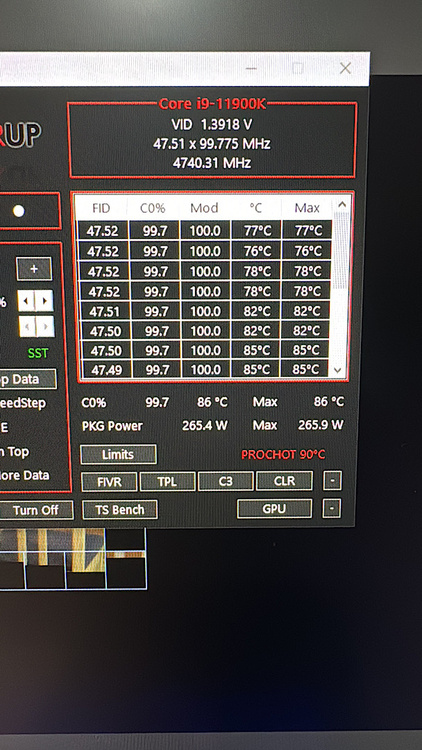
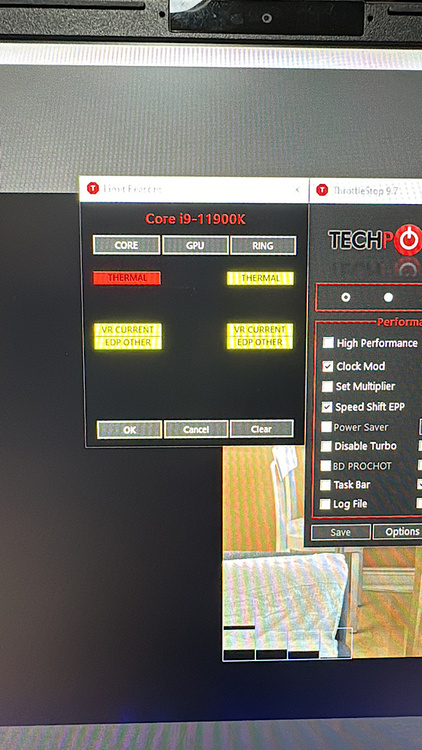
Finally I did manage a higher clock, 5.0GHZ clock ratio in all core but it wasn’t steady, was gradually dropping speed, going down to 4.9ghz. Temps max were around 94c drawing 230w~250w, PL1 & PL2 Max. V offset: -80mv Cinebench score: 15,783pts I did try as well at 4.9GHZ clocks ratio, that was handling well and steady. V offset: -80mv Max pl1 pl2 Temps 80~90c Power consumption: about 230w Cinebench Score: 15,698pts Tweaked a bit more with voltage V offset: -83mv clock ratio: 5.0GHz Last score: 15,851 Max pl1 pl2 Max power consumption: 250w (relatively) No tweaking this laptop anymore, I think this is the max it can perform, this DIY water-cooler needs further improvement. I think is good as an experience.


-
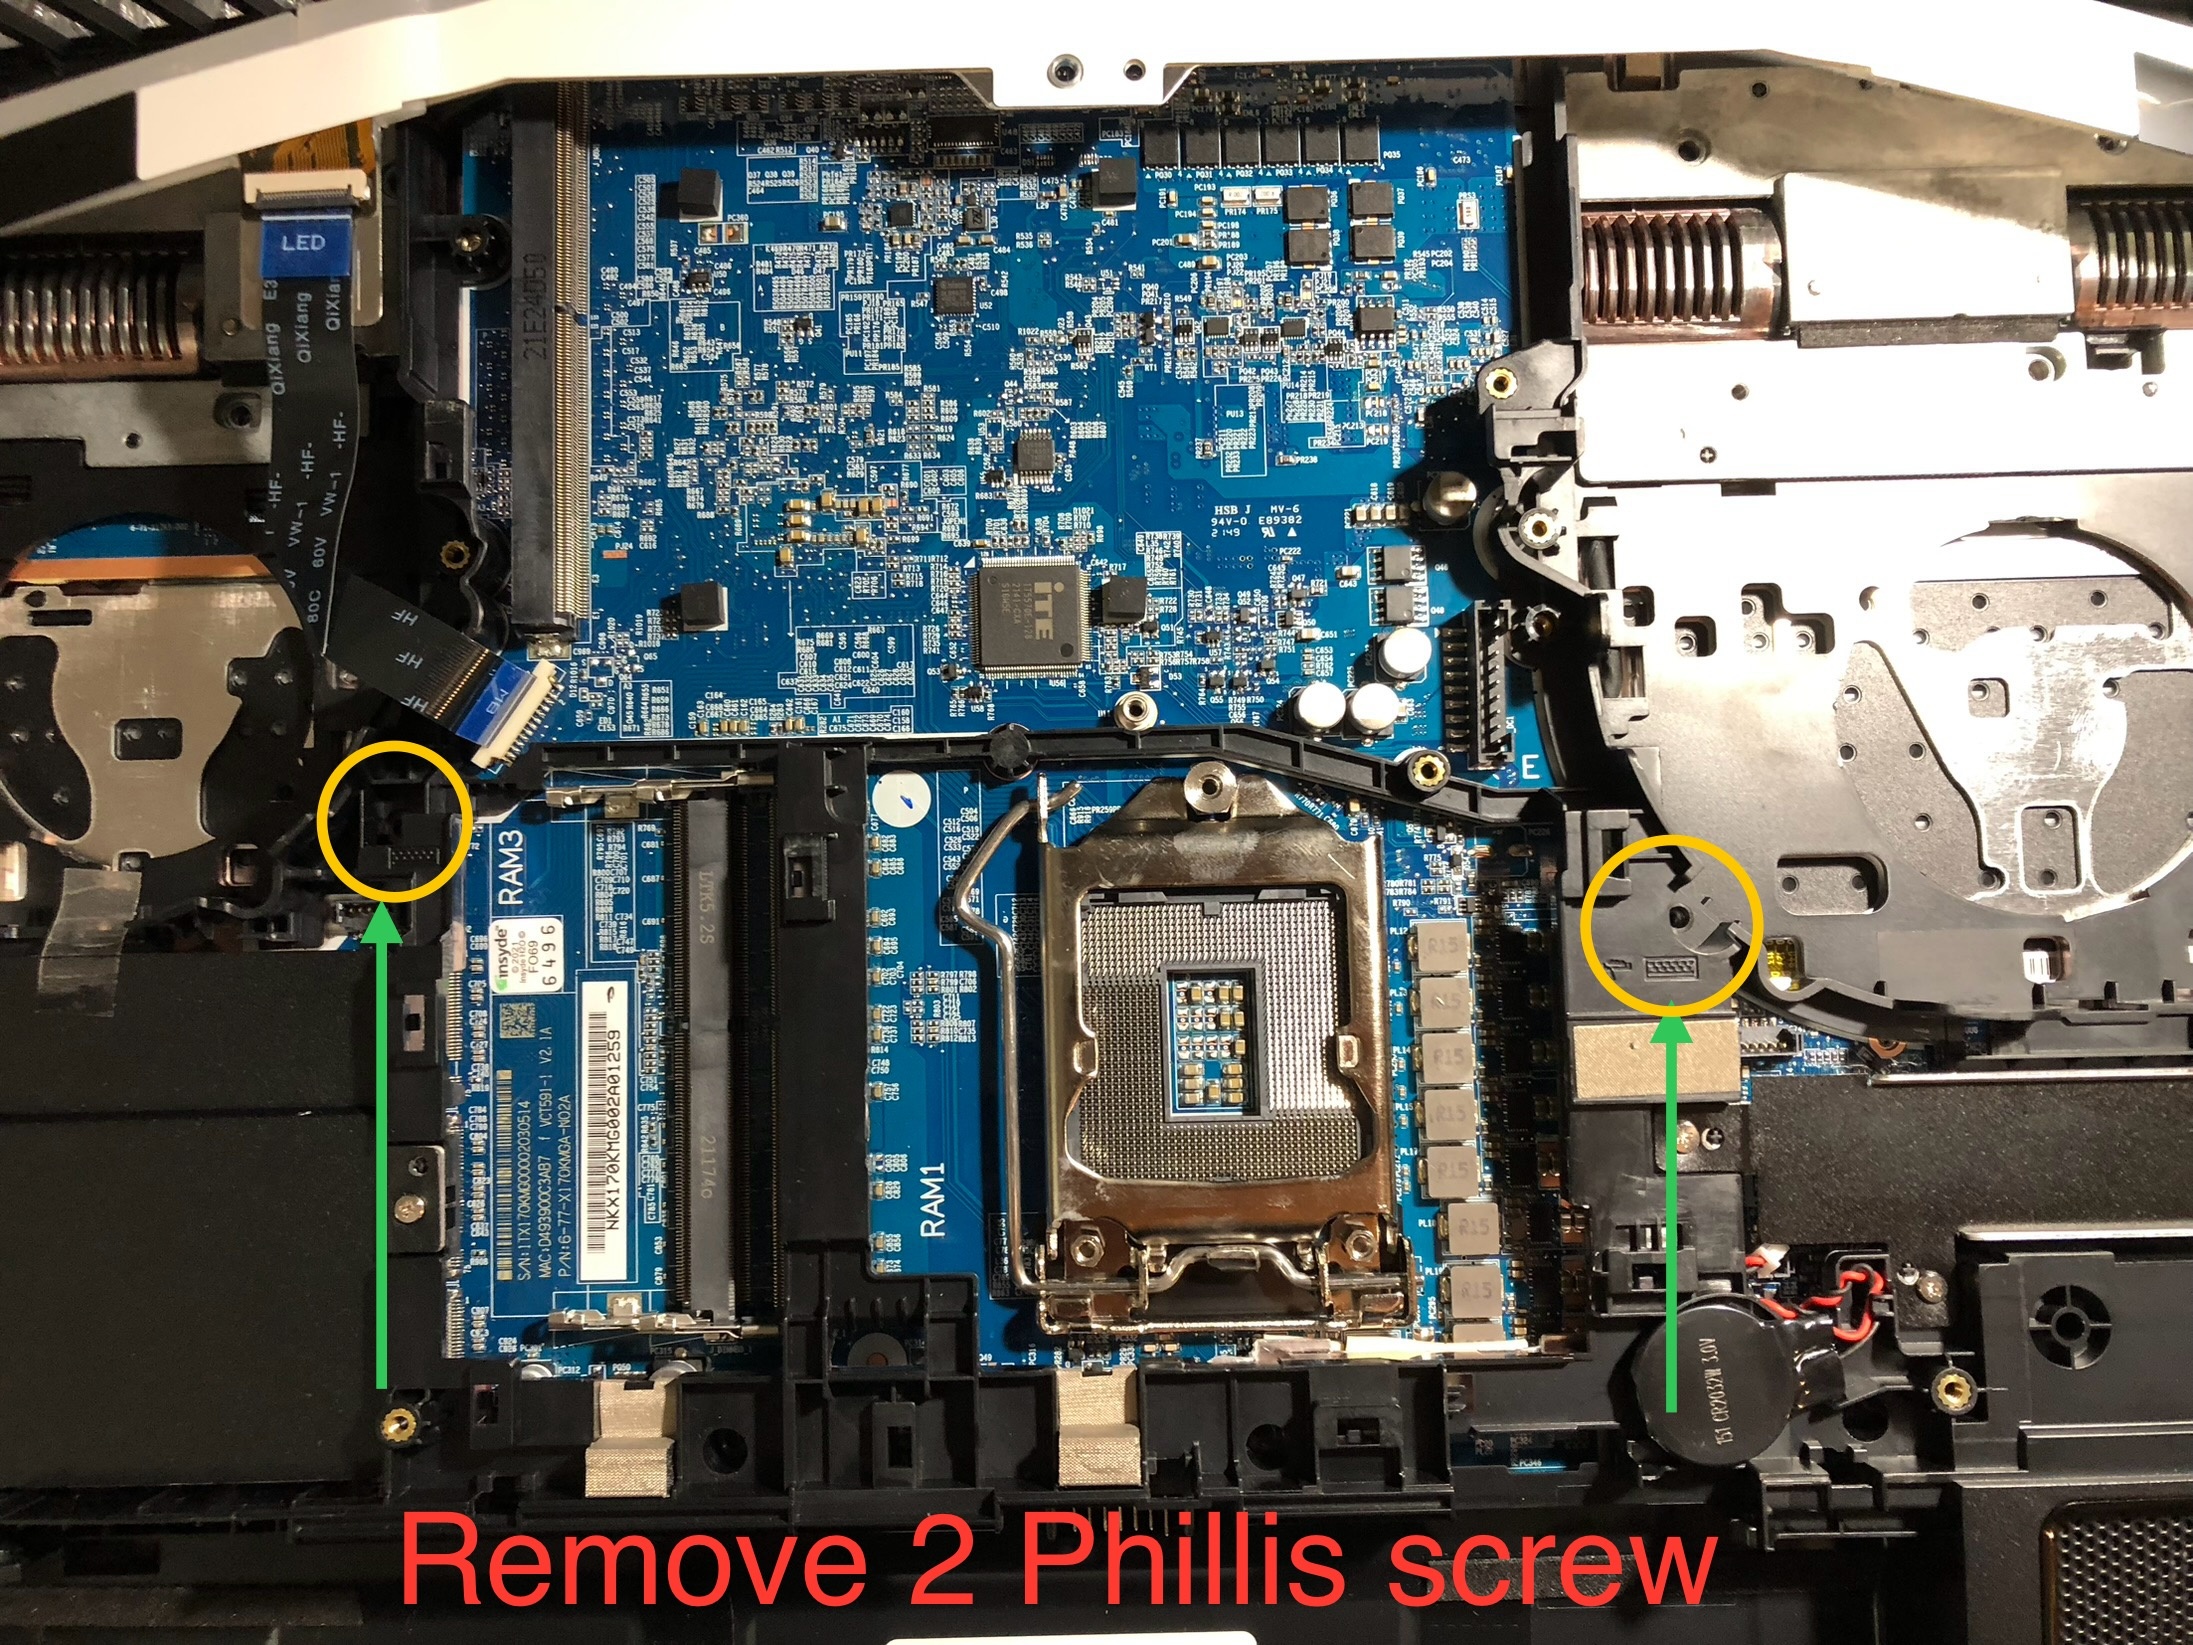
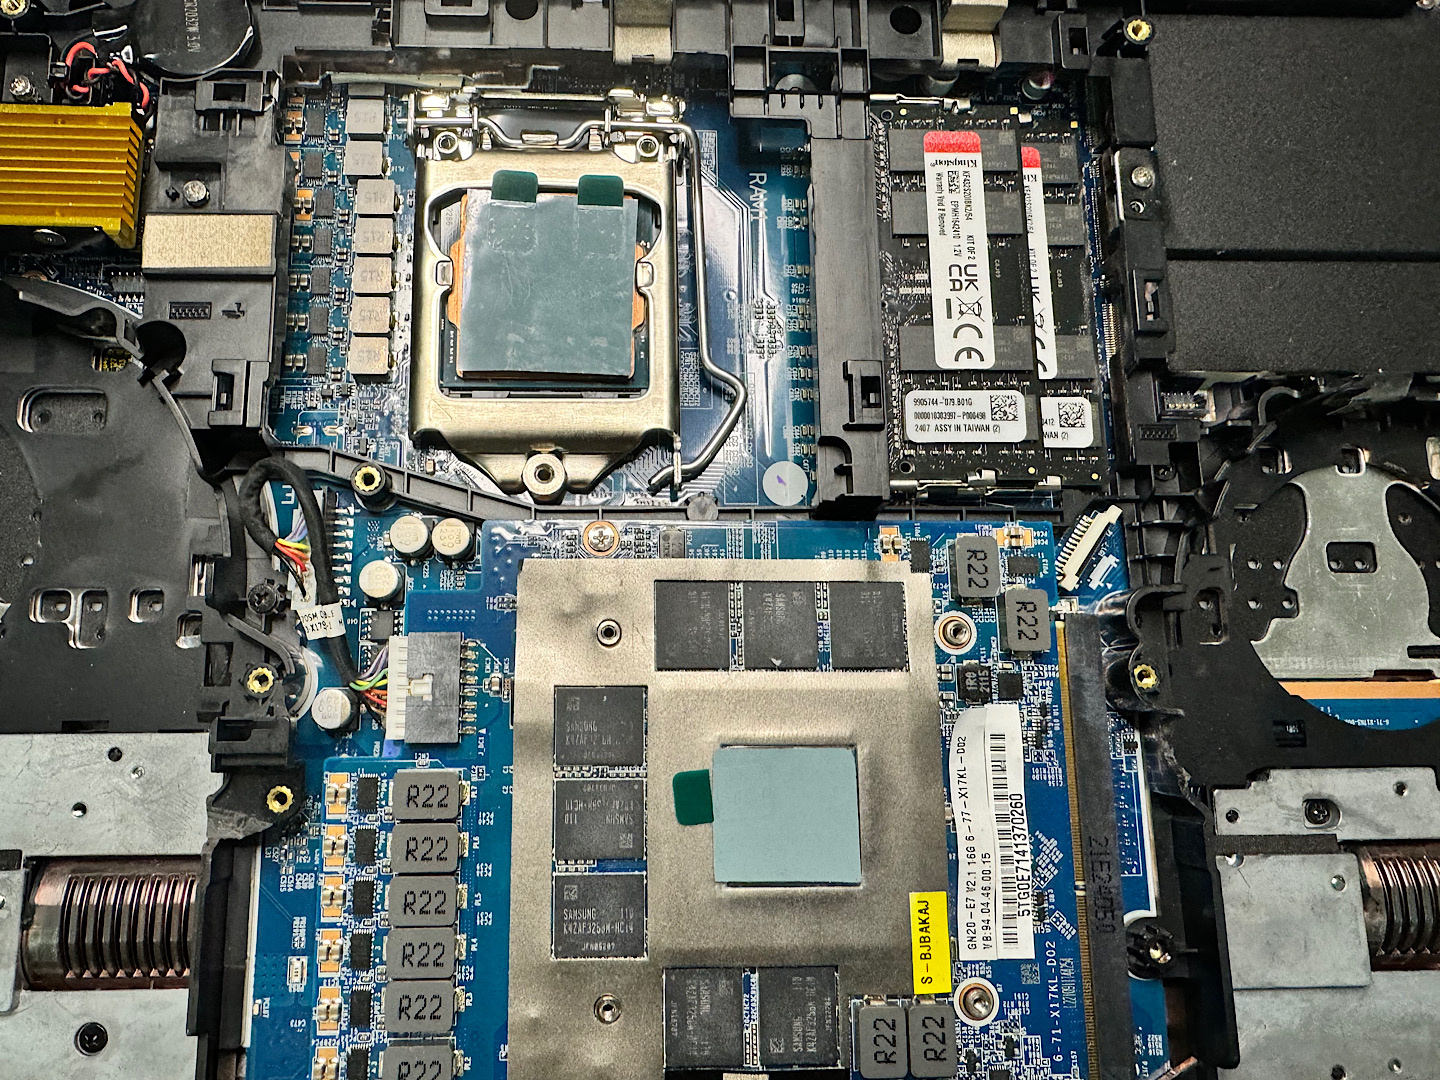
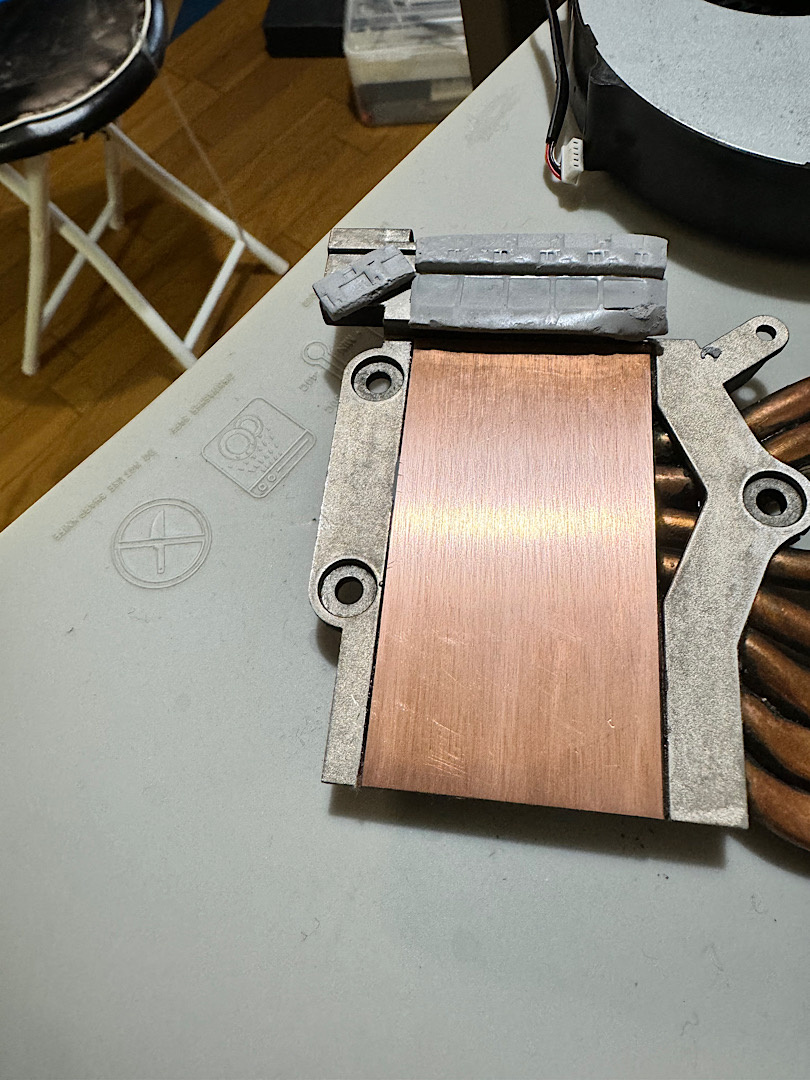
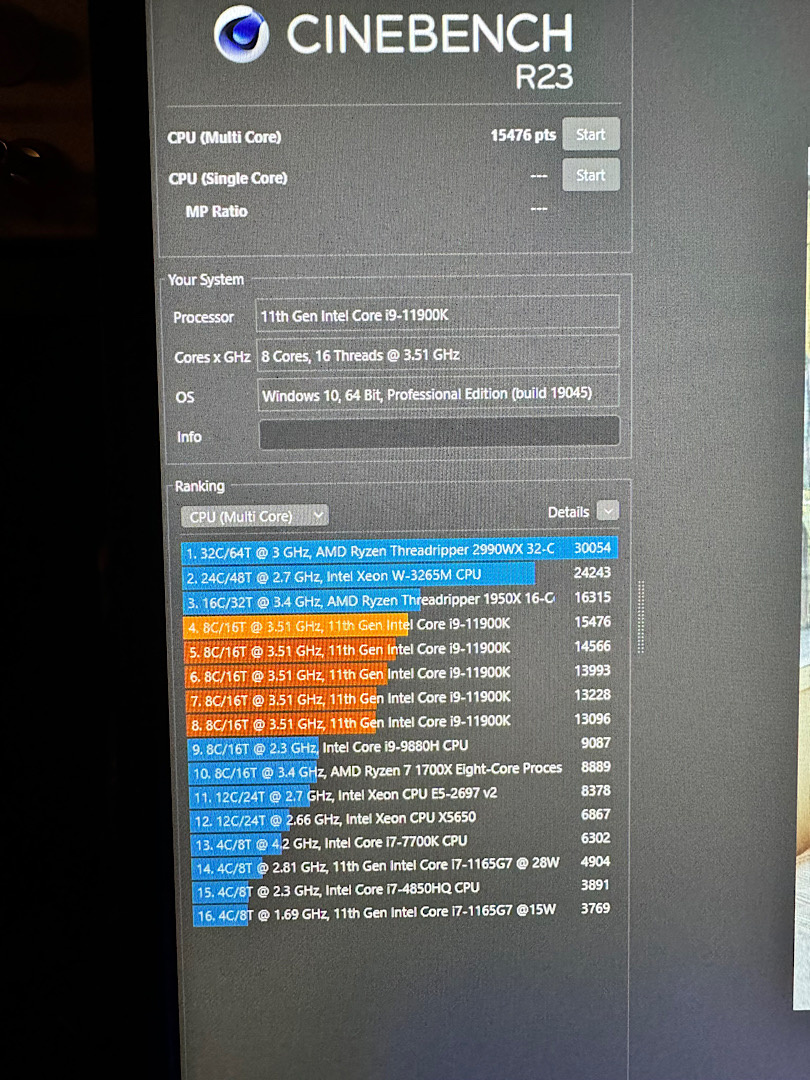
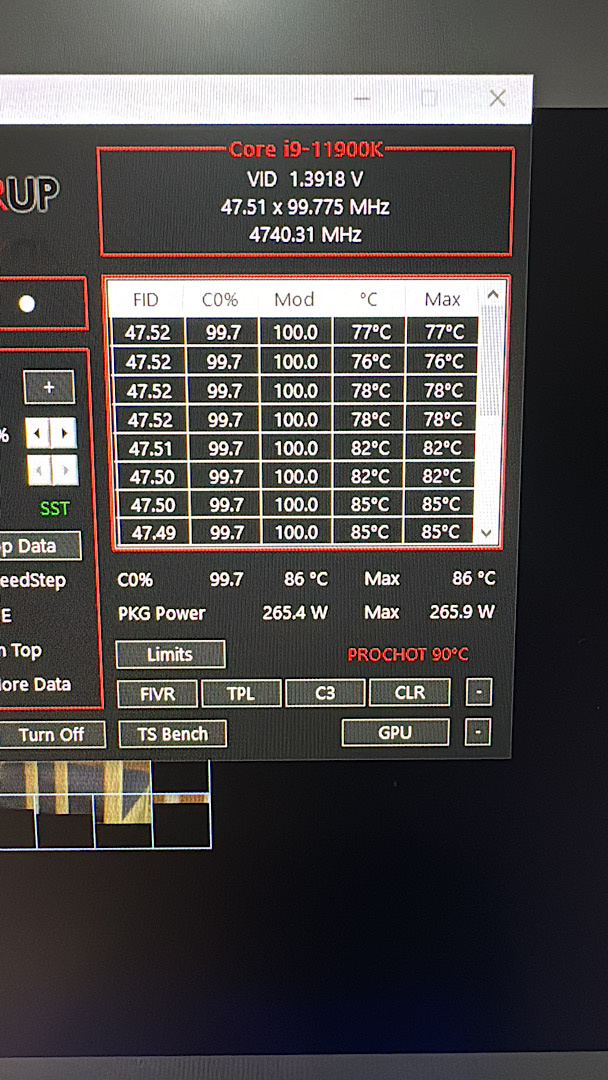
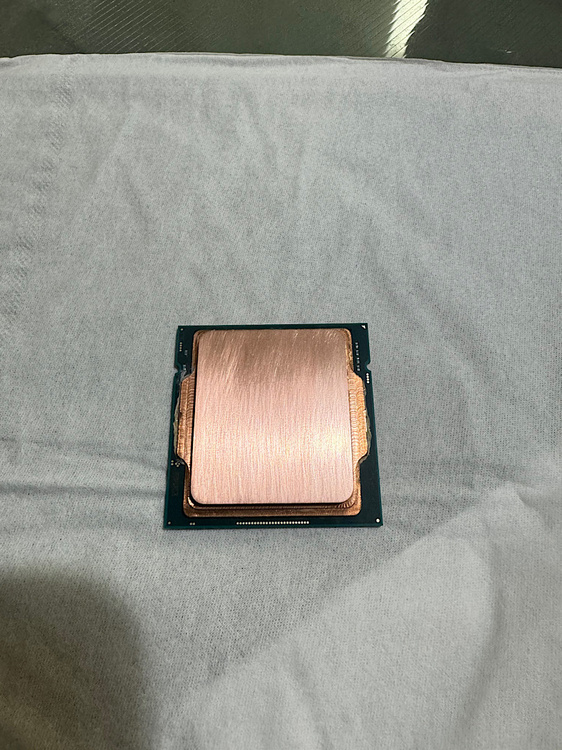
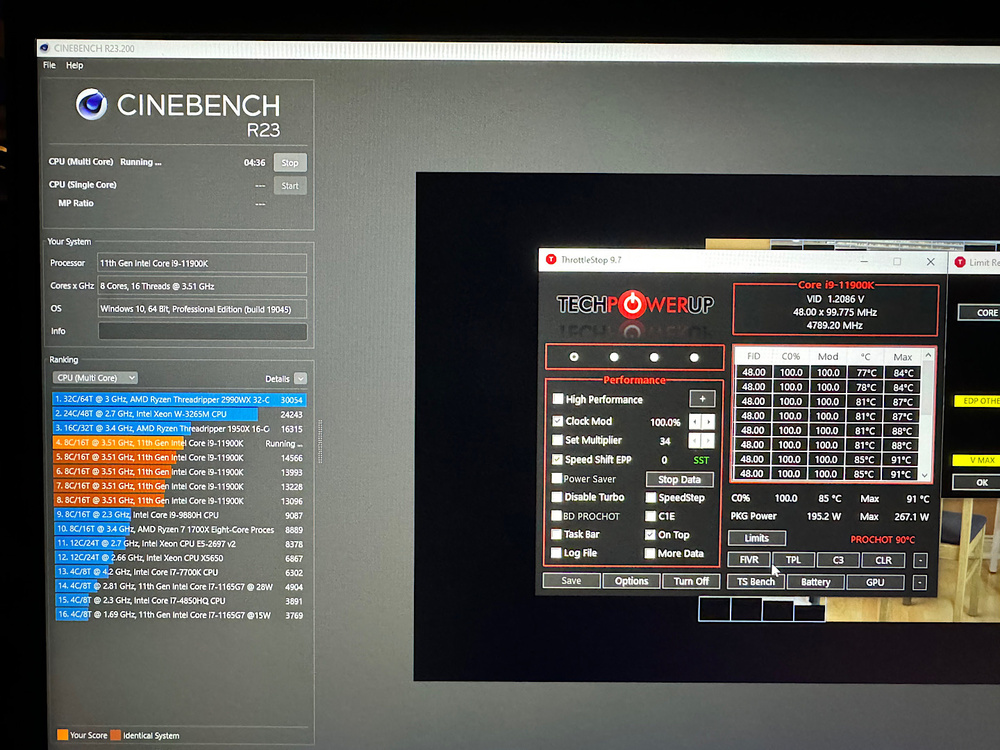
Polished the heatsink and applied PTM7950. Some good results. I got about -10C for doing that. i am not good at Overclocking, this is how far I could go. PTM7950 Temps are hovering around 70c to 80c with OC (before it used to be around 90c~95c with OC) very stable, not crashing. Cinebench: 15,476pts, clocks are stuck at 4.8ghz. Draws about 196w. If “Ring Bin Down and V-Max Stress” is unchecked draws about 260w but clocks fall down and many limits warning appears. I think I could score higher, still working on it.


-
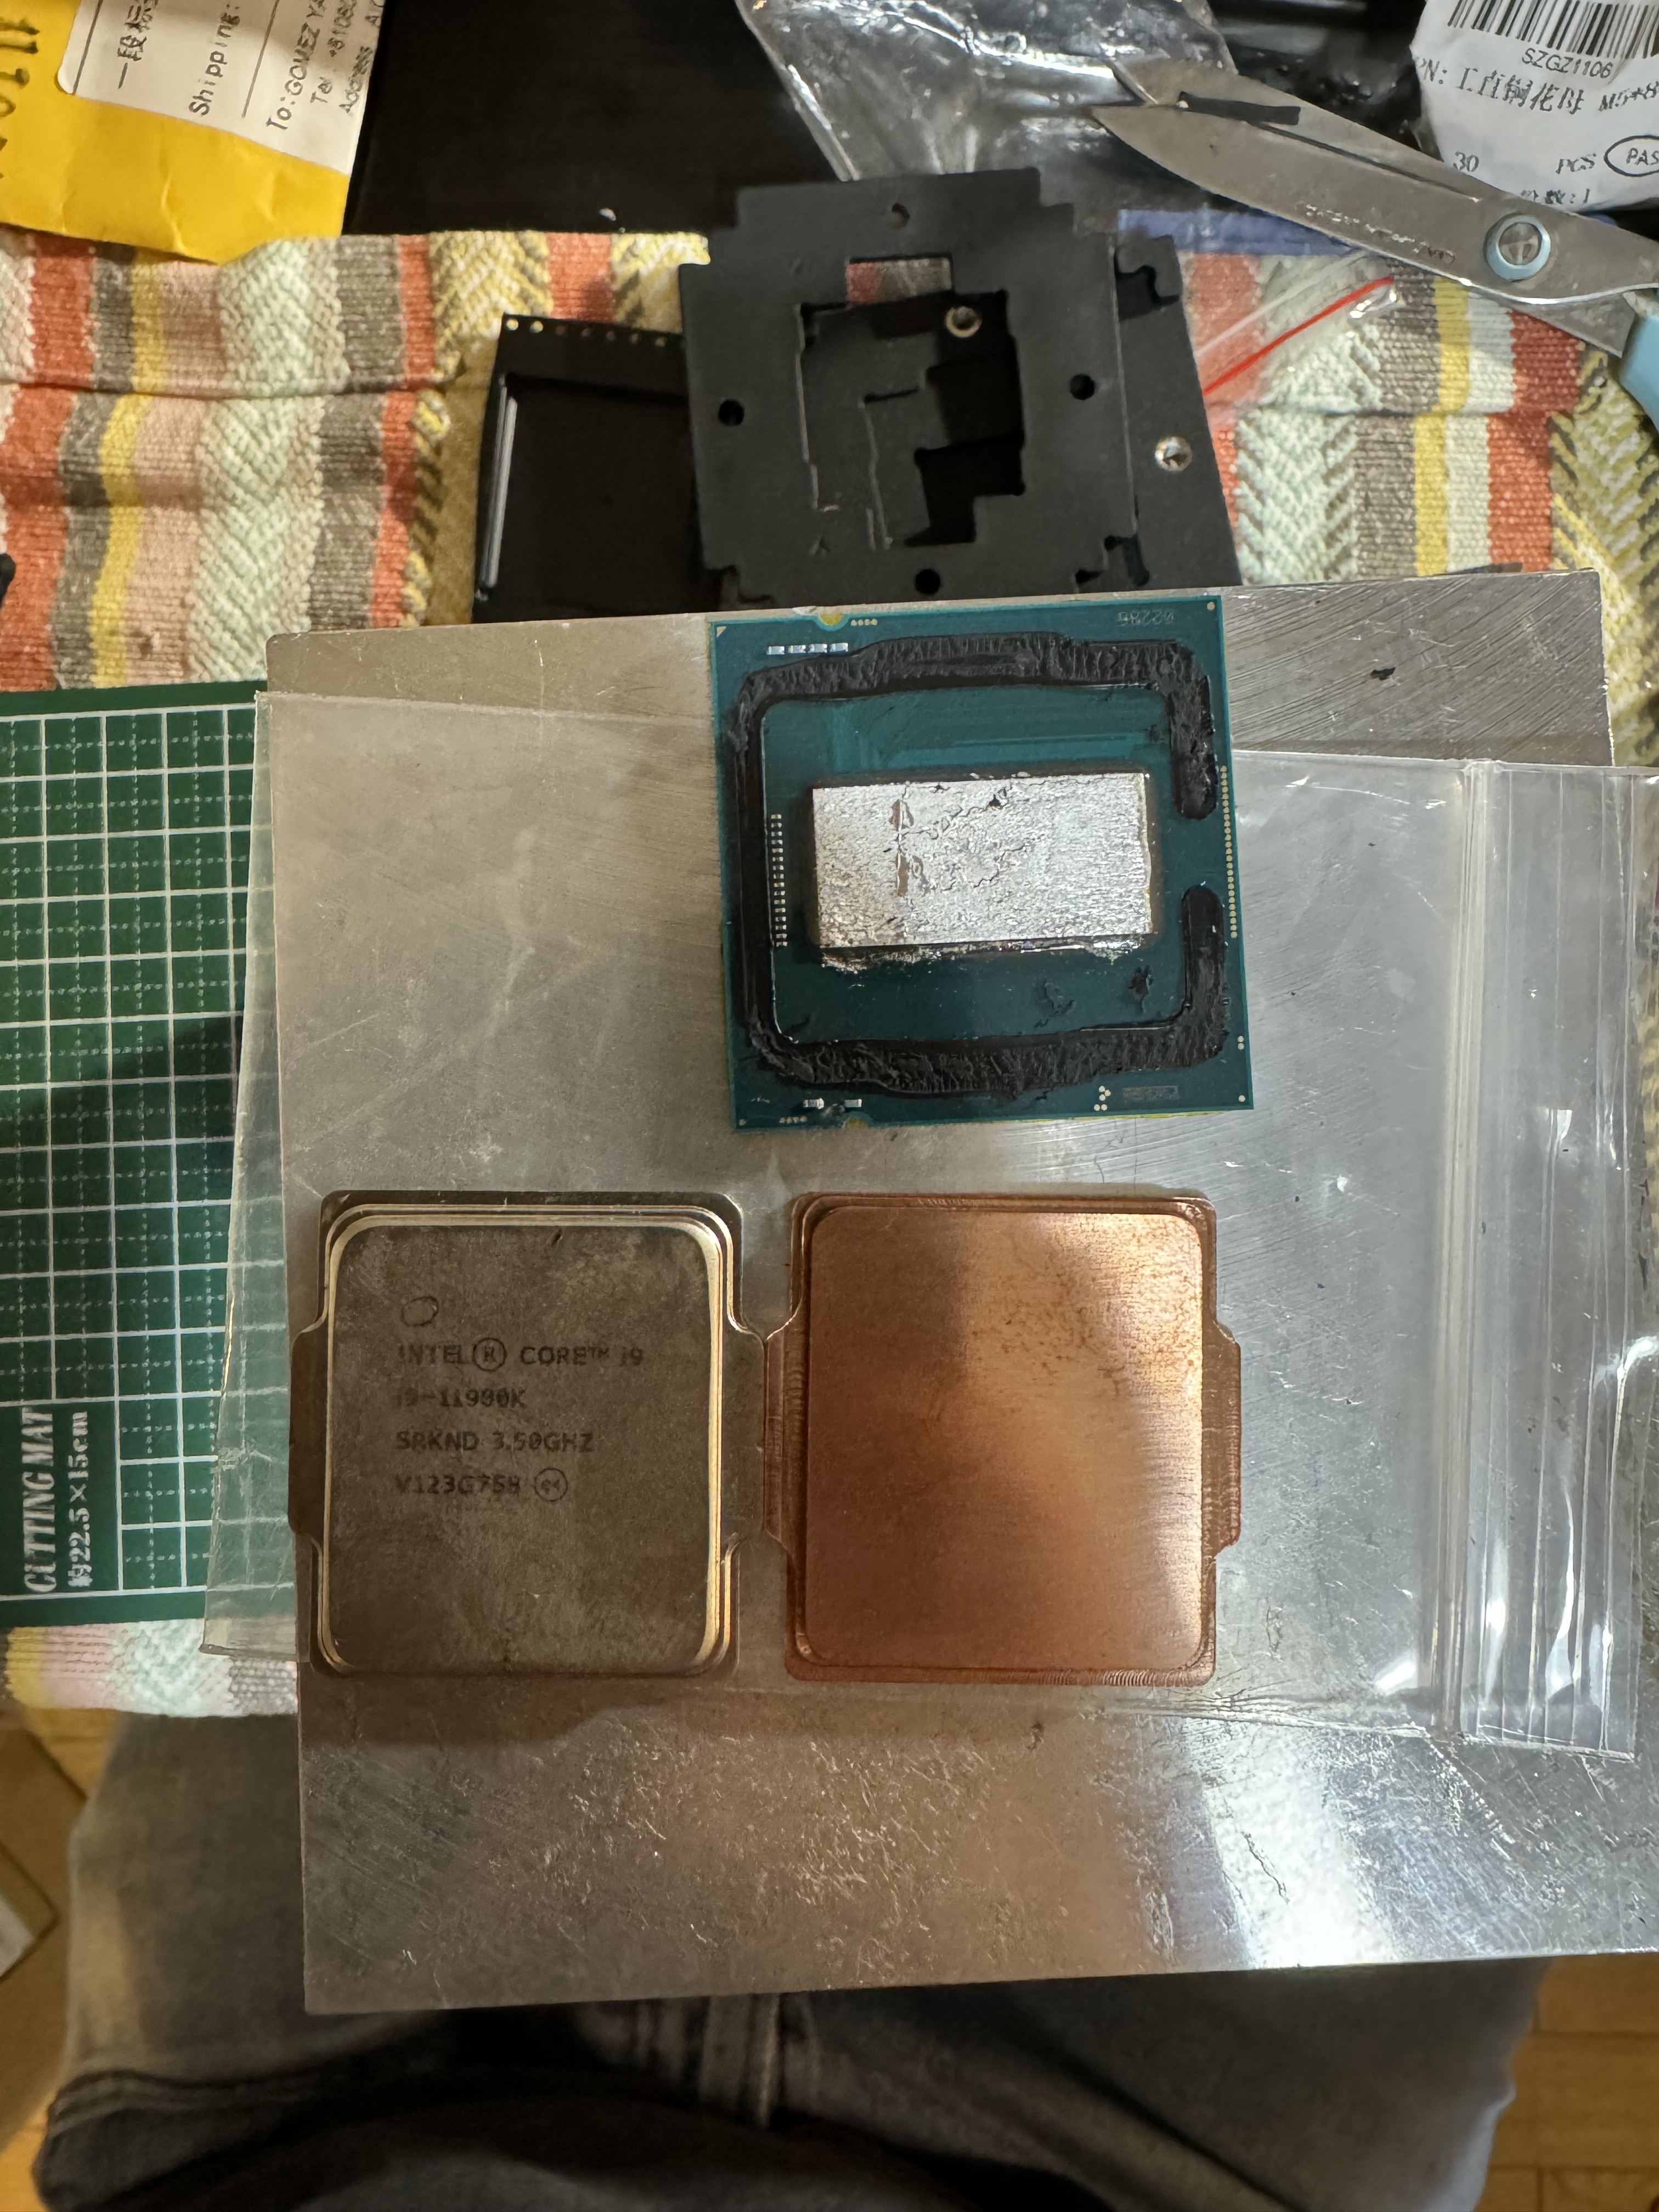
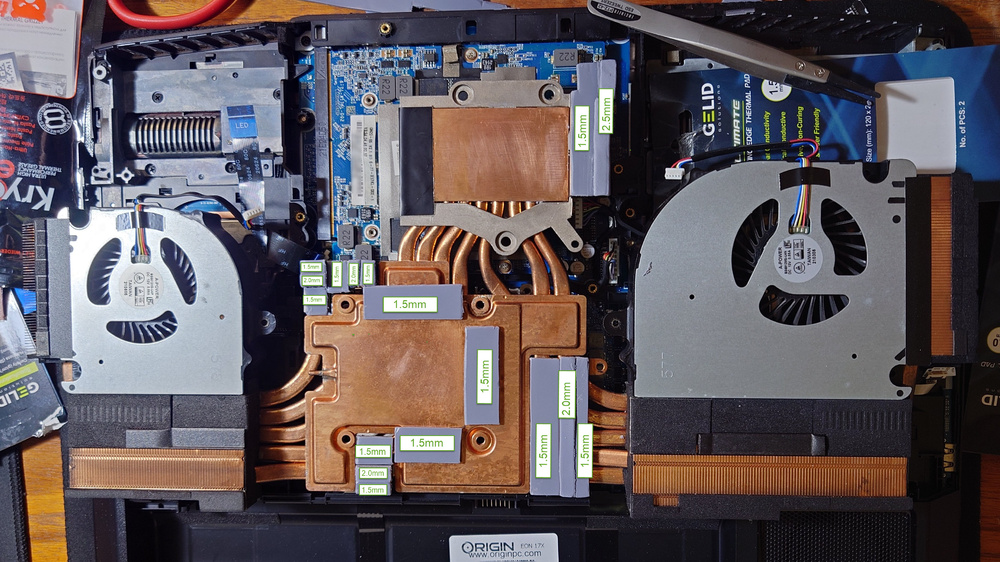
Hi there is already a FORUM specially for that laptop, it has all the necessary Answers and Question you are looking for. I can give you some advice. 1- Proper thermal Pad size and well clean polished heatsink. (You can use PTM7950 for GPU and CPU only, very efficient) 2- Use a copper shim of 0.5mm under the GPU die, it has a kind of a small gap that thermal paste cannot properly cover. Use thermal paste on both side to the copper shim Or PTM7950 thermal pad. 3- BUY a Water-cooler or make your own (eBay or Aliexpress) for overclocking is necessary. 4- last, you can delid your CPU with better Copper die or use the same DIE change the internal thermalpaste from factory, Intel thermal paste is not that good, use Liquid Metal from thermal grizzly. (WARNING: Very dangerous to do, can break your CPU) For more question please follow the official Forum.


-
Hi @strijrator Were you able to control the laptop’s fans with this fan control software?: https://github.com/djsubtronic/ClevoFanControl Yes I have use it, it works relatively fine. Had to apply and test it a couple of time to see it was working at the set curves. Also, I have found the app in the microsoft store that comes with the control center to control the laptop’s rgb, but I don’t know if it works without the control. I didnt know AppStore had a Control Center for RGB. Then I should try and test it. Thank you for the Information.
-
Hi @strijrator Man I wish I knew another software to control the RGB on the laptop, ”control center” does not work well so I tried many other Clevo vendors software and yeah, the Overclock settings and Fans control are mess up, rgbopen does not work well for me so I kind of gave up, left my laptop without it. I am thinking to search again, see some other forums if anyone has manage to get a fix. I don’t know if is because this is Origin laptop mixed with XMG bios then the software cannot find the right device ID. Something does not match or their software is terrible? If I find anything I will post.
-
Hi @JuliusCesare I see you have tested all memories. That behavior is really stranger, does not pass the POST🤔, I heard that whenever you make any hardware changes you should also hard reset the BIOS (Nvram). Try one memory at the time and the reset NVRAM or BIOS and see if works. I think there is also a sequence when installing memories, should be 1 & 3 (2x memories) and 2&4 (if all memories are installed) I guess that’s the order. Hard reset or NVRAM Reset - Yes that’s basically it, taking out all the battery, RTC battery and ac adapter for few seconds or minutes but it is better if you press the power button while all the battery and AC Power adapter is unplugged it will ensure that all that energy it was drain out, that will reset for sure the nvram. I don’t know any other way. I hope it helps.
-
@JuliusCesare I see , so couldn’t be that your memory are getting bad over time? Or the ram pins are dirty? Have you tried in your known good slot the others memories? I hope is not the motherboard getting bad, have you seen any sign of corrosion or mold or white build spots (from water or moisture) near the ram slots? Or anywhere in the motherboard? Have you tried to do a hard reset or load your BIOS configuration to default on your laptop and see if that helps?
-
Hi @JuliusCesare Sorry for the late reply. I see you have flashed your Bios with XMG 1.07.09RTR6, sorry I misread your post, so you even had flashed the BIOS #2 of XMG, I haven’t had any issues with my memory rams, I use only 2 at the moment that are at the bottom case. My laptop is from ORIGIN, had not trouble when flashing, not problems with drivers, everything was smooth. I use Kingston Fury Impact 3200mhz Memory rams, seems very compatible with the system, I will avoid using different brands inside the systems, since mixed rams can create conflict that’s if you have. About the UNLOCKED BIOS there is not any unlocker program or application, I have done it manually by modifying it after windows was installed. It has to be down when you have already installed windows and have your laptop fully equipped with rams, ssd etc. otherwise the Bios locked menus won’t appear. Is a tricky BIOS, I wanted to modify the BIOS update to have the MENU already unlocked so when you update your Bios you will not need to edit manually the menu strings but for some reasons those keys menus aren’t there. I will leave you the post where I made a small instruction on how to unlocked it, lucky XMG Bios aren’t region locked you can make full dump of your Bios. Read carefully if you wish to unlocked it, if you have any questions let me know.
-
Hi @JuliusCesare I have never tried doing a offline windows reset before, crashes when doing so could be some missing files or corruption. Try to do windows scan sfc /scannow, chkdsk, or files system checker Running DISM. Windows does make the CPU fans or GPU go to max speed when it crash, even on games. But I think 80c on CPU or 70c on GPU on quiet mode is high, I run on max settings and overclock and of course, this CPU model is terrible was born to be hot even on water cooling, mine gets around 80c to 90c with 4.9ghz and max power consuming 200w. The GPU on benchmarks with little tweaks (cause too much tweaking makes it crash) hits 50c to 60c. It has low temp even without watercoolers. If I am not wrong running without watercooler on high performance my clock is around 3.9ghz to 4.0 and hits around 80c, the GPU stays around 60c if I am not wrong without watercooler. again I feel that making the proper seating of the thermal pads or thermal paste and the heatsink is really a must. You will have more stability in the system during the peaks, there is always those high consumption on the system that makes everything crash. My system is ORIGIN X170KMG with XMG BIOS 1.07.09RTR6 (this version of the Bios makes good compatibility of the memory ram for 2 so-dimms I think was for the bottom slot, can run at 3200mhz not problem and any other BIOS from other brands, I use Kingston Memories with auto XMP. There is another version for 4 memory compatibility to run at max speed, I think you know that Intel didn’t help together with Clevo to properly build a system were the 4 dimms could be run at MAX speed in laptops, I think if 4 memories are placed will always stay at 2600mhz if I am not wrong, but I think there is not comparability issues to run it like that. Besides many say that the XMG has the most stable BIOS so far and their drivers too. You can give it a try, if doesn’t suit you can always rollback to your own default Bios that’s of course if you have the Bios update program or you if have made a full backup of your BIOS. I have used Clevos Bios and all of them you can rollback the Bios 1.07.06 1.07.07 1.07.08. I don’t have Origin Bios program installation and I haven’t found one, but at least got a clean backup before anything was installed (you need to flash by a programmer like CH431 Black or FPTW - Intel Flash Programmer Tool for windows, as far as I have experimented these Bios aren’t region locked to flash.) hope you have found a solution if you haven’t try this, I don’t know if this will help. Best of luck.