Teo
-
Posts
41 -
Joined
-
Last visited
Content Type
Profiles
Forums
Events
Everything posted by Teo
-
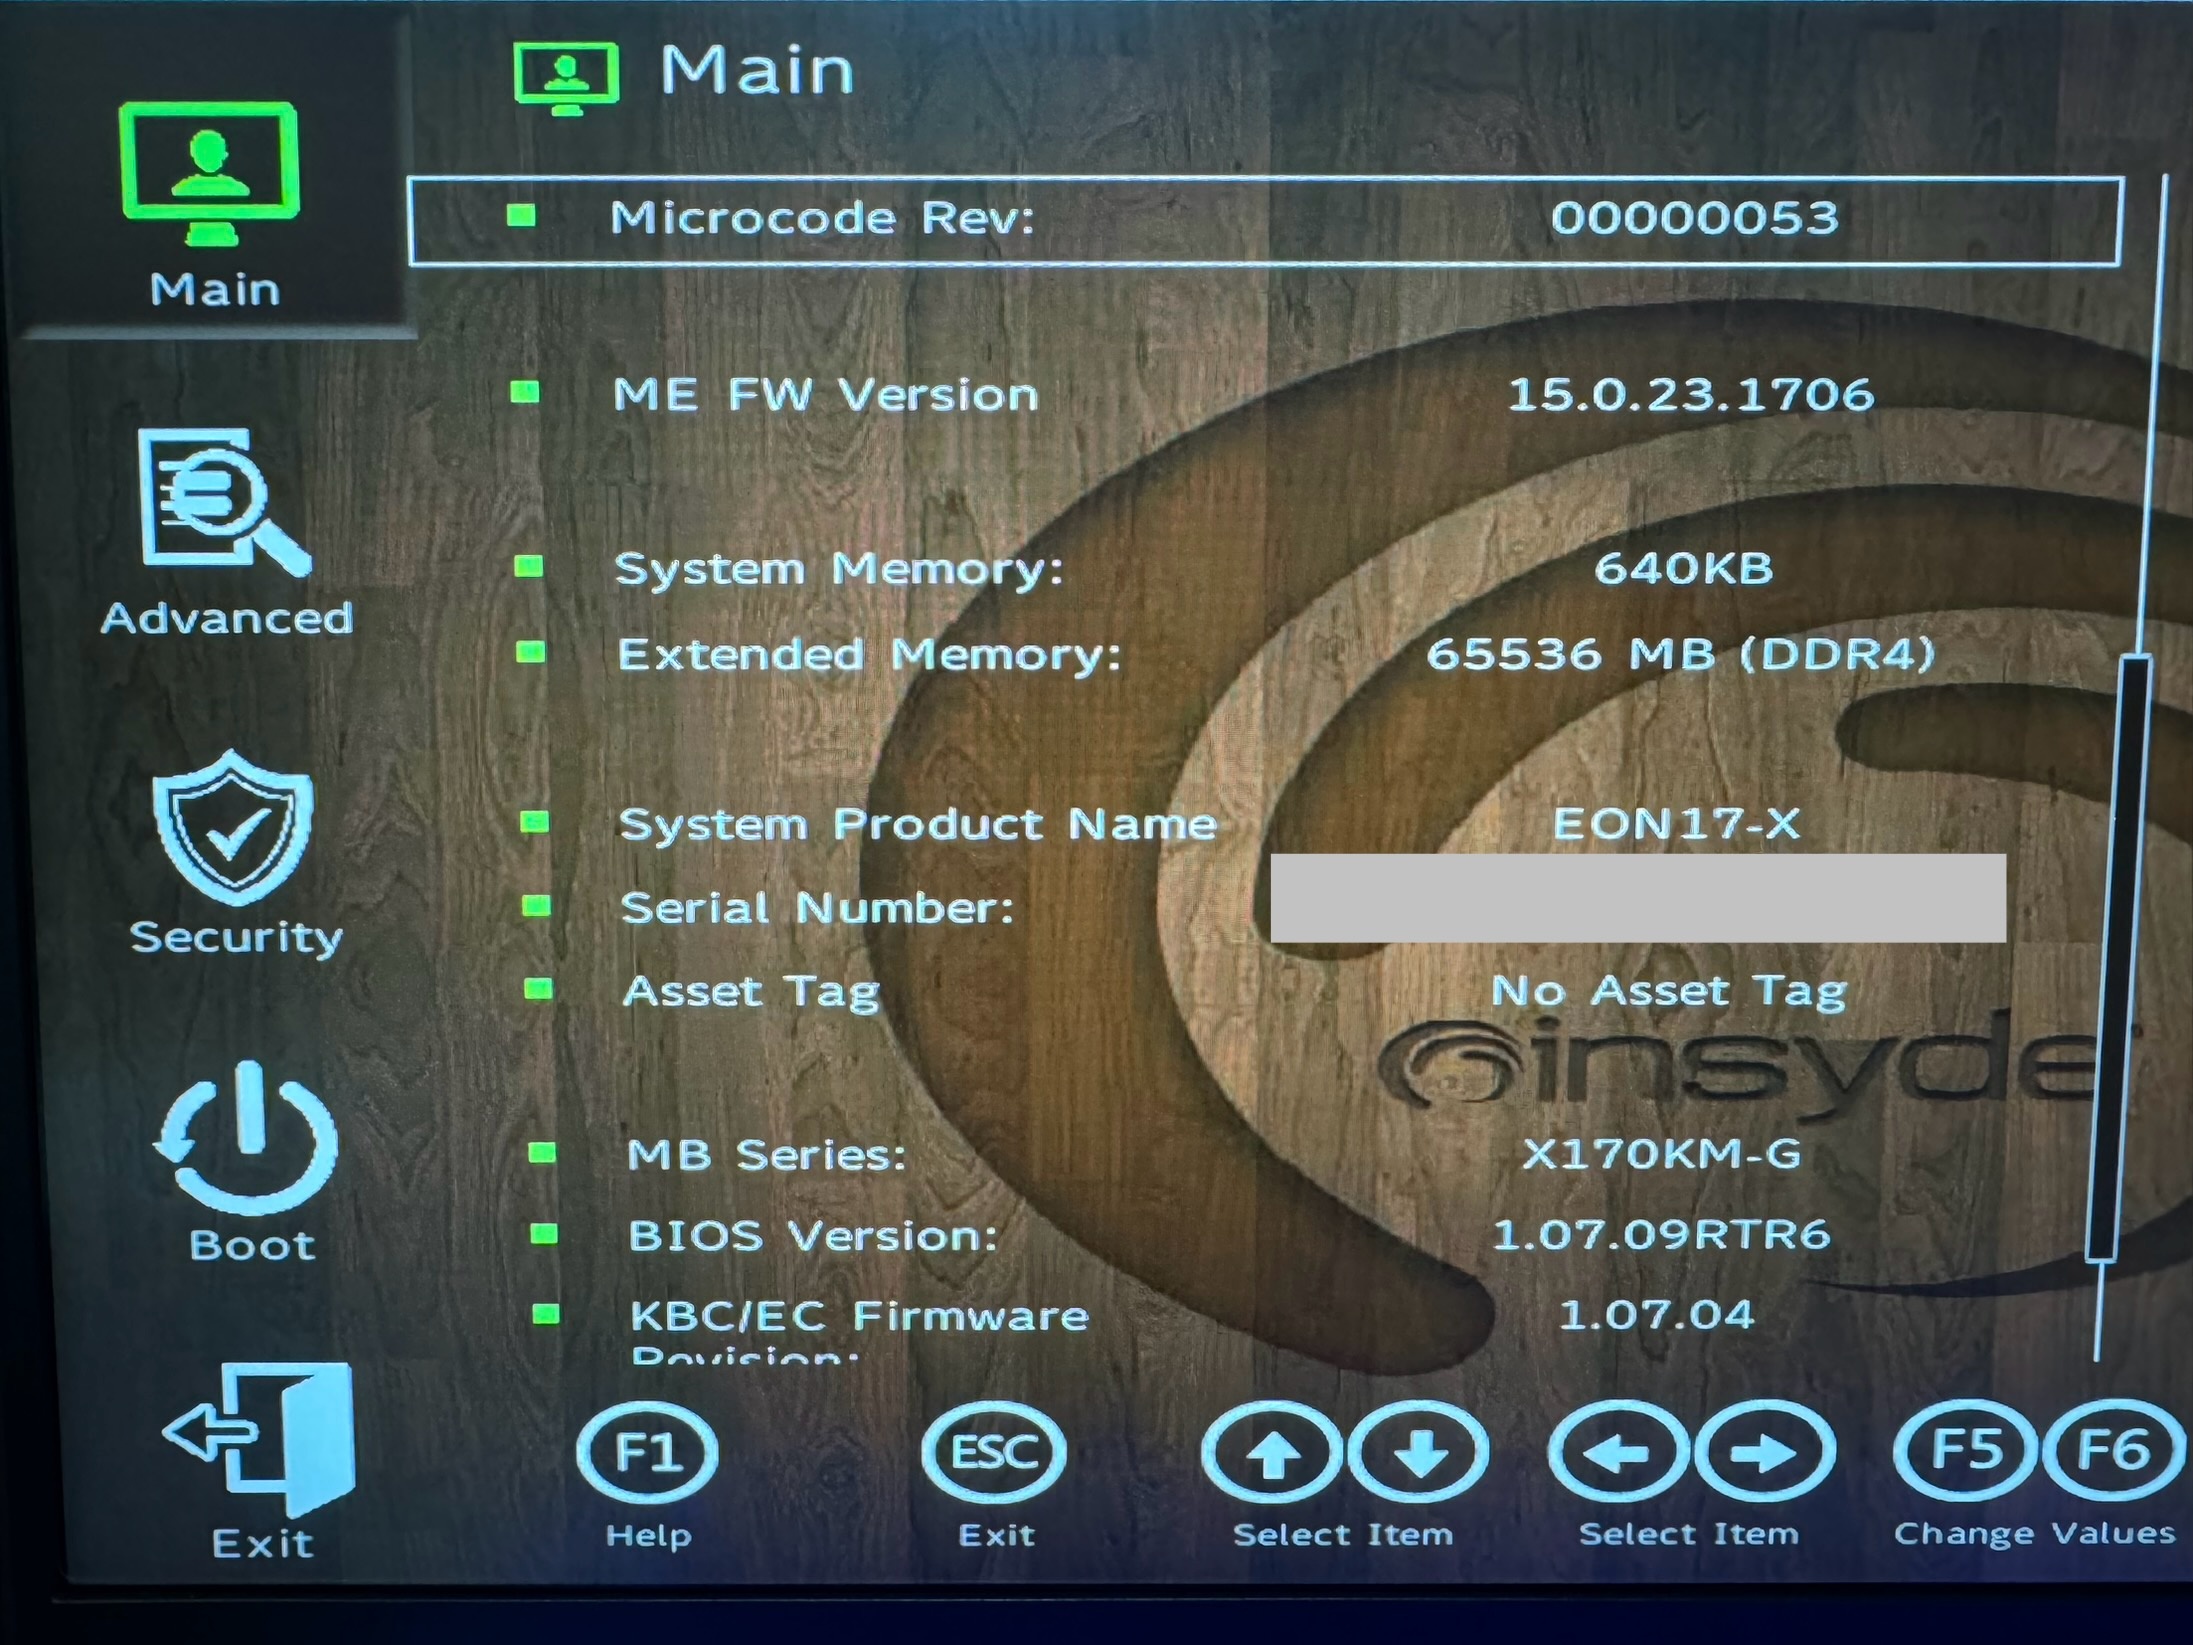
Hi yes you can under volt on XMG 1.07.09RTR bios, I have undervolt it with Throttlestop. VT-D can also be disable on UEFI BIOS MENU. If it doesn’t work for you, you can always downgrade with your Bios update file. good luck.
-
@SamSTG44 check please on the main forum for “Official Clevo X170KM-G Tread” Is all posted there or click this link for the last Benchmark results.
-
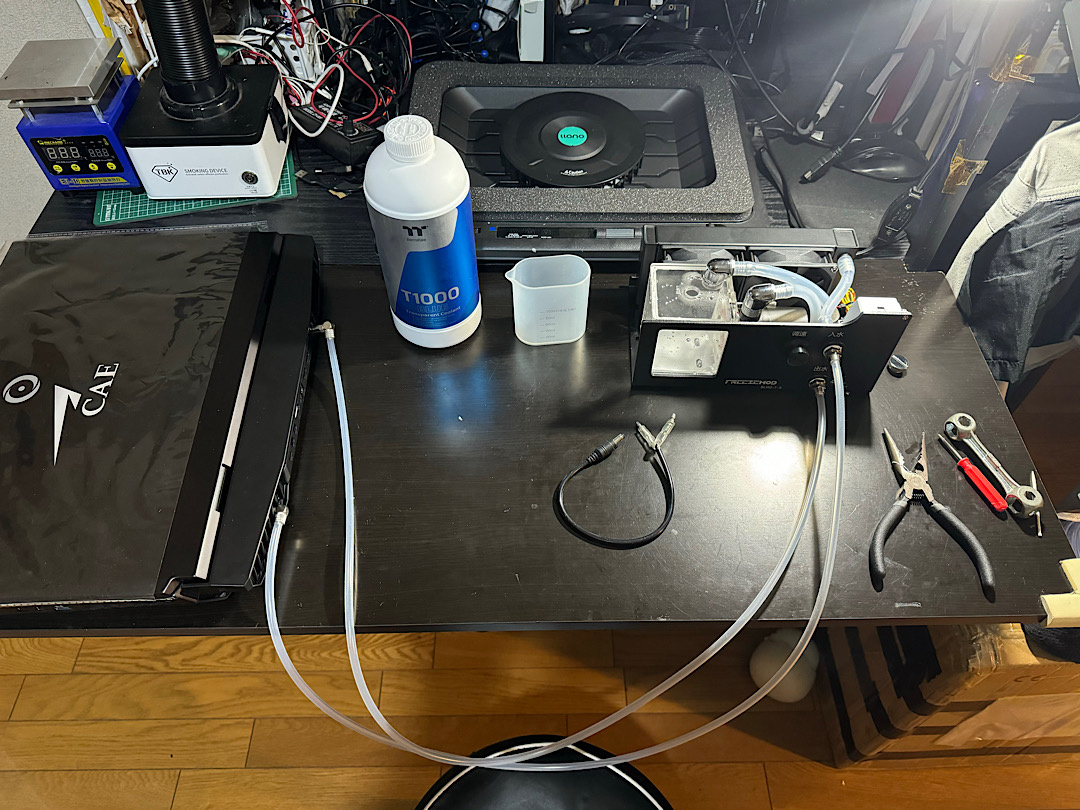
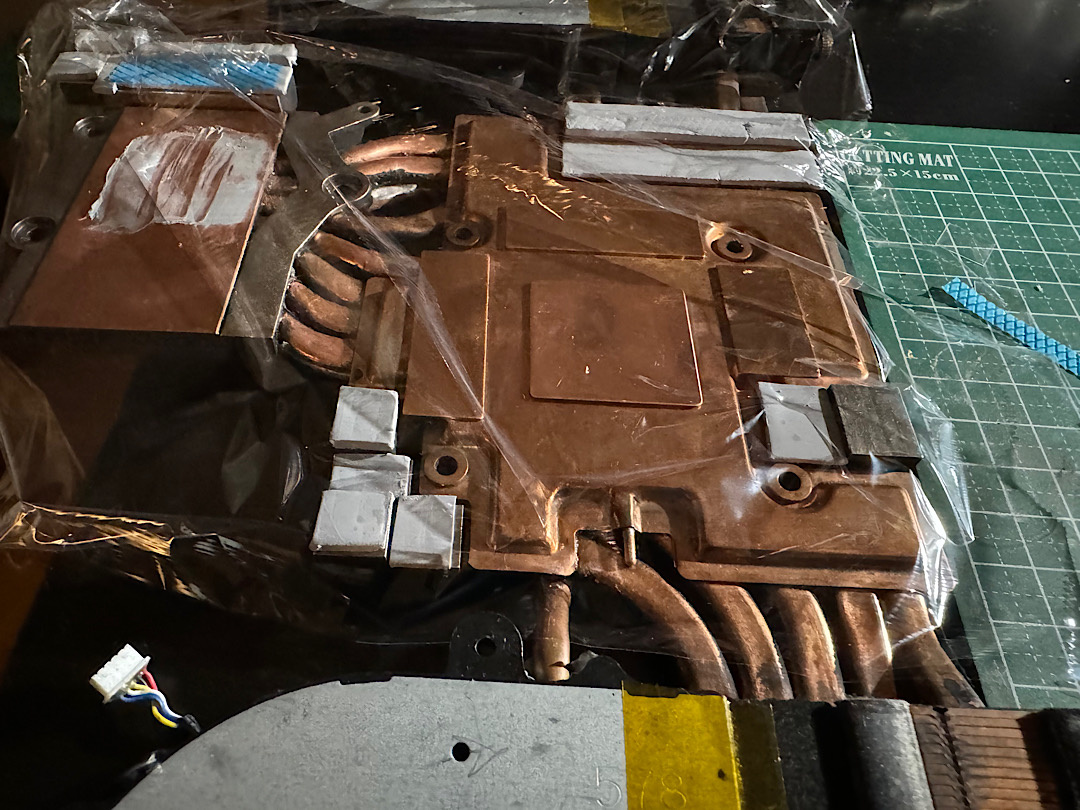
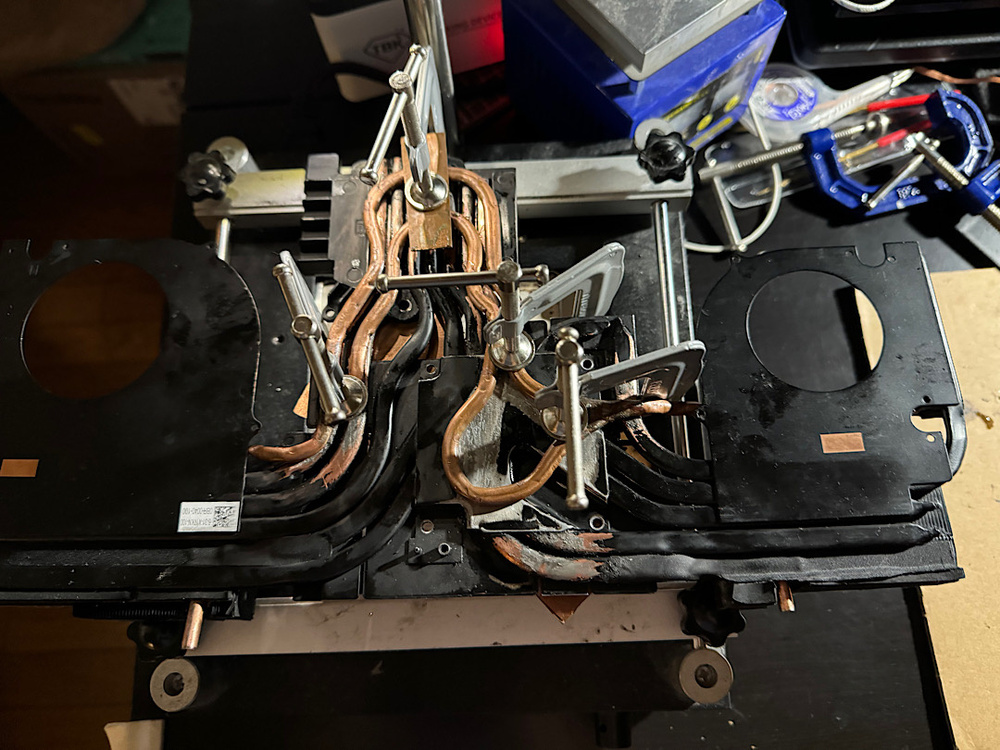
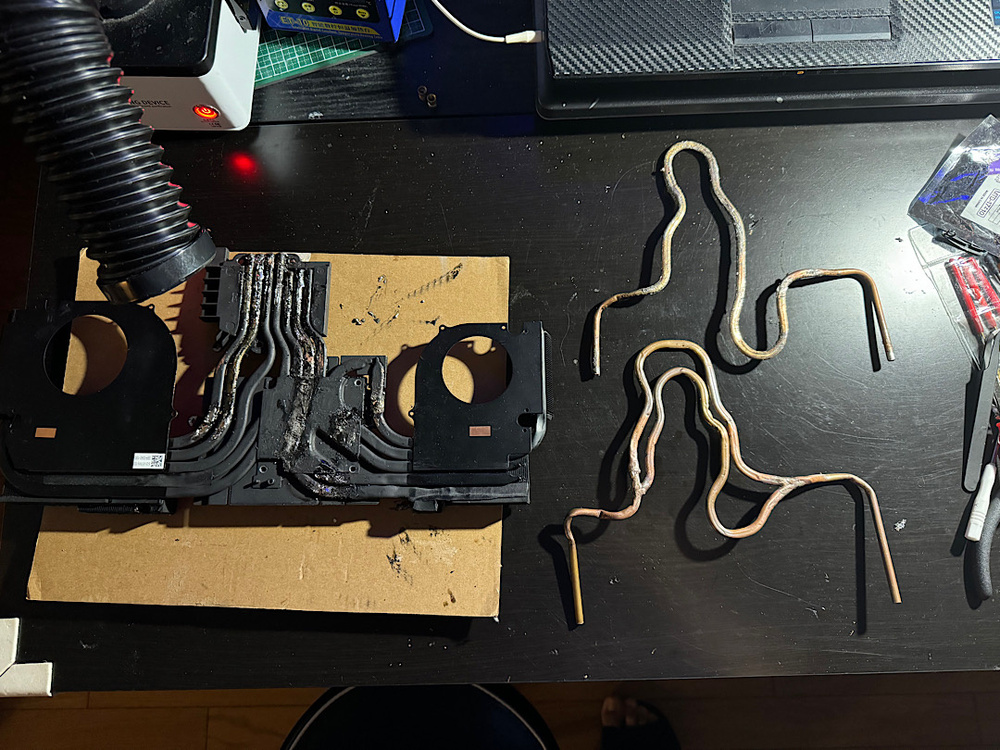
Hi Sorry I really misunderstood your first question, better fans and quieter 🤔 I haven’t heard anything likely in the forum, better thermal paste, metal liquid or PTM7950 pad and de-liding CPU is the only thing I can come up, but this model laptop won’t ever ran quieter, it has a hot CPU no commonly made for laptop is for PC. That’s kind of impossible. Although you can run quieter laptop by using Hybrid System (switch automatically iGPU instead of dedicated GPU when not needed, that requires unlocked BIOS MENU) and setting up power mode for “Entertainment”, on higher performance it won’t be quieter. About watercooler, you can make your own though, if you know how to and have some solder machine. I made my own Watercooler because that 3rd party company who made that watercooler is no so efficient and is too expensive. With less than $10 dollars you can make your own. it requires some experience and a lot of patience but the reward is greater. If like you can Buy your own copper pipes, connectors, silicone tube and a simple waterpump and cools better than factory. (My own Watercooler) First model - 1 pipe water cooler system 2nd model - 2 copper pipes watercooler system. (Made a joint, much better, so I don’t have to use 4 pipes for intake and exit. (the good thing is that I can close the Bottom Cover. A flat pipe of 3mm is necessary to properly close the bottom lid of the laptop if you want to carry it around. ) Aliexpress - has some fast and easy solution to apply a new water cooler. This must be soldered not cold solder or metal glue.


- 5 replies
-
- 1
-

-
- x170kmg
- origin eon17-x
- (and 7 more)
-
I think I know what you mean, sorry for the question but how do they call the other keyboards that the RGB light can be individually assigned? Yes we do have the same Laptop model. 👍🏻 I hope can you get a good keyboard from the store.
-
Must be the #1. I hope there is not a different version of it for Origin X-170KM-G I haven’t gotten that far analyzing it, I really can’t tell. I haven’t bought any replacement or spares for my laptop. I only have dissembled a couple of time. It is weird that none of the seller can’t be more specific which model to use “A” or “B” keyboard. I cannot guarantee anything, the best way it will be to open the laptop and confirm by yourself, it can be a hit miss. The bottom has 8 screws and the keyboard 2 from within. It has indicator where which one is the keyboard screw. It has some pressure clips just try to push the keyboard out from inside of casing under fan base you can see the keyboard back or from the top try to pull it out. Just be careful dont put too much strength to it, and be careful with ribbon cable, they are kind of short. All the best.

-
Hi @Sephiran what’s your laptop model? if is the x170km-g I believe all have the 4zone RBG keyboard, but I can be wrong. About the other one I have never seen it. For I can see on any seller they have mentioned that also works for both laptops X-170km-g and x-170SM, so maybe the difference will be on the vendor side. Mine is Origin model and it has the 4zone RGB keyboard that comes with 3 wide ribbon flex cables, the #2 RGB back light (1 slim and the other wide ribbon) it would not work on mine. Is better if you can contact the store you got it and check or ask what’s the vendors name. There is so many.
-
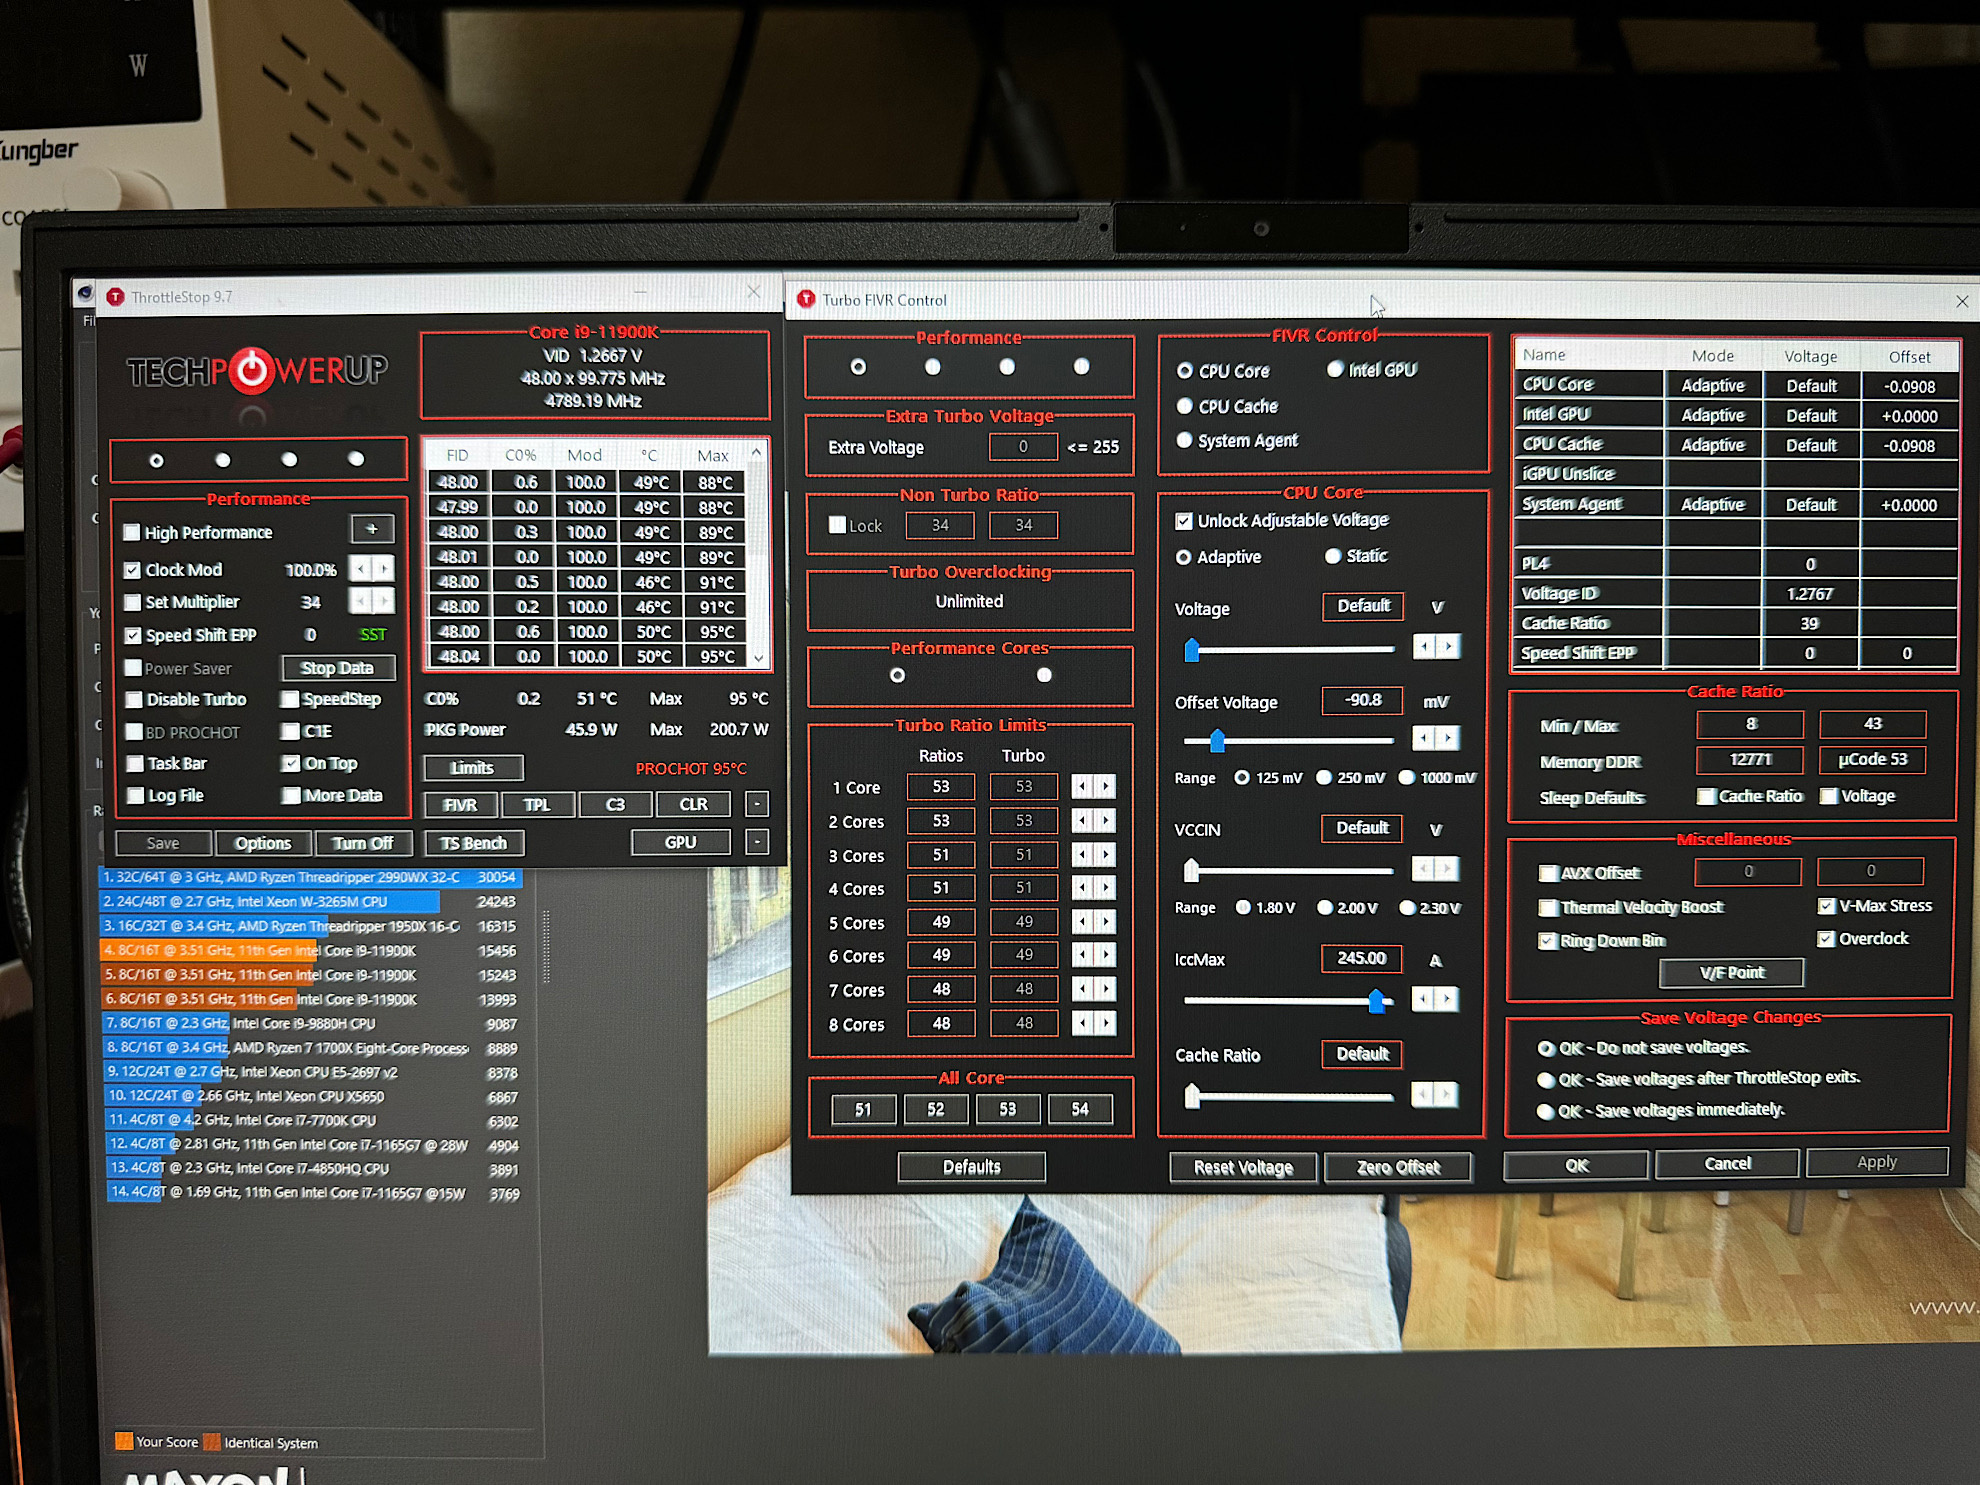
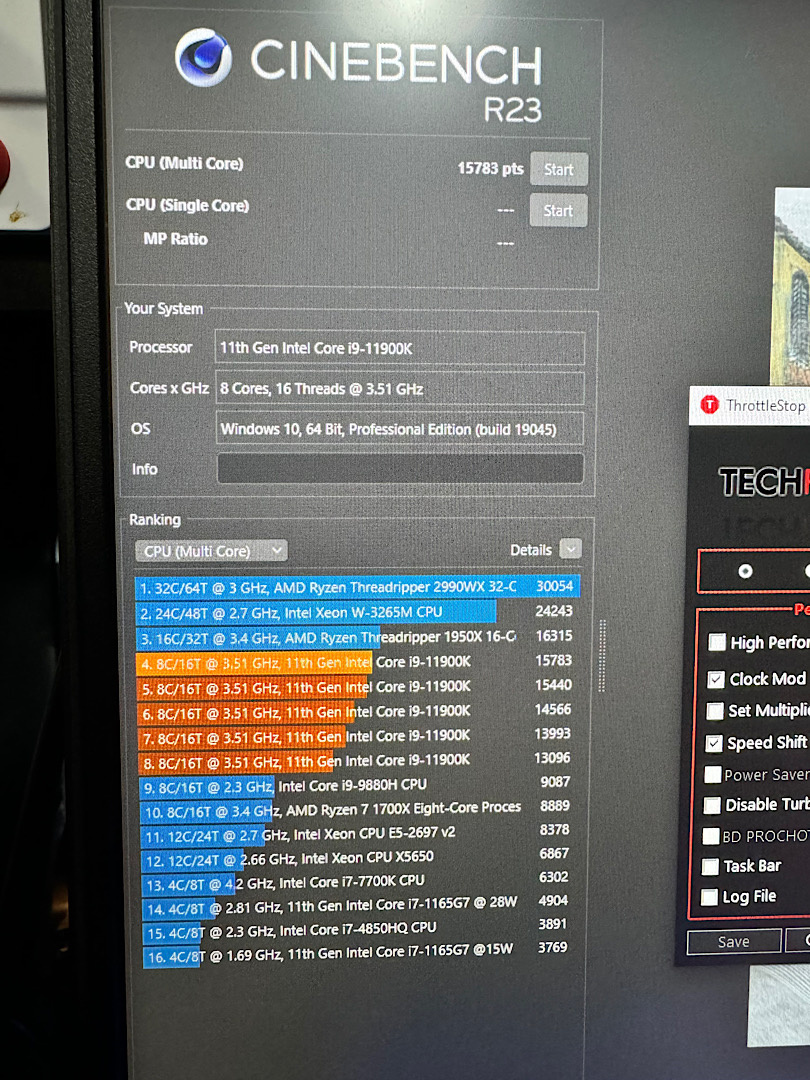
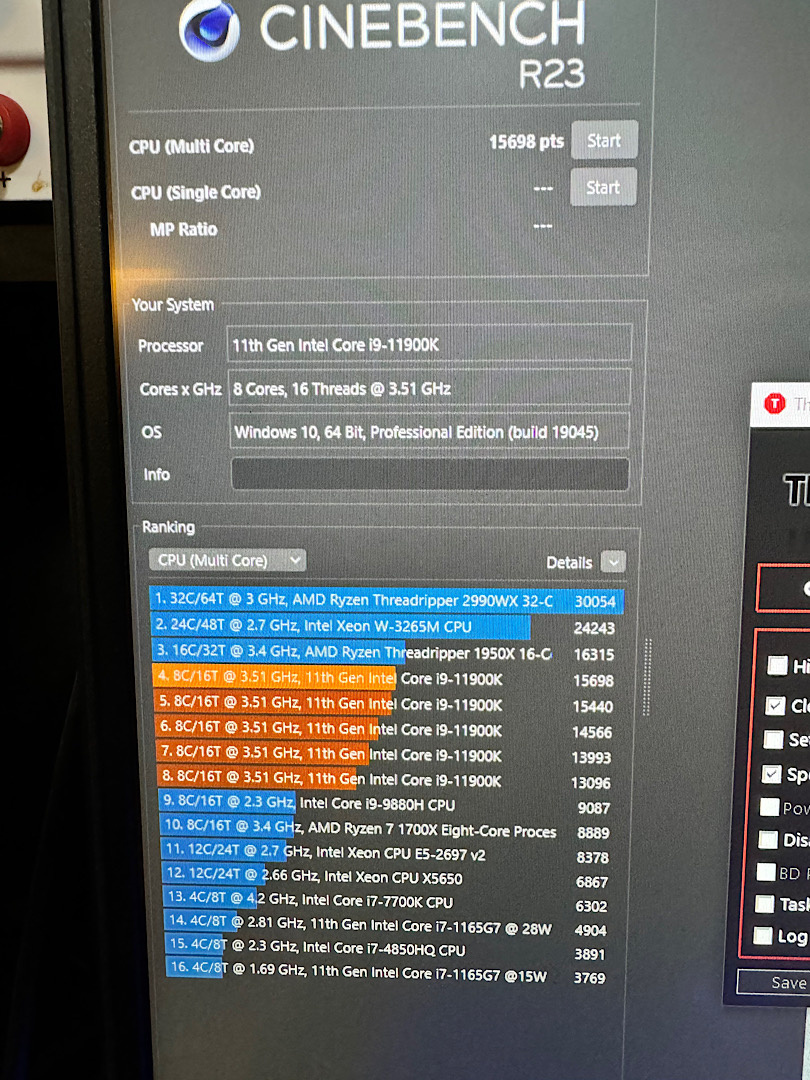
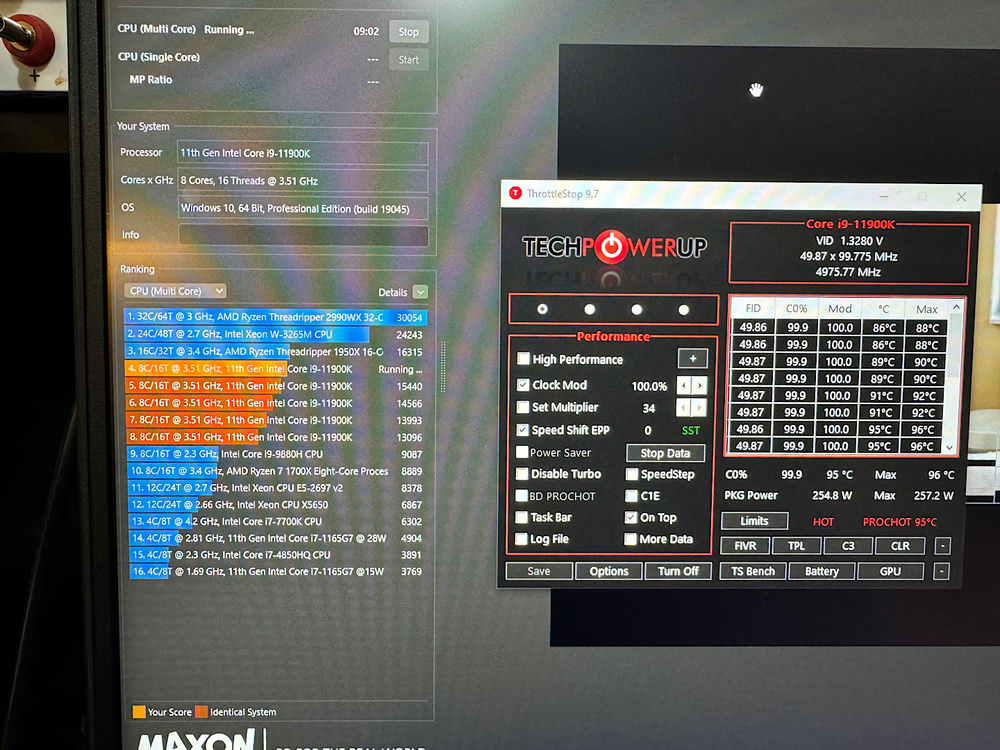
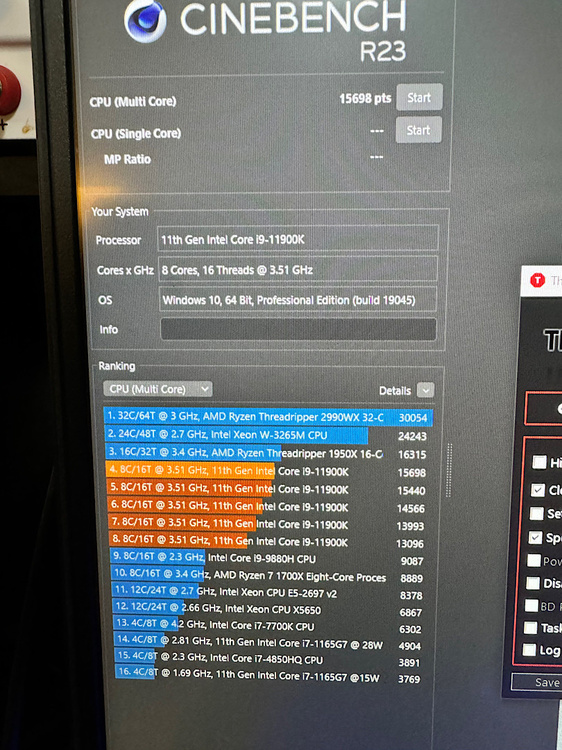
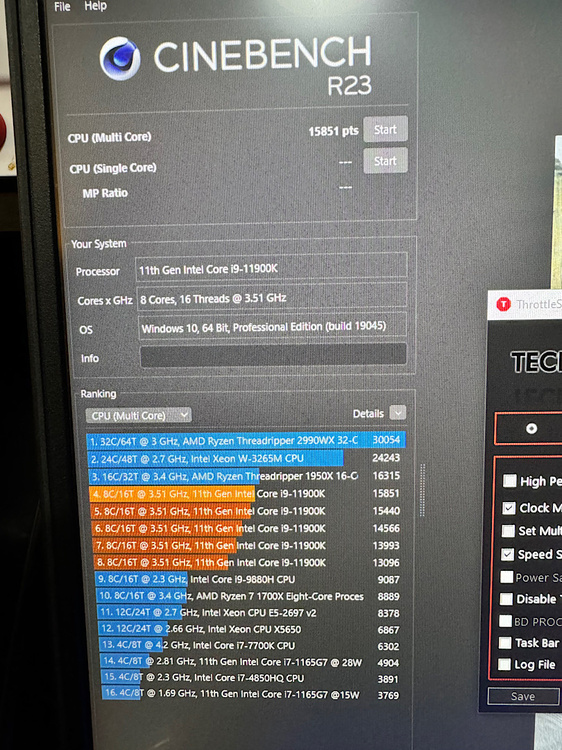
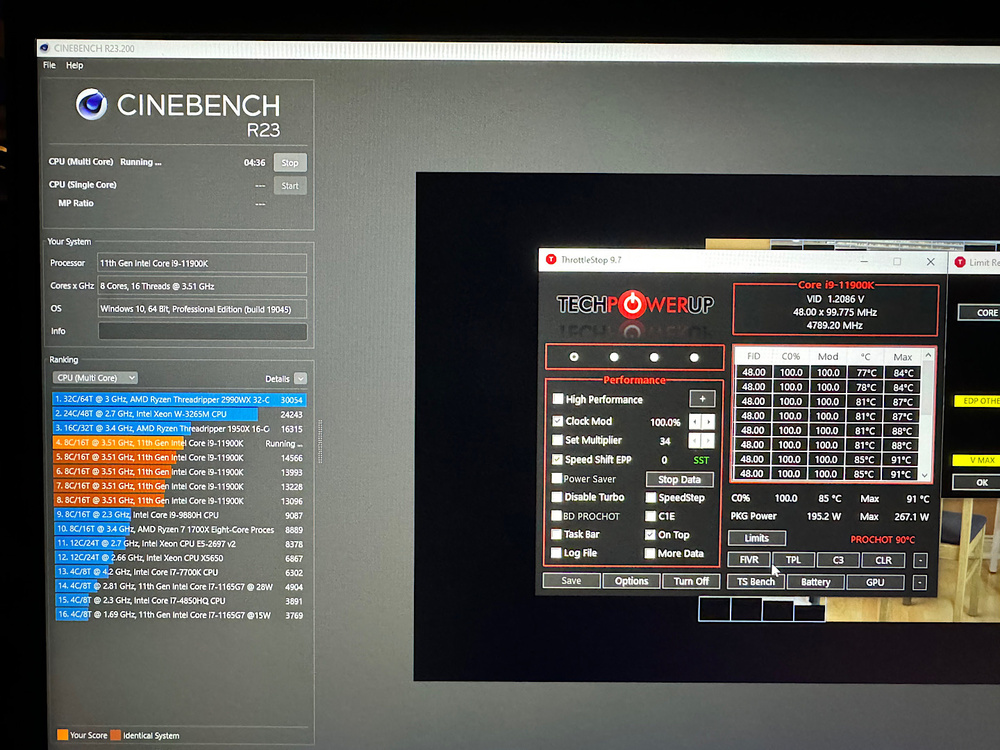
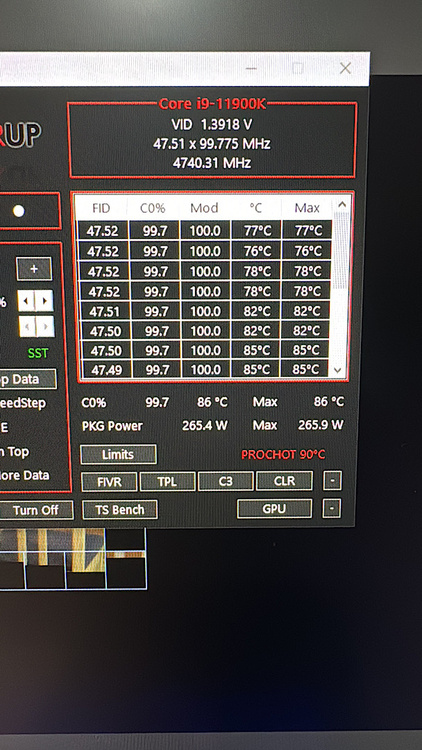
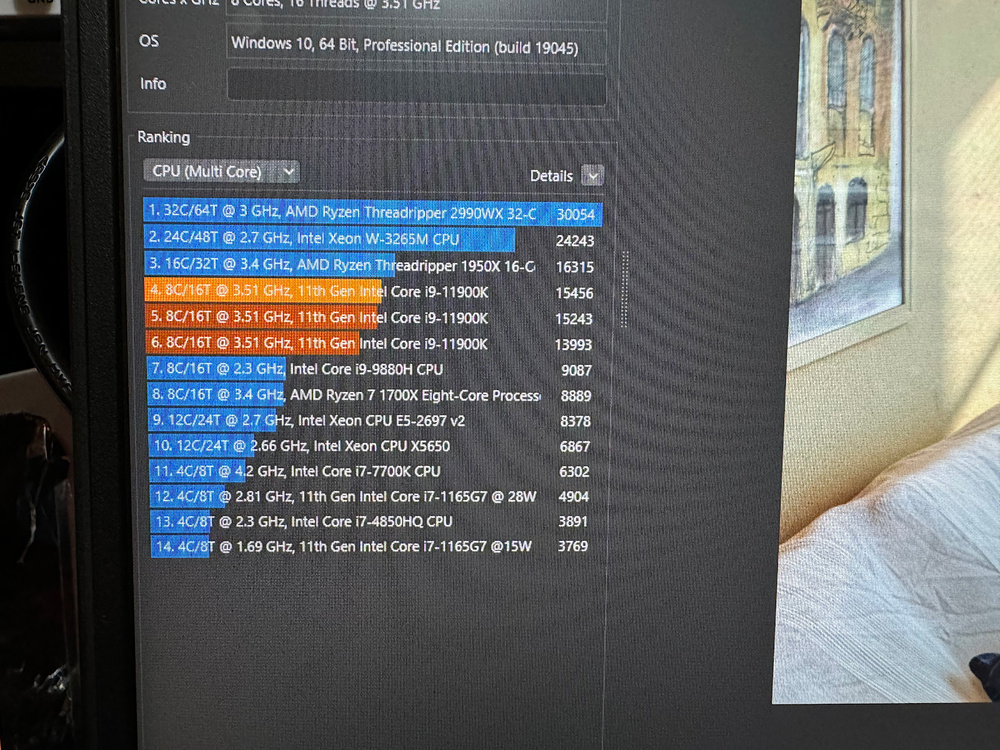
Finally I did manage a higher clock, 5.0GHZ clock ratio in all core but it wasn’t steady, was gradually dropping speed, going down to 4.9ghz. Temps max were around 94c drawing 230w~250w, PL1 & PL2 Max. V offset: -80mv Cinebench score: 15,783pts I did try as well at 4.9GHZ clocks ratio, that was handling well and steady. V offset: -80mv Max pl1 pl2 Temps 80~90c Power consumption: about 230w Cinebench Score: 15,698pts Tweaked a bit more with voltage V offset: -83mv clock ratio: 5.0GHz Last score: 15,851 Max pl1 pl2 Max power consumption: 250w (relatively) No tweaking this laptop anymore, I think this is the max it can perform, this DIY water-cooler needs further improvement. I think is good as an experience.


-
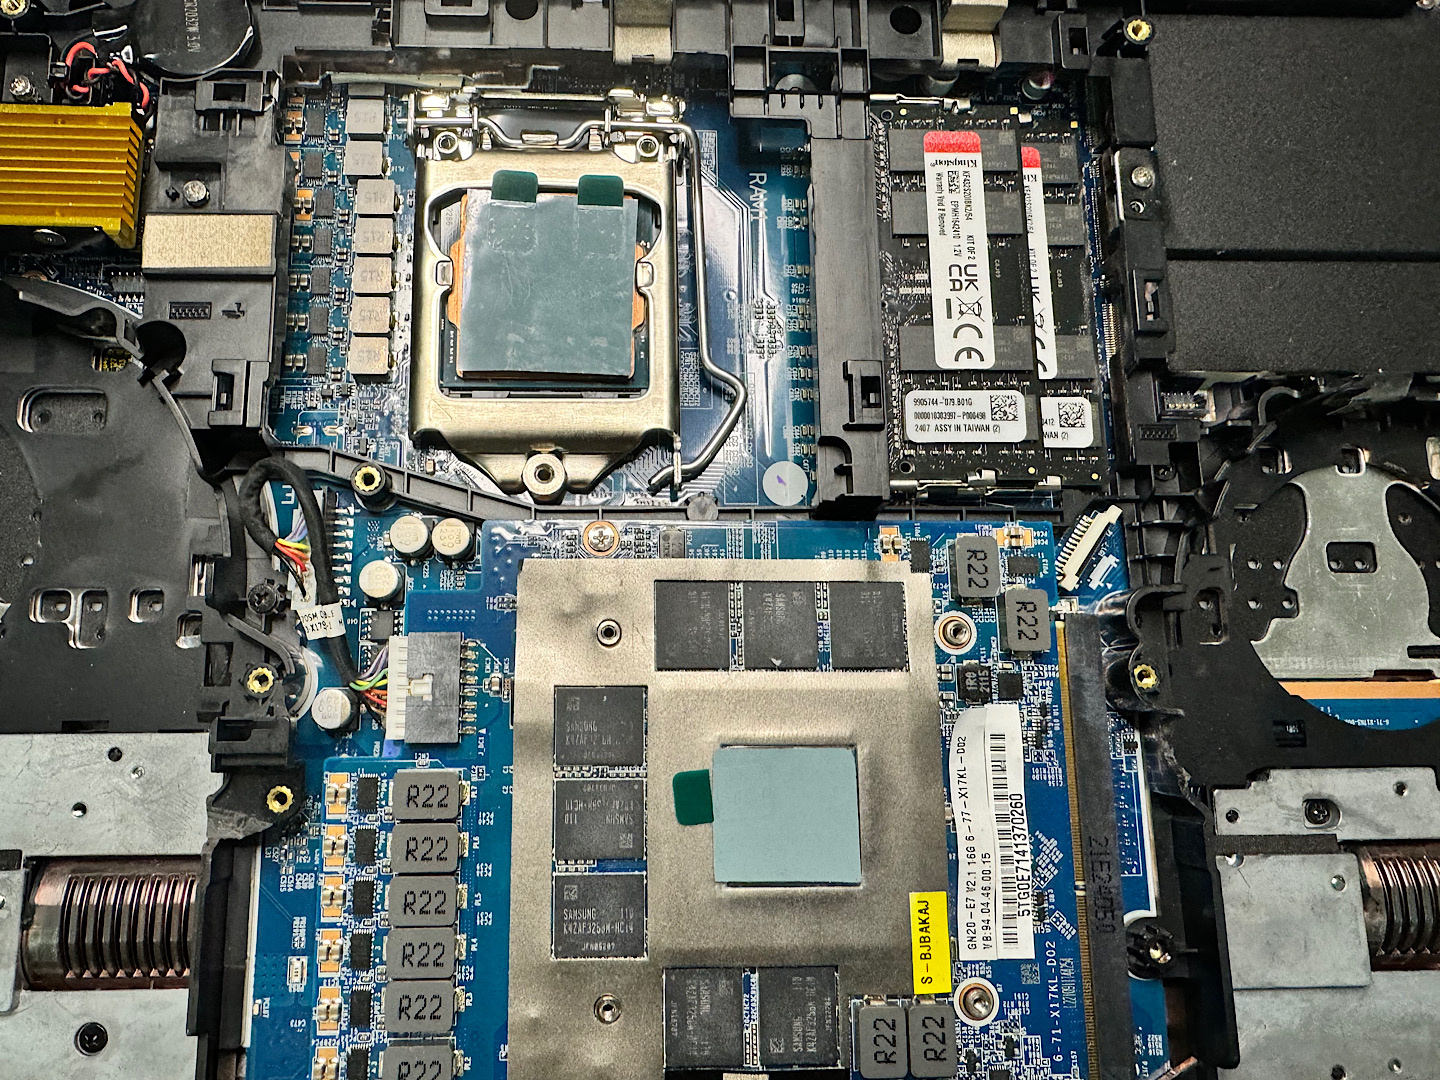
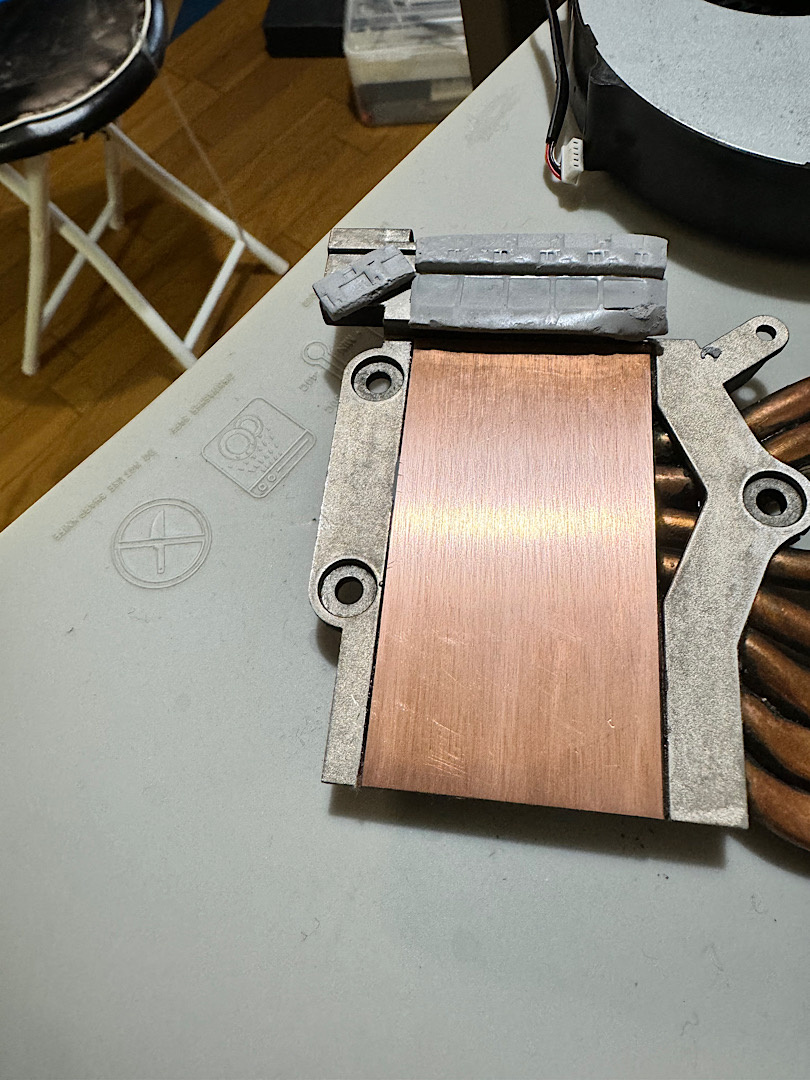
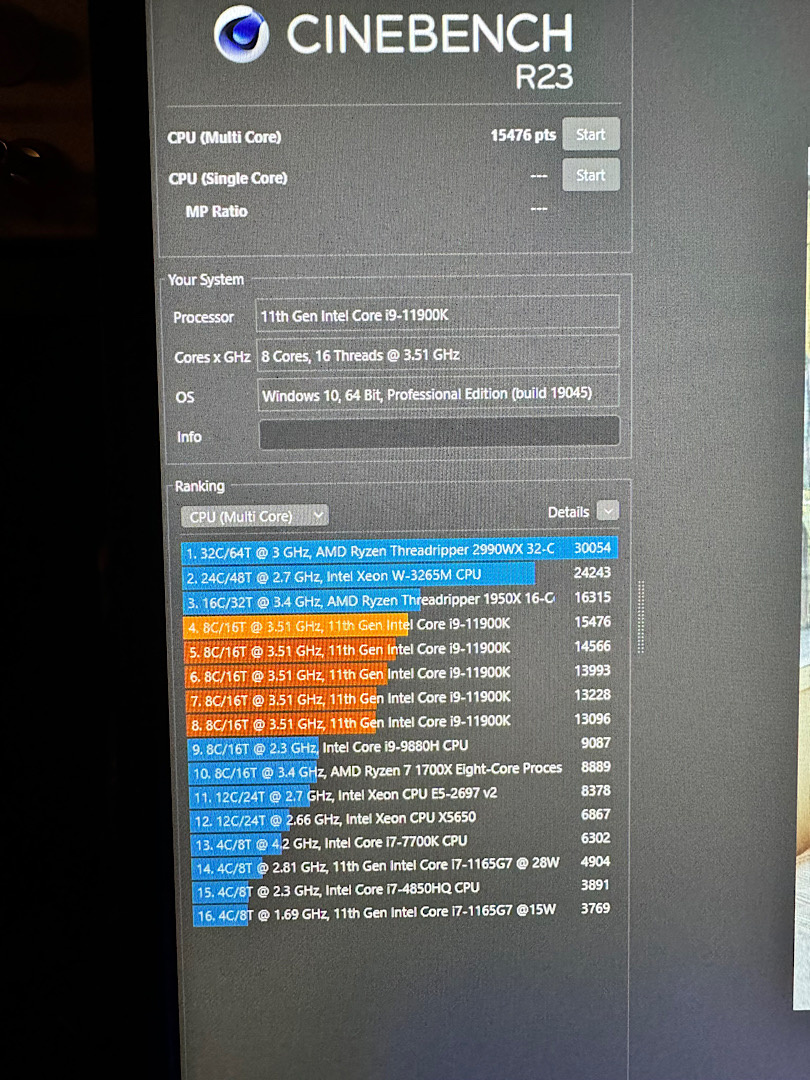
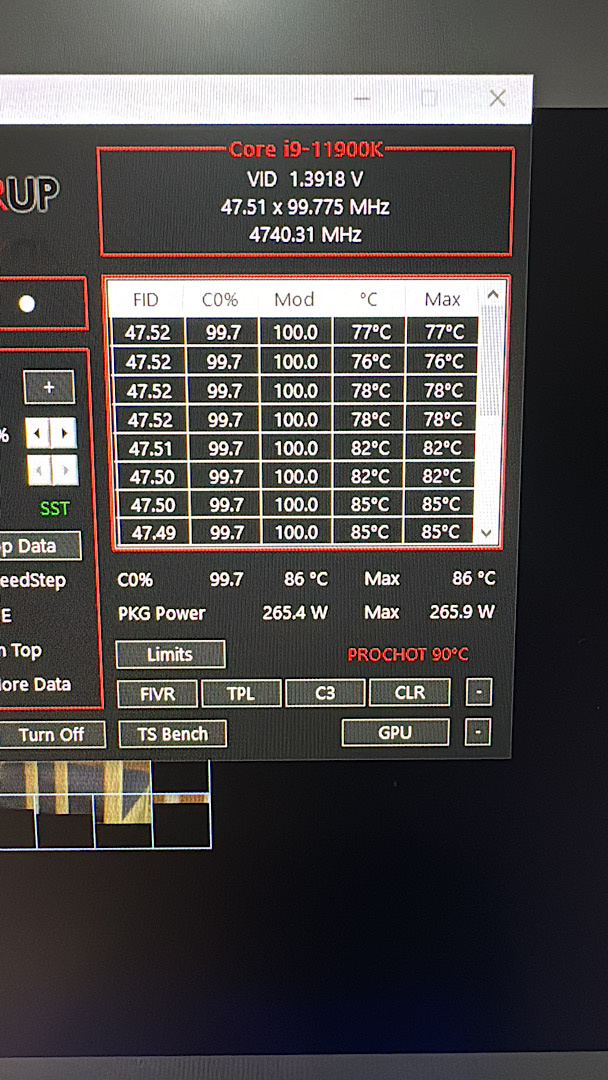
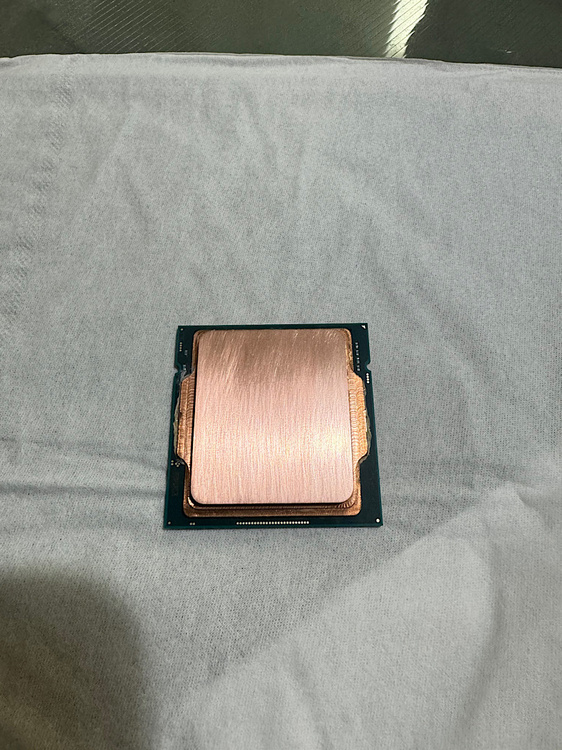
Polished the heatsink and applied PTM7950. Some good results. I got about -10C for doing that. i am not good at Overclocking, this is how far I could go. PTM7950 Temps are hovering around 70c to 80c with OC (before it used to be around 90c~95c with OC) very stable, not crashing. Cinebench: 15,476pts, clocks are stuck at 4.8ghz. Draws about 196w. If “Ring Bin Down and V-Max Stress” is unchecked draws about 260w but clocks fall down and many limits warning appears. I think I could score higher, still working on it.


-
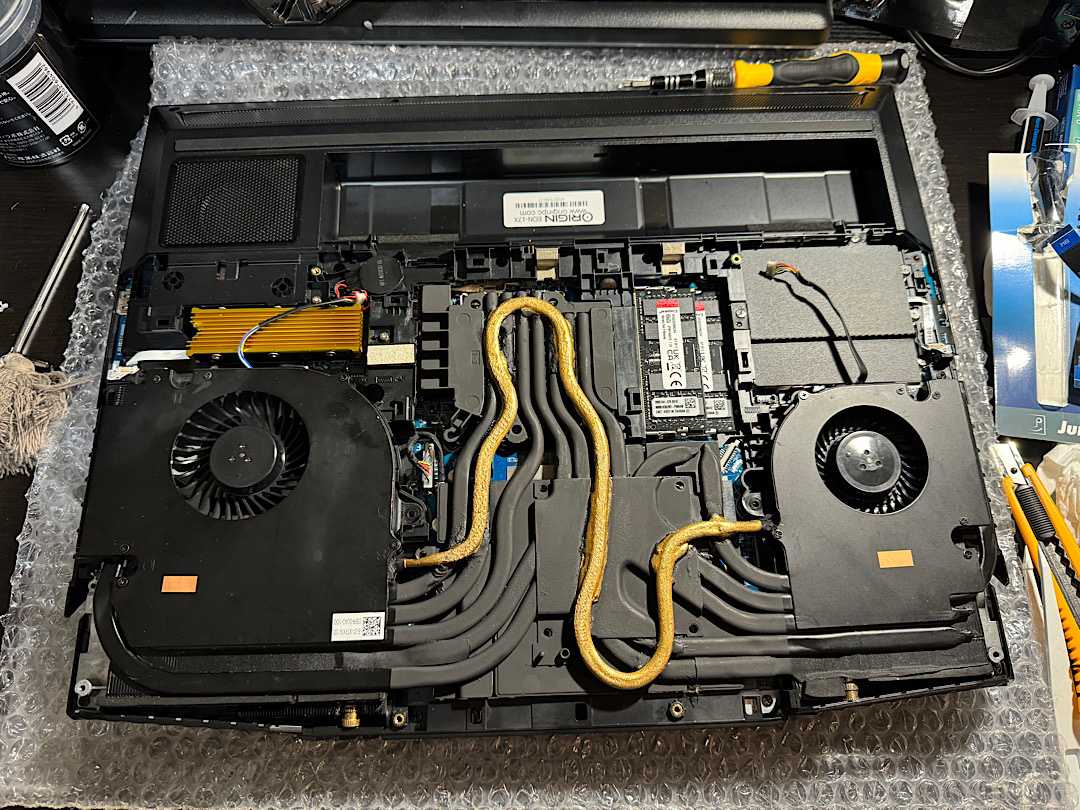
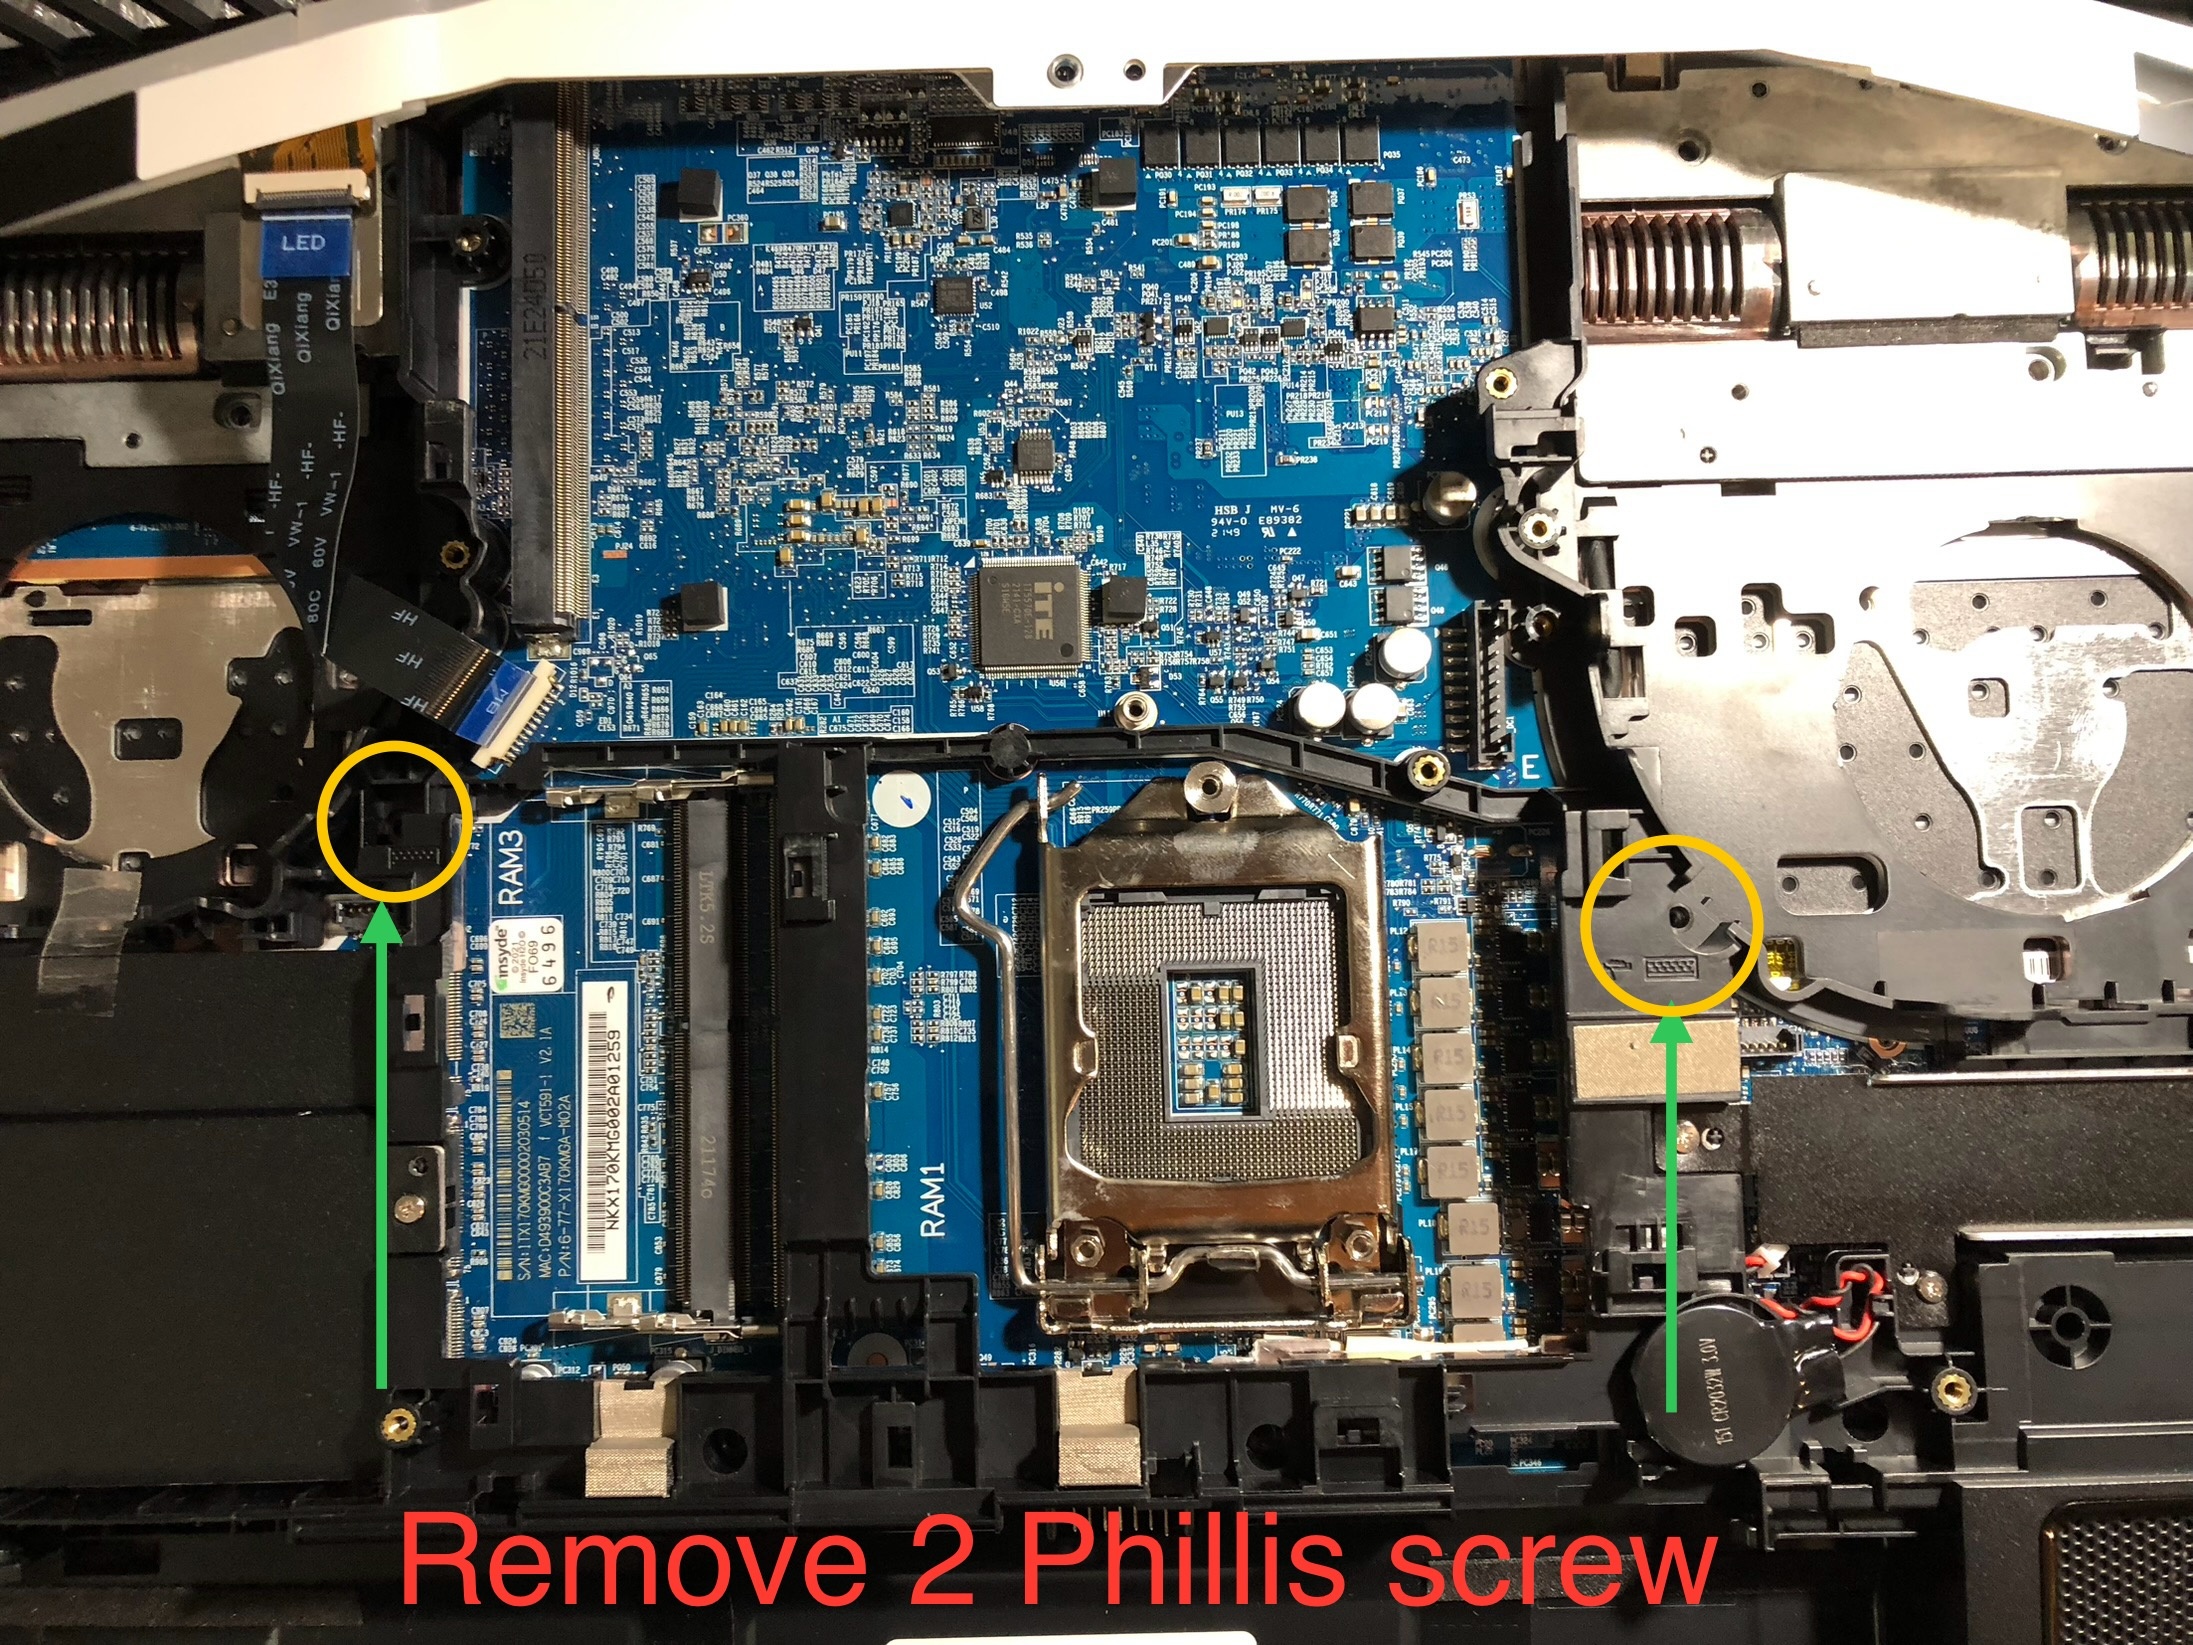
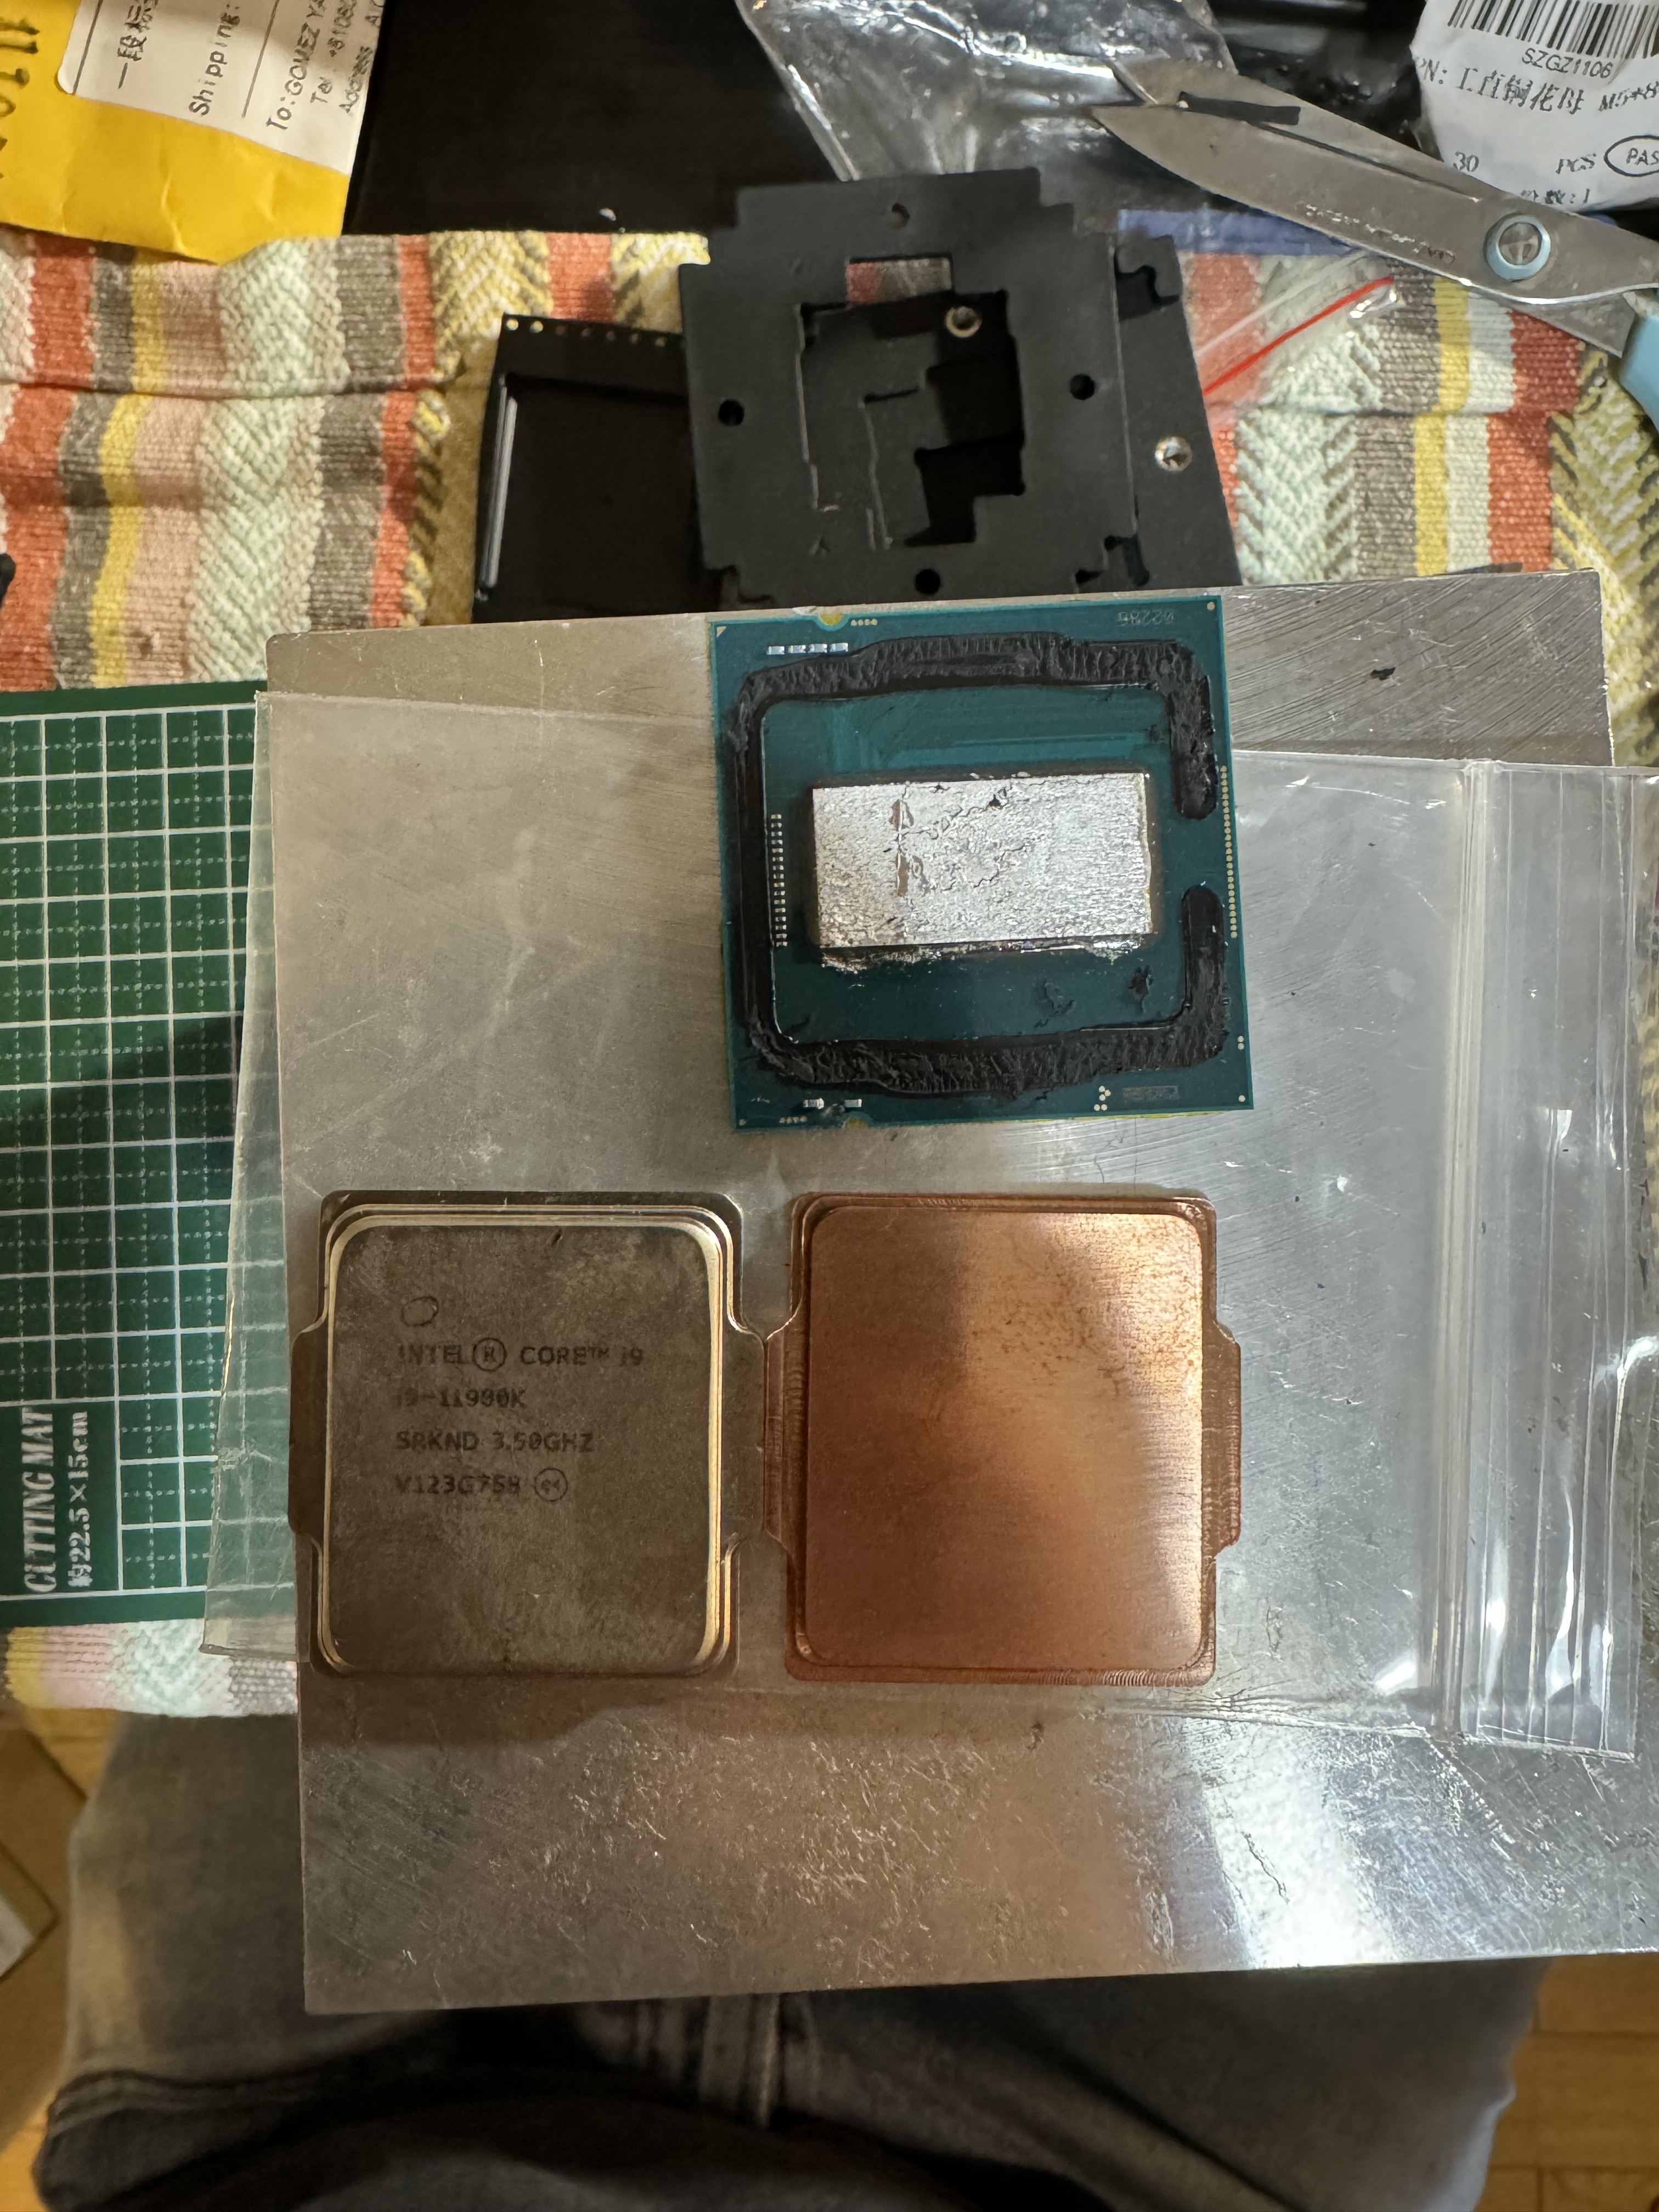
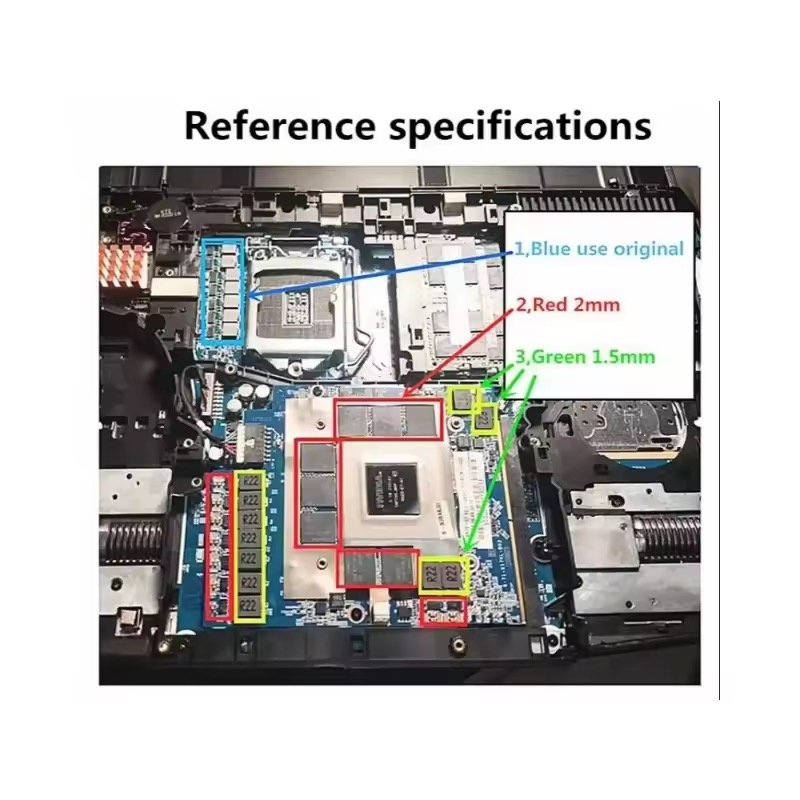
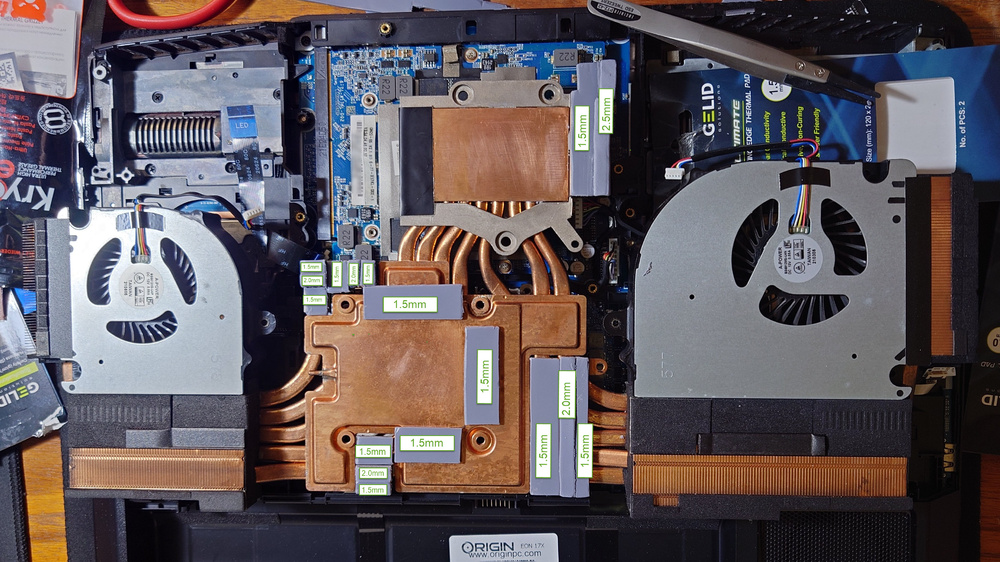
Hi there is already a FORUM specially for that laptop, it has all the necessary Answers and Question you are looking for. I can give you some advice. 1- Proper thermal Pad size and well clean polished heatsink. (You can use PTM7950 for GPU and CPU only, very efficient) 2- Use a copper shim of 0.5mm under the GPU die, it has a kind of a small gap that thermal paste cannot properly cover. Use thermal paste on both side to the copper shim Or PTM7950 thermal pad. 3- BUY a Water-cooler or make your own (eBay or Aliexpress) for overclocking is necessary. 4- last, you can delid your CPU with better Copper die or use the same DIE change the internal thermalpaste from factory, Intel thermal paste is not that good, use Liquid Metal from thermal grizzly. (WARNING: Very dangerous to do, can break your CPU) For more question please follow the official Forum.


-
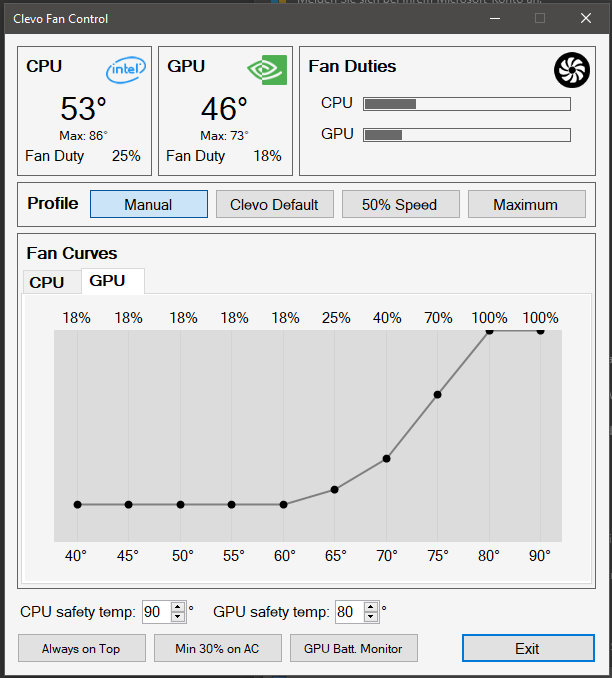
Hi @strijrator Were you able to control the laptop’s fans with this fan control software?: https://github.com/djsubtronic/ClevoFanControl Yes I have use it, it works relatively fine. Had to apply and test it a couple of time to see it was working at the set curves. Also, I have found the app in the microsoft store that comes with the control center to control the laptop’s rgb, but I don’t know if it works without the control. I didnt know AppStore had a Control Center for RGB. Then I should try and test it. Thank you for the Information.
-
Hi @strijrator Man I wish I knew another software to control the RGB on the laptop, ”control center” does not work well so I tried many other Clevo vendors software and yeah, the Overclock settings and Fans control are mess up, rgbopen does not work well for me so I kind of gave up, left my laptop without it. I am thinking to search again, see some other forums if anyone has manage to get a fix. I don’t know if is because this is Origin laptop mixed with XMG bios then the software cannot find the right device ID. Something does not match or their software is terrible? If I find anything I will post.
-
Hi @JuliusCesare I see you have tested all memories. That behavior is really stranger, does not pass the POST🤔, I heard that whenever you make any hardware changes you should also hard reset the BIOS (Nvram). Try one memory at the time and the reset NVRAM or BIOS and see if works. I think there is also a sequence when installing memories, should be 1 & 3 (2x memories) and 2&4 (if all memories are installed) I guess that’s the order. Hard reset or NVRAM Reset - Yes that’s basically it, taking out all the battery, RTC battery and ac adapter for few seconds or minutes but it is better if you press the power button while all the battery and AC Power adapter is unplugged it will ensure that all that energy it was drain out, that will reset for sure the nvram. I don’t know any other way. I hope it helps.
-
@JuliusCesare I see , so couldn’t be that your memory are getting bad over time? Or the ram pins are dirty? Have you tried in your known good slot the others memories? I hope is not the motherboard getting bad, have you seen any sign of corrosion or mold or white build spots (from water or moisture) near the ram slots? Or anywhere in the motherboard? Have you tried to do a hard reset or load your BIOS configuration to default on your laptop and see if that helps?
-
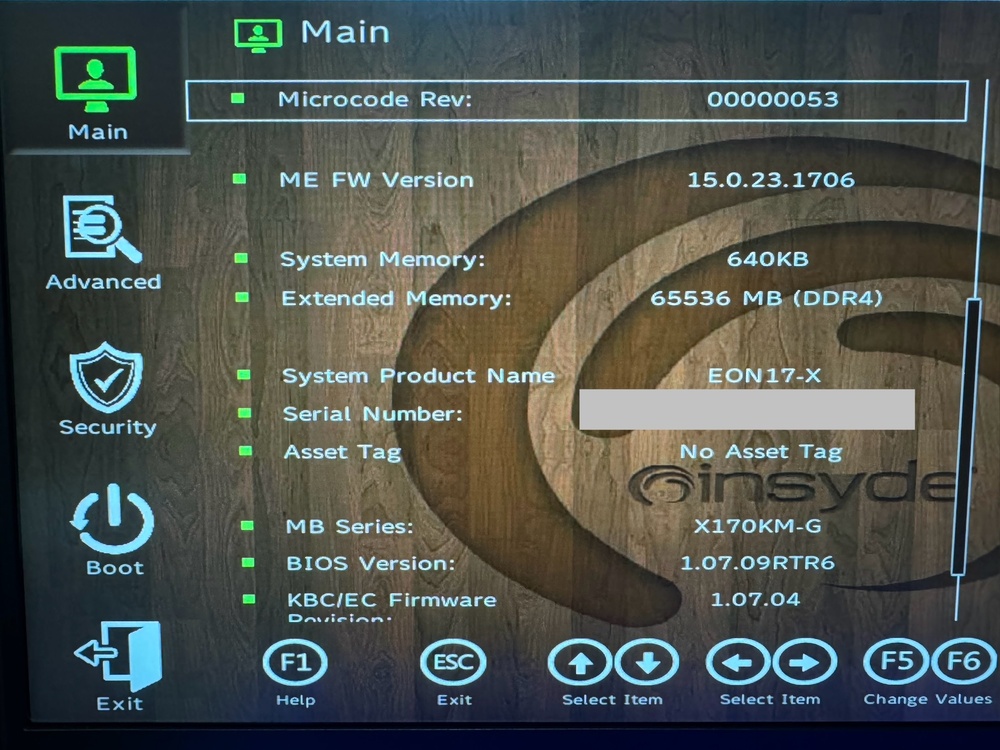
Hi @JuliusCesare Sorry for the late reply. I see you have flashed your Bios with XMG 1.07.09RTR6, sorry I misread your post, so you even had flashed the BIOS #2 of XMG, I haven’t had any issues with my memory rams, I use only 2 at the moment that are at the bottom case. My laptop is from ORIGIN, had not trouble when flashing, not problems with drivers, everything was smooth. I use Kingston Fury Impact 3200mhz Memory rams, seems very compatible with the system, I will avoid using different brands inside the systems, since mixed rams can create conflict that’s if you have. About the UNLOCKED BIOS there is not any unlocker program or application, I have done it manually by modifying it after windows was installed. It has to be down when you have already installed windows and have your laptop fully equipped with rams, ssd etc. otherwise the Bios locked menus won’t appear. Is a tricky BIOS, I wanted to modify the BIOS update to have the MENU already unlocked so when you update your Bios you will not need to edit manually the menu strings but for some reasons those keys menus aren’t there. I will leave you the post where I made a small instruction on how to unlocked it, lucky XMG Bios aren’t region locked you can make full dump of your Bios. Read carefully if you wish to unlocked it, if you have any questions let me know.
-
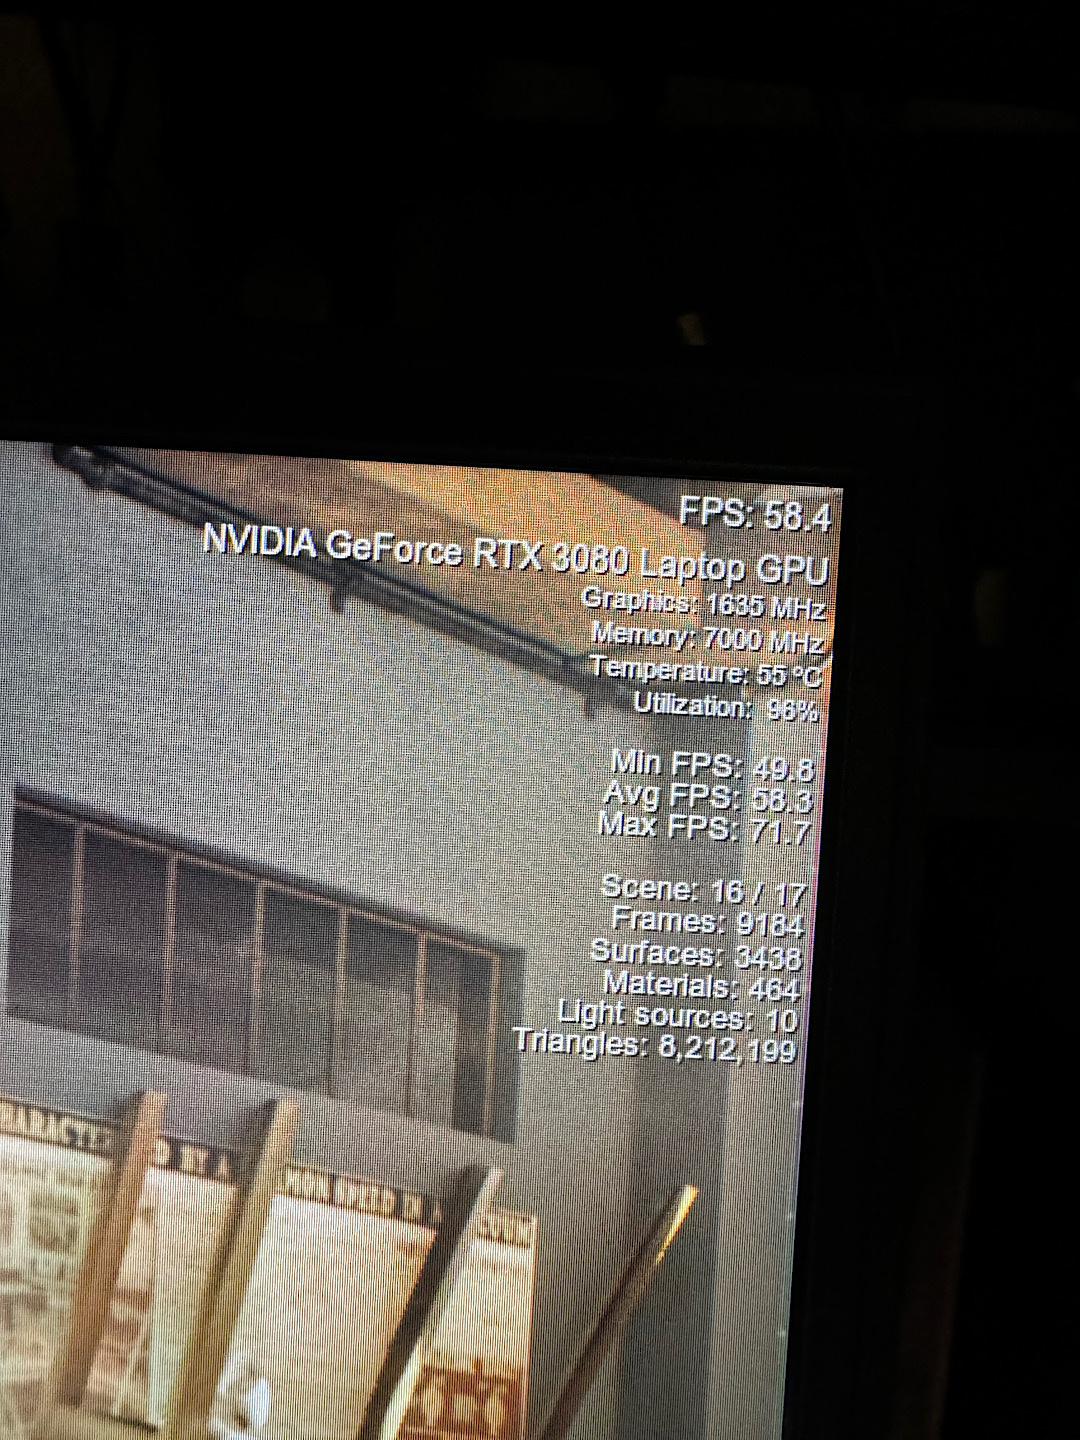
Hi @JuliusCesare I have never tried doing a offline windows reset before, crashes when doing so could be some missing files or corruption. Try to do windows scan sfc /scannow, chkdsk, or files system checker Running DISM. Windows does make the CPU fans or GPU go to max speed when it crash, even on games. But I think 80c on CPU or 70c on GPU on quiet mode is high, I run on max settings and overclock and of course, this CPU model is terrible was born to be hot even on water cooling, mine gets around 80c to 90c with 4.9ghz and max power consuming 200w. The GPU on benchmarks with little tweaks (cause too much tweaking makes it crash) hits 50c to 60c. It has low temp even without watercoolers. If I am not wrong running without watercooler on high performance my clock is around 3.9ghz to 4.0 and hits around 80c, the GPU stays around 60c if I am not wrong without watercooler. again I feel that making the proper seating of the thermal pads or thermal paste and the heatsink is really a must. You will have more stability in the system during the peaks, there is always those high consumption on the system that makes everything crash. My system is ORIGIN X170KMG with XMG BIOS 1.07.09RTR6 (this version of the Bios makes good compatibility of the memory ram for 2 so-dimms I think was for the bottom slot, can run at 3200mhz not problem and any other BIOS from other brands, I use Kingston Memories with auto XMP. There is another version for 4 memory compatibility to run at max speed, I think you know that Intel didn’t help together with Clevo to properly build a system were the 4 dimms could be run at MAX speed in laptops, I think if 4 memories are placed will always stay at 2600mhz if I am not wrong, but I think there is not comparability issues to run it like that. Besides many say that the XMG has the most stable BIOS so far and their drivers too. You can give it a try, if doesn’t suit you can always rollback to your own default Bios that’s of course if you have the Bios update program or you if have made a full backup of your BIOS. I have used Clevos Bios and all of them you can rollback the Bios 1.07.06 1.07.07 1.07.08. I don’t have Origin Bios program installation and I haven’t found one, but at least got a clean backup before anything was installed (you need to flash by a programmer like CH431 Black or FPTW - Intel Flash Programmer Tool for windows, as far as I have experimented these Bios aren’t region locked to flash.) hope you have found a solution if you haven’t try this, I don’t know if this will help. Best of luck.
-
Hi @strijrator I have used the Control Center and is not good and reliable, it works manually but you have to open the control center change some settings save and close an it will work back again. I tried many versions from different brands and it does not work well. I don’t use and will not use it unless there is a fix or update. About the Overclocking system in mine is enable, I have push it to its limits not problem at all, used trottlestop for it (Intel Xtreme Software it does not work properly for overclocking, it does stop functioning at some point, the software shows some errors, I haven’t found any solution). Just need to check that the temps are all on check whole die temps and hotspot temps they should not have too much difference in between (+ - 9c), before I couldn’t do overclock cause of my GPU was suffering from overheat, reaching temper of 70c~80c and shutting down. So now with a copper shim of 0.5mm and thermal paste in between I manage to make proper contact, now the temps on the GPU seats around 50c ~ 60c not shutdowns. Need to check the temps if you wanna overclock, I use a watercooler for it. I use the XMG 1.07.09RTR last version unlocked too (locked or unlocked there is not issues with overclock). Some people have mentioned also about bad memory ram issues, check if is not any hardware problem, CPU too, I used to have a bad CPU once in a Alienware and had many crashes and disabling some options on the BIOS used to help for a while but after was having problem with booting, then replacing the CPU fixed the issue. Try replacing parts until you see stability on your LAPTOP. I hope you find a solution. WATER COOLER (DYI)


-
Hello @crossshot there is a good software that has worked well for me you might find by searching, I think that software link was somewhere in this FORUM but I can’t find it, CLEVO FAN CONTROL • for those who has crashes and problems with the SSD is the PCIE4 slot? It is common to overheat like crazy and random crashes and freezing system occurs, to stop that try to put some good heat sink or put a cooler pad under, it does stops those crashes. The CPU if is the 11900k loves to overheat or if the PCIE4 slot is populated that slot heats up quite a lot. Is an Intel issue not the laptop. Is sad that precisely that CPU is horrible, the 10900k it can better in comparison. Proper cooling on this system it has being the mainly issue for me when crashing. The heatsink seating and fitting is also a big issue so you can find on the forum the right pad size. I hope that helps someone.
-
Hi @strijrator I see so your laptop conditions where kind of similar to mine when acquiring it. I also have use the latest NVIDIA driver with NVcleaninstall, so I think it shouldn’t be the issue either. About updating the EC alone without the Bios is something I have never tried, I am not sure how will this affect the laptop operation and system, but it could be a good place to start and see if that can fix your issue. By the way I have downgrade it my laptop to older bios version with original EC version and I had no issues. About the drivers I am using XMG ones, you did mention as well that some people had problems with the other SSD slot populated with 11th gen CPU, in my case I am only using one SSD 2TB (on pcie4.0 port the one that is separated from the rest) I haven’t yet got other SSD slots populated, I am only use external hard drive for saving data, maybe trying to remove them one by one could show us if is a bad slot or SSD connected. Wondering if is hardware conflict? Have you also tried unplugging almost all devices on your laptop and running with few plugged ? I think definitely we will find out what’s wrong with the laptop. (Sorry if I am already mentioning some troubleshoot that you have already tried, just ignore it)
-
Hi @strijrator Sorry to ask, is this like a second hand laptop? Had windows installed already? Did it shutdown abruptly or did Windows show a blue screen of death? Also, did you use Windows 10 or Windows 11 with this laptop? My laptop seems to shut down randomly but only when I play a game. Sometimes, it will shut down after a few hours. Other times it only takes 10-20 minutes for it to shut down. When I am web browsing or idling, the system seems stable. - Shutting down was on SSD overheat blue screen, or freezing too. - crashing was on games and graphics benchmarks when overclocking the GPU and bad thermal application (overheat). Finding the good balance it was fine. - CPU also some crashing when doing some undervolt. Setting the offset to -90mV to 80mV was fine. I only use windows 10 I don’t like windows11, comes with a lot of issues, I heard so many drivers issues and so many used resources. By the looks how you describe your system behavior kind of feels like the GPU might be the culprit (getting bad) or could be just bad drivers. My temperatures look fine. The games I play do not load the GPU fully, so it hovers around 60-70c. The same is for the CPU. I recently put a heatsink on my OS SSD so the drive's controller temperature is in the 50-60s while the NAND is in the 40-50s. Samsung 990 pro runs very hot, but I think these temperatures are still safe. - Yeah I do also have Samsung pro 990 pro, they do run hot, I am also using a heatsink but seems a bad one, is not that cool is about 60c and can reach 80c easily, need a better heatsink. If the SSD goes over 80c is naturally a shutdown or crash, does not handle well high temps. I have setup a fan under just for the SSD, no more crash and shutdowns. I did have an undervolt, but I am running stock settings now. Overclocking is enabled in my BIOS, though. Maybe I should try disabling that setting. I also have unlocked my BIOS. Maybe relocking it or setting it to default settings will fix the issue. I really have not changed many settings even with the unlocked BIOS, though. I am guessing you also unlocked your BIOS? Have you changed a lot of BIOS settings? - yes I have mess up a lot with the BIOS (different versions, Clevo, Origin and XMG, not issues flashing those BIOS and using) but only have left enabled few things(it is unlocked) overclock enable and XMP, I don’t use Intel xtreme (doesn’t work I don’t know why) I don’t use control center (is limited for overclock) I could overclock directly from the BIOS but I instead use “Throttlestop” goes straight to the point, sometimes I need a 1 time reboot, I don’t keep the changes on save, so every time I start the laptop is on default. I wonder if the Control Center is the cause of the shutdowns. I think I'm going to try to dual boot Windows 11 along my main Windows 10 install. However, I'm not going to install the Control Center on the Windows 11 install. - I think it might not be, it wasn't on my case, I could pretty much run anything without issues, has it flaws I can’t deny it. But who knows. I'm going to try disabling c-states completely to see if that solves the issue. Though, it really seems like a BIOS or EC firmware is at fault from the random shut downs. I might try XMG's latest EC, but I hope it doesn't cause incompatibilities since I am using Origin's stock BIOS. - You can try and see, I have left C-states on and off when doing overclock. Had no issues with c-states. the original EC had not issues on my laptop, worst is that I one time flashed the latest XMG 1.09 Bios to my laptop without updating the EC and it was running normal. I later did upgrade it which also didn’t see any difference or effect but I think this should be update it together. It is really strange how some of these laptops seem to have this issue but others do not. If you look at some of the forum members on this thread, they seem to have the same issue as me. - yes is kind of crazy, but I think if you get a 2nd hand laptop it might come with a lot issues(just my thoughts) where previous owners might had pushed this laptop to the limits, on my case my laptop was almost new (casing and motherboard), got only GPU and CPU 2nd hand from good sellers, luckily they were good. Also, did you ever get any WHEA errors in event viewer about a corrected hardware error or something? I used to get a lot of them, but I disabled "native pcie enable" in the BIOS and the issue seems fixed. - Never got those, I don’t think I ever had any issues with “native PCIE” I have use the laptop on its default settings plus my own settings. Anyway, thank you very much for the help so far. This laptop has been a whole roller coaster to deal with, especially after I upgraded its ram. I should also mention that I ran memtest86 with my 64gb kit that was installed under the keyboard and it threw like 884 errors 🙃. I'm now using the original 16gb kit under the bottom cover. Running memtest86 with this ram showed no errors though that did not stop the random shut downs. I see so there is still some other issues. I hope you can clear up all of them one by one. Try maybe using Intel Graphics “Iris”? Run some games if it does, can be enable with the unlocked menu, see if does crash, I don’t know how powerful is that built in Intel graphic, if it can run the same games you have. I would also try running some MATS/ MODS MEMORY test for the GPU if there is anything wrong with the GPU. There a lot of videos on YouTube explaining how to run that software. Well all the best.
-
Hi @strijrator sorry I couldn’t reply sooner, did you manage to fix the problem? do you recall when the problem started? My laptop model is the ORIGIN 1.08 but updated to XMG 1.09 BIOS, I already posted before about shutdown issues but it was mostly due to overheating. My laptop right now has no issues and runs smoothly. that heatsink is massive for any laptop I have ever seen, my first problem was due bad contact between the heatsink and the GPU underload it used to crash, I can’t recall any shutdowns with the GPU, but I had shutdowns when SSD was over 70~80c, the PCIE4.0 SSD models are hotter than previous, draws more power or are build different, when it wasn’t cooling well enough it use to shutdown any time. I did used a 0.5 mm Copper Shim for my GPU, before on heavy load it was about 80c to 90c, now it seats around 50c to 60c. Check your temperatures, for GPU hotspot, CPU and SSD. I had issue just with over heat. Use HWINFO to see all kind of sensors temp. if you are doing any sort of overclock try to reset the BIOS to default settings. By the way I don’t use the Control Center although I want to for the RBG, is really mess up, when you use the power options on High Performance Mode on Bios is set up as Entertainment Mode (contradicts what’s setup for), fans also don’t act well, sometimes revo like crazy when windows is up, to stop it I had to go to control center and change the fan profile one time and put it back and it will stop. This was only the issues I had with my laptop. All the best.
-
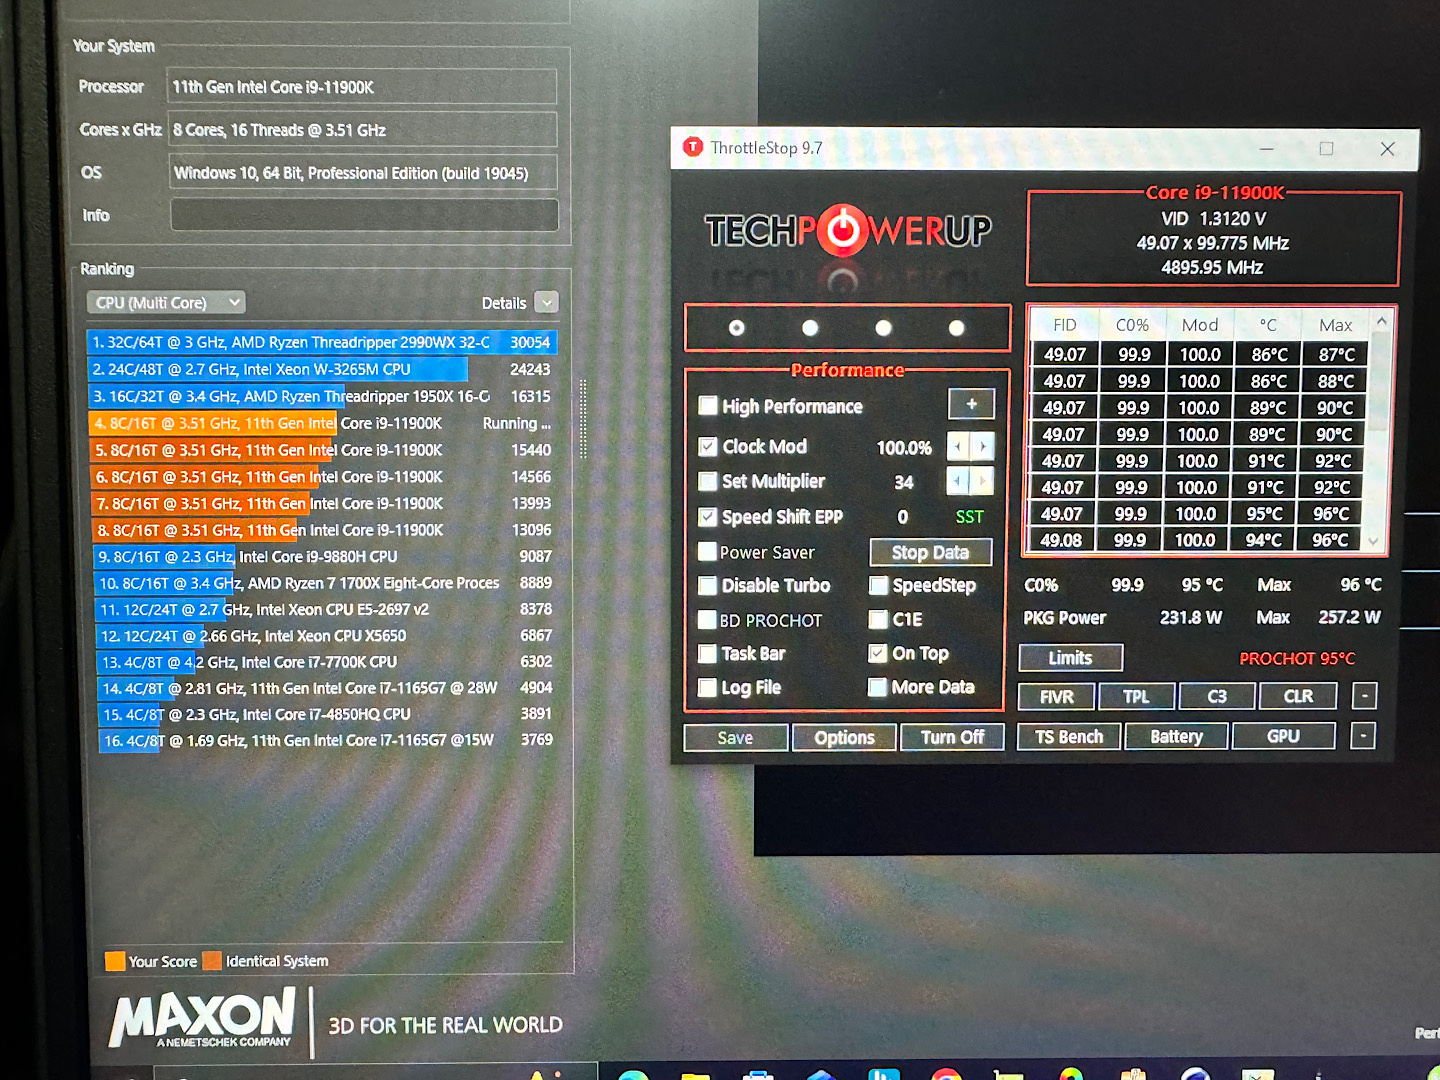
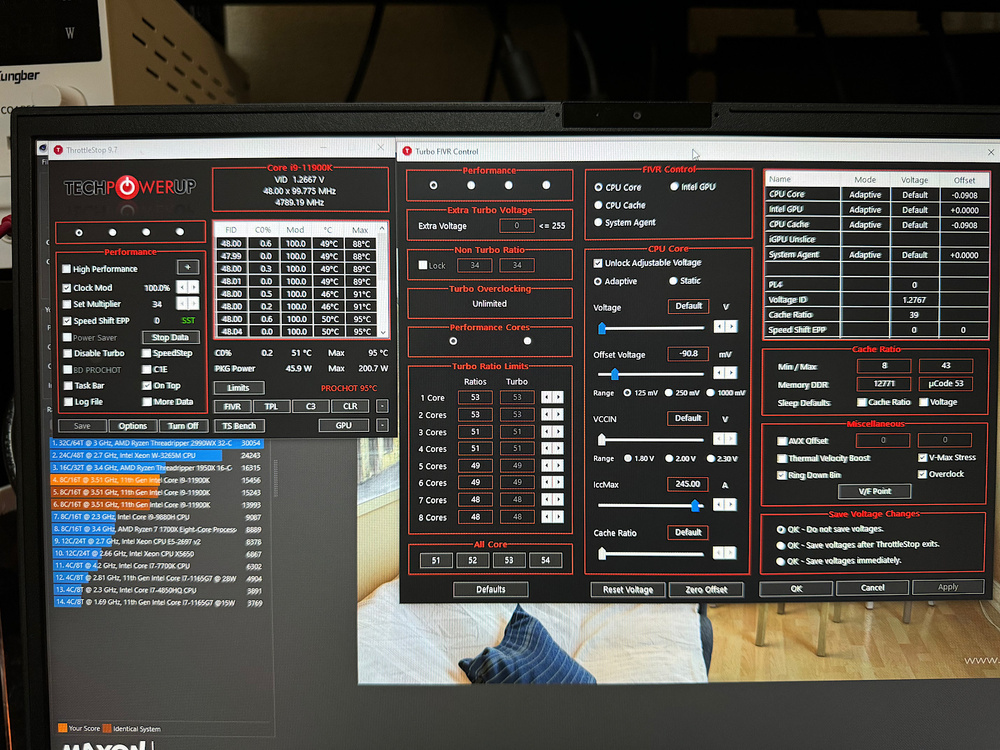
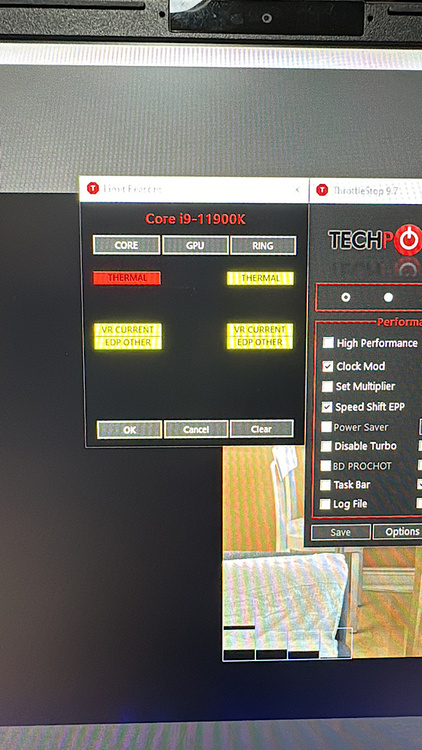
Hi @strijrator I have seen your setup, sorry to say this but if is the i9 11900k drawing 70W something must be wrong, is a bit far from the TDP which is 125w. Are you sure to be running on the right settings? This CPU can handle around 180w to 200w on turbo boost. Here my settings when I do overclock, but of course it has to be running on point the coolers and the temps on check.
-
Hi @strijrator I see, well let me answer. Did you have any issues with ram when you were on the stock Origin bios? It seems you were able to run 64gb at 3200 with an 11900k with no problems, right? You are also using the gear 1 bios, I assume? I am also on an 11900k. - I mostly did not have any errors or problems on the bottom ram slot 1 & 3 even on stock Bios (1.07.08TOPC) but did have some crashes at first, it was due to GPU overheat and overclock, the GPU thermal paste was not enough and it had a big gap, so it got solve by the copper shim 0.5mm. that's what I could realize. I am using Kingston FURY impact CL20 64GB RAMS which has automatic XPM runs smoothly without tweaking or extra settings, as long the laptop supports XMP it will be automatically enabled, I haven't touch the timings until I got updated the BIOS to 1.07.09RTR6, but messing around didn't give any extra boost and some timings mess-up my laptop stability, so right now is on default and XMP enabled, is running solid. I really have to see what time tables are set when on auto. I will let you know. Yes I updated the BIOS #1: 1.07.09RTR6 just for 2 memory slot. Yes I am also using 11900k CPU. Honestly, I am mostly just concerned with getting my ram to run in slots 1 and 3 at its rated spec (3200mhz CL 22 1.2V). I might not even try unlocking my current bios. If you look at my post that I made earlier in this thread, I detail the issues I was having with my ram. Basically, I am having instability running a G. Skill 64gb (2x32) kit at its rated speed of 3200mhz CL 22 1.2V in slots 1 and 3. When I try to put one stick at a time, I still have instability, which is strange. Maybe it is a problem with the ram itself, but w++hen I put the ram in slots 2 and 4, the system is stable, but the ram runs at 2667mhz CL19. Also, I don't think the stock Origin bios allows ram capacities greater than 64gb since when I put the 64gb kit and my original 16gb kit together, the system would turn on but only display a black screen and eventually turn back off. giltheone has this same laptop and was having similar issues to me. He posted about his issue in this thread no too long ago. - I personally haven't tried yet the other slots, I haven't seen what the speed clocks are on those slots. BUT XMG said they have managed to make it run on high clock with all the slots populated. Since I have not plans on using 128GB yet I have left it alone. I also used 2 slots because it is say that is faster faster than 4 slot. I am currently on Origin bios 1.07.08TOPC and EC 1.07.04. Since I want to be sure, going straight from this bios to the latest XMG one should be fine? Also, would I need to update my EC to XMG's latest one afterwards? I am also guessing that I don't have to update the ME firmware (its version can be seen under the bios and EC version in the bios). I probably need to backup my current bios since I cannot find any archive of it anywhere in case the XMG bios is unstable or I want to go back. Oddly enough, it is not even on Origin's driver support site. -Yeah Origin doesn't have those BIOS files on their website, only Clevo and XMG, but is only the update not full BIOS, is better and recommended to make back up of your own Bios, I made a Backup of my BIOS even before it was build and powered on, I believe is a clean ORIGIN BIOS, I did compare it before and after installing all the rest parts and windows on it. I forgot once to updated the EC and I didn't have any issues, so I did updated the EC later, I couldn't see any difference. On this thread you can find most of the Bios for Clevo model (I just cannot remember what was the vendors name). I have thought about tuning my ram to run at 2933mhz CL 21 or slower so I can try to run the ram in slots 1 and 3 without stability issues. However, I believe the only way to do this is through an unlocked bios. At the beginning of this thread, electrosoft said that the bios unlocker provided by ViktorV will work with most bios versions up to 1.07.08, so I'm guessing it could work with my stock Origin bios? If not, I guess I will have to find a bios from another vendor that is version 1.07.07. I have also heard of customizing ram speed and latency through Thaiphoon Burner, but apparently the ability to that is locked behind a paywall. Yes it does works for ORIGIN 1.07.08 I have tested it, if at first you don't see the hid99den menus you just have to : load optimal configurations or defaul settings on the Bios and it will appear. Whether I decide to flash my bios to the XMG one or unlock it in its current state, I just want to be totally sure not to brick my system. - I believe it wont get bricked unless the files are corrupt, wrong USB memory format, wrong BIOS, energy shortage during update. I always have a programmer just in case (CH431A). If you do upgrade your bios to XMG read carefully their instructions, you might need to flash it twice to properly take effect they said, is a DESKOT laptop combination, so somehow not everything starts well on the first time, a 2nd reflash it might needed. I think I will try unlocking the bios with ViktorV's script first and manually adjusting ram speed. Hopefully I can just select another JEDEC profile to simplify things. -Thats pretty safe, it works very well, I had not issues using it. I hope does works well for you. Interestingly, another user on this thread stated that 64gb at 3200mhz will not work on this laptop since it is too much strain on the IMC. It is also advised in the manual to run ram in slots 1 and 3 first and then 2 and 4. However, unlike slots 1 and 3, slots 2 and 4 seem to be stable for me at least, even though they downclock the ram to 2667mhz. Ram with this laptop is definitely confusing to say the least. Yeah those issues with those RAMS on the slot 1 &3 compatibilities are a bit weird. It is said that 1 and 3 are faster and better. probably the laptop cannot handle a 22CL Memory RAM, mine is 20CL. or G-Skill Ripjaws memory rams aren't very stable? what could it be? Anyway, I really appreciate your help and response! 😃 I have been trying to figure this all out for quite a while now. You are welcome, sorry if I couldn't give you all the answers you needed, I hope you can find the solution to your Laptop. My laptop gave me more issues with overheat than other, even my SSD too gave BSOD blue screen, was getting hot, they said PCIE 4.0 SSD are hotter than their predecessors, over 60c I was getting instability issues, after fixing the overheat issues on the SSD never again was crashing. (btw I have a SAMSUNG 990M 2TB, I was scared because later after a knew they had a firmware issue with their lifespan, the lifespan used to drop quick, but on my case I don't see is getting degraded the lifespan or condition. almost full with a year and still at 100% good condition) I guess SAMSUNG got it fix before I got mine.
-
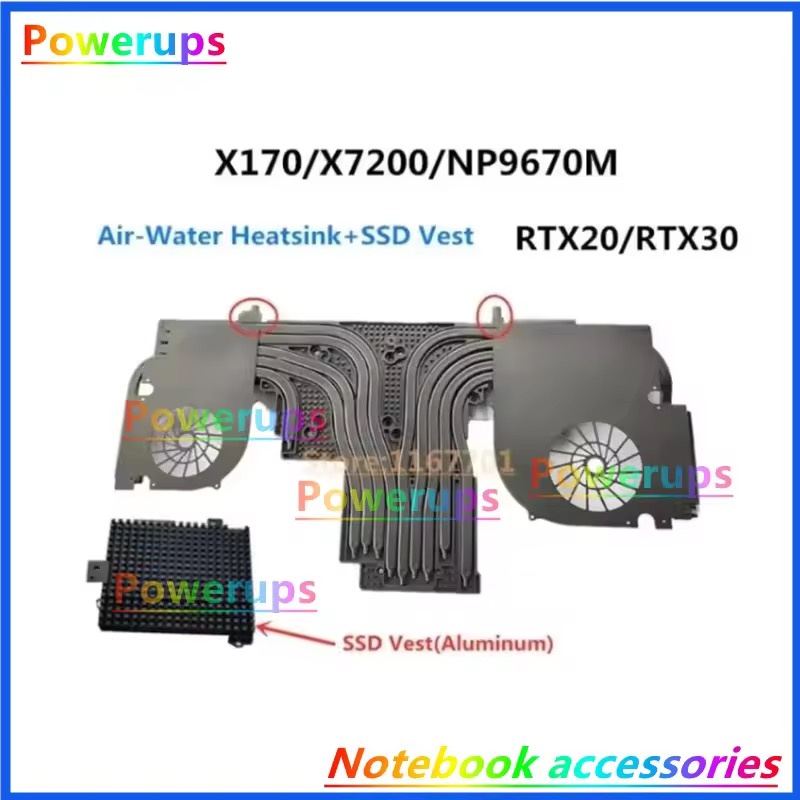
Hi @momo25 Sorry to heard that, I guess whoever made that cooling water/air heatsink it was not perfect at all, probably every area is uneven, Is a bit hard to trust the quality control of that store. That’s why before buying it I read about others experiences, it wasn’t worth I felt, the air cooling degraded a bit, it wasn’t efficient as they said on the comments, the metal used to vent heat was too thick. (To be honest I was really tempted to buy it, did look great and it was less the hassle to make one from scratch or how to make one, but price and efficiency was not on balance.) Yeah even for me too, those copper IHS for 11th gen CPU was gone before I started building my own laptop. I hope you have managed to fix your cooling problems on the laptop. I still feel the original heatsink is far better just needs that extra water cooler pipe. (Sorry for the late reply)
-
Hi @strijrator Yes my Bios was stock when I did upgrade it. About the post you replied to, is for unlocking XMG BIOS, there is not software for unlocking it so I had to do it manually if you have read the post. I guess you know that at the beginning of this thread you can find the software to unlock any BIOS brand if the version is below 1.07.08. I have tested on mine on Origin models, works well. I updated my laptop with XMG Bioses, when you download it you Will get 2 files. The reason for this 2 files is for memory compatibility, if I am not wrong (Gear1 and Gear2, or sort of) one is for laptops with 2 memories populated and the other one is for 4 memories populated. (To my understanding: Intel didn’t collaborate so much to produce a better Bios for x-170km when 4 memories were populated, the speed was always downgraded to 2666mhz and many other issues, so XMG team worked hard and made it work and improved many other things, not like 100% full speed 3200mhz but very close) They said the XMG is much stable compare to other BIOS version, so I think it will better to try it if it solves the Memory issues you are having. Note: you can always revert the Bios update of your Laptops vendor if available, had zero issues, I changed my laptop versions back and forward from 1.07.07 ~ 1.07.09RTR and ORIGIN, CLEVO STYLE, XMG (I mean BIOS from those brands, mine is from ORIGIN vendor) and had no issues. Sorry for my late reply. I hope you have found a way to work things out.
-
Hello Momo25 If you bought this same model of Water cooler from Aliexpress try this measurements. I don’t know if you already figure out. Also if you can since you delided the CPU try to sanded with a thin sander paper, it will create a better surface for contact. tips: I did use a copper shim of 0.5mm for the GPU and applied Arthic thermal paste, my GPU runs at 50c~60c on heavy load and benchmarks. If you open 2 pages back from this post you will see all what I have done to my laptop, I think I also posted what was the thickness of my thermalpads, also other users has posted it You can find those infos, if you look back on the first post of this thread. Best of luck.