

incendery
-
Posts
69 -
Joined
-
Last visited
Content Type
Profiles
Forums
Events
Posts posted by incendery
-
-
7 hours ago, kingofswag187 said:
I got it working as discussed privately! Turns out the VBIOS I was playing around with wasn't compatible with the mutant CPUs, but was fine with retail chips (8700K, G3930, 6700 etc)
interesting! strange the tongfang vbios didn't work with the es CPUs 🤔
-
 1
1
-
-
7 hours ago, cdoublejj said:
holy hell MXM still exists!? a 3080 no less!!!
MXM is quite dead in the consumer space unfortunately 😞 this is a card from the last true DTR clevo with socketed CPU and GPU (X170KM) -
unusual it isn't working with the QTJ1, what style mutant chip was it? one of the IHS ones?
I believe I used Dsanke's 1.05 based bios when I had a QTJ2 running in mine before the heatsink swap
6 hours ago, kingofswag187 said:Unfortunately, the QTJ1 did not seem to end up working out, I believe the adapter it is mounted suffers PCIE incompatibilities with the MXM standard, the seller mentions that it "cannot work for notebooks, desktops only", but the 8700K is still a strong CPU so I am not too fazed!
-
1
-
-
51 minutes ago, MiRaGe said:
The second rig of the signature. 165W 3080 with 220/1600 OC

wow I'm impressed it's stable at +220! what clocks did you see through the run?
-
Wow what a fascinating little device, it will be interesting to hear how it goes 🙂
-
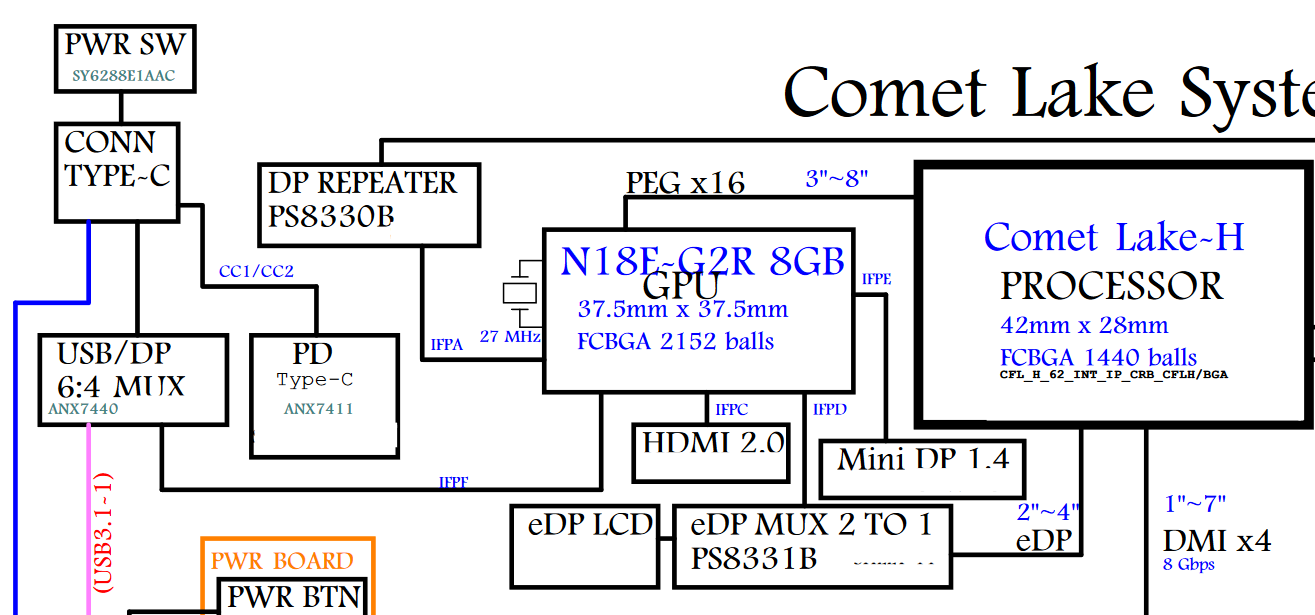
unless I have got the wrong schematic I believe you are mistaken.
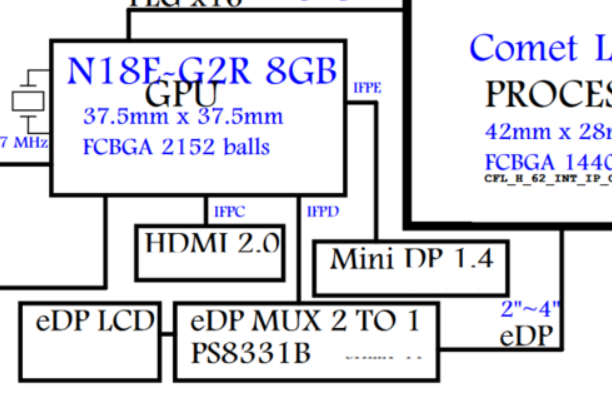
The EDP lane coming from the integrated graphics goes into the EDP MUX, this switches between the DGPU and the IGPU to connect them to the LCD, all other external video connections only connect to the DGPU.
When set to Hybrid the default display will be internal as the default display will be routed through the IGPU (this may be something you can change with a bios that has unlocked option menus?) as for the no display on discrete my guess would be that there is some issue along the way initilizing the GPU past the GOP vbios state without an internal display hooked up, I am admittedly not very knowledgable in that area though so I can only hypothesize.
-
1
-
-
7 hours ago, 6730b said:
Correct, it's for microscopic lines from wiper use. As mentionned, they are totally invisible and un-fealeable ...until a low sun hits from front. The compound's polishing material\particles says size 3 μ, if I get it right = 0,003 mm = polishing to restore clear surface, not remove 'real' scratches, never meant to take a away 1\2 mm of glass :O) Well, maybe if one used 100 liters and polished daily for a few months :O) btw, tested the stuff on some (plastic) protection googles (angle grinder work etc), gave them a second life.
1st impression after windscreen polish is positive, very good amelioration and no ill effects. But have yet to drive into the exact problematic strong low-sun condition, will see if needing a few more rounds of polish.interested to hear how this goes, I have some terrible scratches on the rear window that make it impossible to see through in the right lighting.
-
1
-
-
The mux isn't the issue here as it is only hooked between the internal display, you can't use the integrated graphics externally because it isn't hooked up to it in any way that is why hybrid doesn't work on an external display. I think the issue is the default display output is set to internal for whatever reason when set to dedicated graphics only.
Not to excuse Sager's support which in all likelihood is the cheapest call centre in a country where wages are poor so they can increase profits, but this isn't a direct move to create e-waste as a laptop being used without an internal display connected is an uncommon use case.
it isn't a "fake MUX switch" it is simply a device to switch the display between integrated and dedicated graphics on the fly when using hybrid mode, this is only connected to the internal display connection which is standard on most laptops with dedicated graphics.
-
 1
1
-
-
not sure exactly how or if it would work but I would be thinking of using the dead LCD as a starting point, it's already somewhat of a breakout if you trace the signals 🙂
-
3 hours ago, JQM said:
I rigged up the broken screen and flashlights again to switch to Discrete because I wanted to check on something (if Ctrl+Shift+Win+B, the hotkey to restart your graphics driver, would fix it), and saw that there was an option called "GPU Performance Scaling" that was set to Enabled in my BIOS. I had disabled it, and then... briefly, Windows actually boots and displays. It doesn't last long though. After about a minute, the GPU stops outputting anything and Device Manager reports the usual Code 43, seen via TeamViewer.
I don't understand. If I had a spare screen (because BIOS access is... sometimes necessary, would hate to break it), one thing I'd like to do is see what the screen looks like disassembled, and if there's a PCB or something that it just "needs" for some reason. Weirdly, if I have it set to Discrete, and have the broken screen plugged in the eDP port, outputs fine to my monitor. BIOS, boot screen, Windows, all of it. No Code 43, just works.
looking at the EDP standard you may need to pull HotPlugDetect to 3.3v, I wonder if a display not reporting EDID data would let the GPU work properly too
-
18 hours ago, 1610ftw said:
Not so sure you are that limited thermally as to not make use of a 9900K - it usually is better silicone and you could limit all core speed to not exceed the power uptake of your 8700K which at up to 150W is quite substantial 😄
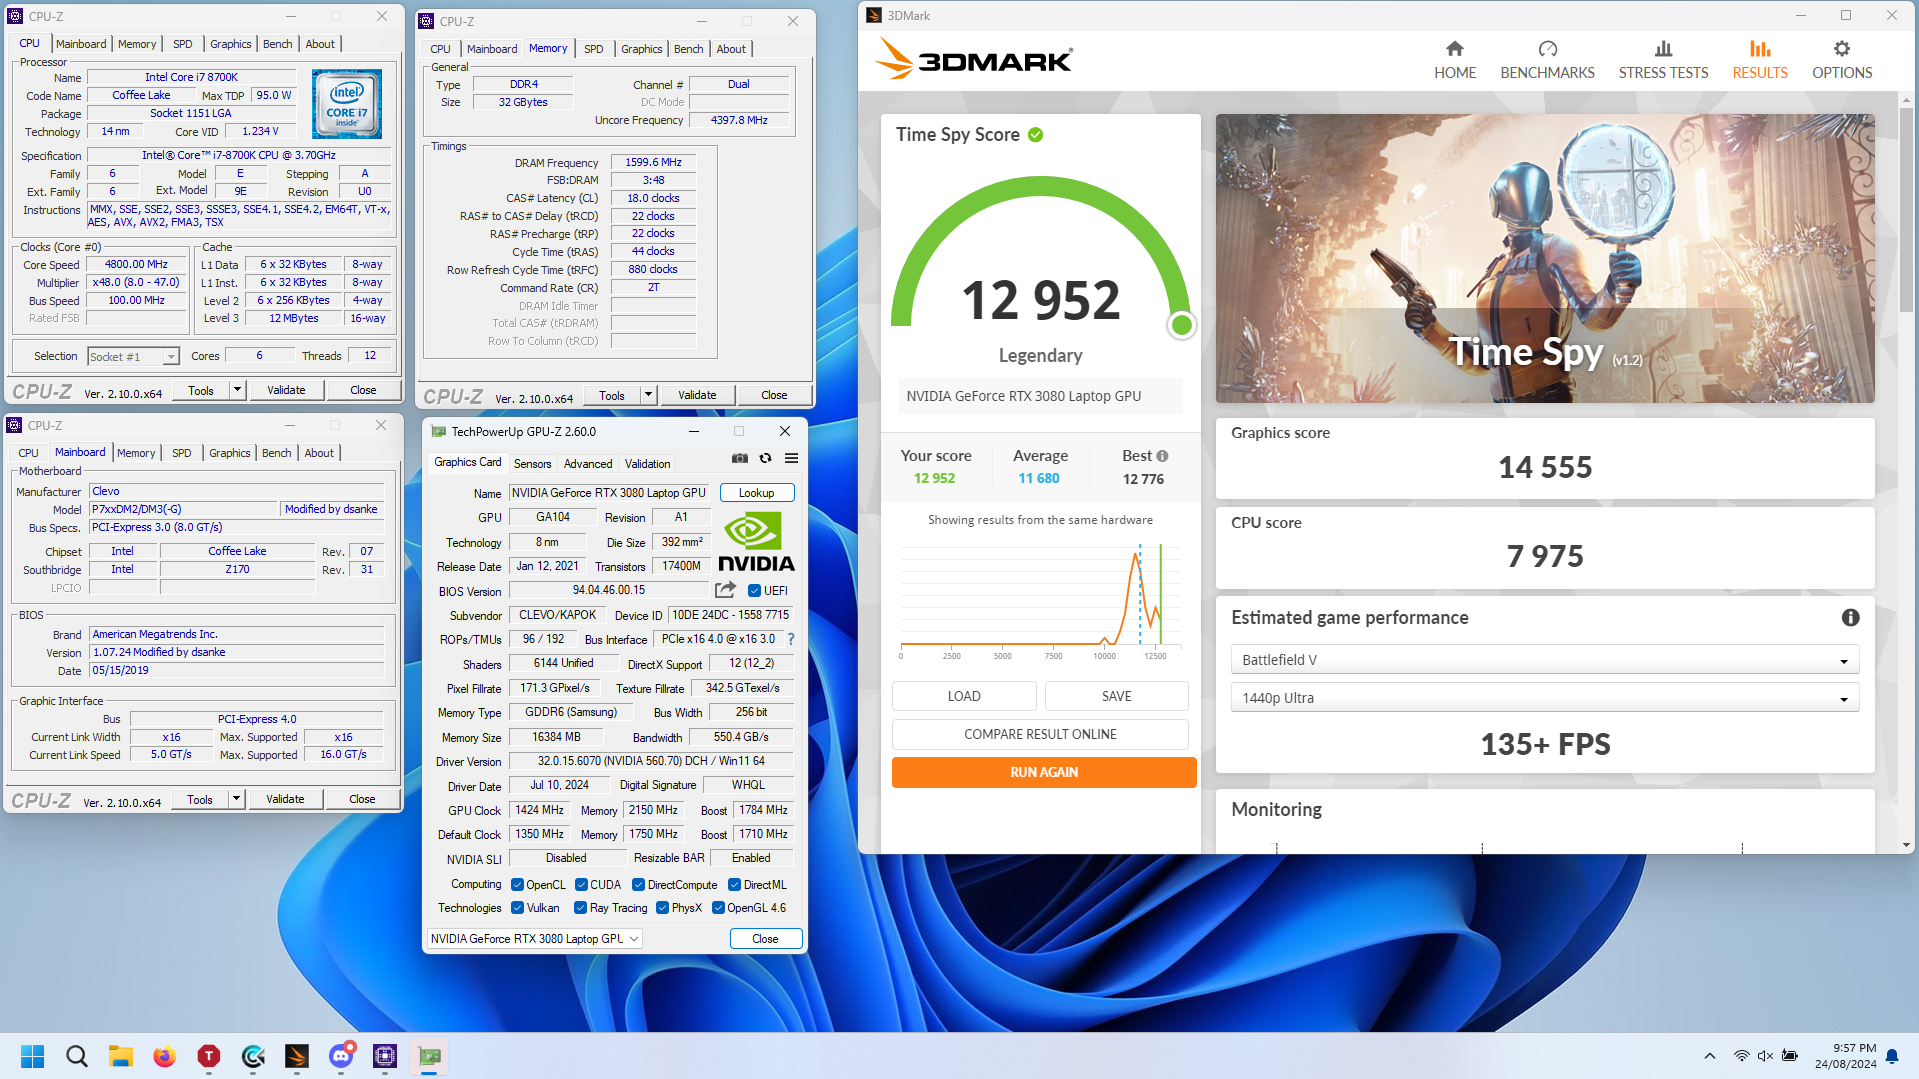
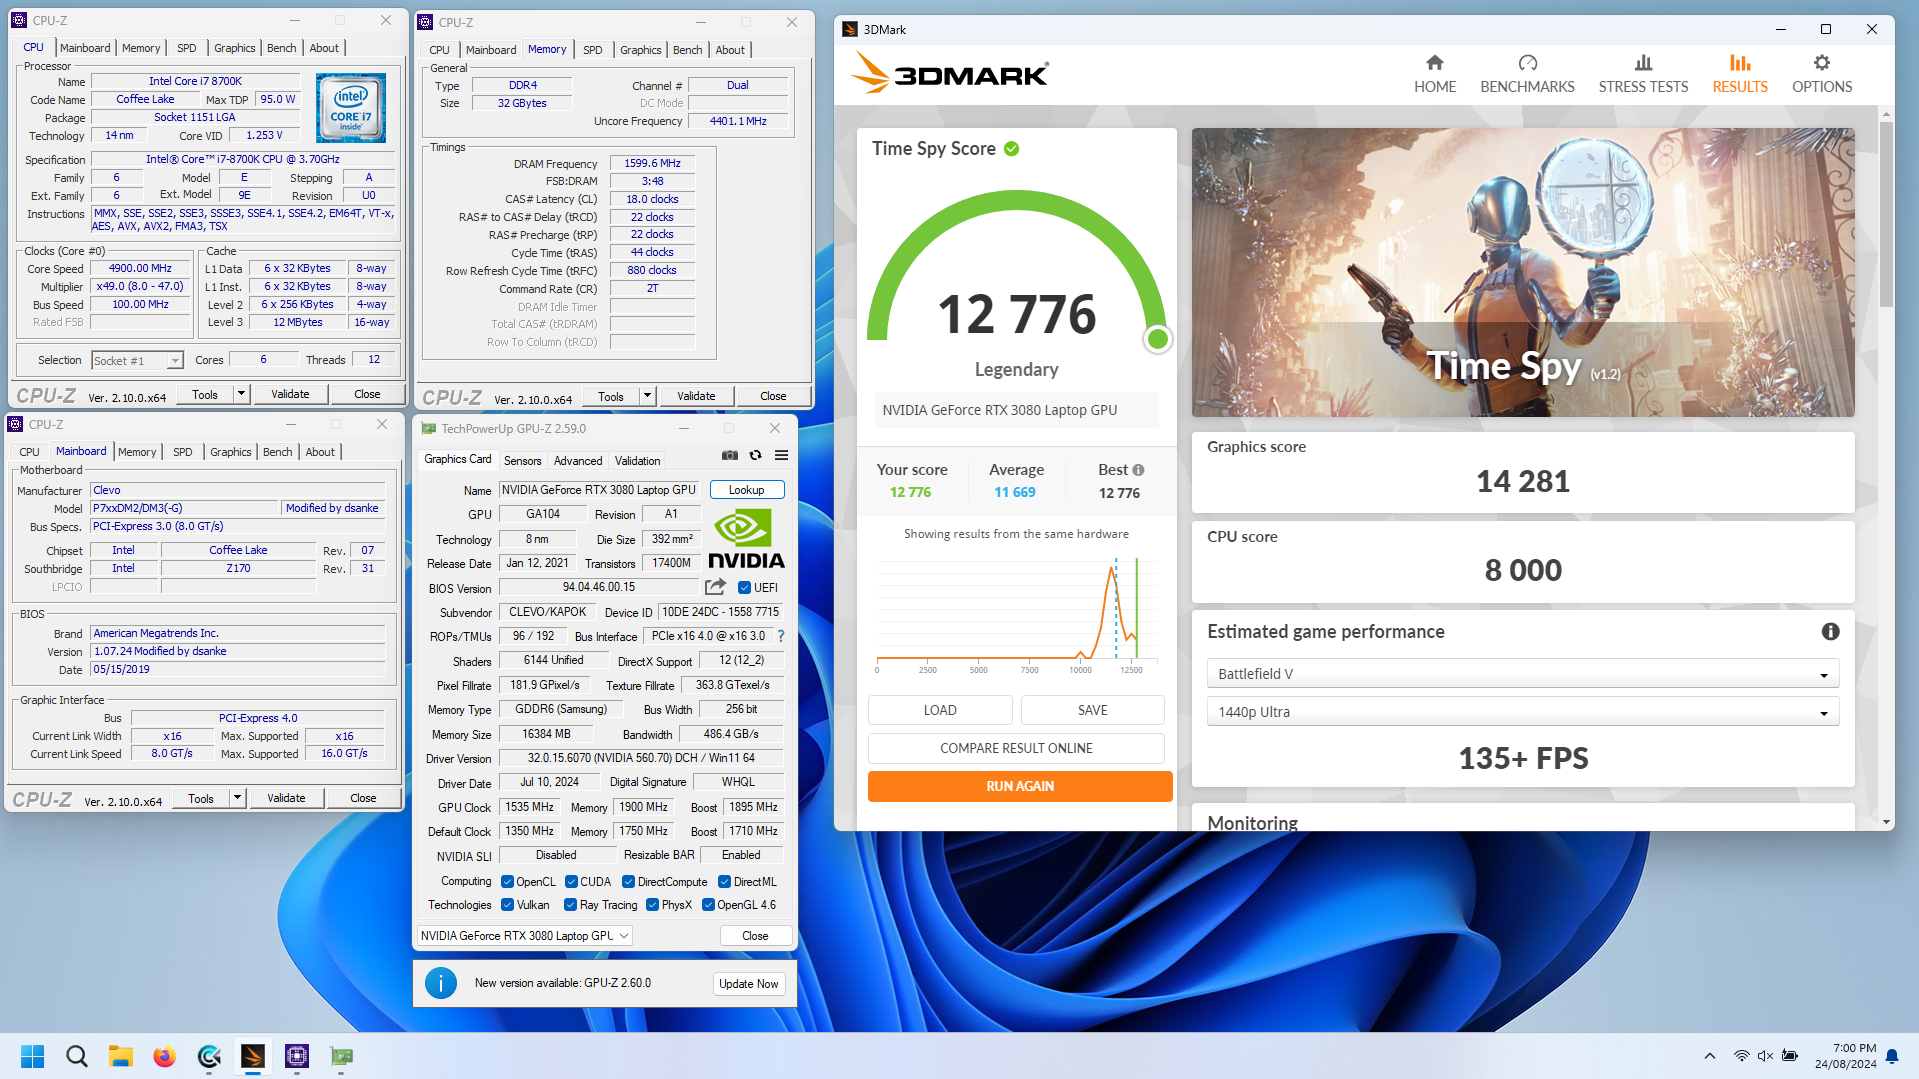
The heatsink for the 20xx and 30xx GPUs looks very nice indeed and I see that you got very good temperatures for the CPU and GPU in your Time Spy run!
Taobao has a bunch of fans. Probably best to get the ones that are supposed to have maximum airflow and if needed reduce their speed.
Awfully tempting with the 9900k... maybe I'll make a bad financial decision sometime in the future and get one 😂
the heatsink is fantastic, the only thing I've changed is using some springs to clamp the CPU instead of just screws as included with the heatsink originally, eventually I plan on soldering copper shims on for the vrms, and memory on the GPU.
I've seen a few different ones on taobao from the same seller who produces the vapour chamber cooler, https://item.taobao.com/item.htm?id=640747471518 not sure exactly which are the most performant but I believe the 51m converted fans seem the "performance" option maybe
-
1
-
-
5 minutes ago, 1610ftw said:
Great job and that CPU score and total score in Time Spy will skyrocket with a 9900K but you know that 😉
Which heatsink did you get from Ali Express?
Thank you :D, and yes I'm aware it would score a fair amount higher with a 9900k 😅I'm thermally limited as is so I'll have to cope with my 8700k
I went with the air only one of these from aliexpress https://www.aliexpress.com/item/4000174372901.html it handles the heat well but I am looking to order some upgraded fans from taobao to try and combat the heat soak-
1
-
-
-
1
-
 1
1
-
-
-
1
-
1
-
-
More tuning, more tweaking
hitting the edge of stability at +185 on the core, tempted to add some more bulk capacitance on the card to see if I can eek out a little more frequency.
(don't worry about the memory I've got better stuff on the way 😁)
http://www.3dmark.com/3dm/116369231?-
3
-
1
-
-
good on you 🙂 always a bit nerve wracking doing it for the first time
seconding what kojack said with the slippery slope 😂
-
2
-
-
it's a bit of an oddball solution but perhaps something like this could work?
https://www.aliexpress.com/i/1005004111527529.html -
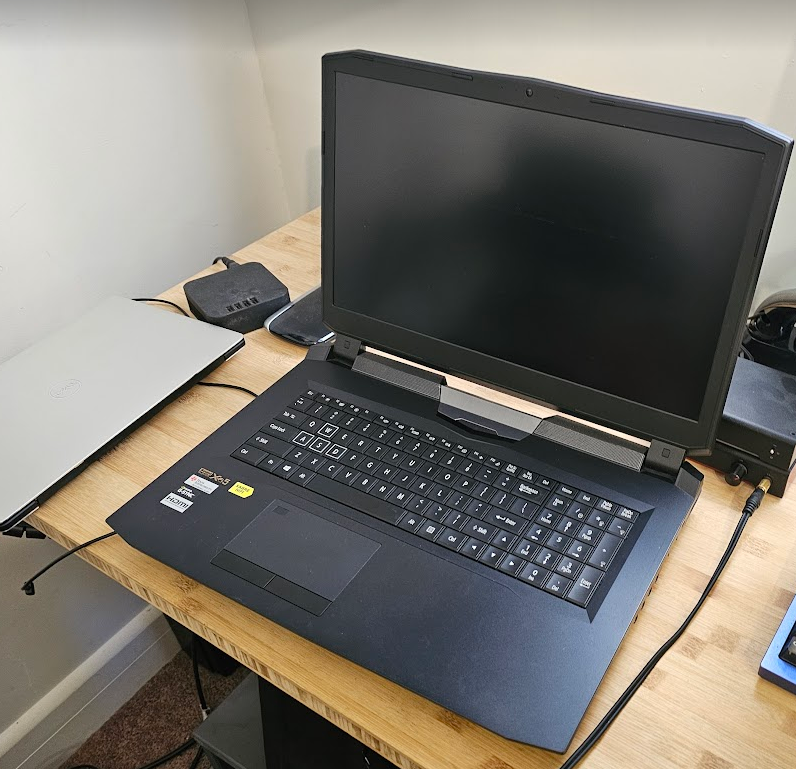
I've posted a little bit about this laptop process but thought it would be best to make a thread to document it here.
current specs:
P775dm3-g
i7 8700k: 4.7ghz -115mv
RTX 3080 16GB (180w shunt modification)
32gb CL18 spectek 2x16
2tb 970 evo + 2tb WD Blue SSD
1080p 60hz panelintel AC8265
Modified Dsanke "P7xxDM_RTX" 1.07 bios to suit
Windows 11
The laptop I started with is a P775DM3-g I picked up for cheap with a 6700k and an unhappy 1060 that would constantly crash and stop outputting to the display.

After finding this thread from a forum member who had bought a 3080mxm for their P775tm1 and documented the process to get it working (and the possibility of making nvidia drivers work without .inf modification which was a priority for me) I decided to order a 3080 for myself.
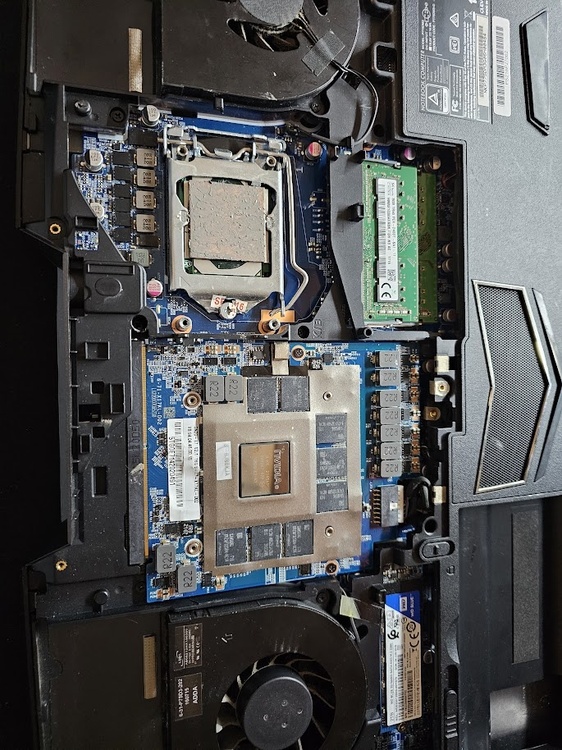
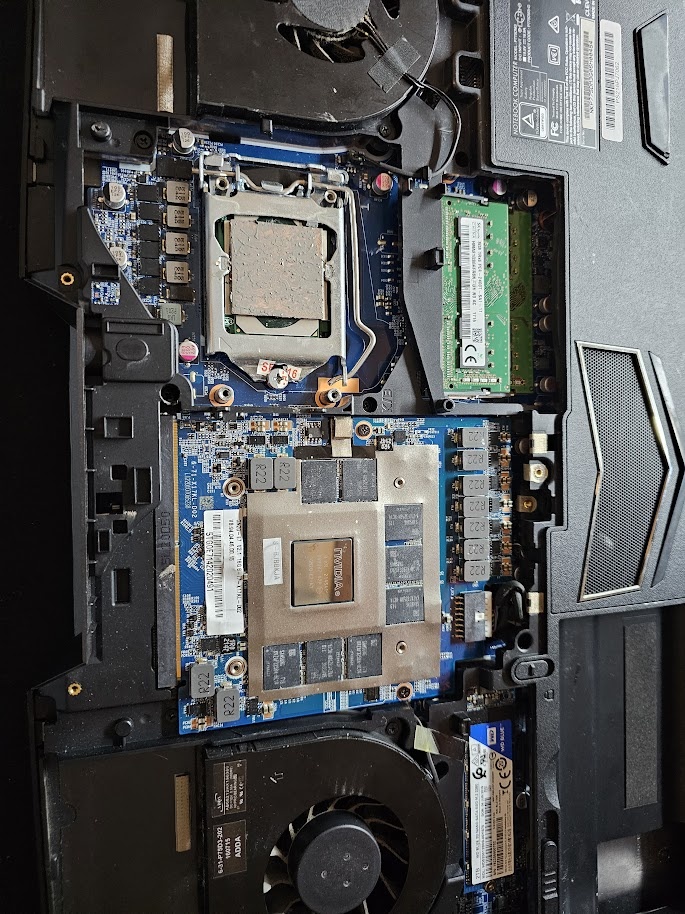
At the time I had a QTJ2 mutant cpu but unfortunately due to the IHS height and the rigidity of the aliexpress customized heatsink I had to go back to the 6700k, This was then upgraded to a delidded 8700k acquired from a friend.
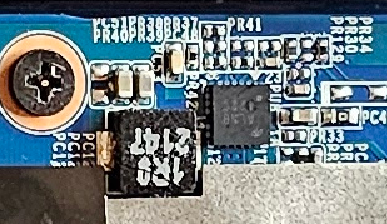
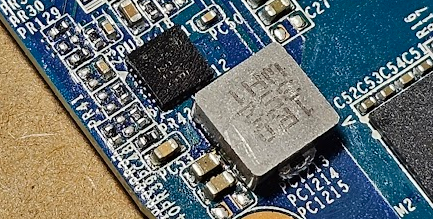
Unfortunately the 3080 was mildly damaged in shipping! A cracked inductor and the external power connector was squished.
in a stroke of luck ebay was helpful with the refund process and I was left with the card in my posession, the connector was an easy fix but the inductor required a bit more effort.
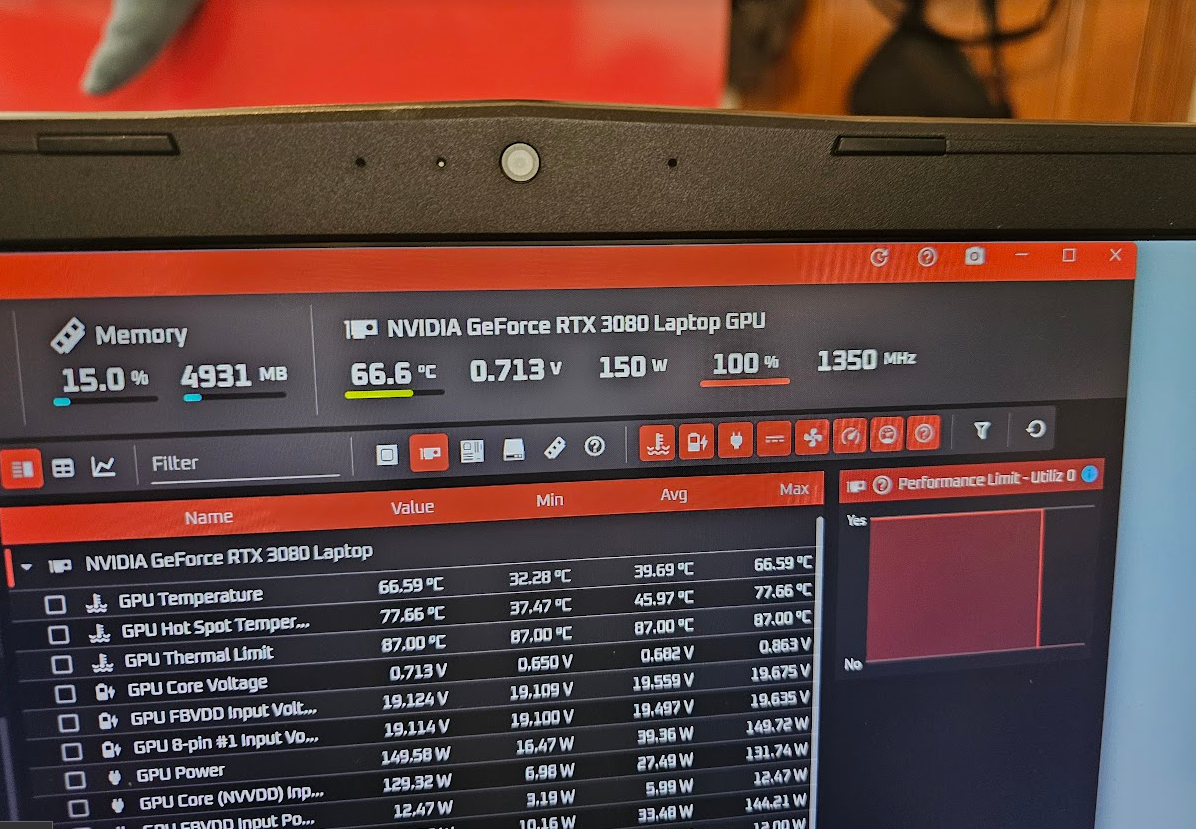
With the parts installed I then worked on the bios going off the details in this comment from forum user srs2236, changed the ID from 7705 (p775) to 7715 (X170KM). Installing the latest Nvidia driver worked without a hitch, power was limited to 150w due to no dynamic boost support (power limit is covered later on), the aliexpress heatsink is amazing at keeping temperatures in check.

With the GPU working fine I began on the CPU, due to some mistakes with mounting pressure and the QTJ2 I had damaged / squished one corner of the socket so needed to lift a section of pins back up by hand (thought for a moment I might have killed the board when I realized what had happened😐)
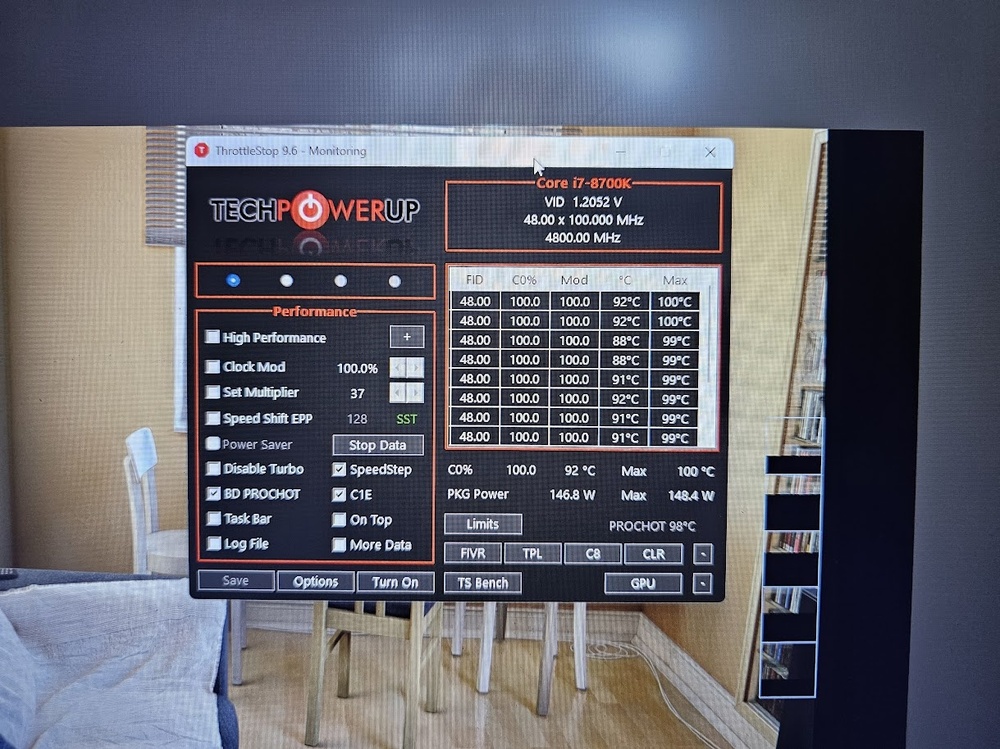
The P775 has a lower OCP limit than the TM1 (144A vs 180A) so if too high of an instantanous load (avx torture test etc) is applied it can cause shutdowns with a big overclock, I found OCCT small extreme to be too much unless I limit the CPU.
currently I have settled at 4.7ghz -115mv offset and it is very stable, photo attached is from testing at 4.8ghz.
After some benchmarking and tuning I was annoyed with the 150W power limit but I wasn't prepared to use the old driver with unlocked power limits, so the only real choice was a shunt modification...
20mOhm shunt resistors added on to the existing 5mOhm, in theory this should give 20% extra headroom (180w) but until I can tap in to i2c on the card and see what power actually is getting used I can only make an educated guess how much power it is drawing.
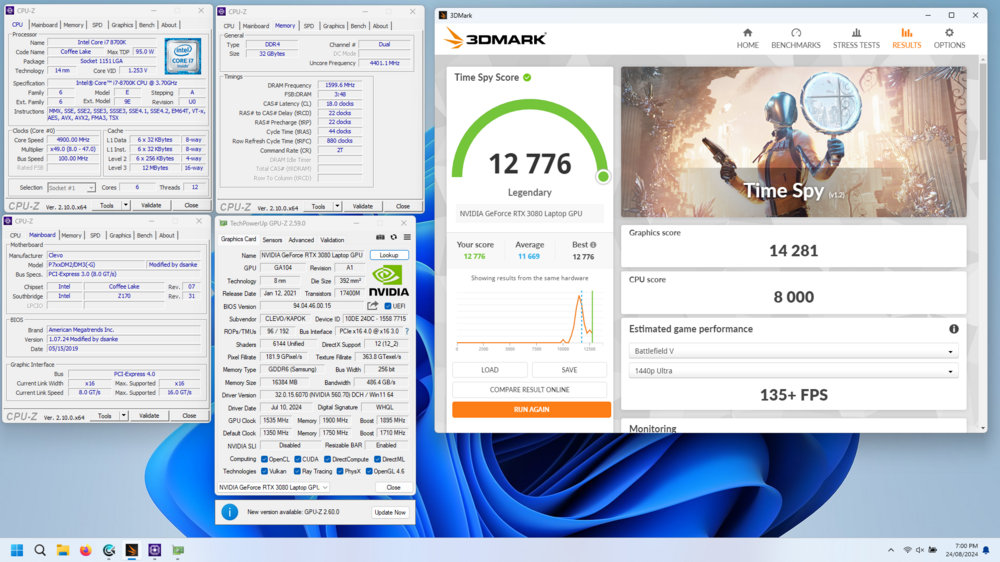
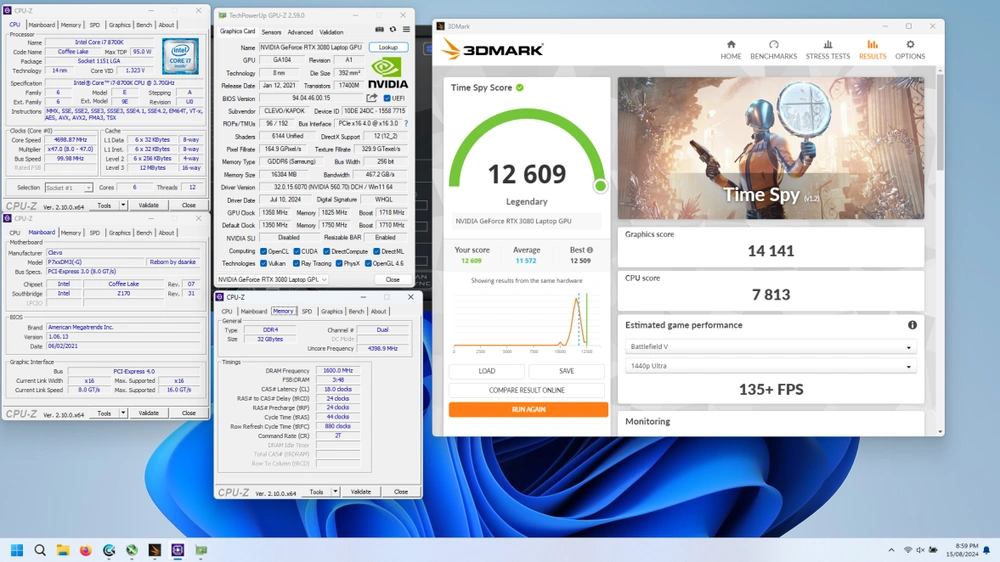
I went from a bit over 12k in timespy graphics score to over 14k!
Next post I will cover some of the problems and solutions I went through getting the bios to work (I am firmly a novice in this area so a lot of it is trial and error)-
1
-
-
On 8/21/2024 at 12:07 AM, runix18 said:
You can use the 2021 version bios of Dsanke RTX, tweak that for 3000 series and still retain the Realtek and 6/7th gen CPUs functionality🙃
I have a 2021 modified version already :), I was playing around with the later version with the bios features.
the only small realtek hiccup is no automatic lowering of volume to 30% when plugging in the headphones so care is needed to not deafen yourself
---Update, P775dm 2/3 audio fix---
you can fix the driver issue and use unmodified P7xxdm2/3 audio drivers by changing the intel audio device subsystem ID in the boardID module, this is causing a mismatch with the dsanke RTX bios which stops the driver working.
search for: 8B 0E C7 04 08 58 15 09 77 EB 0D 0F B6 45 FF 8B
change to: 8B 0E C7 04 08 58 15 05 77 EB 0D 0F B6 45 FF 8Band you will have working audio drivers again.
*speaker and headphone audio are not separate, be careful not to deafen yourself when switching to headphones!
-
7 hours ago, JQM said:
I truthfully have no clue what VBIOS really are, or if they're even modifiable for a laptop without the manufacturer (Nvidia's ChatGPT-using support says they're a part of the laptop's BIOS, if that's the case only Sager can help me here), but I did find this if anyone would know what to look for inside VBIOS...?
It's Tongfang's RTX 2070 Super Mobile VBIOS: https://www.techpowerup.com/vgabios/260760/260760
While my laptop is based on Clevo (Sager is a redistributor for Clevo), not Tongfang, I wonder if there's anything to look at there?
Vbios is the ROM that initializes the GPU when you turn the computer on :), it's either stored in a separate chip from the normal bios or it can be included in the main bios ROM.
https://en.wikipedia.org/wiki/Video_BIOS some good information to get context here
if you can load up GPUZ and screenshot the main windows that would be greatIgnore this part I have just seen your new post*
Cheers
-
another vouch for PTM7950, I'm amazed how well it performs.
-
2
-
-
Hello P7xxDM2/3 users reading this thread, attached is a lightly tweaked Dsanke bios for these laptops with support added for 3000 cards from the X170KM without .inf modification.
The only changes from the original P7xxDMx_RTX.rom is a change to GPU subsystem 7709 (P775tm1) to 7715 (x170km)
You will need to use the Realtek UAD driver once installed due to a change from HDA to UAD (according to dsanke in the smxdiy post containing this bios), attached is the version of the bios from the p775tm1 that works with the dm3 soundcard, the only issues are improper support for volume control, you will have the same volume set on headphones and speakers but the amplifier will enable and work https://downloads.eurocom.com/support/drivers/systems/431/431_Audio_W1064.zip
I am unsure exactly how Dsanke has worked their magic but it is based on the P775TM1 and has extra features in the bios plus support for proper overclocking controls for >4 cores (does not support 6/7th gen CPUs on this bios). -
hmm strange issue, looking at the block diagram the mux only handles the internal display connection.
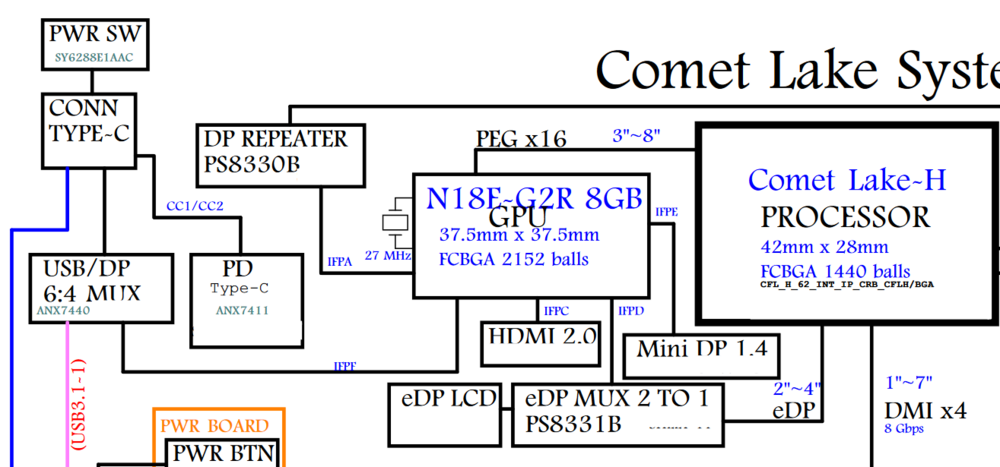
this would explain why you don't see advanced startup grub etc if they're defaulting to the igpu which doesn't have a way to output to the external monitors.
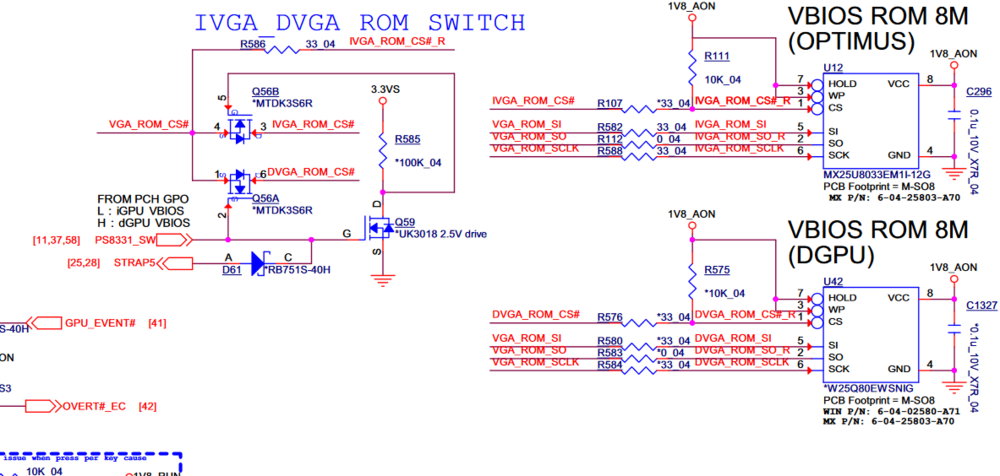
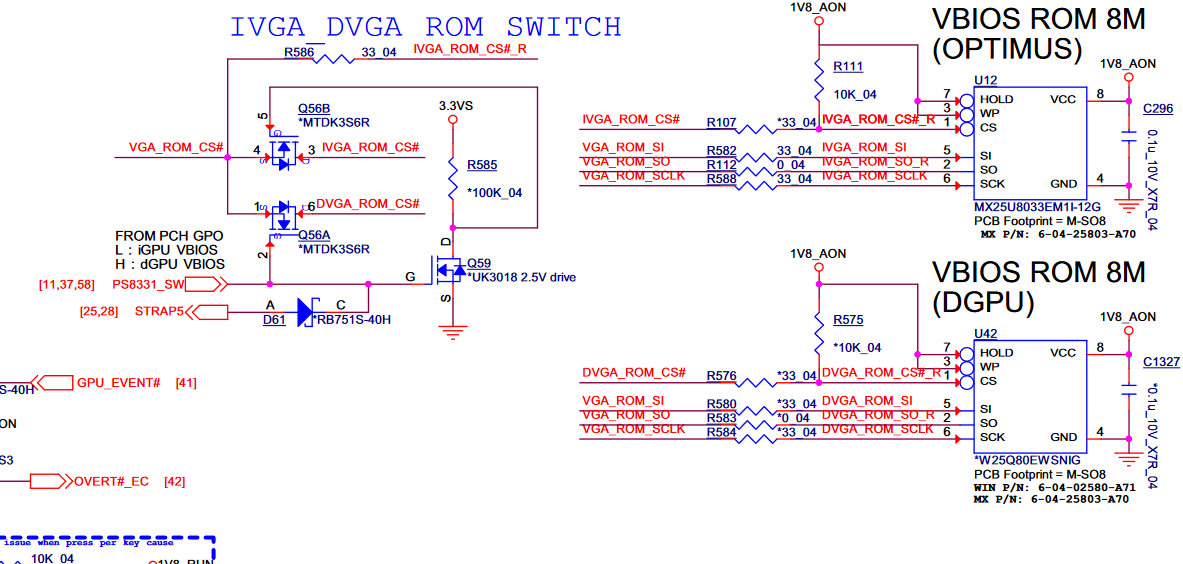
I'm unsure why the DGPU doesn't wake up in windows that is quite odd, it may be something to do with the vbios perhaps? there is 2 roms onboard for optimus and dgpu only behaviour and perhaps there is an issue with the dgpu ROM?
In the details for microsoft display adapter what is the hardware ID reported if any? -
On 8/15/2024 at 8:15 AM, Meaker said:
My GPU did not die, that's gone to someone else who is having fun. It was the motherboard with too much mounting pressure on the CPU side I think.
Meaker you didn't suffer from substrate bending did you?
I was having this issue with the aftermarket heatsink and stock mounting screws, I replaced them with springs on longer screws and repaired the squished pins in the socket and it's happy now.


Official Clevo P870TM-G Thread
in Sager & Clevo
Posted
enable above 4g decoding, that should do it 🙂