
amirhesamsadeghpour
-
Posts
39 -
Joined
-
Last visited
Content Type
Profiles
Forums
Events
Everything posted by amirhesamsadeghpour
-
 1.7.3 nice 👌
 -
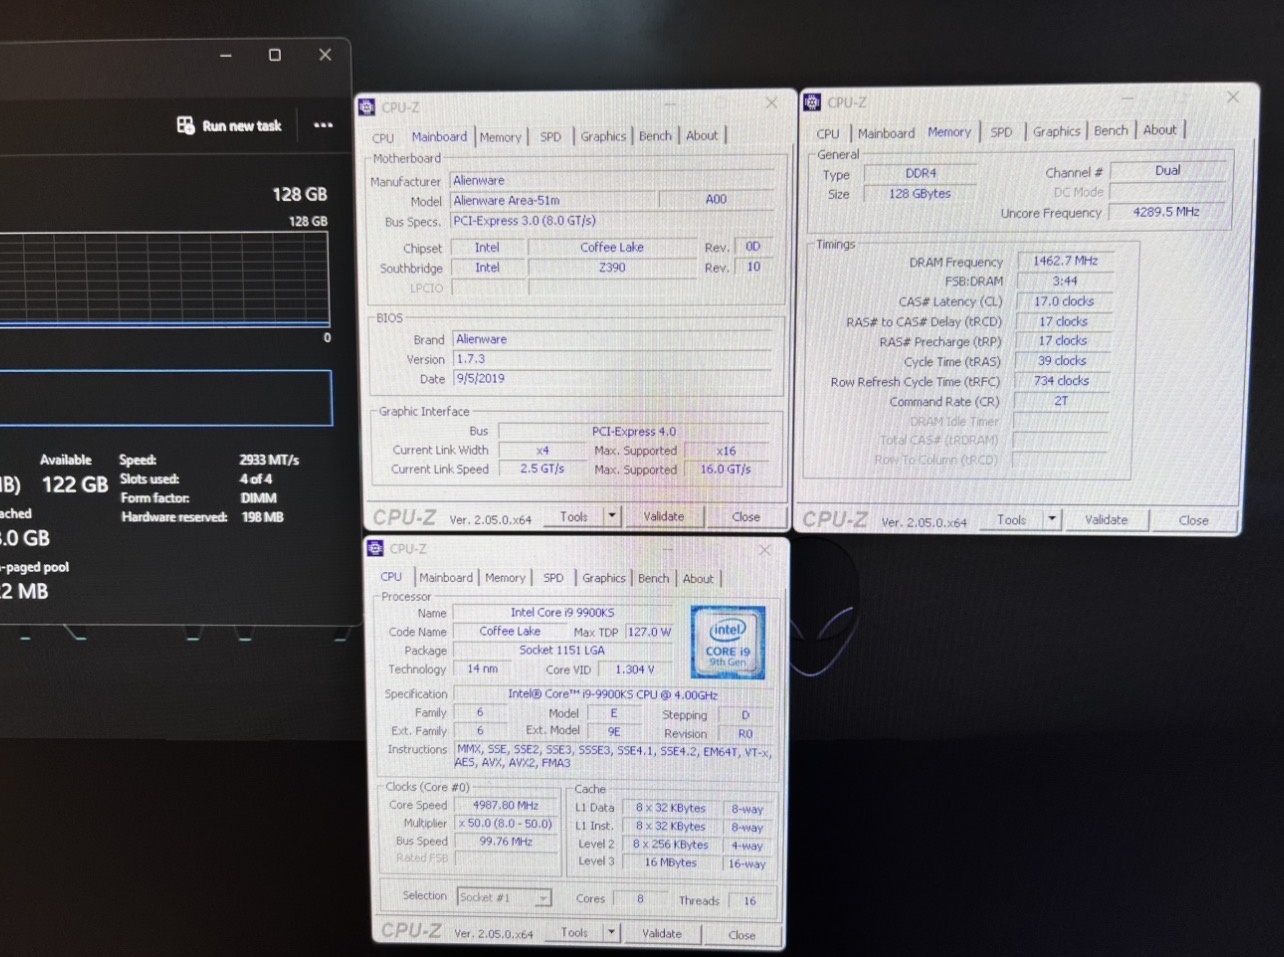
Out of all the BIOS versions I tested, BIOS 1.7.3 delivered the best memory frequency and timing results. Using very ordinary Samsung DDR4-2666 memory modules, I was able to overclock them to 2933 MHz with timings of CL17
-
Alienware Graphics Amplifier with 40 Series GPU's
amirhesamsadeghpour replied to Maxware79's topic in Alienware
Go into XTU and set the Core Voltage Offset to -0.130V, then set the CPU multiplier to all-core 47x and run Time Spy again. Your CPU score should increase from around 7000 to over 10000, and the overall Time Spy score should reach around 22,000 to 23,000. -
Area-51m 4K Panel in R1
amirhesamsadeghpour replied to ssj92's topic in Alienware 13 / 15 / 17 / 51m (2015-2020)
This 4K, 60Hz panel has a connector similar to your panel — 40-pin, 25 mm. Ask the seller to send a photo of the eDP connector -
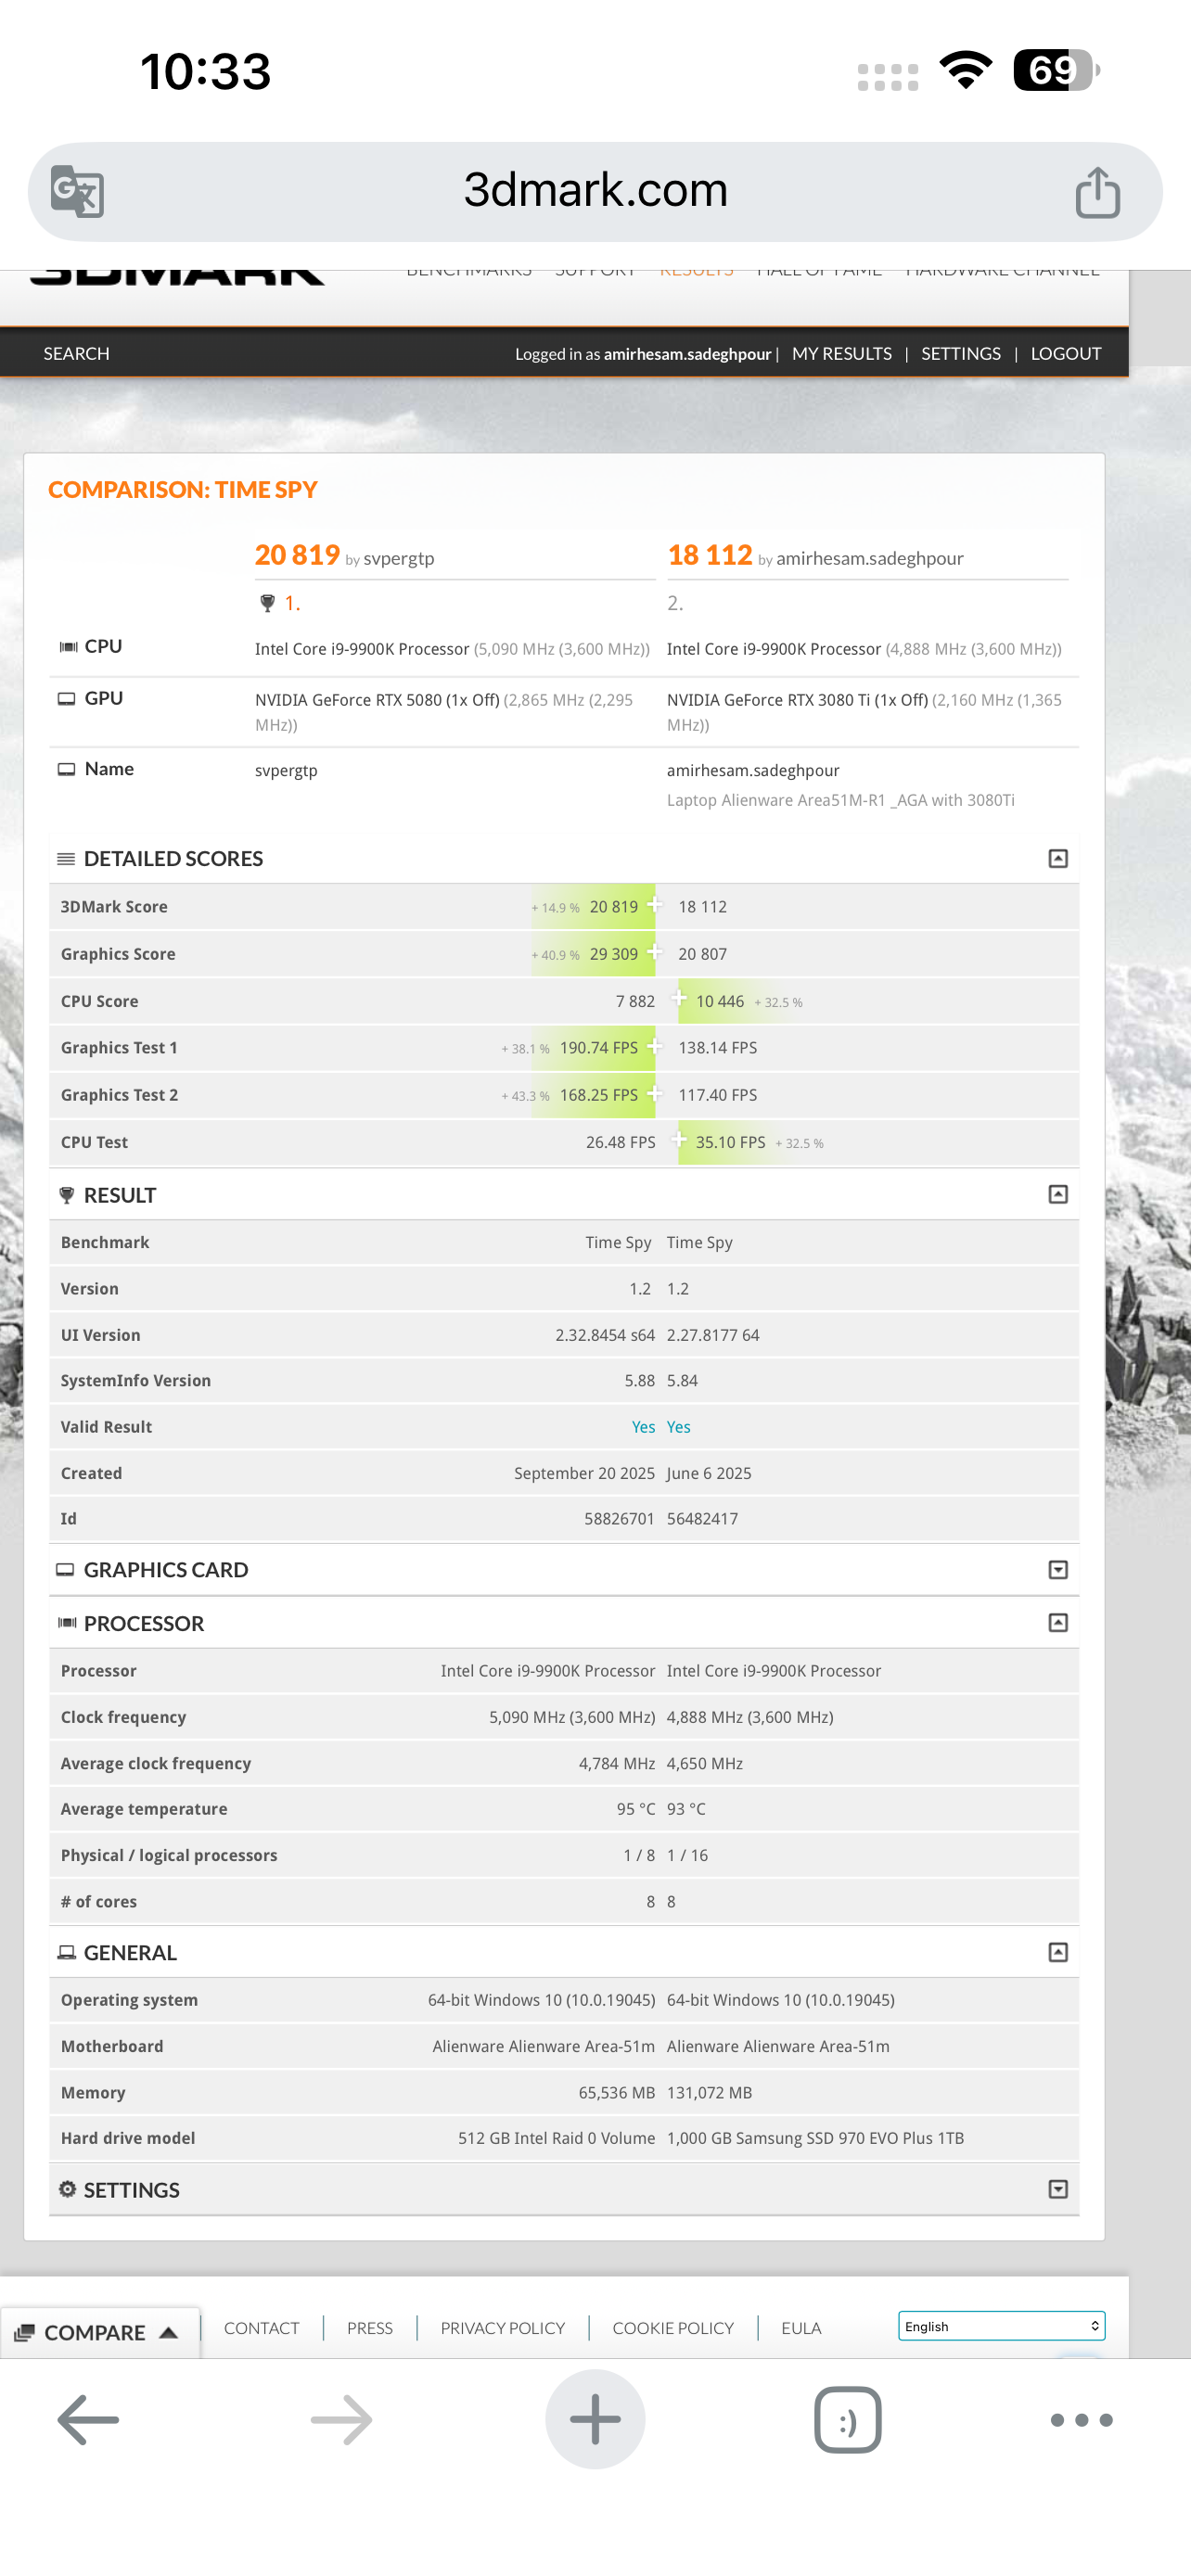
Using liquid metal does not help much in reducing temperatures. The main cause of high temperatures is the heatsink itself. No matter what you do, the i9-9900K will still reach 100°C. The best thing you can do is undervolt the CPU. Just go into Intel XTU and set the core voltage offset to around -0.120 to -0.130, then set the all-core multiplier to 47x or 48x. After that, run a benchmark and check the results. You should see lower temperatures and noticeably different CPU performance. If the system is stable, you can also try going up to -0.140 offset. My previous 9900K, using the same settings, achieved a score of 10,466 in the Time Spy benchmark.
-
Using liquid metal does not help much in reducing temperatures. The main cause of high temperatures is the heatsink itself. No matter what you do, the i9-9900K will still reach 100°C. The best thing you can do is undervolt the CPU. Just go into Intel XTU and set the core voltage offset to around -0.120 to -0.130, then set the all-core multiplier to 47x or 48x. After that, run a benchmark and check the results. You should see lower temperatures and noticeably different CPU performance.
-
By sharing your system specifications, we can work together to find the best possible configuration. I can also suggest stable tuning settings so you can get the maximum performance out of your system.

-
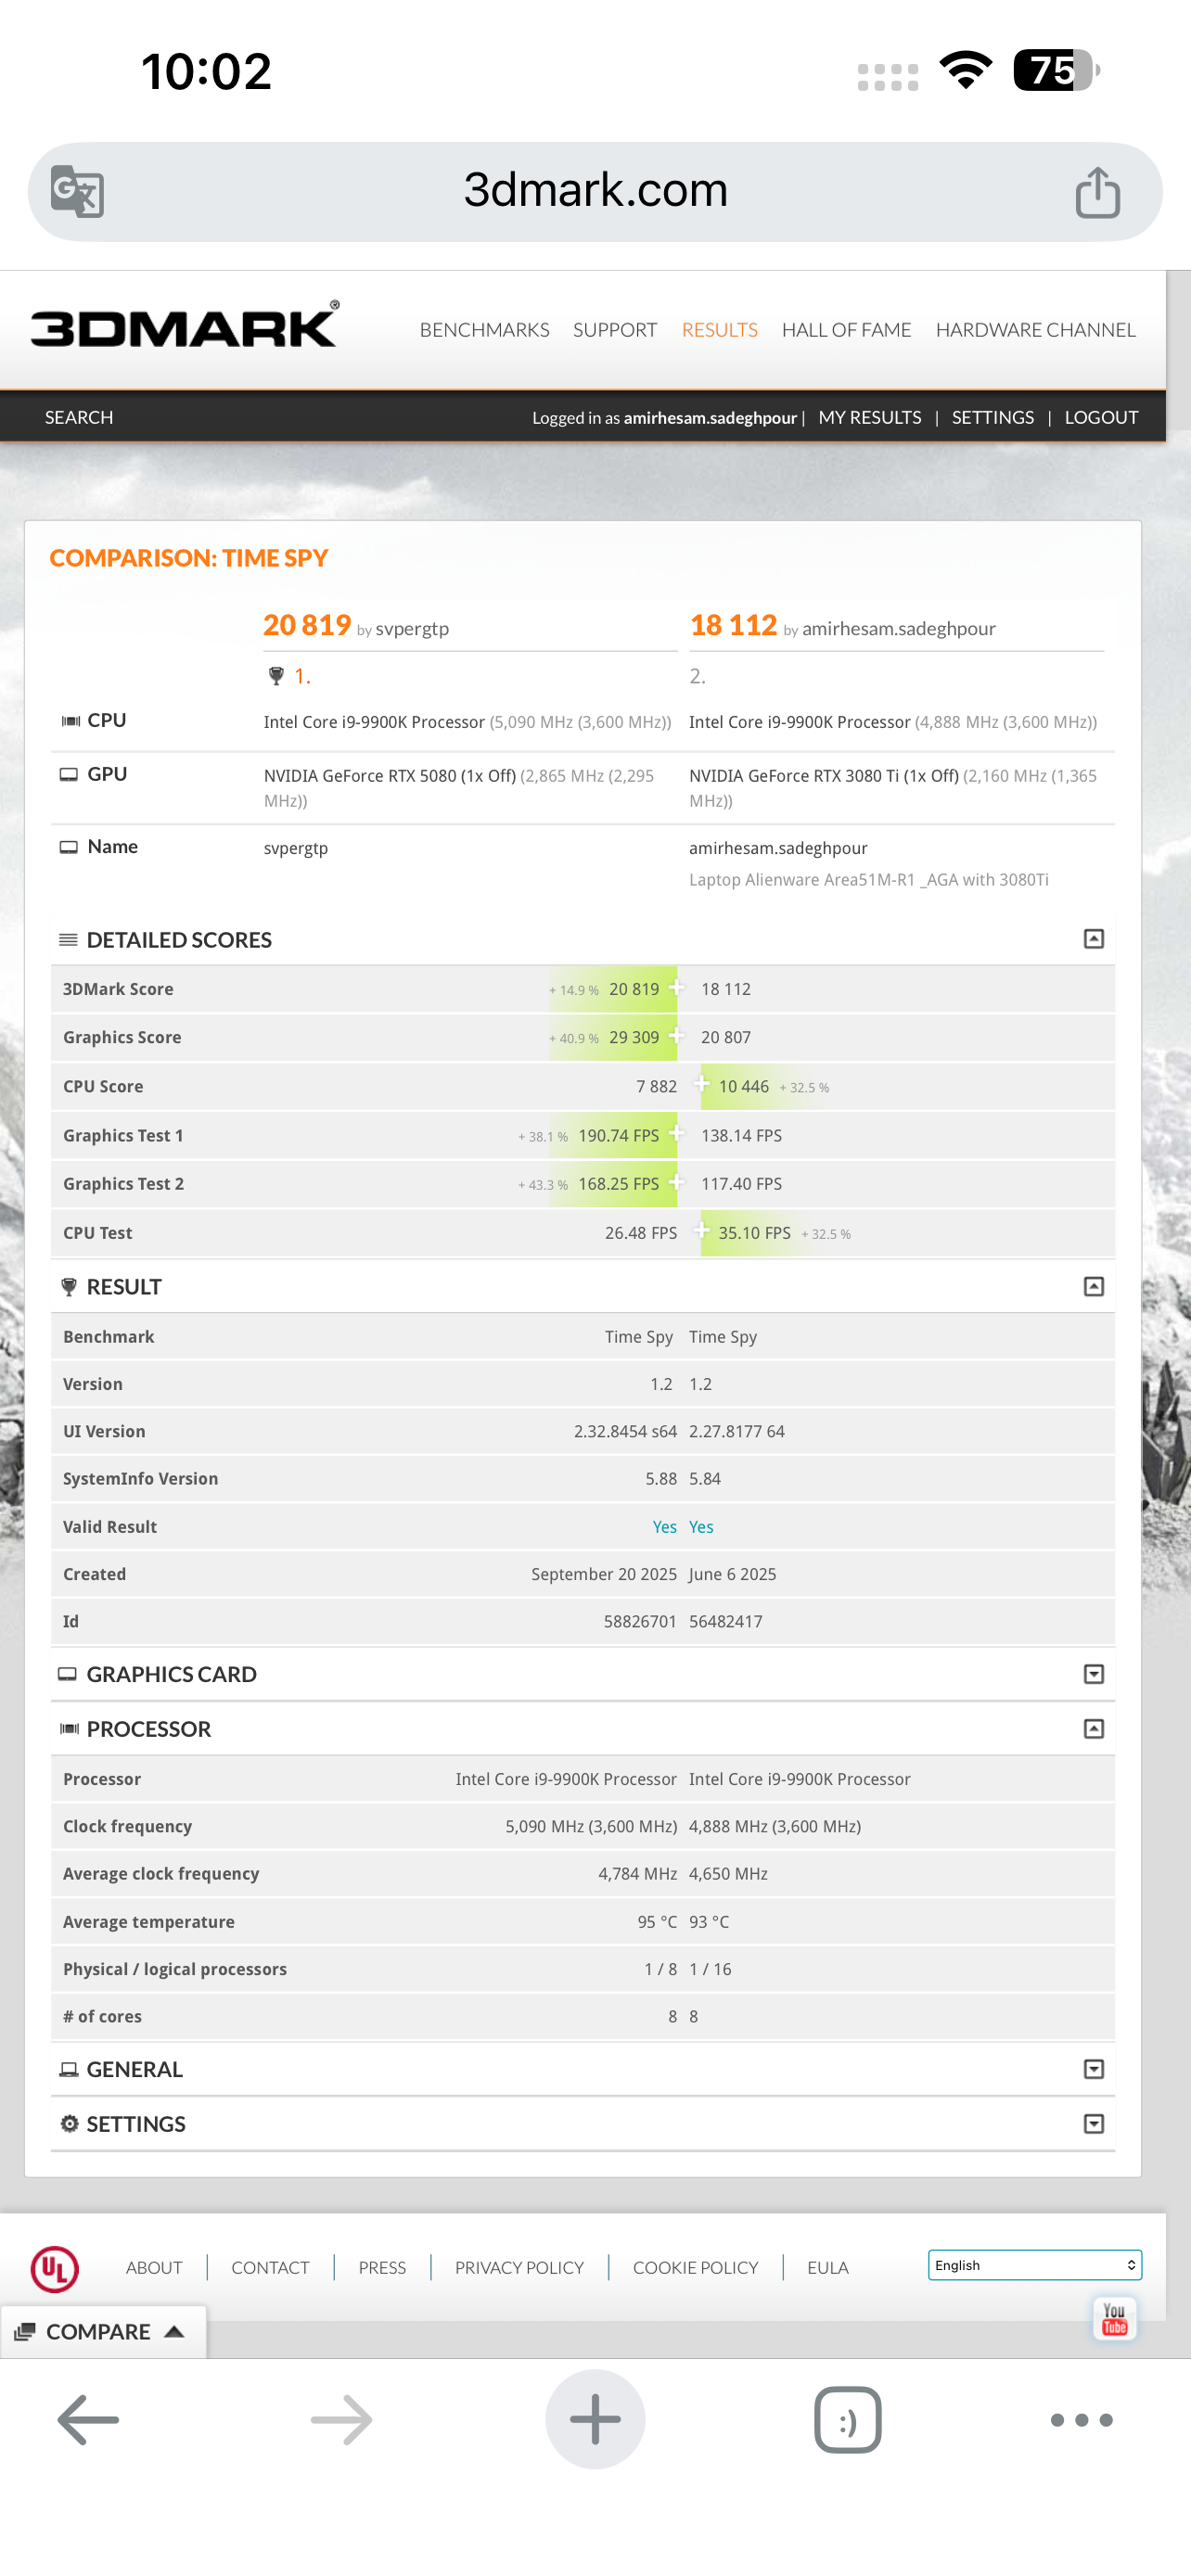
I’m waiting for you to improve your CPU score in Time Spy and send me a really good record so I can enjoy seeing the result. If I had an RTX 5080 right now, I would definitely set an incredible benchmark record with this laptop. Unfortunately, my card is only a 3080 Ti. Come on, let’s make an impressive record with the 5080.
-
Send me a screenshot of your current RAM frequency and timings so I can check them. I’ll help you tune the best possible settings for maximum performance and stability.
-
The BIOS versions that allow you to set memory frequencies higher than 2666 MHz are as follows: BIOS 1.1, 1.3.2, 1.5, and 1.7.3. Newer BIOS versions have more restrictions and allow fewer modifications through RU. If you want, I can also send you the best settings for 2933 MHz, with the lowest timings that are both fully stable and deliver excellent performance. In fact, 2933 MHz with CL17 timings performs better than 3200 MHz with CL20 or CL22 timings.
-
This isn’t a problem — a 9900K naturally runs around 100°C, and that’s not an issue. However, if you’re seeing severe thermal throttling, the problem is usually poor contact between the IHS and the heatsink, which you can fix using a thin copper shim. The best solution is upgrading to a 9900KS. You can check my post — with the 9900KS, temperatures under worst-case conditions reach only around 75 to 80°C. It might sound surprising, but due to power limiting, you can actually get higher performance with lower wattage and significantly lower temperatures.
-
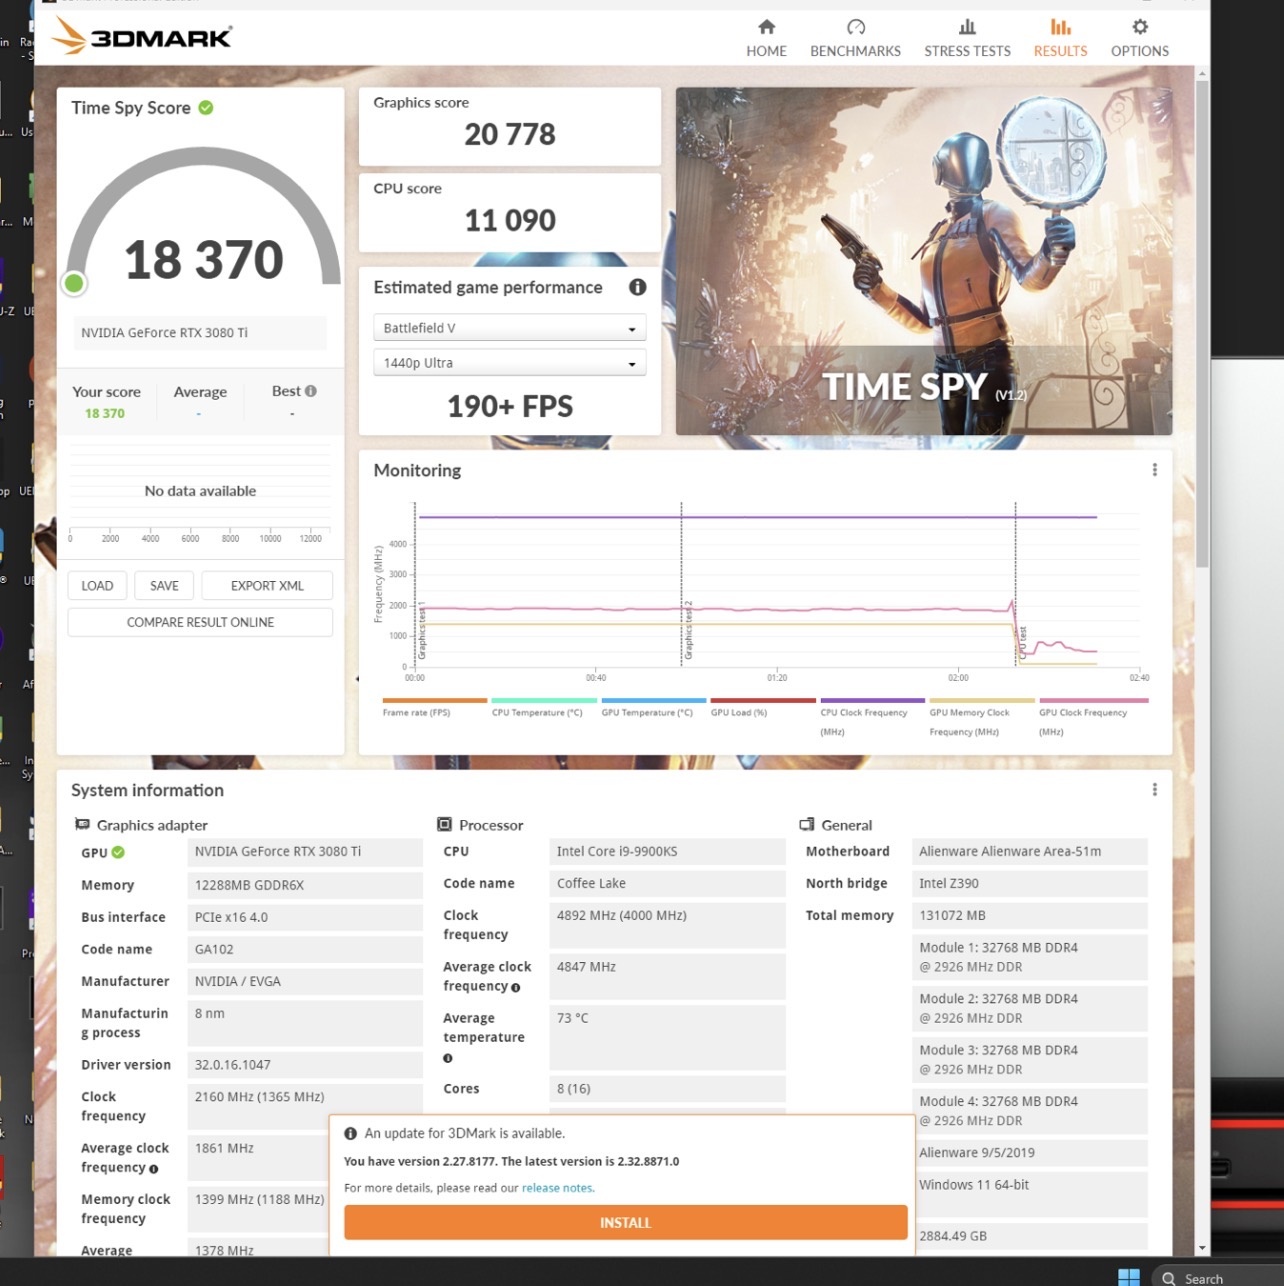
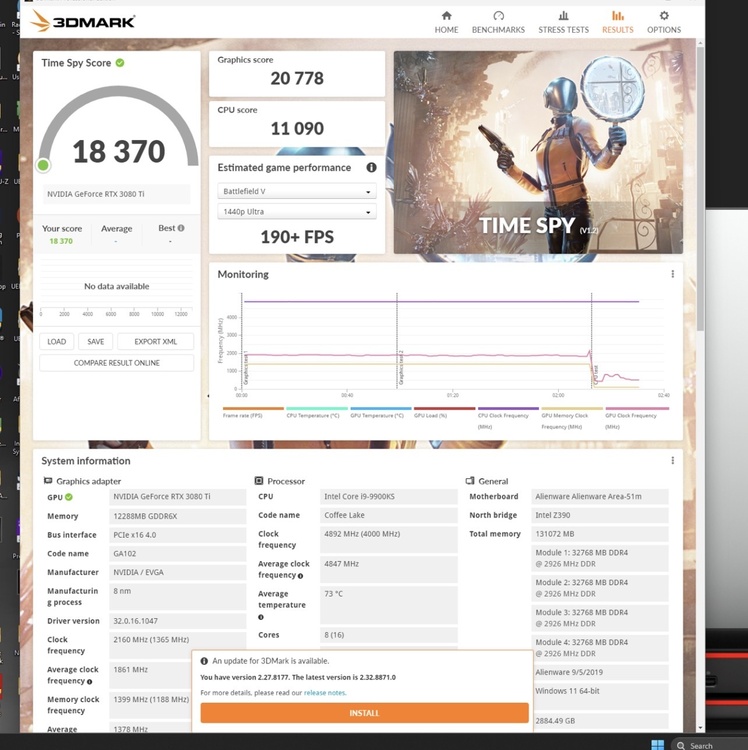
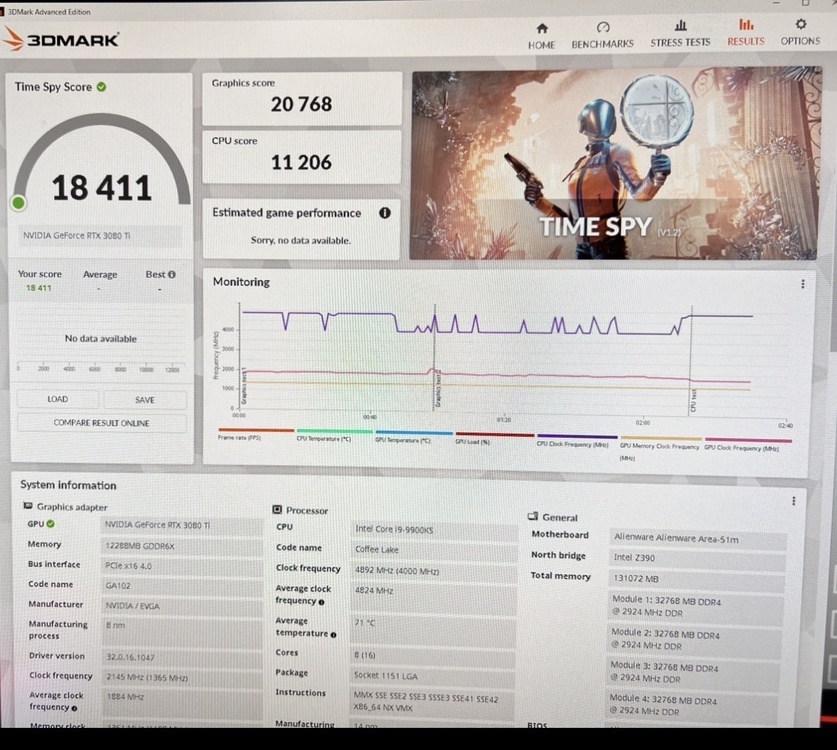
Time spy test score Old Cpu 9900K: https://www.3dmark.com/spy/56481843 ~~~~~~~~~~~~~~~~~~ New Cpu 9900KS : https://www.3dmark.com/spy/64018720 After upgrading my Alienware Area-51m R1 to the Intel Core i9-9900KS, I noticed that almost every user who performed this upgrade experienced significant CPU performance degradation. Most reported Time Spy CPU scores were only between 8000 and 9000 points due to power limits, EDP throttling, BIOS limitations, and the lack of a proper 9900KS profile in the BIOS. I decided to fully optimize and tune the system manually. After testing multiple BIOS versions, tweaking hidden settings, optimizing memory timings, tuning power behavior, and creating a custom optimized profile for the 9900KS, I finally achieved a stable and fully optimized result. Previously, with the standard i9-9900K, the best temperature I recorded during Time Spy was 96°C. However, after upgrading to the i9-9900KS, the system delivered noticeably higher and more stable performance while running significantly cooler, with a maximum Time Spy temperature of only 71°C. My final Time Spy score reached 18,411 overall, with a CPU score of 11,206 — paired with an EVGA RTX 3080 Ti XC3 that scored 20,767 in graphics performance, which is currently the highest known CPU score achieved with an i9-9900KS on an Alienware Area-51m R1. What makes this result even more impressive is that the CPU maintains excellent temperatures and efficiency while delivering desktop-class performance inside a laptop platform. I compared the performance of my laptop using two processors, the 9900K and the 9900KS. You can see the temperature difference between both CPUs in the Time Spy benchmark. There is more than a 25°C temperature gap between these two processors on the Area-51M. The reason is the power limitation of the 9900KS. By undervolting with XTU, you can achieve higher performance at lower power consumption and significantly lower temperatures. The 9900KS on the Area-51M is power-limited by the BIOS. Since voltage profiles for the 9900KS are not defined in the BIOS, it only allows the CPU to use up to 130W. I am trying to remove this BIOS-imposed limitation. However, even with this 130W limit, you can still achieve significantly lower temperatures compared to the 9900K or any other processor, along with higher performance. If I can remove this limitation, I can increase the CPU score in the Time Spy cpu score benchmark up to 13,000. System highlights: Alienware Area-51m R1 Intel Core i9-9900KS Custom optimized BIOS/RU tuning DDR4-2666 overclock to 2933 CL17memory tuning Fully optimized thermal and power behavior Stable high-performance operation
-
Do you have Telegram so you can send me a video of the issue you’re experiencing?
-
I upgraded the CPU to an Intel Core i9-9900KS. I originally had BIOS version 1.28 installed. In order to remove some limitations, I tested every BIOS version from 1.7.3 up to 1.28. My motherboard is the 2019 revision 2 model, and I had no issues downgrading the BIOS.
-
My friend says the 5070 Ti has better performance and supports 4x frame generation. Both cards are good, but my recommendation to you is the 5070 Ti.
-
Area-51m 4K Panel in R1
amirhesamsadeghpour replied to ssj92's topic in Alienware 13 / 15 / 17 / 51m (2015-2020)
If you are using a 144Hz FHD panel, your EDP port is 40 pins, 2.5cm long and 0.5mm thick. The cable is in the corner. It is the same as before the R2 models. The 4k models in the R2 are usually the middle socket. If you are planning to change the display, let me know and I will guide you. -
“The 5070 Ti is an excellent choice. Definitely get it and enjoy it.”
-
I think the result you got is more due to CPU throttling rather than the actual power of your system. Your CPU score for the Intel Core i9-9900K is below normal, and this typically happens when the processor is heavily throttling due to high temperatures, which causes its speed to drop. For retesting, apply the following settings in Intel Extreme Tuning Utility (XTU): • Reduce CPU voltage by around -0.100V (Undervolt) • Set the all-core multiplier to 47x • Set fan speeds to 100% This will: • Lower temperatures • Prevent throttling • Keep the CPU frequency stable Also, before running the test, close any CPU-intensive programs from Task Manager so the processor isn’t under unnecessary load and you get more accurate results. Then run the 3DMark Time Spy test again. Also, pay attention to the image you shared — it clearly shows CPU performance degradation. Your GPU score is good, but this CPU drop is lowering the overall score. An important point is that improving CPU performance doesn’t only affect its own score — 👉 it can also improve GPU performance and ultimately enhance the entire system’s output. I’m confident you can easily reach around 24K to 25K. If you’d like, we can try to set a solid record with your system 😄 With that score, you’ll outperform many 2025 and 2026 laptops. Additionally, in the image, the Time Spy scores of our systems are compared — your CPU achieved about 35% lower performance. Overclocking requires proper knowledge, and if all factors are not carefully evaluated, it can actually lead to performance degradation. The main reason for the drop in your system’s performance is high temperature combined with voltage and frequency settings that are not well balanced. At first glance, one of the cores briefly reached around 5100 MHz at the start of the test, but it’s highly likely that within a few seconds the frequency dropped below 4000 MHz, which resulted in the recorded score of around 7700. With proper voltage and thermal conditions, you should realistically achieve a standard score in the range of 10K to 11K. For effective overclocking, you typically need an upgraded heatsink, high-quality thermal paste, upgraded fans (for example, moving from R1 to R2 fan configurations), and solid overclocking knowledge. With these adjustments, the CPU score can reach around 12K to 13K in the Time Spy Benchmark. That way, you can showcase the true power of your system.

-
Alienware Graphics Amplifier with 40 Series GPU's
amirhesamsadeghpour replied to Maxware79's topic in Alienware
I think the result you got is more due to CPU throttling rather than the actual power of your system. Your CPU score for the Intel Core i9-9900K is below normal, and this typically happens when the processor is heavily throttling due to high temperatures, which causes its speed to drop. For retesting, apply the following settings in Intel Extreme Tuning Utility (XTU): • Reduce CPU voltage by around -0.100V (Undervolt) • Set the all-core multiplier to 47x • Set fan speeds to 100% This will: • Lower temperatures • Prevent throttling • Keep the CPU frequency stable Also, before running the test, close any CPU-intensive programs from Task Manager so the processor isn’t under unnecessary load and you get more accurate results. Then run the 3DMark Time Spy test again. Also, pay attention to the image you shared — it clearly shows CPU performance degradation. Your GPU score is good, but this CPU drop is lowering the overall score. An important point is that improving CPU performance doesn’t only affect its own score — 👉 it can also improve GPU performance and ultimately enhance the entire system’s output. I’m confident you can easily reach around 24K to 25K. If you’d like, we can try to set a solid record with your system 😄 With that score, you’ll outperform many 2025 and 2026 laptops. Additionally, in the image, the Time Spy scores of our systems are compared — your CPU achieved about 35% lower performance. Overclocking requires proper knowledge, and if all factors are not carefully evaluated, it can actually lead to performance degradation. The main reason for the drop in your system’s performance is high temperature combined with voltage and frequency settings that are not well balanced. At first glance, one of the cores briefly reached around 5100 MHz at the start of the test, but it’s highly likely that within a few seconds the frequency dropped below 4000 MHz, which resulted in the recorded score of around 7700. With proper voltage and thermal conditions, you should realistically achieve a standard score in the range of 10K to 11K. For effective overclocking, you typically need an upgraded heatsink, high-quality thermal paste, upgraded fans (for example, moving from R1 to R2 fan configurations), and solid overclocking knowledge. With these adjustments, the CPU score can reach around 12K to 13K in the Time Spy Benchmark. That way, you can showcase the true power of your system.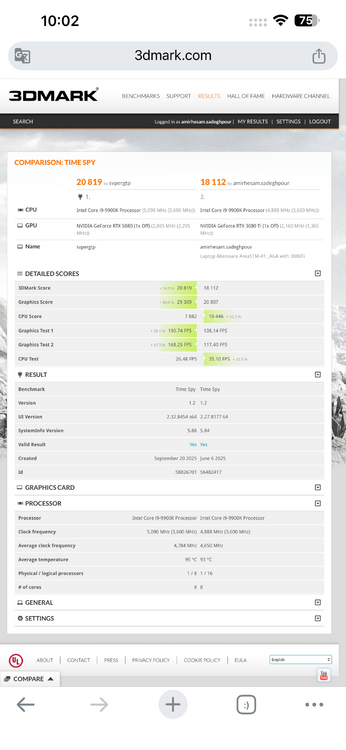
-
Alienware Graphics Amplifier with 40 Series GPU's
amirhesamsadeghpour replied to Maxware79's topic in Alienware
-
Alienware Graphics Amplifier with 40 Series GPU's
amirhesamsadeghpour replied to Maxware79's topic in Alienware
My friend, BIOS version 1.9.3 is newer than 1.3.2, and you won’t have any issues. This problem will be resolved by upgrading the BIOS to version 1.9.3. https://www.dell.com/support/home/en-uk/drivers/driversdetails?driverid=tc3x1 -
These settings control memory bandwidth, and the other option enables custom settings and XMP profiles. If you configure both options, you will get a 2933 MHz memory frequency. Can’t you find these hex values in RU.efi? To be stable at 2933 MHz, your RAM may need timing adjustments. You can also try CL20 or CL22 timings. The hexadecimal equivalent becomes this, meaning: CL16 → 0x10 CL18 → 0x12 CL20 → 0x14 CL22 → 0x16 CL24 → 0x18 and so on… Where are the other timings? In RU, usually after address 0x940, the following addresses correspond to: Address | Timing | Description 0x940 | CL | CAS Latency 0x941 | tRCD | RAS to CAS Delay 0x942 | tRP | Row Precharge 0x943 | tRAS | Active to Precharge Delay For example, for timings 20-20-20-48 (CL-tRCD-tRP-tRAS), you enter: Address | Hex Value 0x940 | 0x14 (CL20) 0x941 | 0x14 (tRCD 20) 0x942 | 0x14 (tRP 20) 0x943 | 0x28 (tRAS 48) Decimal value 48 in hexadecimal becomes 0x28 By the way, send me the link to your best Time Spy score so I can take a look. .
-
For those frustrated with the 2400MHz RAM limit on the Alienware Area-51M R1, I've found a way to bypass the restriction and overclock the memory up to 2933MHz. This guide will walk you through the process step by step. # 🔧 Requirements Before you begin, you should be familiar with BIOS modding tools. You’ll need: ✅ Intel CSME Tools (for BIOS backup – version 12) ✅ UEFI Tool ✅ IFR Extractor ✅ RU.EFI (for modifying BIOS variables) ✅ A bootable USB drive 💡 How to Boot with UEFI Shell: * Rename ShellX64.efi to bootx64.efi. * Place it in the /EFI/BOOT/ directory on a FAT32-formatted USB drive. * (use rufus ) # 🛠 Step-by-Step Guide # 1️⃣ Extracting BIOS Data 1️⃣ Open the extracted BIOS file using UEFI Tool. 2️⃣ Press CTRL+F, go to the Text tab, and search for CFG LOCK. 3️⃣ Once found, scroll down, click the option, and extract the PE32 file (Extract As-Is). # 2️⃣ Extracting BIOS Variables 1️⃣ Run IFR Extractor as an administrator. 2️⃣ Extract the PE32 file as a text document. 3️⃣ Note down the variables needed for modification. # 3️⃣ Modifying BIOS with RU.EFI 1️⃣ Create a bootable USB drive with RU.EFI. 2️⃣ Enter BIOS and disable Secure Boot. Set the USB as the boot device. 3️⃣ Reboot the system and boot from USB. 4️⃣ After booting from the USB, you will automatically enter UEFI Shell. Here, you need to enter RU.EFI. 5️⃣ To access RU.EFI, type the following command and press Enter: FS0: This will give you access to the USB drive. 6️⃣ Then, enter the following command to launch RU.EFI: RU.EFI Once inside RU.EFI, the main menu will appear, and you can access the BIOS settings. # Main Commands in RU.EFI: * ESC: Exit the menu * ALT + =: Search BIOS settings * CTRL + Page Down: Navigate through pages of settings * CTRL + W: Save changes * ALT + Q: Exit RU.EFI and reboot the system # 4️⃣ Overclocking RAM Speed in BIOS 1️⃣ Press CTRL + Page Down until you find variable 0A00. 2️⃣ Locate the 0A63/0A64 variables, which control RAM speed. Modify the following values for 2933MHz: 0XA64 → 0B 0XA63 → 75 ✅ Standard setting for 2667MHz: 0XA64 → 0A 0XA63 → 6B ✅ Memory Profile: MEMORY PROFILE 0XA65 → 01 ✅ Additional Overclocking: 0X93F → 0B 💾 Save the settings: ✔ Press CTRL+W to save changes. ✔ Exit with ALT+Q (or Ctrl + Alt + Del). ✔ Re-enter BIOS and verify the changes. # ⚠ Important Notes ✅ This method works on all BIOS versions: 1.0.1, 1.2, 1.9.3, 1.23, 1.24, 1.25, 1.26, 1.28, 1.3.2 ✅ Best BIOS version for stability: 1.3.2 🔹 Fully compatible with 200W GPU vBIOS 🔹 No sudden FPS drops or thermal throttling ✅ BIOS Update Warning * Disable automatic BIOS updates in BIOS settings if you plan to use an older BIOS version. * If the BIOS updates automatically, your settings may reset, requiring you to redo the process. 💡 Startup Delay Note: After applying these changes, your system may take 1 to 2 minutes to display anything upon restart—this is normal. 💡 Incompatibility Recovery: * If the selected frequency is not compatible with your RAM and your system doesn’t display anything, don’t panic! * Simply disconnect the battery and reset the BIOS to restore the default settings. ⚠ Caution: ❌ Do NOT modify other settings in RU.EFI unless you know what you’re doing. ✅ I’m simply sharing my experience, and I hope this helps! # 🎯 Final Thoughts This method unlocks the full potential of RAM on the Alienware Area-51M R1, breaking Dell’s artificial 2400MHz limit. If you need help, feel free to ask! 💬 . This is entirely at your own risk, and I take no responsibility for any issues that may arise. It is highly recommended that you back up your BIOS settings before making any changes and follow the steps carefully
-
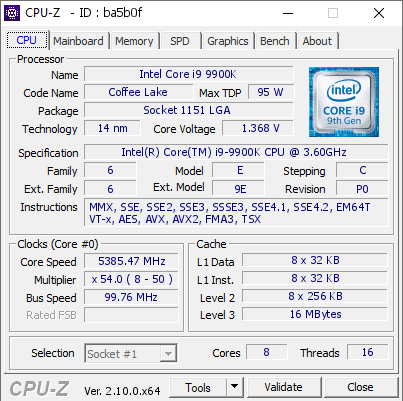
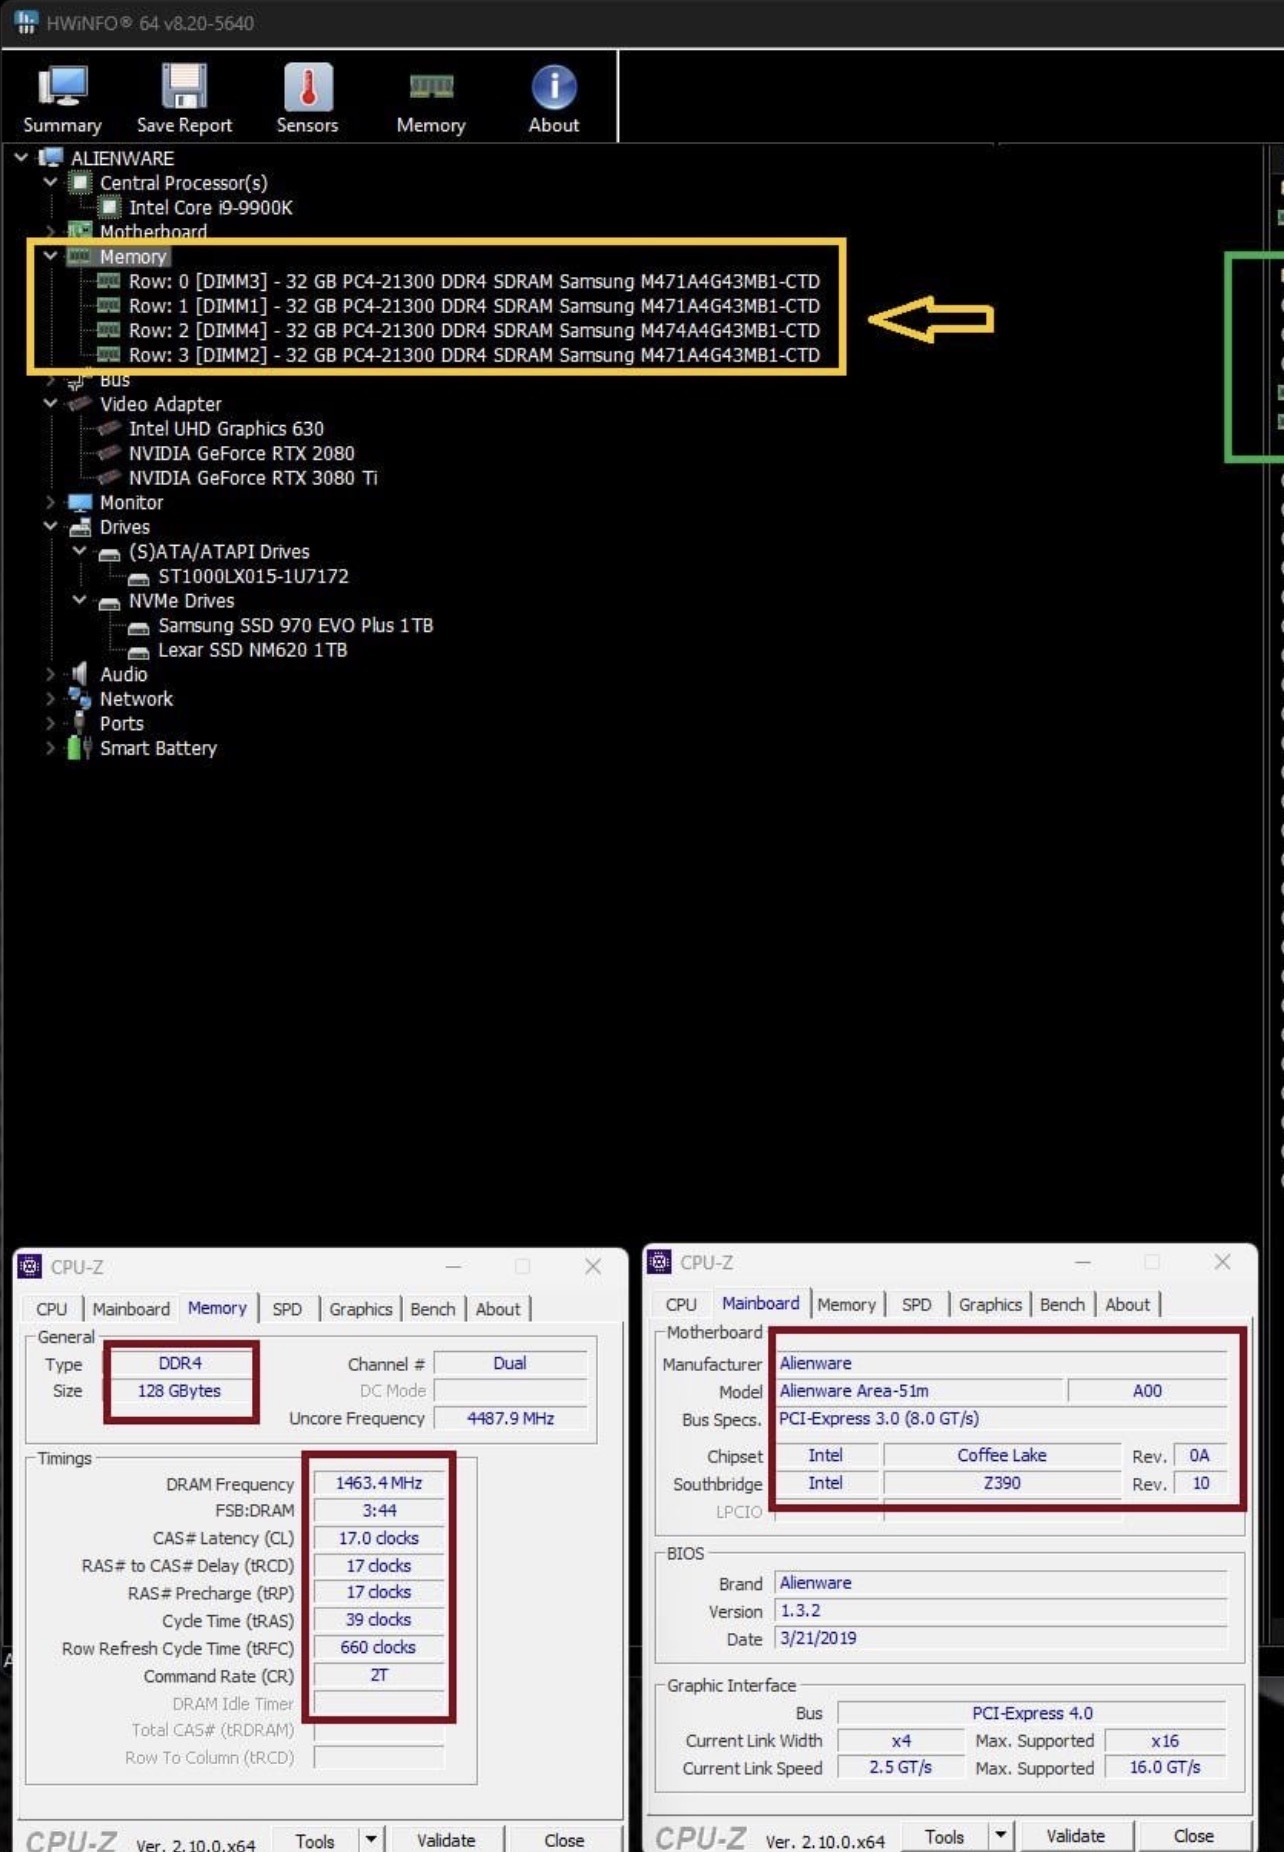
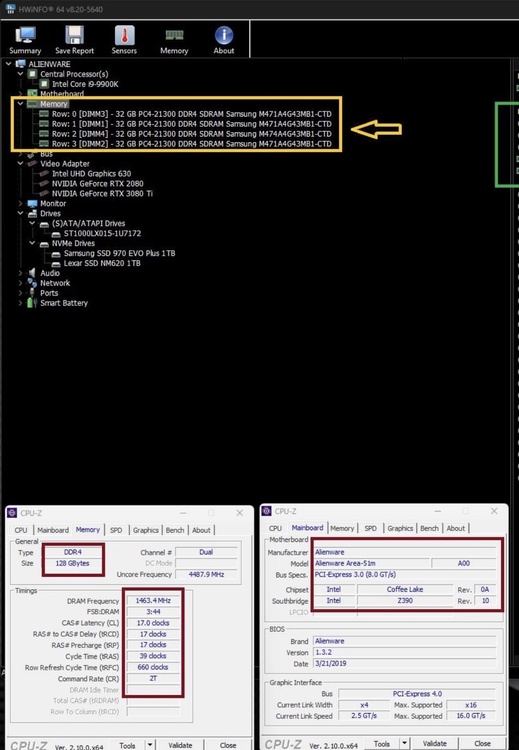
Alienware Area-51m R1 – i9-9900K All-Core Overclock to 5385 MHz with Stock Cooling! --- CPU-Z Validation: https://valid.x86.fr/ba5b0f The Achievement: I managed to overclock all 8 cores of the Intel Core i9-9900K (desktop CPU) inside my Alienware Area-51m R1 laptop to 5385 MHz – and it’s validated by CPU-Z. What makes this special is that it was done using the stock cooling system (no liquid metal, no physical cooler mods). System Specs: · Laptop: Alienware Area-51m R1 · CPU: Intel Core i9-9900K (8C/16T) · Motherboard: Z390 chipset (Alienware custom) · Cooling: Factory stock cooler (dual fans, vapor chamber) · RAM: 128GB (4×32GB) · Vcore: 1.368 V (as recorded in validation) · Multiplier: 54× · BCLK: 99.76 MHz How It Was Done: · Multiplier set to 54× · BCLK increased to 99.76 MHz · Vcore manually adjusted to ~1.34–1.37 V · Maximum power limits unlocked · Alienware Command Center set to “Performance” fan profile All settings were applied via BIOS and Intel XTU. No hardware modification was made to the cooling system. Why This Matters: · Most laptops with the i9-9900K struggle to maintain 5.0 GHz on all cores, let alone 5.385 GHz. · Achieving this on stock cooling proves how capable the Area-51m’s thermal solution really is. · The CPU-Z validation provides a verifiable proof of the all-core frequency. Stability & Temperatures: This was a validation run – the system was stable long enough to complete the CPU-Z validation and a short Cinebench R23 run. Under full load, core temperatures quickly hit 95+°C and thermal throttling kicked in. This configuration is not recommended for daily use or long gaming sessions; it’s purely a benchmark / personal record. Final Thoughts: The Alienware Area-51m R1 remains a legendary laptop that can still surprise with its overclocking headroom. Achieving a 5.385 GHz all-core overclock on factory cooling is a testament to its robust design. If you own one, carefully push its limits – but keep an eye on thermals! --- Validation link again: https://valid.x86.fr/ba5b0f --- Alienware Area-51m R1 – i9-9900K all-core overclock to 5385 MHz on stock cooling! ✅ Validated by CPU-Z. 🔗 https://valid.x86.fr/ba5b0f #Alienware #Area51m #Overclocking #i9_9900K #CPUZ