incendery
-
Posts
81 -
Joined
-
Last visited
Content Type
Profiles
Forums
Events
Everything posted by incendery
-
Hello! this is a behaviour of the embedded controller causing the CPU to throttle when GPU load is applied, unfortunately this is seemingly only solvable with premamod EC firmware but that is practically impossible to find:( throttlestop will do fine as it continuously overrides the register change the EC makes
-
this sounds similar in issue to what I experienced, I believe there is an issue with one of the drivers that gets automatically pulled and it's congestion on ambush, if you put your system under load and hold a key then release do you continue to see keystrokes for a short time after releasing?
-
after more testing I have realized the bios change does not fix the issue 😞 I will be doing more testing with different drivers to try and diagnose it
-
My memory training isn't nearly as happy on the 1.05 bios! 3200mhz errors a lot when previously on xmp it was rock solid stable for months. I am stable now at 2933mhz but I wonder if the keyboard can be ported forwards to the 1.07 bios or perhaps the memory initialization backwards to the 1.05 🙂
-
It's been a little bit since the last update, I have been busy moving countries so not a lot of work done on the laptop 😄 I found an issue with the bios version based on 1.07, due to some problem with how the keyboard is read and buffered (I believe) there is an issue where a key held for a while will have ghost keypresses when it is released. The keyboard issue persists between seperate installs and is not present on the 1.05 version so I believe it is something with how the EC communicates with the system on differing versions. I am currently in the process of installing upgraded fans from TaoBao, I made the mistake of not ordering the DC to PWM converters from the seller so I must make my own which is taking some time, I will hopefully have more updates on this within the next month 🙂 Stay safe, stay happy.
-
if you look for the service manual for your model clevo there is probably a schematic you can use to help troubleshoot 🙂
-
I do plan on talking to the VRM at some point, I have recently moved countries so my time has been a little short and I've been using the laptop as my main PC now 🙂 I salvaged The 20mOhm shunts from some parts donor boards I had laying around at the time, nothing too specific I don't know if my machine ever supported gsync and haven't tried getting it working, using NVIDIA custom resolution settings I have the display overclocked happily to 100hz instead 🙂
-
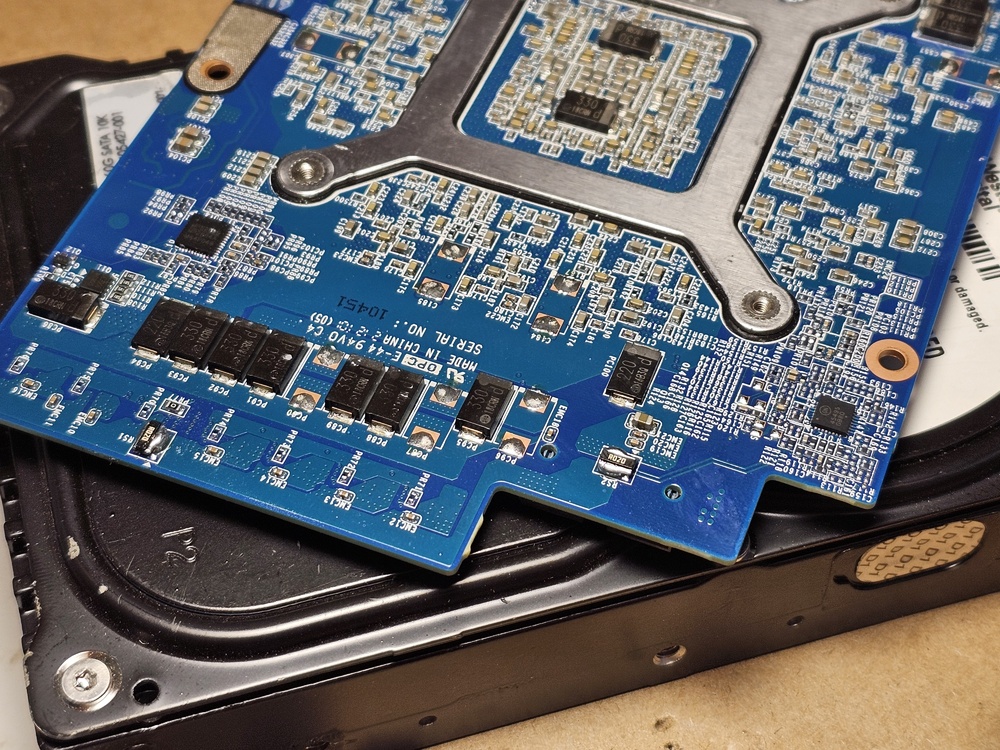
Yes I did shunt mod it 🙂 I was quite conservative with it as I want it to last a good long time. I added 20mOhm shunt resistors on top of the 5mOhm already on the card so in theory (without talking to the vrm itself) it should be 180w. The performance is quite good and beats 165w dynamic boost cards in GPU benchmarks
-
Part 2: BIOS modifications. A late update since the last post, life has been busy 🙂 To preface this post, I am firmly a beginner with BIOS modifications and my understanding is limited 🙂 I am cobbling together information from many smart people to make this work. My goals for the BIOS modifications are: Coffee lake support. Power limit removal. Functioning audio drivers with working headphone amplifier. Native Nvidia driver installation without INF modification. 1 + 2 For Coffee lake support and power limit removal I am using Dsanke's fantastic 1.07.24 bios based on the P775tm1, while this functions mostly flawlessly it does have issues where the audio drivers no longer work and the powerful dedicated headphone amp doesn't switch on. 😞 From what I could understand in the smxdiy thread by Dsanke this has to do with the bios 1.07.24 changing from HDA to UAD support. 3 Initially I was dissapointed that this bios didn't work properly with the audio drivers and I would like to have my headphone amplifier working 😄, the symptoms of non functional amp + spdif LED always on were very similar to an issue I caused when trying to initially get native Nvidia driver support following on a Post from user SRS2236, I had changed the subsystem ID value for the intelHD audio device in error when figuring out which was for the GPU! this mismatch of IDs stopped the Realtek driver from working properly similarly to how Nvidia driver needs an INF modification. With this hunch I had a look at the boardID file in the bios provided by Dsanke and sure enough the subsystemID for intelHDaudio was set to that of the P775tm1 not the P775dm3, changing this from 7709 to the correct ID of 7705 allowed me to install a realtek UAD driver and retain working audio with a functional headphone amplifier! The only issue I was unable to resolve is that the headphone amp no longer lowers volume automatically on detecting headphones so care must be taken not to deafen yourself 🙂 Link to original post with hex values to change 4 the Nvidia driver has a set list of matching device and subsystem IDs, if your combination of IDs isn't valid then it will fail to install and require NVcleaninstall or other methods to add your combination, while this works fine it also requires extra hassle along with no automatic updates and issues with anticheat solutions. The fix for subsystem ID mismatch is to change the subsystem ID 😄. once again referring to this post for clues we can see the BoardIDPEI module is where the subsystem ID for the GPU originates, and if we can change our ID to 7715 (instead of 7705 or 7709 from p775dm3 and p775tm1 respectively) then we can trick the Nvidia driver into installing without any questions asked because 7715 is the subsystem ID for the clevo X170km which shipped with a 3080. after a bit of trial and error the values which need changing will be these 2 values (if your bios is p775dm3 derived it will be 0577, if p775tm1 derived it will be 0977) Change them to 1577 as below. E8 00 59 74 0C 48 75 10 C7 45 FC 58 15 15 77 EB DE 10 E5 1B 74 4D C7 44 24 0C 58 15 15 77 C7 44 After changing the IDs I have had 0 issues regarding GPU drivers, automatic updates etc all work flawlessly 🙂 Issues / future plans I've become aware of the CPU throttling behaviour when any GPU load is detected 😞 this isn't too problematic as throttlestop can override this behaviour but I would like to solve this. From research and my limited understanding it seems to be a function of the EC causing this throttling, when the GPU is loaded bit 38 in MSR 1A0H is flipped (Turbo mode Disable) and when load is removed it reverts back after a few seconds, Prema has to my understanding overcome this with their custom EC firmware which is not available unfortunately, I reached out to Prema but did not hear back from them (I respect their decision not to release the files due to personal or professional reasons). My plan going forward is to take some time to learn more about reverse engineering and see where that takes me 🙂 Thank you for reading!
- 24 replies
-
- 1
-

-
- clevo p775dm3
- clevo
- (and 3 more)
-
amazing scores!! I can only dream of CPU temperatures that low 😅😅😅
-
intruiging, thanks for sharing!
-
I suspect it may not be a vbios thing at this point, it may be something with the EC and enabling the GPU.
-
clevo p870tm/tm1-g Official Clevo P870TM-G Thread
incendery replied to ViktorV's topic in Sager & Clevo
enable above 4g decoding, that should do it 🙂 -
interesting! strange the tongfang vbios didn't work with the es CPUs 🤔
- 24 replies
-
- 1
-
-
- clevo p775dm3
- clevo
- (and 3 more)
-
MXM is quite dead in the consumer space unfortunately 😞 this is a card from the last true DTR clevo with socketed CPU and GPU (X170KM)
-
unusual it isn't working with the QTJ1, what style mutant chip was it? one of the IHS ones? I believe I used Dsanke's 1.05 based bios when I had a QTJ2 running in mine before the heatsink swap
- 24 replies
-
- 1
-
-
- clevo p775dm3
- clevo
- (and 3 more)
-
wow I'm impressed it's stable at +220! what clocks did you see through the run?
-
Wow what a fascinating little device, it will be interesting to hear how it goes 🙂
-
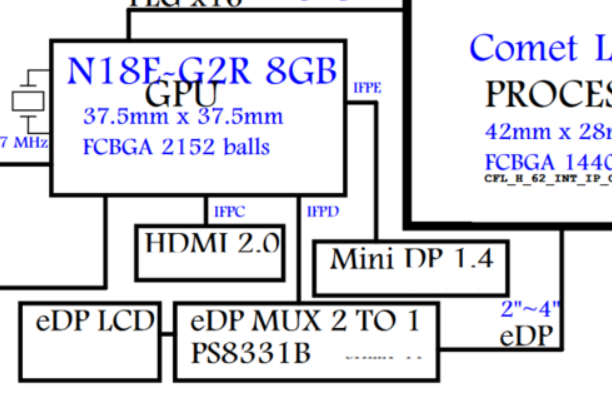
unless I have got the wrong schematic I believe you are mistaken. The EDP lane coming from the integrated graphics goes into the EDP MUX, this switches between the DGPU and the IGPU to connect them to the LCD, all other external video connections only connect to the DGPU. When set to Hybrid the default display will be internal as the default display will be routed through the IGPU (this may be something you can change with a bios that has unlocked option menus?) as for the no display on discrete my guess would be that there is some issue along the way initilizing the GPU past the GOP vbios state without an internal display hooked up, I am admittedly not very knowledgable in that area though so I can only hypothesize.
-
interested to hear how this goes, I have some terrible scratches on the rear window that make it impossible to see through in the right lighting.
-
The mux isn't the issue here as it is only hooked between the internal display, you can't use the integrated graphics externally because it isn't hooked up to it in any way that is why hybrid doesn't work on an external display. I think the issue is the default display output is set to internal for whatever reason when set to dedicated graphics only. Not to excuse Sager's support which in all likelihood is the cheapest call centre in a country where wages are poor so they can increase profits, but this isn't a direct move to create e-waste as a laptop being used without an internal display connected is an uncommon use case. it isn't a "fake MUX switch" it is simply a device to switch the display between integrated and dedicated graphics on the fly when using hybrid mode, this is only connected to the internal display connection which is standard on most laptops with dedicated graphics.
-
not sure exactly how or if it would work but I would be thinking of using the dead LCD as a starting point, it's already somewhat of a breakout if you trace the signals 🙂
-
looking at the EDP standard you may need to pull HotPlugDetect to 3.3v, I wonder if a display not reporting EDID data would let the GPU work properly too
-
Awfully tempting with the 9900k... maybe I'll make a bad financial decision sometime in the future and get one 😂 the heatsink is fantastic, the only thing I've changed is using some springs to clamp the CPU instead of just screws as included with the heatsink originally, eventually I plan on soldering copper shims on for the vrms, and memory on the GPU. I've seen a few different ones on taobao from the same seller who produces the vapour chamber cooler, https://item.taobao.com/item.htm?id=640747471518 not sure exactly which are the most performant but I believe the 51m converted fans seem the "performance" option maybe
- 24 replies
-
- 1
-
-
- clevo p775dm3
- clevo
- (and 3 more)
-
Thank you :D, and yes I'm aware it would score a fair amount higher with a 9900k 😅I'm thermally limited as is so I'll have to cope with my 8700k I went with the air only one of these from aliexpress https://www.aliexpress.com/item/4000174372901.html it handles the heat well but I am looking to order some upgraded fans from taobao to try and combat the heat soak
- 24 replies
-
- 1
-
-
- clevo p775dm3
- clevo
- (and 3 more)