
Amir.s
-
Posts
65 -
Joined
-
Last visited
Content Type
Profiles
Forums
Events
Everything posted by Amir.s
-
 Glad I could help! If you have any questions or run into any issues, just let me know and I’ll do my best to help.
 -
Go into XTU and set the Core Voltage Offset to -0.120V, then set all cores to 4.8GHz and test it. Your CPU performance should improve significantly. If it’s stable, try lowering it further to -0.125V and test again. The CPU should stop throttling, and temperatures should drop as well. Your CPU score is terrible. You should be getting somewhere between 10,200 and 10,400 points. On my 9900K, I was completely stable at -0.140V with all cores running at 4.8GHz, and I had absolutely no throttling.
-
To test stability, you can use a memory testing tool or just launch a game and see if the system remains stable.
-
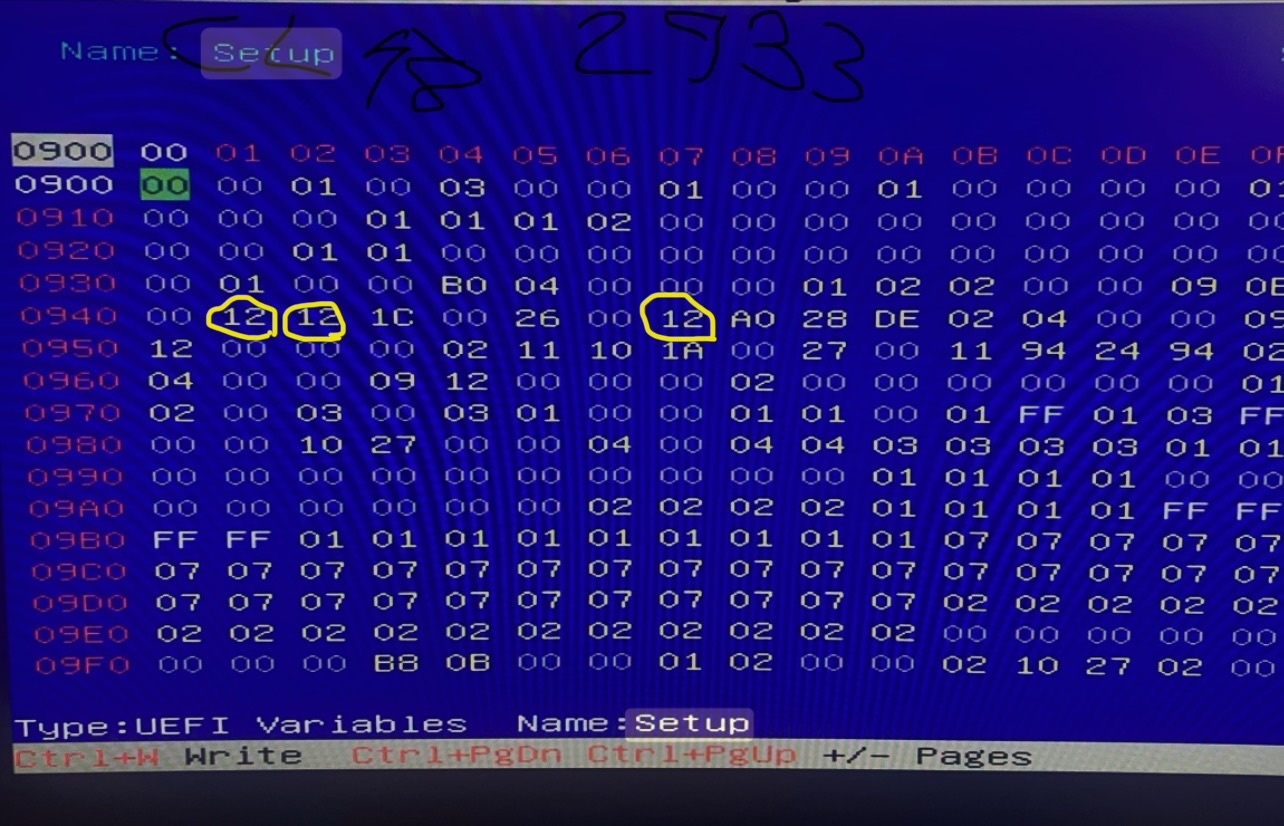
Is the system stable now? Did you also apply the Memory Warm Test option? With the right timing configuration, you should be able to run stable even at CL19. For now, reboot the system, set those three values I marked to 13, and test it.
-
I can help you undervolt it without using XTU. You just need to extract the PE32 file and send it to me. If you have any issues, just let me know and I’ll help you out.
-
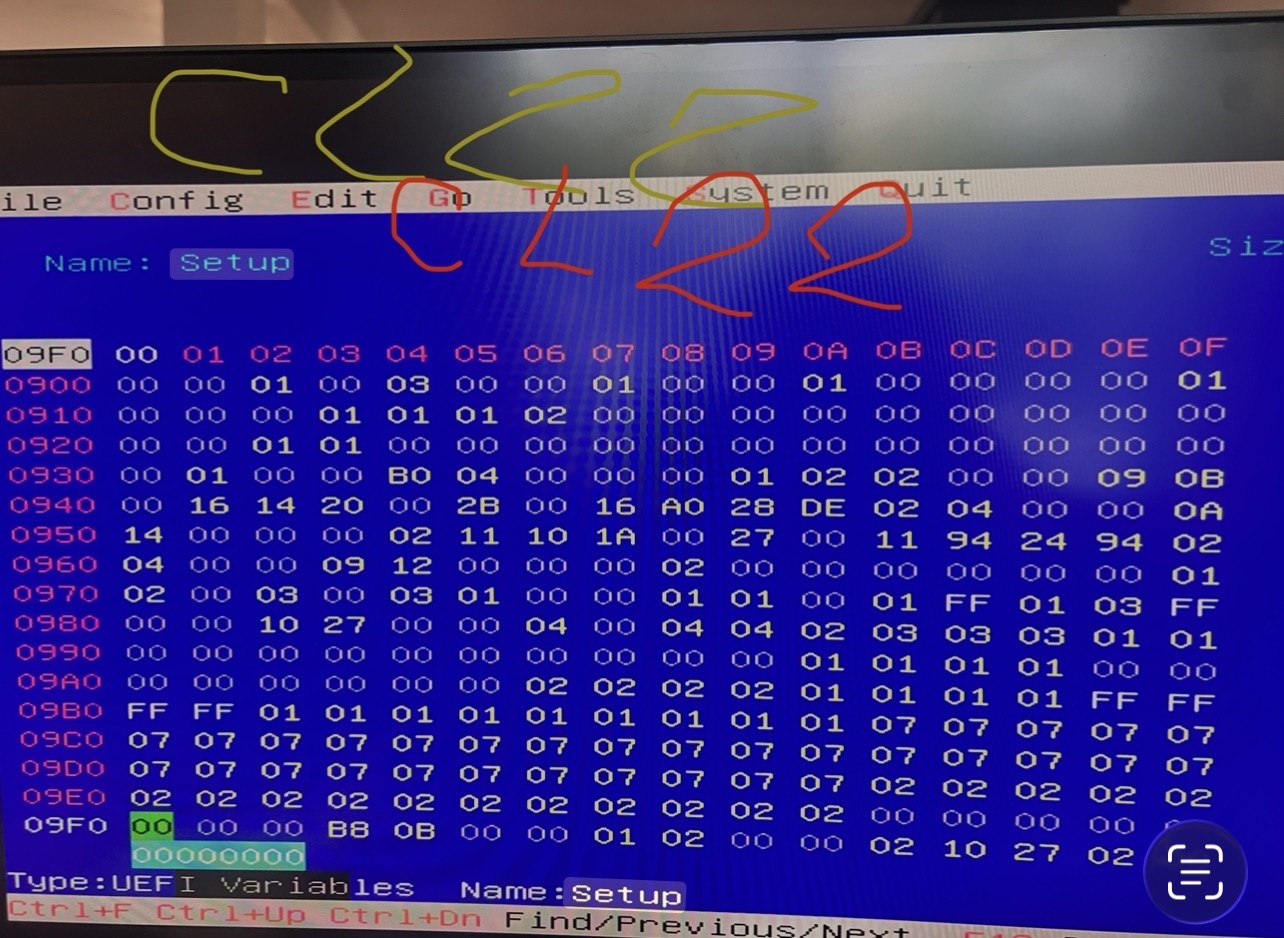
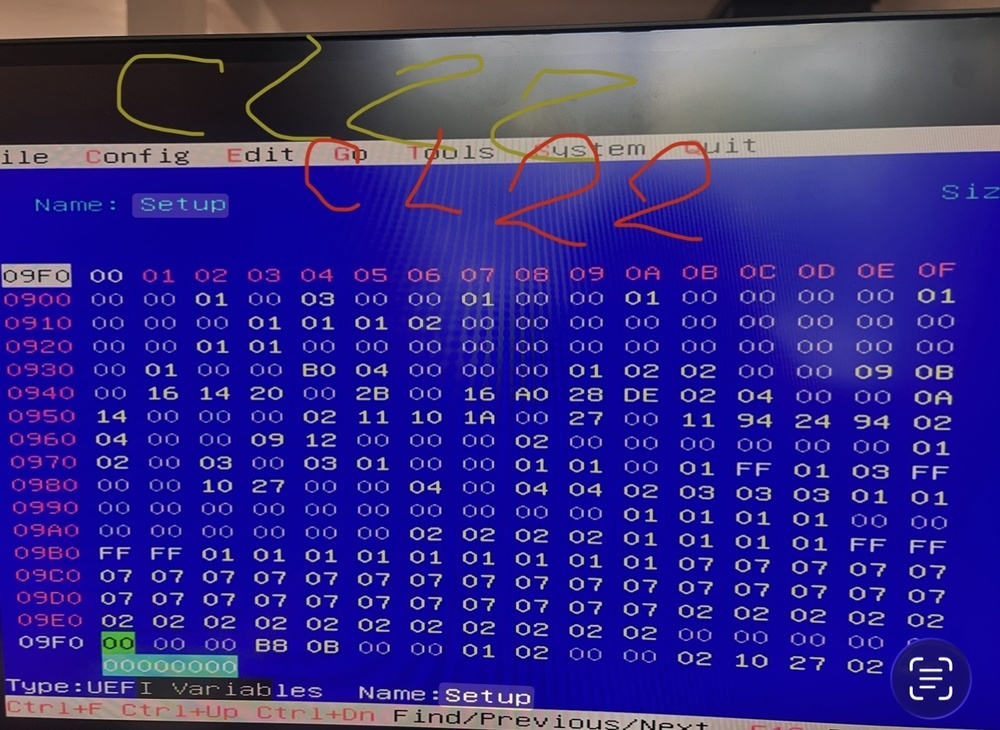
0xB43 = 00 disable memory warm boot test Try testing these CL22 settings too.
-
The timings don’t seem to be compatible with your RAM. What timings are you currently testing with?
-
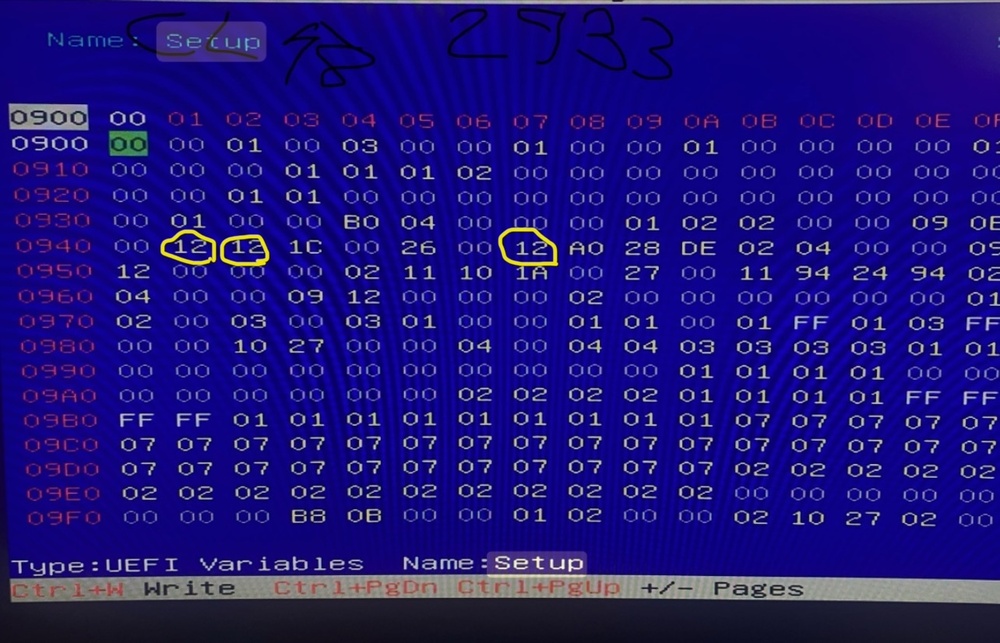
Make the changes I mentioned. I’ve marked them in yellow — change those values from 12 to 13. If it’s still not stable, try 14 and let me know. Also, send me a picture of your RAM timings after making the changes.
-
We need to increase the timings to make the system more stable, because your RAM’s standard timings at 2666 MHz are CL18. If we set them to CL19, it should be more stable.
-
One of your RAM sticks supports XMP and has good timings, but the other two are pretty bad. The ideal setup is to have matching RAM modules with the same timings and frequency.
-
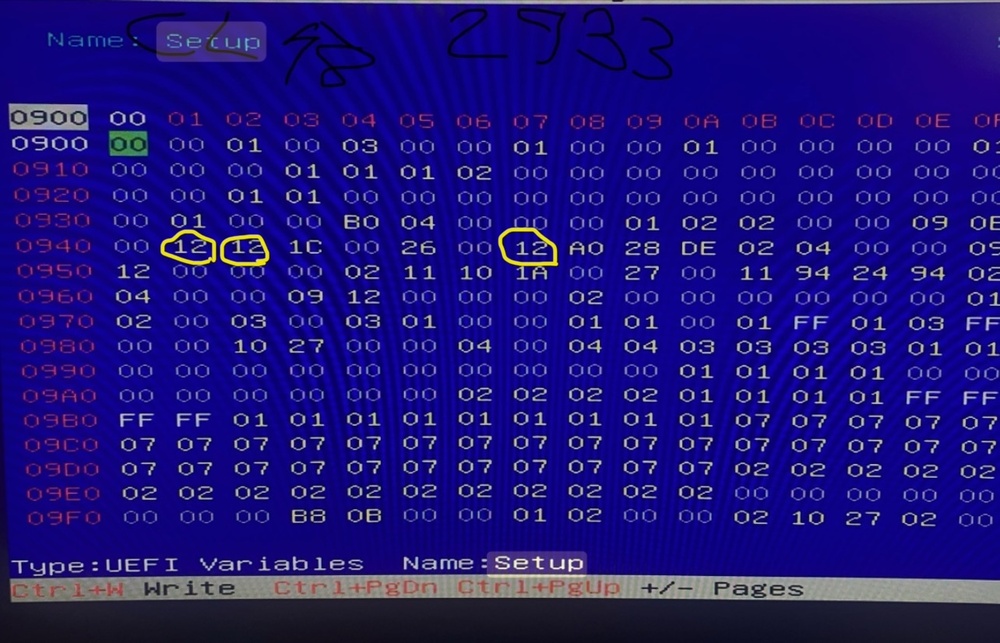
Change the ones I marked in yellow to 13.
-
The timings need to be set manually. If the system doesn’t display an image with these timings, we’ll increase them because two of your RAM sticks are already running at CL18 timings at 2666 MHz. Because of that, we may need to set the timings to CL19 or even CL20. There’s absolutely nothing to worry about, and these settings are completely safe. If you have any questions, feel free to send me a message and I’ll help you through it.
-
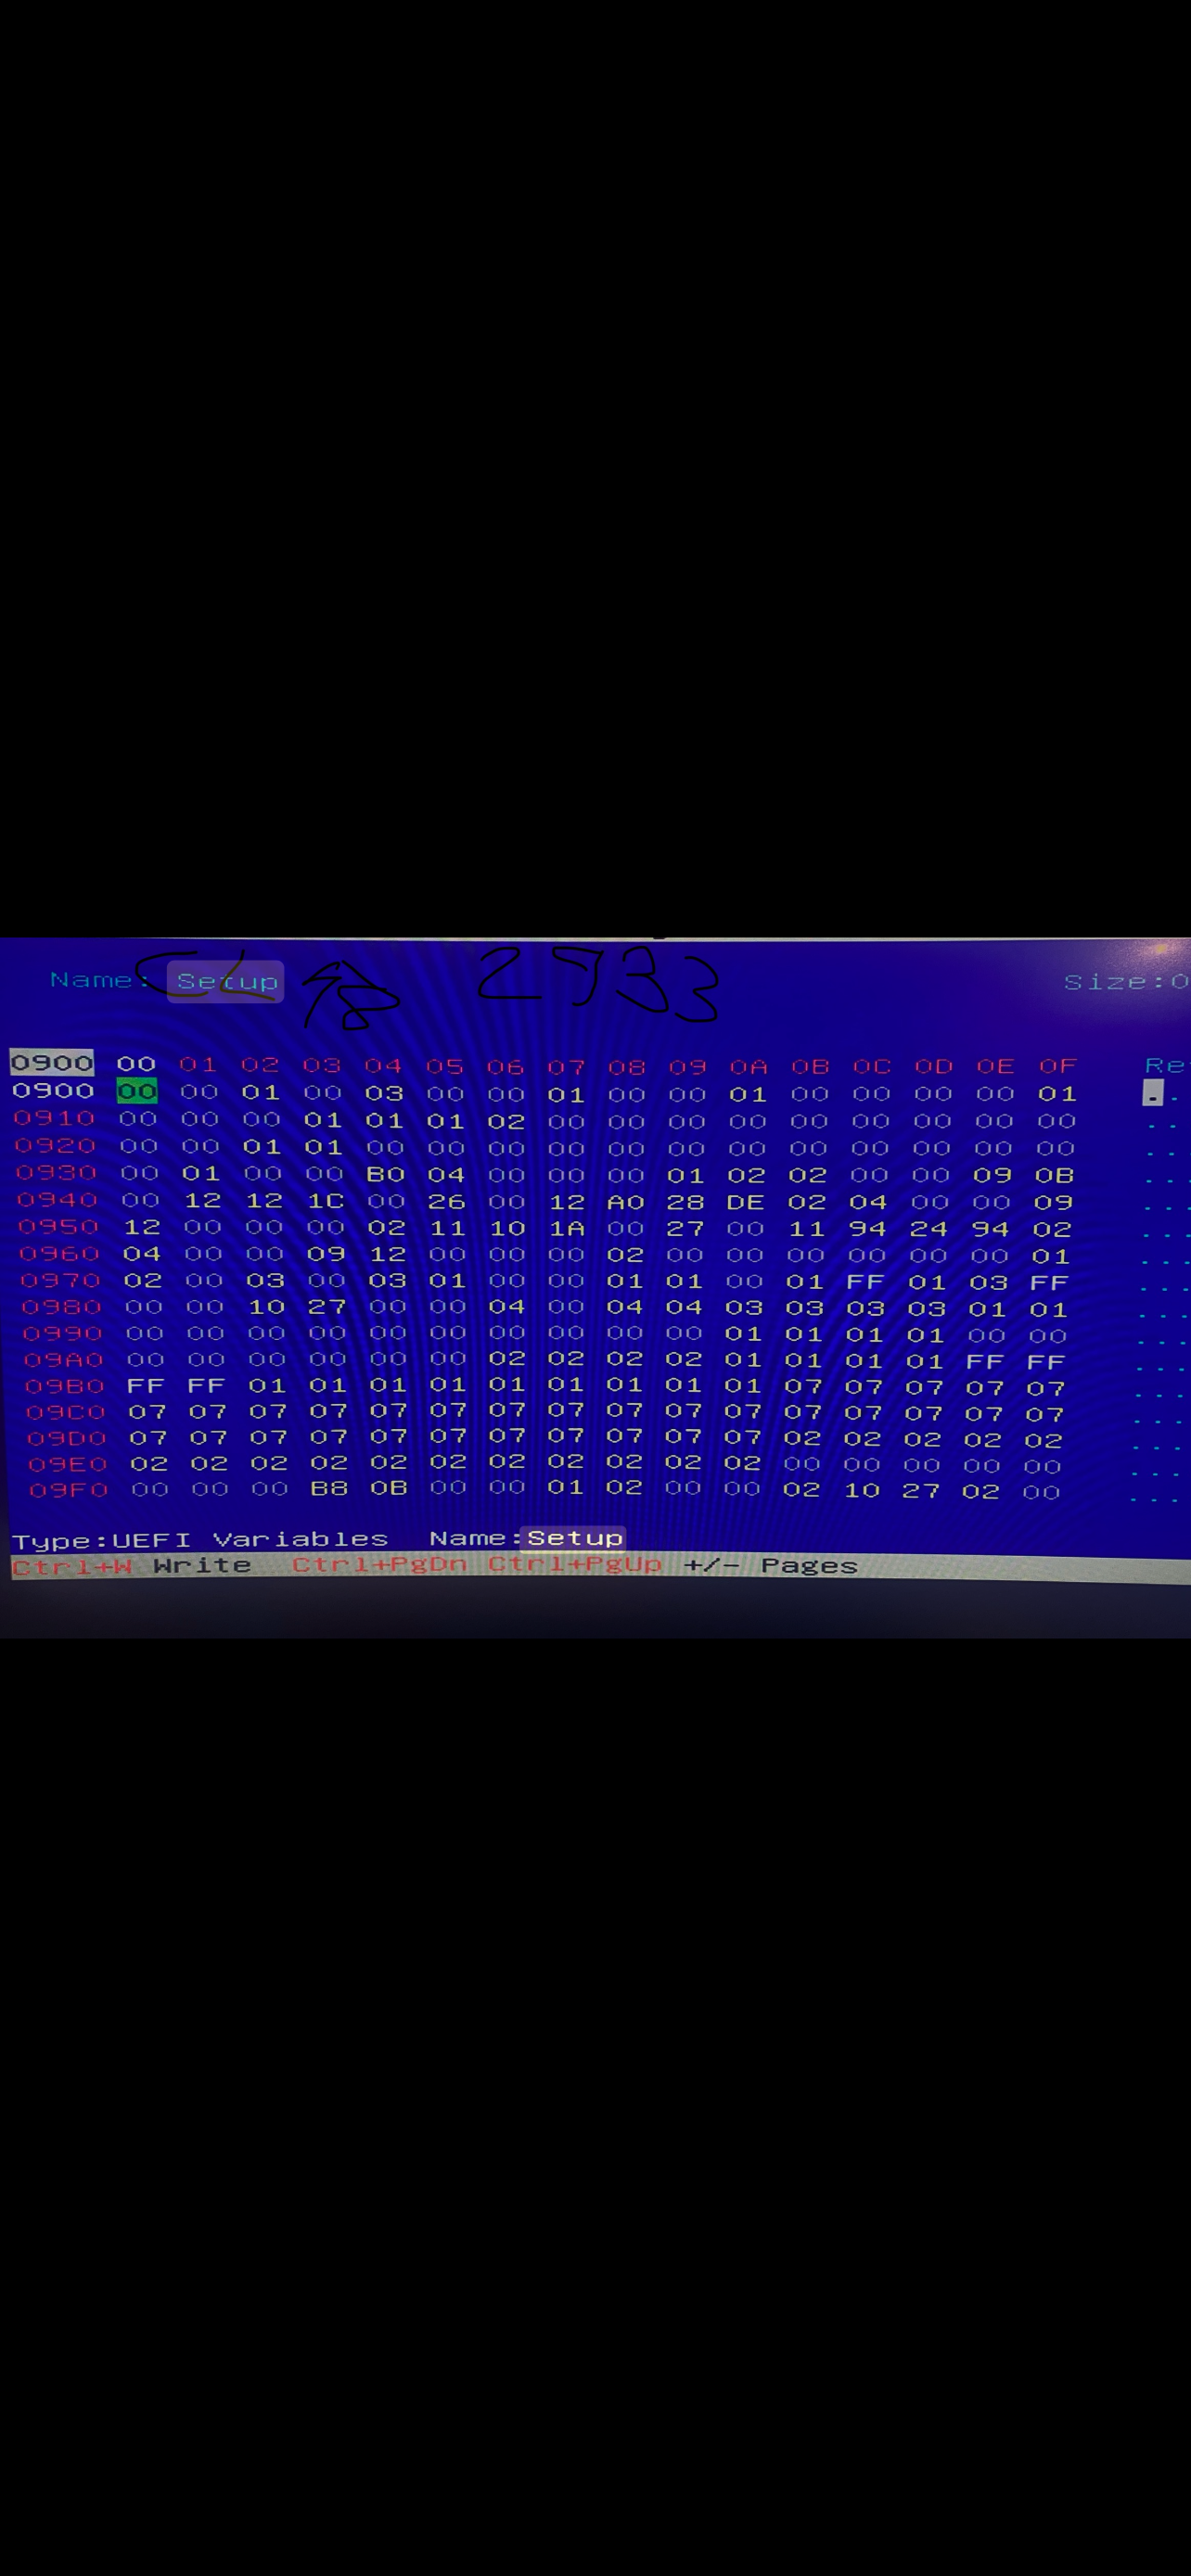
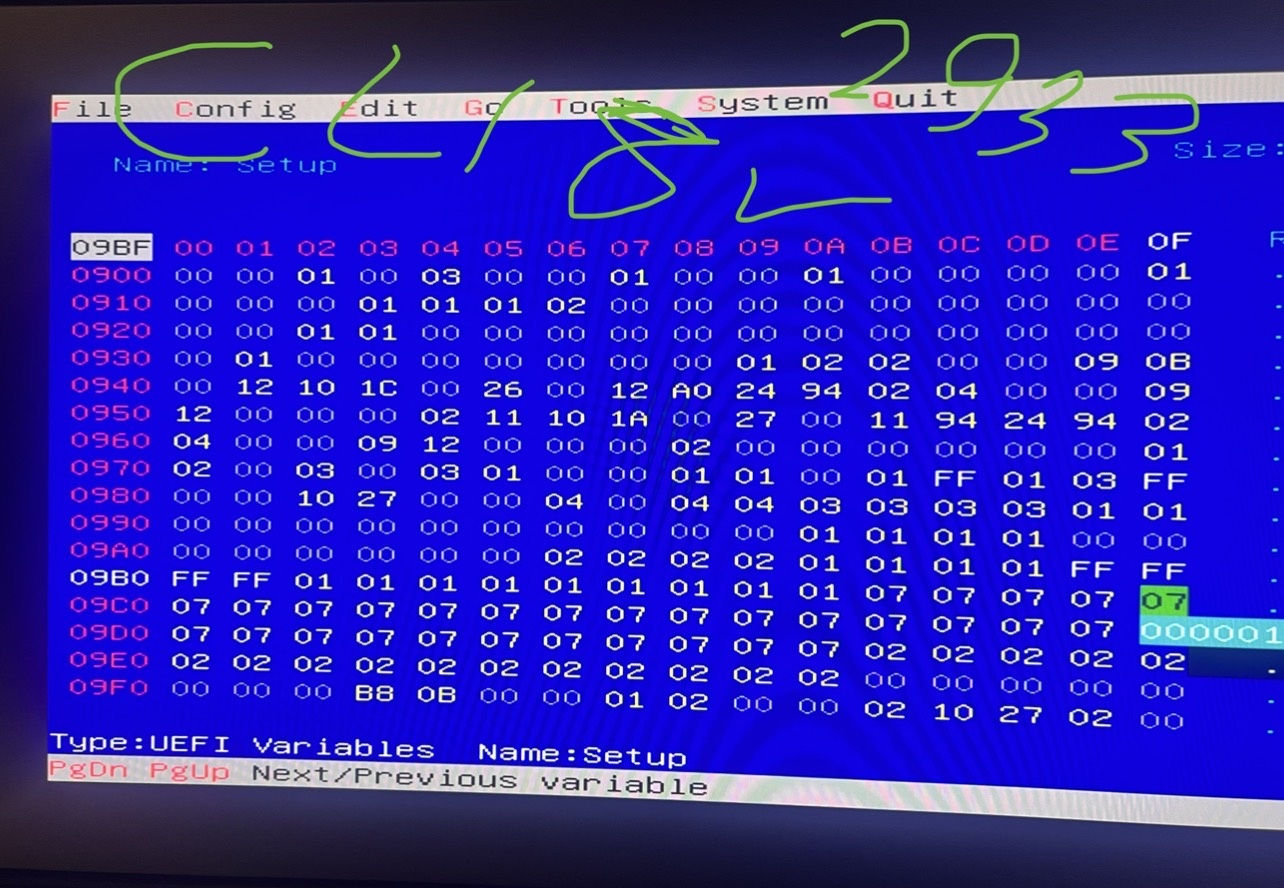
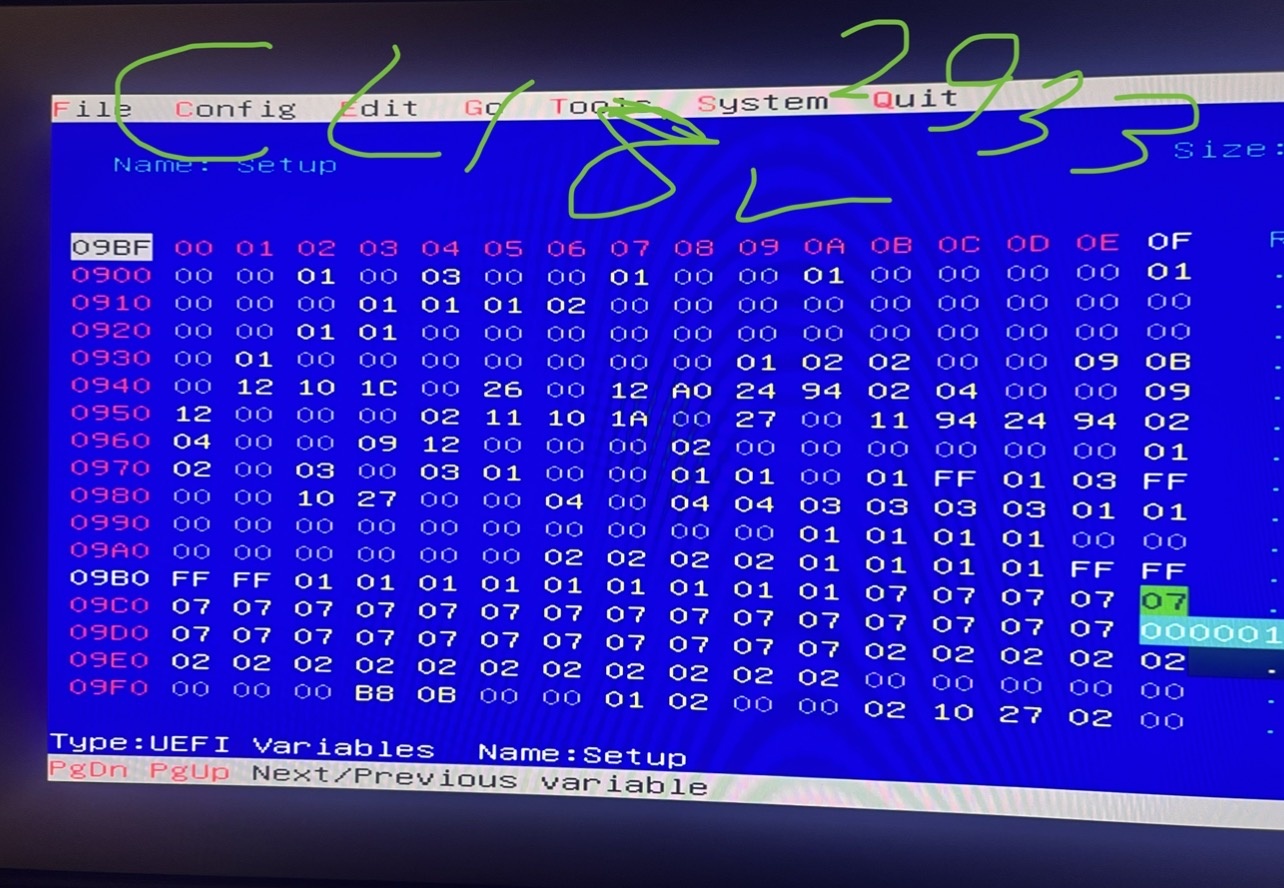
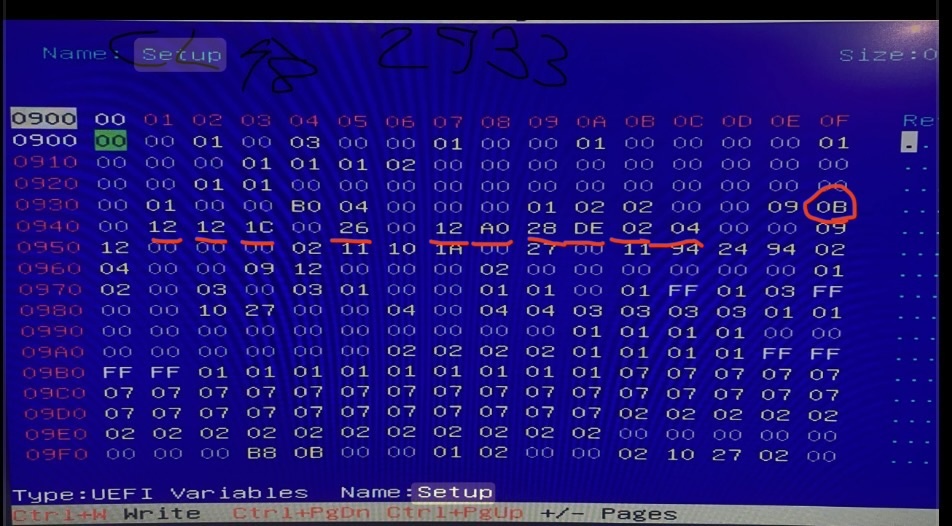
093F is the memory multiplier. When you set it to 0B, the RAM frequency changes to 2933 MHz. The 0940 row contains the memory timings, which are the ones I marked with the red lines.
-
Besides those three, change the ones I marked with the red lines as well, similar to the picture I sent.
-
Besides those three, change the ones I marked with the red lines as well, similar to the picture I sent. If the system doesn’t display an image after applying the settings, wait for about 2 minutes and don’t turn it off. It should reboot automatically and display an image again. Then go into the BIOS; the memory frequency will have dropped to 2666 MHz. At that point, I’ll send you more conservative timings so you can reach 2933 MHz.
-
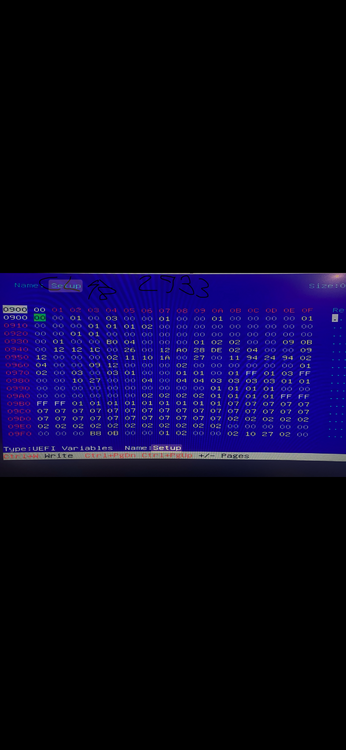
Keep in mind that inside RU, offsets are shown without the 0x prefix. For example, an offset that appears as 0xA65 in the PE32 file will be displayed as 0A65 in RU. Just find the three offsets I mentioned and enter the values exactly as shown. Ignore the rest, as those settings are related to RAM timings ظ 0xA63 = 75 0xA64 = 0B 0xA65 = 01
-
I checked the PE32 file and it looks fine, so there’s no issue with it. That file is only used to view the hex values from within Windows, and we don’t need it for this process. First, you need to prepare the USB drive. I’ll send you a link, and you can copy the required files to the flash drive. Link file :https://filebin.net/jgrip7aewrf2f7xe Open Rufus. Select your USB drive under Device. Use the following settings: Boot Selection: Non bootable or FreeDOS (depending on your Rufus version) Partition Scheme: GPT Target System: UEFI (non CSM) File System: FAT32 Click Start and wait for the process to finish. Once it’s done, copy RU.EFI to the root of the USB drive. The USB structure should look like this: \EFI\BOOT\BOOTX64.EFI \RU.EFI Then: Restart the system. Press F12 to open the boot menu. Select the UEFI USB drive. The RU environment should load. Next, type RU.EFI and press Enter to launch it. Press Alt + Plus (+) or Alt + Minus (-) to display the list. Then use Ctrl + Page Up and Ctrl + Page Down to find SETUP and press Enter. Inside the Setup section, use Ctrl + Page Up and Ctrl + Page Down to navigate through the entries. Check the hex values I posted earlier and enter the same numbers and letters accordingly. Once you’re done, press Ctrl + W to save the changes. After saving, press Ctrl + Alt + Delete to reboot the system and let it boot normally.
-
Check your BIOS version in CPU-Z and tell me which version you’re on. If needed, you can send me the extracted text file as well. First, downgrade your BIOS to 1.7.3 since newer BIOS versions can lock or restrict some settings. Have you made the bootable USB for RU yet?
-
This picture shows the hex values for the memory frequencies that are used when inserting them. The highest frequency you can get on the Area-51m is 3200 MHz. If you tell me exactly what you’re trying to do, I can help you out. Also let me know your laptop model, what RAM you’re using, and its stock frequency.
-
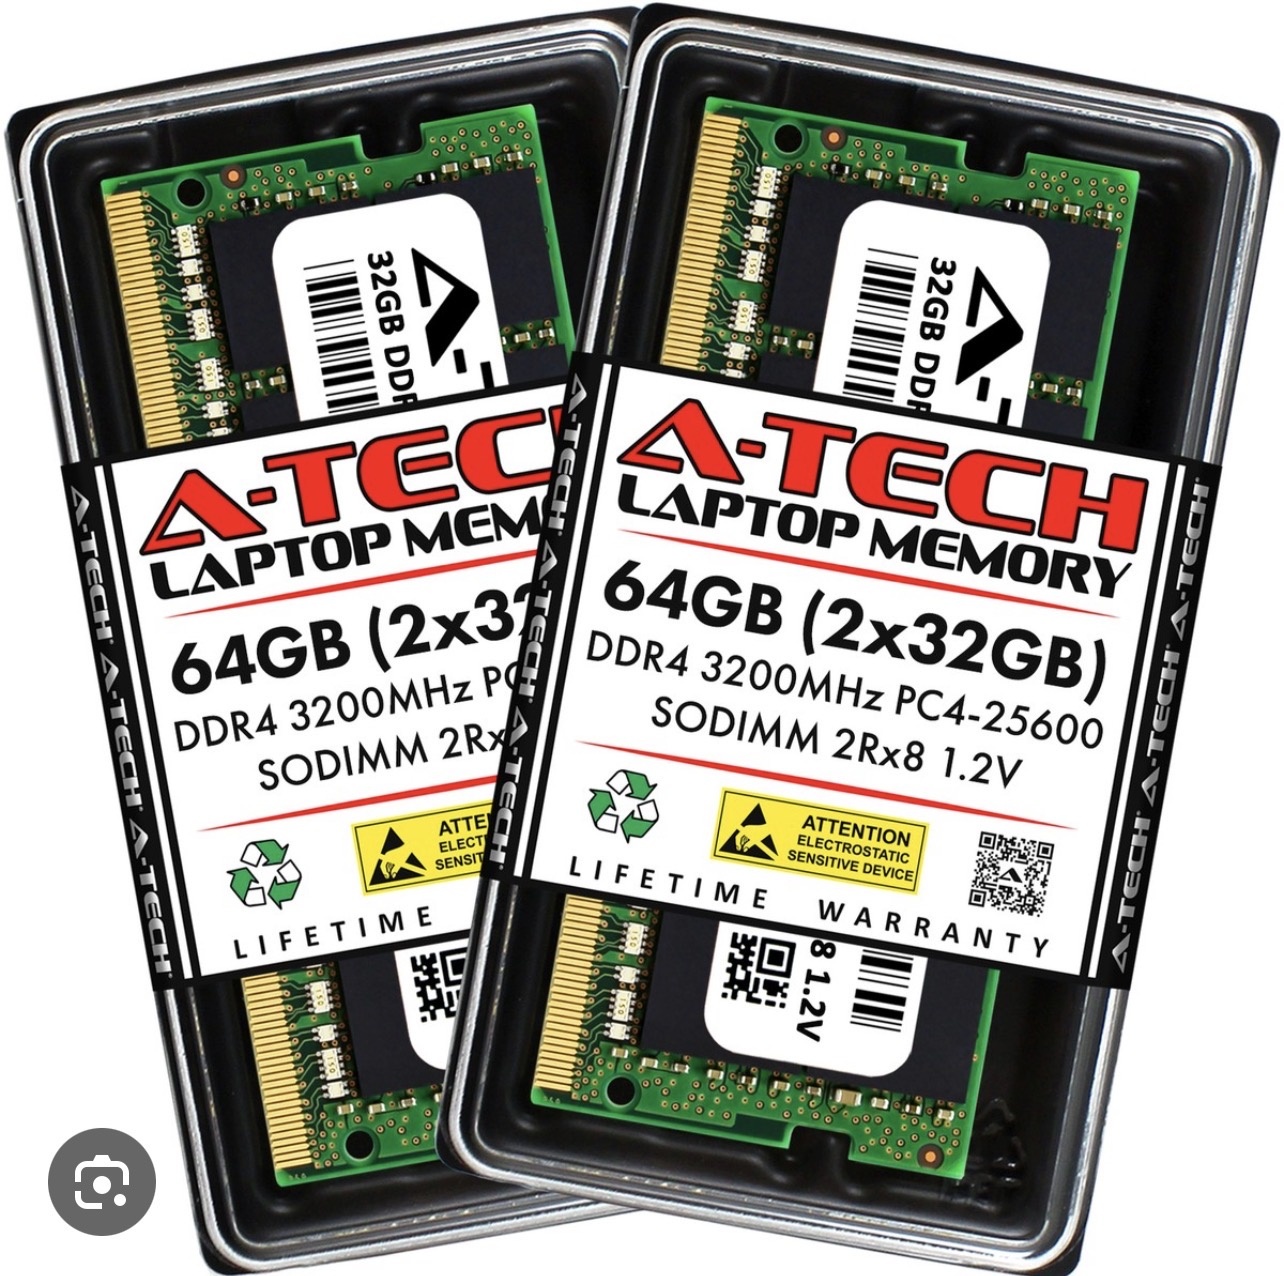
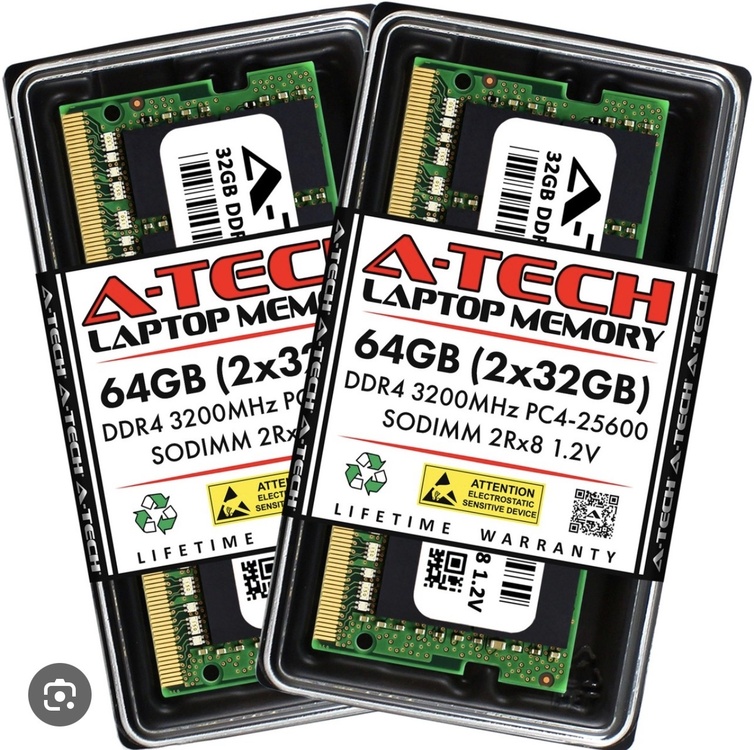
The settings I sent you were tested at 3200 MHz using the RAM model shown in the attached photo.
-
Apply these settings and enable XMP Profile 1. I’d also like you to disable Memory Warm Test (Warm Memory Training) so the system is less strict when training the RAM and boots more easily. If the system doesn’t display any image after the changes, you’ll need to disconnect the CMOS (BIOS) battery to reset the BIOS settings. 0A63 A0 0A64 0F 0A93 00 0A65 02
-
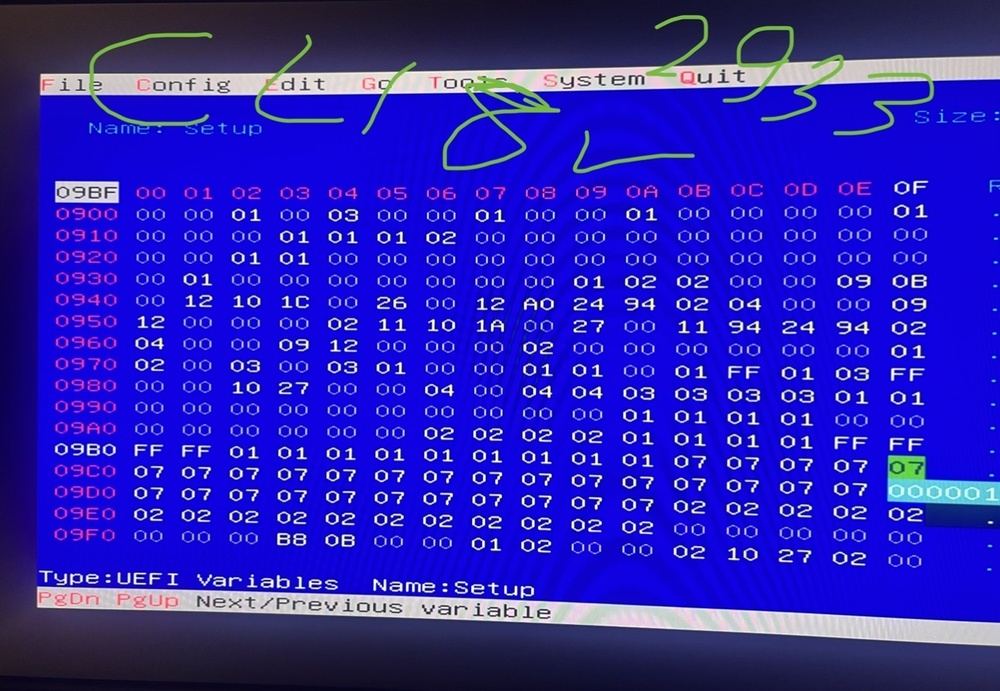
0xA65 = 01 ( costum profile on) Set the memory timings according to the screenshot I sent. The BIOS must be version 1.9.3 or earlier, otherwise the BIOS applies stricter timing restrictions. I’m using BIOS version 1.7.3. On newer BIOS versions, memory timing adjustments are much more limited, so you should use an older BIOS version to apply these timing changes.
-
If you lower the timings—for example, to CL19 or CL18—at 2933 MHz, you’ll get better performance than 3200 MHz running at CL22. To run the memory at 3200 MHz, you need to enable XMP.
-
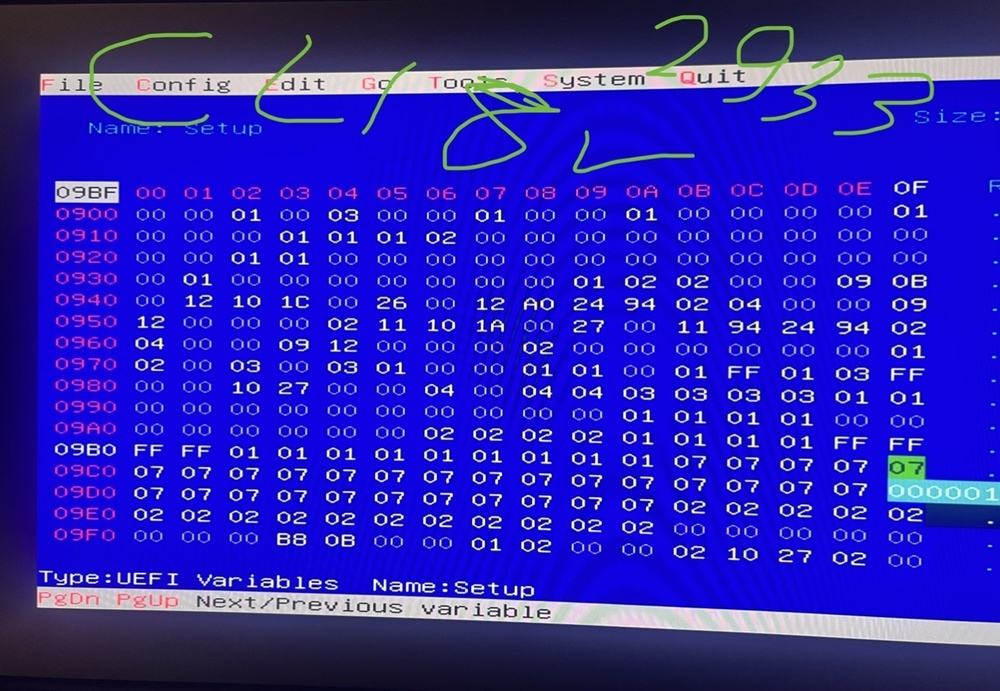
If you lower the timings—for example, to CL19 or CL18—at 2933 MHz, you’ll get better performance than 3200 MHz running at CL22. Set the memory timings according to the screenshot I sent. The BIOS must be version 1.9.3 or earlier, otherwise the BIOS applies stricter timing restrictions. I’m using BIOS version 1.7.3. On newer BIOS versions, memory timing adjustments are much more limited, so you should use an older BIOS version to apply these timing changes. 0XA65 → 01 custom profile
-
By default the frequency is 2400. My RAM is 2666 MHz and it is stable up to 2933, which is why I didn’t push it higher. Send me a screenshot from the Memory tab in CPU-Z so I can check your RAM situation and guide you.