
Amir.s
-
Posts
118 -
Joined
-
Last visited
Content Type
Profiles
Forums
Events
Everything posted by Amir.s
-
My friend, BIOS version 1.9.3 is newer than 1.3.2, and you won’t have any issues. This problem will be resolved by upgrading the BIOS to version 1.9.3. https://www.dell.com/support/home/en-uk/drivers/driversdetails?driverid=tc3x1
-
 These settings control memory bandwidth, and the other option enables custom settings and XMP profiles. If you configure both options, you will get a 2933 MHz memory frequency. Can’t you find these hex values in RU.efi? To be stable at 2933 MHz, your RAM may need timing adjustments. You can also try CL20 or CL22 timings. The hexadecimal equivalent becomes this, meaning: CL16 → 0x10 CL18 → 0x12 CL20 → 0x14 CL22 → 0x16 CL24 → 0x18 and so on… Where are the other timings? In RU, usually after address 0x940, the following addresses correspond to: Address | Timing | Description 0x940 | CL | CAS Latency 0x941 | tRCD | RAS to CAS Delay 0x942 | tRP | Row Precharge 0x943 | tRAS | Active to Precharge Delay For example, for timings 20-20-20-48 (CL-tRCD-tRP-tRAS), you enter: Address | Hex Value 0x940 | 0x14 (CL20) 0x941 | 0x14 (tRCD 20) 0x942 | 0x14 (tRP 20) 0x943 | 0x28 (tRAS 48) Decimal value 48 in hexadecimal becomes 0x28 By the way, send me the link to your best Time Spy score so I can take a look. .
 -
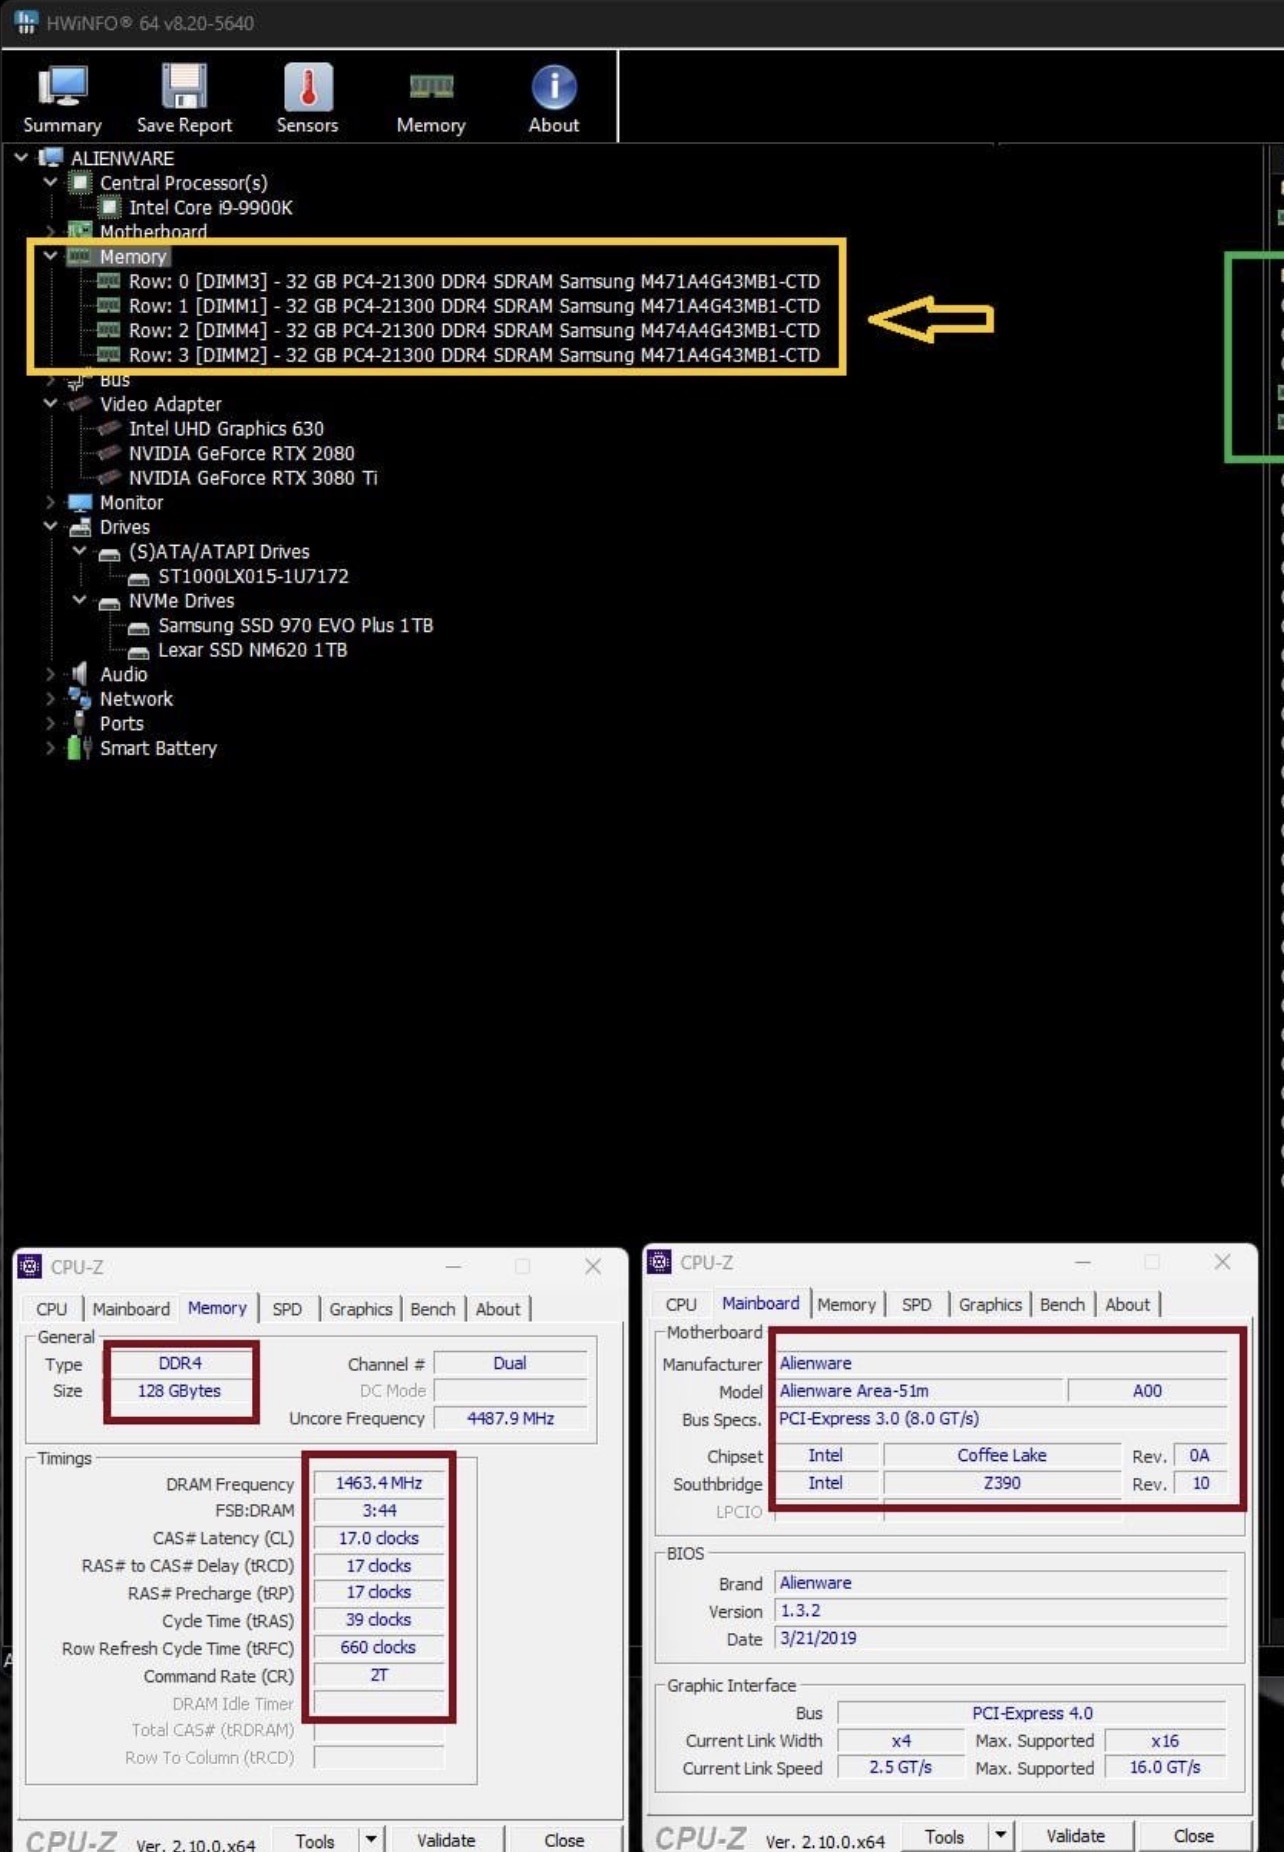
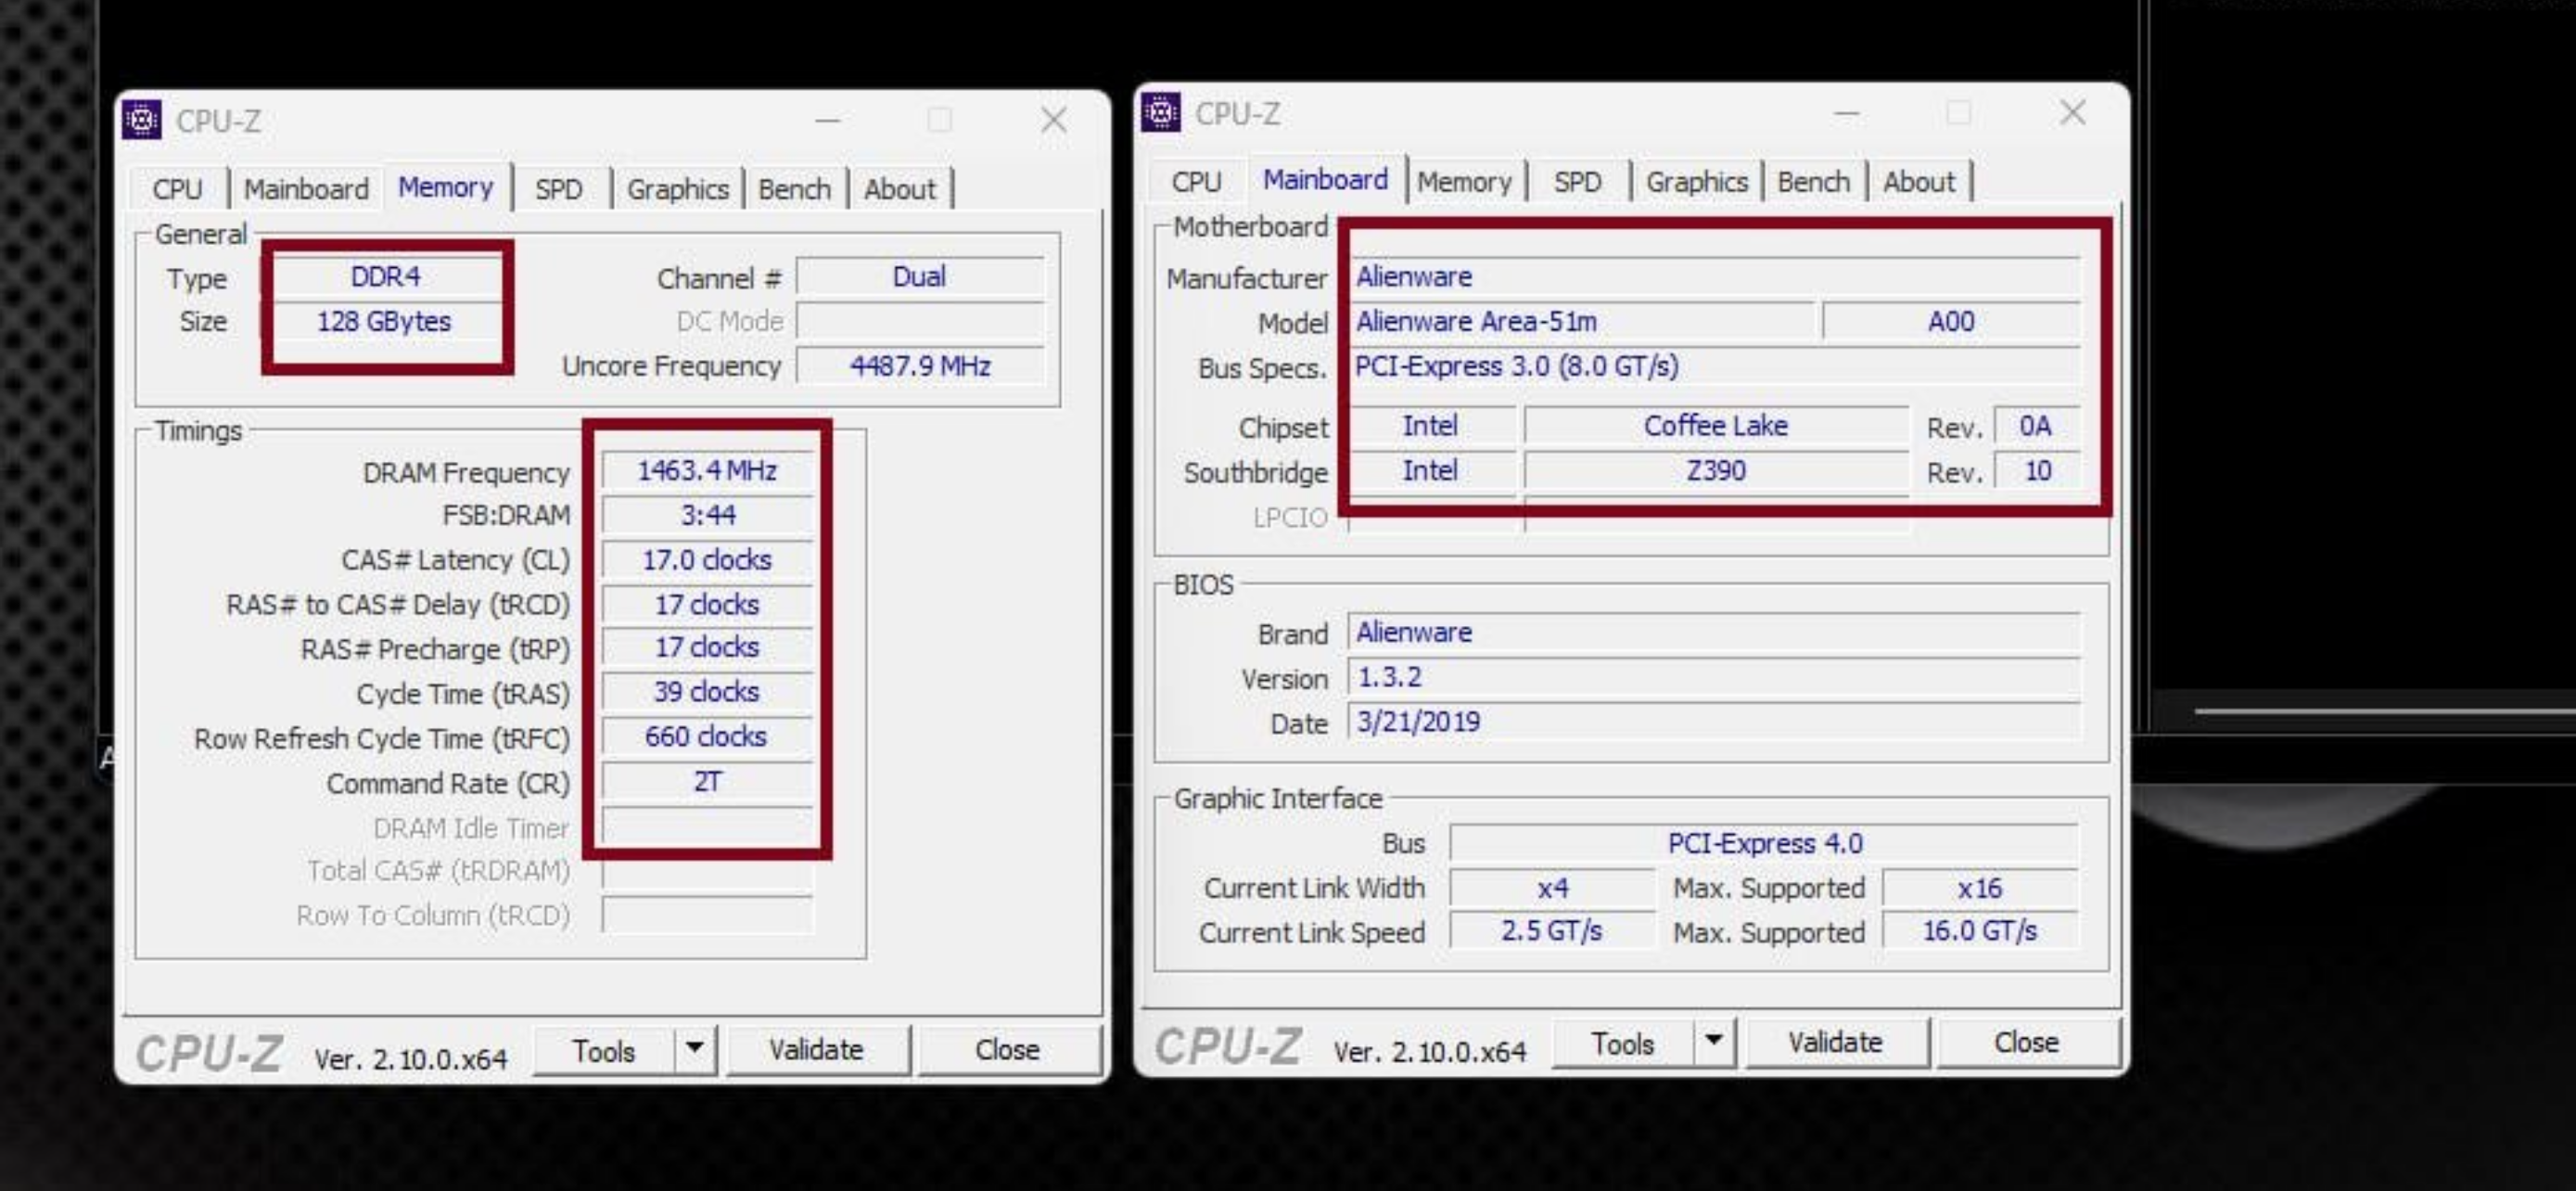
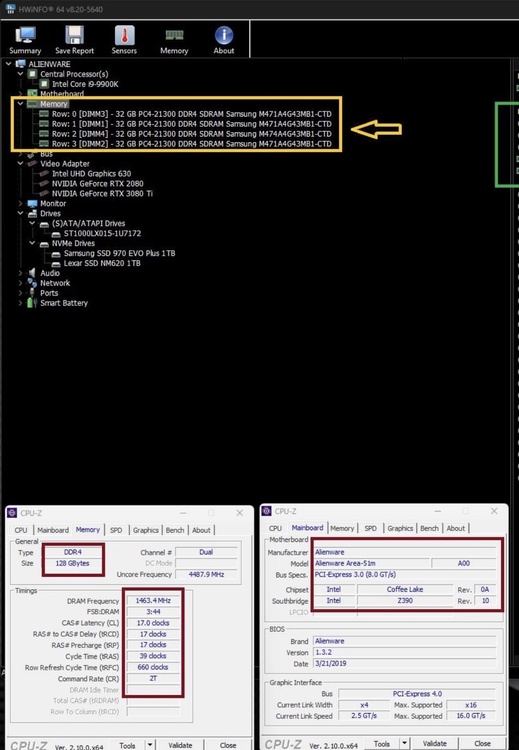
For those frustrated with the 2400MHz RAM limit on the Alienware Area-51M R1, I've found a way to bypass the restriction and overclock the memory up to 2933MHz. This guide will walk you through the process step by step. # 🔧 Requirements Before you begin, you should be familiar with BIOS modding tools. You’ll need: ✅ Intel CSME Tools (for BIOS backup – version 12) ✅ UEFI Tool ✅ IFR Extractor ✅ RU.EFI (for modifying BIOS variables) ✅ A bootable USB drive 💡 How to Boot with UEFI Shell: * Rename ShellX64.efi to bootx64.efi. * Place it in the /EFI/BOOT/ directory on a FAT32-formatted USB drive. * (use rufus ) # 🛠 Step-by-Step Guide # 1️⃣ Extracting BIOS Data 1️⃣ Open the extracted BIOS file using UEFI Tool. 2️⃣ Press CTRL+F, go to the Text tab, and search for CFG LOCK. 3️⃣ Once found, scroll down, click the option, and extract the PE32 file (Extract As-Is). # 2️⃣ Extracting BIOS Variables 1️⃣ Run IFR Extractor as an administrator. 2️⃣ Extract the PE32 file as a text document. 3️⃣ Note down the variables needed for modification. # 3️⃣ Modifying BIOS with RU.EFI 1️⃣ Create a bootable USB drive with RU.EFI. 2️⃣ Enter BIOS and disable Secure Boot. Set the USB as the boot device. 3️⃣ Reboot the system and boot from USB. 4️⃣ After booting from the USB, you will automatically enter UEFI Shell. Here, you need to enter RU.EFI. 5️⃣ To access RU.EFI, type the following command and press Enter: FS0: This will give you access to the USB drive. 6️⃣ Then, enter the following command to launch RU.EFI: RU.EFI Once inside RU.EFI, the main menu will appear, and you can access the BIOS settings. # Main Commands in RU.EFI: * ESC: Exit the menu * ALT + =: Search BIOS settings * CTRL + Page Down: Navigate through pages of settings * CTRL + W: Save changes * ALT + Q: Exit RU.EFI and reboot the system # 4️⃣ Overclocking RAM Speed in BIOS 1️⃣ Press CTRL + Page Down until you find variable 0A00. 2️⃣ Locate the 0A63/0A64 variables, which control RAM speed. Modify the following values for 2933MHz: 0XA64 → 0B 0XA63 → 75 ✅ Standard setting for 2667MHz: 0XA64 → 0A 0XA63 → 6B ✅ Memory Profile: MEMORY PROFILE 0XA65 → 01 ✅ Additional Overclocking: 0X93F → 0B 💾 Save the settings: ✔ Press CTRL+W to save changes. ✔ Exit with ALT+Q (or Ctrl + Alt + Del). ✔ Re-enter BIOS and verify the changes. # ⚠ Important Notes ✅ This method works on all BIOS versions: 1.0.1, 1.2, 1.9.3, 1.23, 1.24, 1.25, 1.26, 1.28, 1.3.2 ✅ Best BIOS version for stability: 1.3.2 🔹 Fully compatible with 200W GPU vBIOS 🔹 No sudden FPS drops or thermal throttling ✅ BIOS Update Warning * Disable automatic BIOS updates in BIOS settings if you plan to use an older BIOS version. * If the BIOS updates automatically, your settings may reset, requiring you to redo the process. 💡 Startup Delay Note: After applying these changes, your system may take 1 to 2 minutes to display anything upon restart—this is normal. 💡 Incompatibility Recovery: * If the selected frequency is not compatible with your RAM and your system doesn’t display anything, don’t panic! * Simply disconnect the battery and reset the BIOS to restore the default settings. ⚠ Caution: ❌ Do NOT modify other settings in RU.EFI unless you know what you’re doing. ✅ I’m simply sharing my experience, and I hope this helps! # 🎯 Final Thoughts This method unlocks the full potential of RAM on the Alienware Area-51M R1, breaking Dell’s artificial 2400MHz limit. If you need help, feel free to ask! 💬 . This is entirely at your own risk, and I take no responsibility for any issues that may arise. It is highly recommended that you back up your BIOS settings before making any changes and follow the steps carefully
-
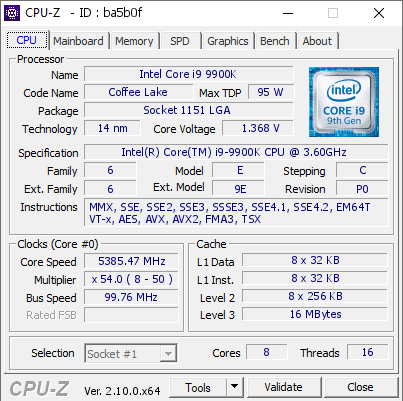
Alienware Area-51m R1 – i9-9900K All-Core Overclock to 5385 MHz with Stock Cooling! --- CPU-Z Validation: https://valid.x86.fr/ba5b0f The Achievement: I managed to overclock all 8 cores of the Intel Core i9-9900K (desktop CPU) inside my Alienware Area-51m R1 laptop to 5385 MHz – and it’s validated by CPU-Z. What makes this special is that it was done using the stock cooling system (no liquid metal, no physical cooler mods). System Specs: · Laptop: Alienware Area-51m R1 · CPU: Intel Core i9-9900K (8C/16T) · Motherboard: Z390 chipset (Alienware custom) · Cooling: Factory stock cooler · RAM: 128GB (4×32GB) · Vcore: 1.368 V (as recorded in validation) · Multiplier: 54× · BCLK: 99.76 MHz How It Was Done: · Multiplier set to 54× · BCLK increased to 99.76 MHz · Vcore manually adjusted to ~1.34–1.37 V · Maximum power limits unlocked · Alienware Command Center set to “Performance” fan profile All settings were applied via BIOS and Intel XTU. No hardware modification was made to the cooling system. Why This Matters: · Most laptops with the i9-9900K struggle to maintain 5.0 GHz on all cores, let alone 5.385 GHz. · Achieving this on stock cooling proves how capable the Area-51m’s thermal solution really is. · The CPU-Z validation provides a verifiable proof of the all-core frequency. Stability & Temperatures: This was a validation run – the system was stable long enough to complete the CPU-Z validation and a short Cinebench R23 run. Under full load, core temperatures quickly hit 95+°C and thermal throttling kicked in. This configuration is not recommended for daily use or long gaming sessions; it’s purely a benchmark / personal record. Final Thoughts: The Alienware Area-51m R1 remains a legendary laptop that can still surprise with its overclocking headroom. Achieving a 5.385 GHz all-core overclock on factory cooling is a testament to its robust design. If you own one, carefully push its limits – but keep an eye on thermals! --- Validation link again: https://valid.x86.fr/ba5b0f --- Alienware Area-51m R1 – i9-9900K all-core overclock to 5385 MHz on stock cooling! ✅ Validated by CPU-Z. 🔗 https://valid.x86.fr/ba5b0f #Alienware #Area51m #Overclocking #i9_9900K #CPUZ
-
Disable iGfx and 2080 on Alienware Area-51 R1?
Amir.s replied to 2CPU's topic in Alienware 13 / 15 / 17 / 51m (2015-2020)
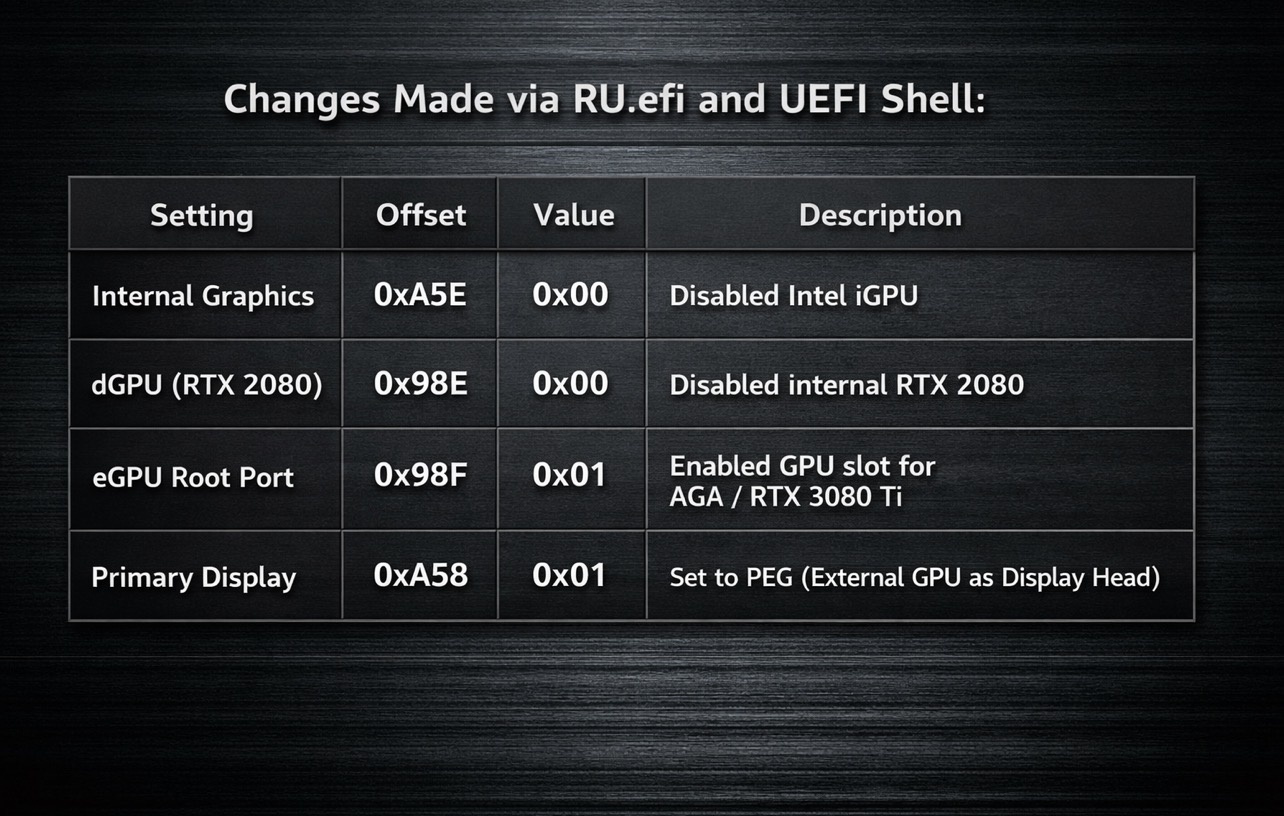
The monitor is now connected directly via DisplayPort to the RTX 3080 Ti. What has actually improved (real benefits): ✅ Improved performance and smoother FPS Every frame is now rendered and displayed directly by the RTX 3080 Ti. No iGPU path, no frame copying, no Optimus interference. Games feel significantly smoother and more responsive, even if raw FPS hasn’t dramatically increased. Stable frame rates and frame times in heavy games. ✅ Lower CPU and GPU temperatures With both the iGPU and RTX 2080 disabled, the laptop cooling system no longer needs to handle 2–3 GPUs. Internal heat buildup is reduced. CPU package temperatures drop by 5–8°C in some scenarios. Fans spin less and the system is overall quieter. ✅ Power efficiency and thermal ceiling Less power wasted on unused chips = lower CPU and eGPU temps. Cleaner power delivery and reduced system bottlenecks. Battery lasts longer during idle or light use. ✅ Driver stability No more switching between GPUs, unexpected crashes, or application confusion. Device Manager shows only the GPU you’re actually using. Fewer background services (no Intel GPU services, no unnecessary switching). ✅ Cleaner boot, no glitches Faster and smoother boot process. No screen flicker, no black-to-white color shift during GPU switching. Display output comes solely from the RTX 3080 Ti — exactly as it should. Benchmarks and games 3DMark Fire Strike and Time Spy show more stable and higher CPU+GPU scores. Real-world games like STALKER 2, Cyberpunk 2077, and The Witcher 3 run extremely smoothly without any quality loss. GPU-Z confirms full GPU load, proper bus usage, and no bottleneck from the iGPU. -
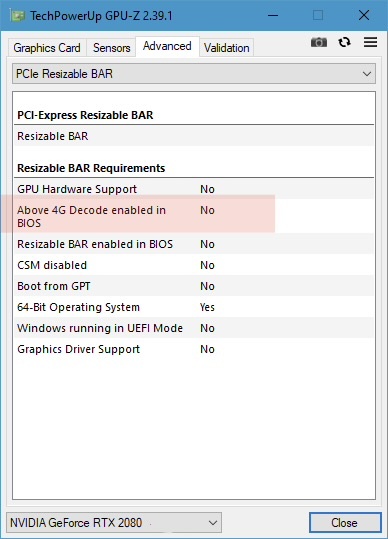
💻 How to Enable Above 4G Decoding on Alienware Area-51M R1 What does Above 4G Decoding do? When this option is enabled: The system uses 64-bit address space for PCIe devices. This allows hardware resources to be mapped into a much larger memory space (above the 4GB limit). As a result, the legacy addressing limitation is removed. ⸻ 🚀 Practical Benefits 1️⃣ Essential for Modern Graphics Cards Modern RTX and newer GPUs: Have large VRAM capacity Use large BAR (Base Address Registers) If Above 4G is disabled: The GPU may not initialize properly Driver errors can occur System stability and performance may suffer ⸻ 2️⃣ Critical for eGPU Setups For external GPUs (Thunderbolt / AGA): With Above 4G enabled: GPU detection becomes more stable Prevents PCIe address space exhaustion Reduces boot and initialization issues ⸻ 3️⃣ Better Stability for Multi-PCIe Systems Systems that use: Internal + external GPU Multiple NVMe SSDs Capture cards PCIe expansion cards All benefit from the larger PCIe memory address space. 🧩 System Context Laptop: Alienware Area-51M R1 CPU: Desktop i9-9900K eGPU Dock: Alienware Graphics Amplifier External GPU: RTX 3080 Ti If you’re running an eGPU or modern high-VRAM graphics card, enabling Above 4G Decoding is strongly recommended. 🎯 What We’re Doing We’re enabling 64-bit PCIe memory mapping so the system can: Properly allocate MMIO space for large GPUs Prevent PCIe resource exhaustion Improve eGPU detection reliability Avoid Code 12 / Code 43 errors Prepare the system for Resizable BAR (if BIOS-modded) 🧰 Requirements RU.EFI utility Access to hidden BIOS variables (via IFR/RU) 🪜 Step-by-Step Guide 1️⃣ Boot into RU.EFI Plug in your EFI boot USB Enter Boot Menu → launch EFI Shell Run: RU.EFI 2️⃣ Open BIOS Variable Store Inside RU: Press: Alt + = Select: Setup Then open: VarStore: 0x1 3️⃣ Go to the Variable Offset From IFR, the setting : Above 4G Decoding VarOffset = 0xA2B In RU: Press: Ctrl + G Enter: A2B 4️⃣ Change the Value Value Meaning 00 Disabled 01 Enabled ✅ Set the value to: 01 5️⃣ Save Changes Press: Ctrl + W Confirm the save prompt. 6️⃣ Reboot Restart the system and boot into Windows. ✅ How to Verify It Worked Method 1 — Device Manager If there are no: Code 12 errors Code 43 errors Then PCIe resources are properly allocated. Method 2 — GPU-Z Bus Interface should be stable under load with no detection drops. Method 3 — Event Viewer No PCI resource allocation warnings = success. ⚠️ Notes If Windows fails to boot, revert value back to 00 For eGPU setups, this should almost always be Enabled Systems with iGPU + dGPU + eGPU heavily benefit from expanded MMIO 🧠 Why It Matters for This System With: External GPU over AGA High-power RTX card Multiple PCIe devices / NVMe drives Enabling Above 4G Decoding improves: Stability • GPU detection • Resource allocation reliability
-
With a little optimization, you can easily achieve a total score of 2400 to 26000 in Time Spy. Unfortunately, I don’t have access to a 5080 or 5090 card; if I did, I would definitely record amazing scores.
-
By adjusting the timings, you can also test at 2933MHz. My RAM modules are all Samsung and are stable with timings 17 and 18. I also have a RAM stick that is 3200MHz and works easily on this laptop.
-
Downgrade the laptop BIOS to 1.9.3 — the issue of failing to boot and no display will be resolved."
-
If you’re an Alienware Area-51M R1 user connecting an RTX 40/50 GPU via the Alienware Graphics Amplifier (AGA), you may experience random no-display / black-screen issues. This is caused by BIOS compatibility limitations with newer GPU architectures over AGA. Solution: For Area-51M R1, the most reliable fix is to downgrade or upgrade your BIOS to version 1.9.3. This version resolves PCIe handshake and external GPU initialization issues that cause random no-display events. Steps: 1. Download BIOS v1.9.3 from Dell’s official site or a trusted source. 2. Carefully follow Dell’s instructions to flash the BIOS. 3. After flashing, fully power cycle your laptop and AGA. 4. Test your external GPU — the no-display issue should be resolved. Note: Practical guides and video tutorials for downgrading the Area-51M R1 BIOS are available on YouTube for step-by-step help. ⚠️ For other Alienware laptops: BIOS v1.9.3 is only for Area-51M R1. If you have a different model with a similar issue, you’ll need to test different BIOS versions to find the most stable one for your system
-
Disable iGfx and 2080 on Alienware Area-51 R1?
Amir.s replied to 2CPU's topic in Alienware 13 / 15 / 17 / 51m (2015-2020)
Cheek my topic -
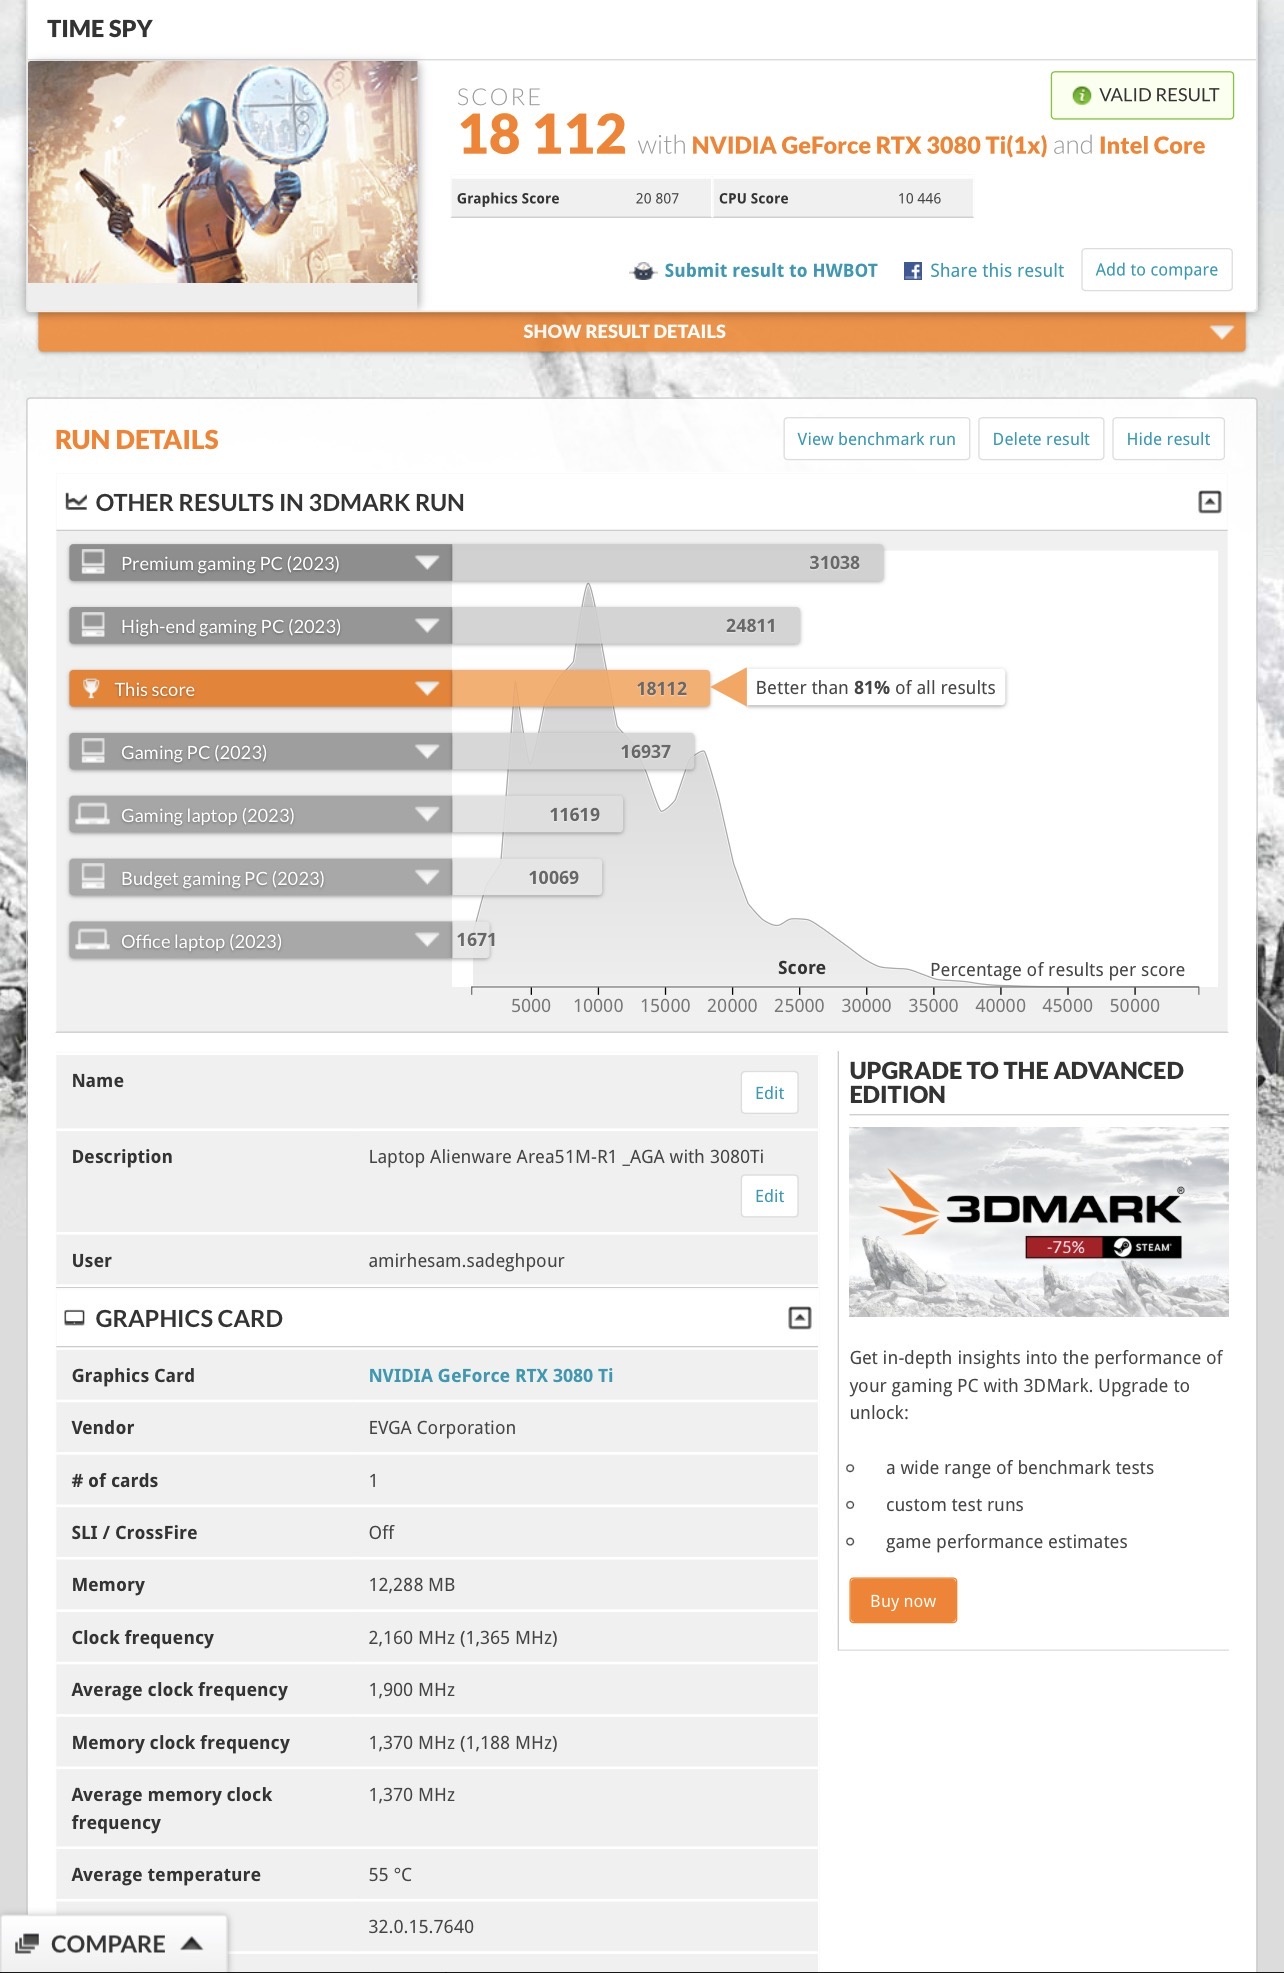
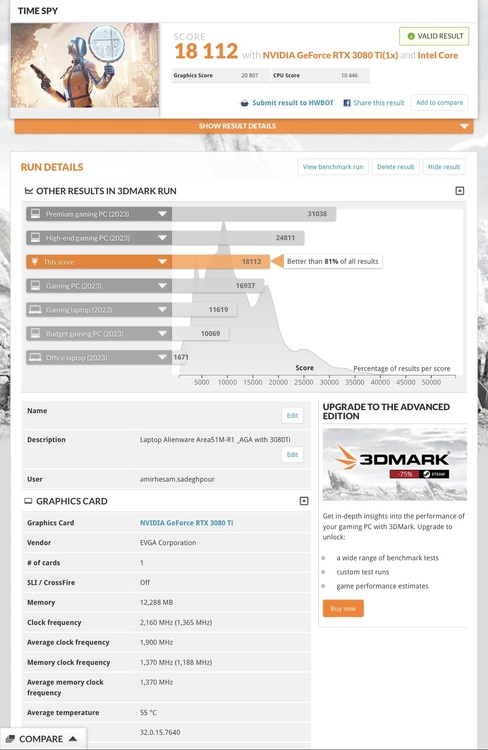
Time spy score: 18112 Graphics score:20807 Cpu score: 10446 My system: Area51m r1 intel 9900k 128G memory 2933Mhz AGA ( 3080Ti EVGA) https://www.3dmark.com/spy/56482417
-
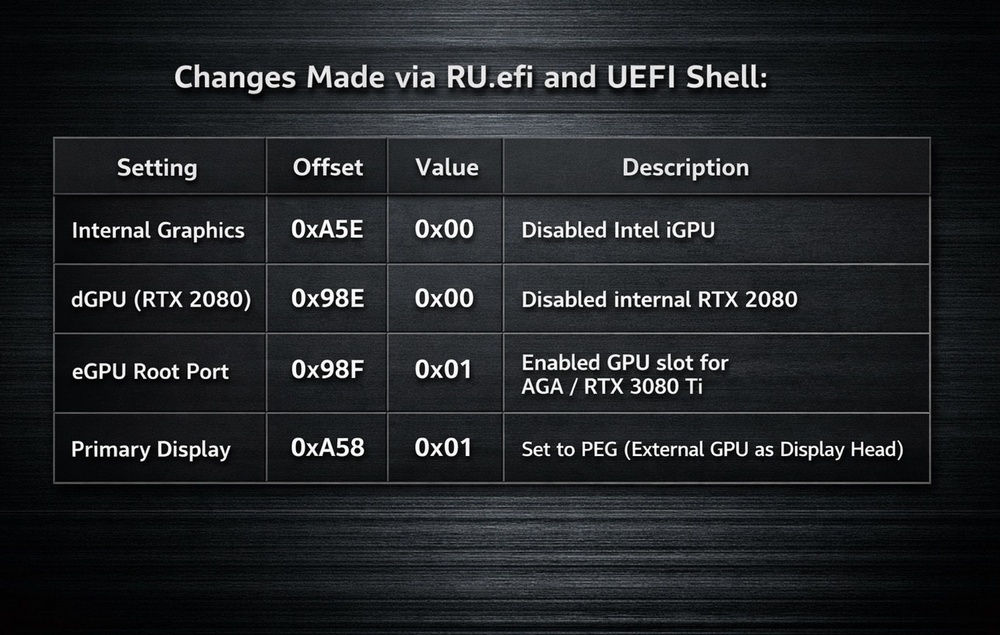
Removed All Bottlenecks on Area-51M — Now Running Only on AGA GPU (My Card RTX 3080 Ti) Hey folks, I recently completed a deep graphics config mod on my Alienware Area-51M R1, and it completely transformed how my system behaves and performs. I wanted total control — so I: Disabled the Intel iGPU Disabled the internal RTX 2080 Forced the system to boot and run only from my external RTX 3080 Ti inside the Alienware Graphics Amplifier (AGA) The result? No Optimus. No hybrid graphics. No performance routing. Just raw, direct PCIe power from the 3080 Ti. Why I did it: I was tired of: Games and apps launching on the wrong GPU Display signal being routed through iGPU due to Optimus Random GPU switching, driver conflicts, inconsistent performance RTX 2080 and Intel GPU drawing power and generating heat — even when I didn’t need them 🚀What I changed (via RU.efi and UEFI Shell) Monitor is connected directly to the DisplayPort on the 3080 Ti. What improved (the real benefits): ✅ Improved performance & smoother FPS Now every frame is rendered and displayed directly by the RTX 3080 Ti No iGPU path, no copying frames, no Optimus interference Games feel noticeably smoother and more responsive, even if the raw FPS doesn’t dramatically increase I get consistent frame pacing and stable frame times across demanding titles ✅ Lower CPU & GPU temperatures With both iGPU and RTX 2080 disabled, the laptop’s cooling system no longer has to manage 2–3 GPUs Internal heat buildup is reduced CPU package temps dropped by 5–8°C in some scenarios Fans spin less often and quieter overall ✅ Power efficiency & thermal headroom Less power draw from unused chips = more thermal headroom for CPU & eGPU Power delivery stays cleaner, system throttling is reduced Battery drains slower on idle or light usage ✅ Driver stability No more switching between GPUs, no surprise crashes or app confusion Device Manager shows only one GPU — the one I actually use Fewer background services (no Intel GPU services, no switching daemons) ✅ Cleaner boot, no glitches Boot is faster and cleaner No screen flicker, no black-to-white transitions while switching GPUs Display output comes only from the 3080 Ti — as it should Benchmarks & Gaming 3DMark Fire Strike and Time Spy show better consistency and better scores in CPU+GPU tests In real-world games like STALKER 2, Cyberpunk 2077, and The Witcher 3, performance is buttery smooth with no dips GPU-Z confirms full GPU load, proper bus usage, and no bottleneck through iGPU System Specs: Alienware Area-51M R1 Intel Core i9-9900K Alienware Graphics Amplifier EVGA RTX 3080 Ti XC3 Ultra 32GB DDR4 Monitor: ASUS 3440x1440, connected via DisplayPort to 3080 Ti TL;DR Disabled Intel iGPU and RTX 2080 Forced system to boot and run ONLY from the RTX 3080 Ti in the Amplifier Result: better performance, lower temps, zero Optimus, fully stable External GPU now runs free — no interruptions, no compromises Let me know if you want help setting this up — I’ll gladly walk you through it or help you find the right offsets for your system. Unchain your GPU. Let it breathe. Let it dominate. Tags: Alienware Area-51M 3080Ti eGPU Graphics Amplifier RU.efi BIOS Mod No Optimus PCMR
- 7 replies
-
- 1
-

-
- area-51m r1
- area 51m r2
- (and 3 more)
-
Disable iGfx and 2080 on Alienware Area-51 R1?
Amir.s replied to 2CPU's topic in Alienware 13 / 15 / 17 / 51m (2015-2020)
These posts are mine. Unfortunately, Dell reported my posts to protect its own performance interests and profits, so users wouldn’t find out about the capabilities of this masterpiece and upgrade their devices. -
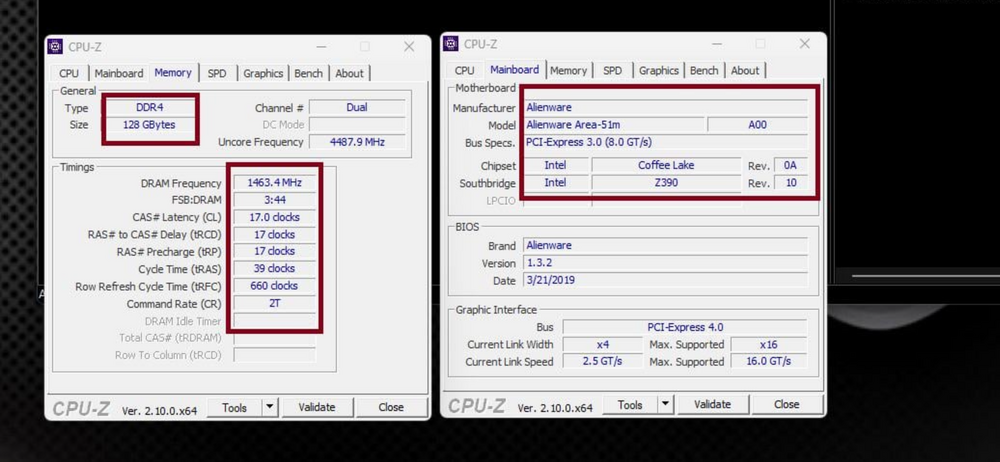
For those frustrated with the 2400MHz RAM limit on the Alienware Area-51M R1, I've found a way to bypass the restriction and overclock the memory up to 2933MHz. This guide will walk you through the process step by step. # 🔧 Requirements Before you begin, you should be familiar with BIOS modding tools. You’ll need: ✅ Intel CSME Tools (for BIOS backup – version 12) ✅ UEFI Tool ✅ IFR Extractor ✅ RU.EFI (for modifying BIOS variables) ✅ A bootable USB drive 💡 How to Boot with UEFI Shell: * Rename ShellX64.efi to bootx64.efi. * Place it in the /EFI/BOOT/ directory on a FAT32-formatted USB drive. * (use rufus ) # 🛠 Step-by-Step Guide # 1️⃣ Extracting BIOS Data 1️⃣ Open the extracted BIOS file using UEFI Tool. 2️⃣ Press CTRL+F, go to the Text tab, and search for CFG LOCK. 3️⃣ Once found, scroll down, click the option, and extract the PE32 file (Extract As-Is). # 2️⃣ Extracting BIOS Variables 1️⃣ Run IFR Extractor as an administrator. 2️⃣ Extract the PE32 file as a text document. 3️⃣ Note down the variables needed for modification. # 3️⃣ Modifying BIOS with RU.EFI 1️⃣ Create a bootable USB drive with RU.EFI. 2️⃣ Enter BIOS and disable Secure Boot. Set the USB as the boot device. 3️⃣ Reboot the system and boot from USB. 4️⃣ After booting from the USB, you will automatically enter UEFI Shell. Here, you need to enter RU.EFI. 5️⃣ To access RU.EFI, type the following command and press Enter: FS0: This will give you access to the USB drive. 6️⃣ Then, enter the following command to launch RU.EFI: RU.EFI Once inside RU.EFI, the main menu will appear, and you can access the BIOS settings. # Main Commands in RU.EFI: * ESC: Exit the menu * ALT + =: Search BIOS settings * CTRL + Page Down: Navigate through pages of settings * CTRL + W: Save changes * ALT + Q: Exit RU.EFI and reboot the system # 4️⃣ Overclocking RAM Speed in BIOS 1️⃣ Press CTRL + Page Down until you find variable 0A00. 2️⃣ Locate the 0A63/0A64 variables, which control RAM speed. Modify the following values for 2933MHz: 0XA64 → 0B 0XA63 → 75 ✅ Standard setting for 2667MHz: 0XA64 → 0A 0XA63 → 6B ✅ Memory Profile: MEMORY PROFILE 0XA65 → 01 ✅ Additional Overclocking: 0X93F → 0B 💾 Save the settings: ✔ Press CTRL+W to save changes. ✔ Exit with ALT+Q (or Ctrl + Alt + Del). ✔ Re-enter BIOS and verify the changes. # ⚠ Important Notes ✅ This method works on all BIOS versions: 1.0.1, 1.2, 1.19, 1.23, 1.24, 1.25, 1.26, 1.28, 1.3.2 ✅ Best BIOS version for stability: 1.3.2 🔹 Fully compatible with 200W GPU vBIOS 🔹 No sudden FPS drops or thermal throttling ✅ BIOS Update Warning * Disable automatic BIOS updates in BIOS settings if you plan to use an older BIOS version. * If the BIOS updates automatically, your settings may reset, requiring you to redo the process. 💡 Startup Delay Note: After applying these changes, your system may take 1 to 2 minutes to display anything upon restart—this is normal. 💡 Incompatibility Recovery: * If the selected frequency is not compatible with your RAM and your system doesn’t display anything, don’t panic! * Simply disconnect the battery and reset the BIOS to restore the default settings. ⚠ Caution: ❌ Do NOT modify other settings in RU.EFI unless you know what you’re doing. ✅ I’m simply sharing my experience, and I hope this helps! # 🎯 Final Thoughts This method unlocks the full potential of RAM on the Alienware Area-51M R1, breaking Dell’s artificial 2400MHz limit. If you need help, feel free to ask! 💬 . This is entirely at your own risk, and I take no responsibility for any issues that may arise. It is highly recommended that you back up your BIOS settings before making any changes and follow the steps carefully
-
My friend, I can guide you to improve your system’s performance. The Area-51M and AGA combo is unbeatable. You just need to know how to get the best performance out of it.