
Maro97
-
Posts
340 -
Joined
-
Last visited
Content Type
Profiles
Forums
Events
Everything posted by Maro97
-
-
Could you plz send me a link for backlight mod v2 cable ?
-
Where i can get the modded heatsink for p870tm support RTX 4090 ?
-
Prema BIOS does not work on all systems, even if they are the same model. The protection is tied to each device’s Service Tag. Therefore, you need to contact Prema and send to him a dump file of your current BIOS so they can unlock the motherboard, reveal the hidden BIOS settings, and also apply their own internal BIOS optimizations and modifications.
-

clevo p870tm/tm1-g Official Clevo P870TM-G Thread
Maro97 replied to ViktorV's topic in Sager & Clevo
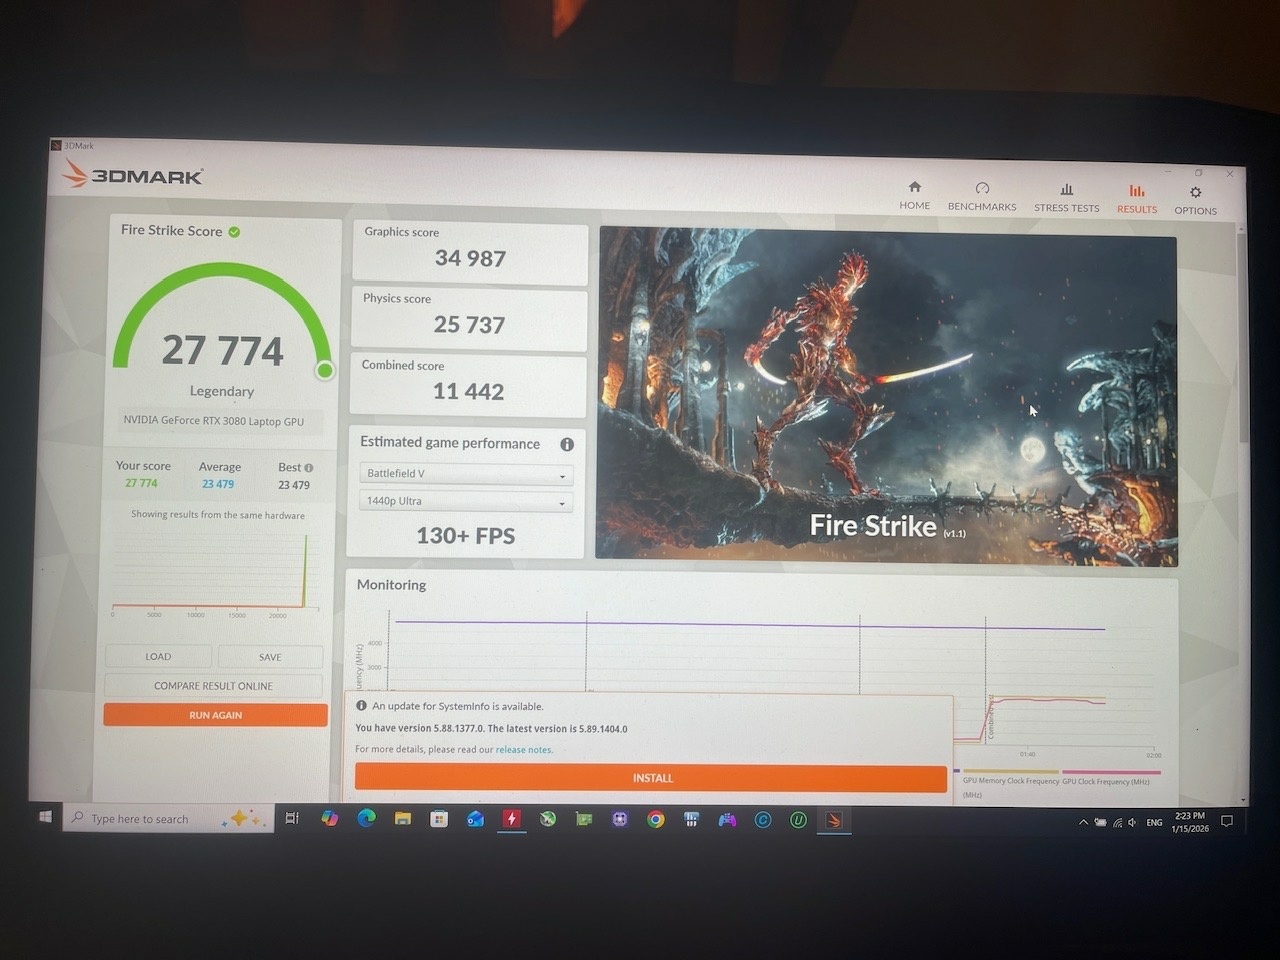
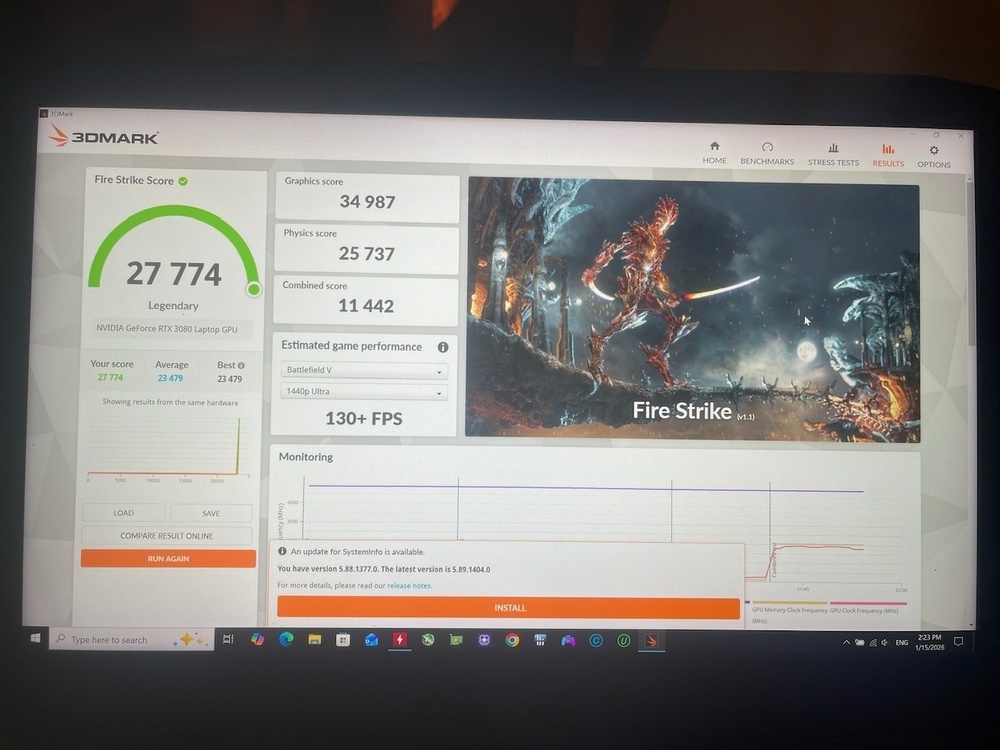
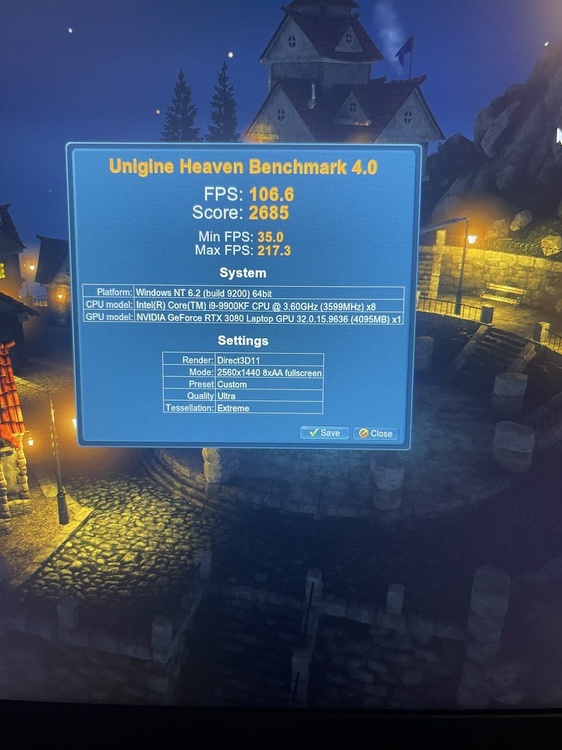
Unfortunately, I wasn’t online while the benchmark was running, so I took a photo of it with my phone at the time -
clevo p870tm/tm1-g Official Clevo P870TM-G Thread
Maro97 replied to ViktorV's topic in Sager & Clevo
This high score sponsored by @Developer79 cuz the vapour chamber fits very good with RTX 3080 … The spacing between the components, capacitors, and coils around the core is professionally and excellently designed. Also, the GPU temperature does not exceed 63°C, and the difference between the GPU temperature and the hotspot is only about 6°C, with the hotspot being higher. p870tm 9900kf rtx 3080 32G ram 2x16 OC 3200mhz CL16 17.3” led 165hz 1440p 😁 -
clevo p870tm/tm1-g Official Clevo P870TM-G Thread
Maro97 replied to ViktorV's topic in Sager & Clevo
-
clevo p870tm/tm1-g Official Clevo P870TM-G Thread
Maro97 replied to ViktorV's topic in Sager & Clevo
Hello mickey i hope the Bios which i sent works . Where did you get the rtx 30xx adapter ? -
clevo p870tm/tm1-g Official Clevo P870TM-G Thread
Maro97 replied to ViktorV's topic in Sager & Clevo
Maro -
Nvidia-vBIOS-Clock-Power-Tweaker - PASCAL TESTING NEEDED !
Maro97 replied to JadeRover's topic in Components & Upgrades
i modded my clevo rtx 3080 by this tool https://github.com/JadeRover/Nvidia-vBIOS-Clock-Power-Tweaker/releases/tag/v1.0.1 and try to flash it with NVFLASH but didn't work -
Nvidia-vBIOS-Clock-Power-Tweaker - PASCAL TESTING NEEDED !
Maro97 replied to JadeRover's topic in Components & Upgrades
can i flash it with nvflash ? -
clevo p870tm/tm1-g Official Clevo P870TM-G Thread
Maro97 replied to ViktorV's topic in Sager & Clevo
hello everyone what is that ? https://github.com/JadeRover/Nvidia-vBIOS-Clock-Power-Tweaker -
I bought it from China 🇨🇳. A friend of mine was there on a business trip, so I sent him a link from the Chinese Taobao store, and he purchased it for me from there.
-
Sorry for interrupting in this forum, even though my laptop is not an X170KM-G , but I’m sharing my experience upgrading the screen on my Clevo P870TM. yes i upgrade my p870tm led to NE173QHM-NY7 - 1440P , 165HZ, 400 nits , 6ms GTG with clevo rtx 3080 mxm it's work great That’s when I realized that G-SYNC limits the FPS output of the GPU. So I started looking for a 2K display with a very good color gamut, (165hz) high refresh rate, and fast response time for AAA games. I found that the NY7 panel was the best option, even though it doesn’t support G-SYNC I chose higher color gamut and nits over the G-SYNC feature. When I used to turn off G-SYNC with others led , I got higher frame rates, but with noticeable screen tearing—especially with a lower refresh rate. However, with 2K resolution, a 165Hz display, and an RTX 3080, playing AAA games on high settings, if you reach around 100 FPS using 9th, 10th, or even 11th gen processors, the overall experience becomes very close to newer generations of GPUs and CPUs. This is based on my personal experience. Don’t be fooled by FPS numbers — all those frame rate monitoring programs have reduced our enjoyment of gaming on laptops. My setup: Clevo P870TM i9-9900KF (undervolted -90mV, 4.7GHz on all 8 cores) RTX 3080 with vapor chamber (max temp 63°C without liquid metal & 2 x 16 32GB Crucial Ballistix RAM (2666MHz 1.35V, overclocked via XMP to 3200MHz CL16


-
Which laptop tested with 4080 / 4090 ?
-
4090 with ZRT VBIOS ?
-
-
This is exactly what I do every time I test a new thermal paste that has recently been released on the market. For gpu cooling I’m using a thermal grizzly duronaut.
-
As you can see in the image, the GPU temperature does not exceed 65°C, and the difference between the hotspot and the GPU temperature is about 6°C, which also confirms that the thermal pads are installed with the correct thickness

-
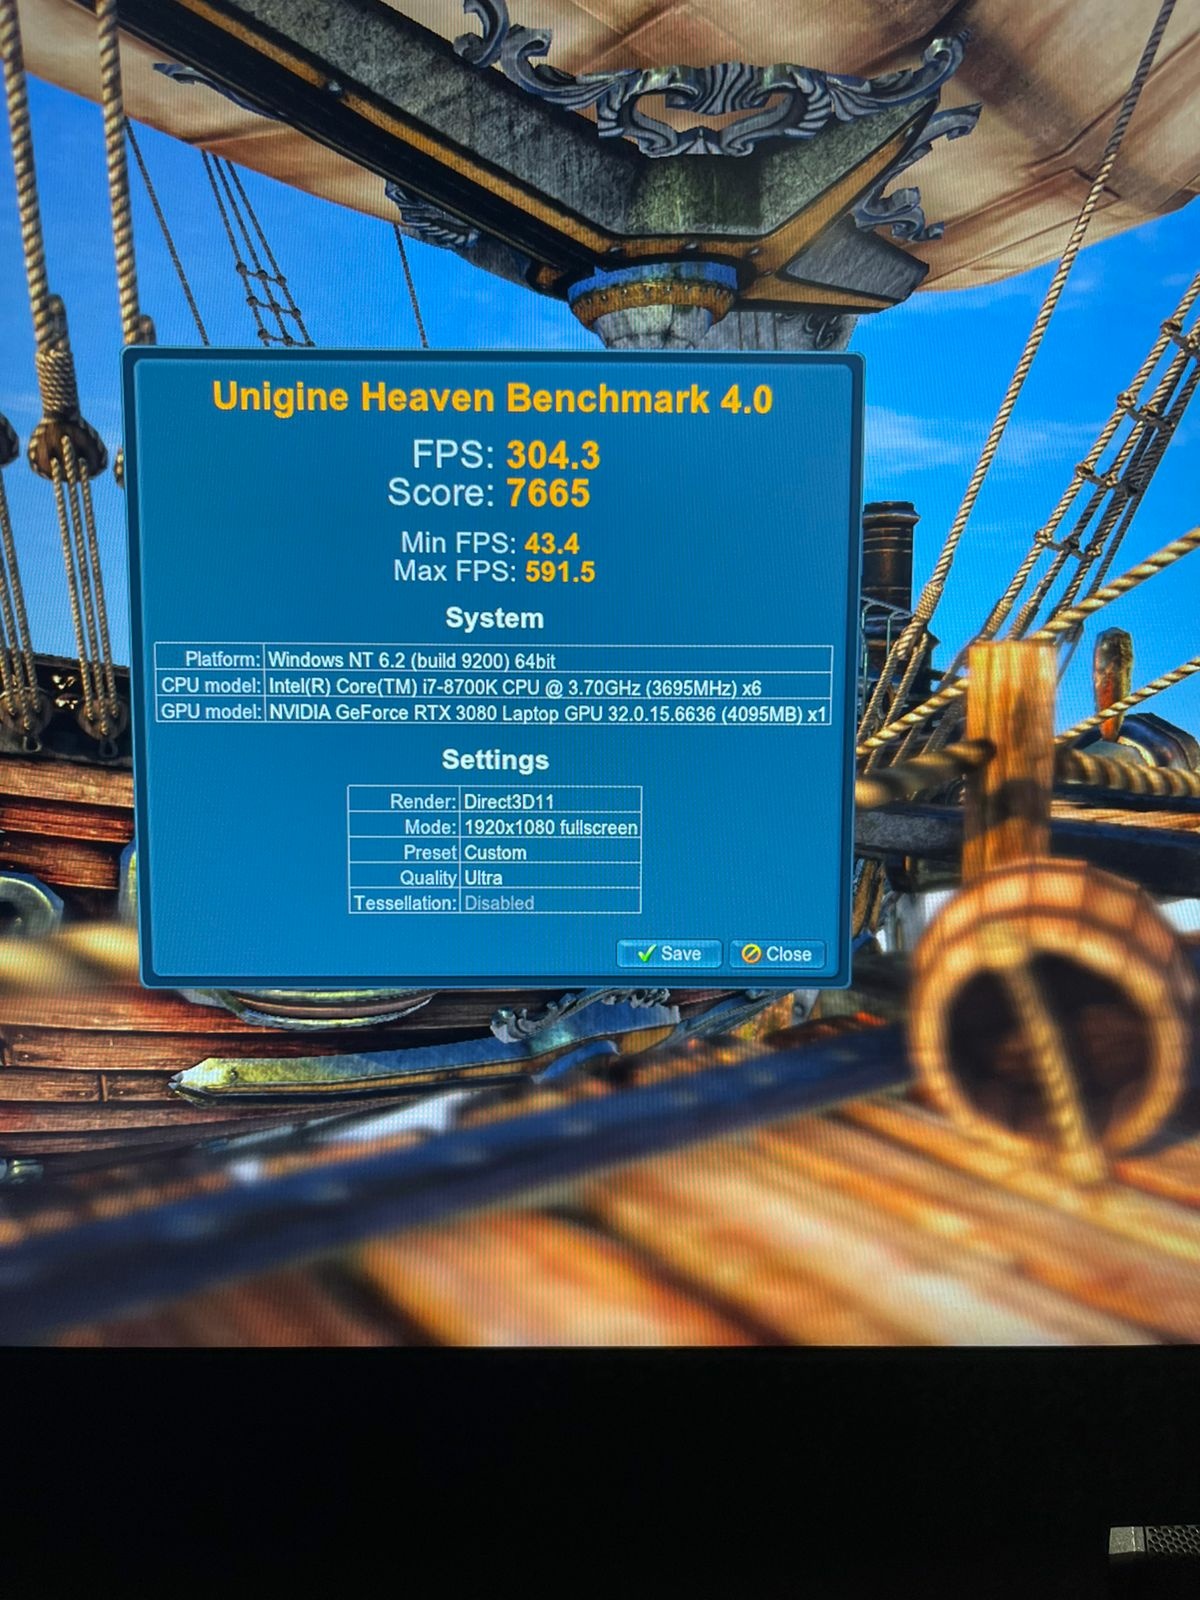
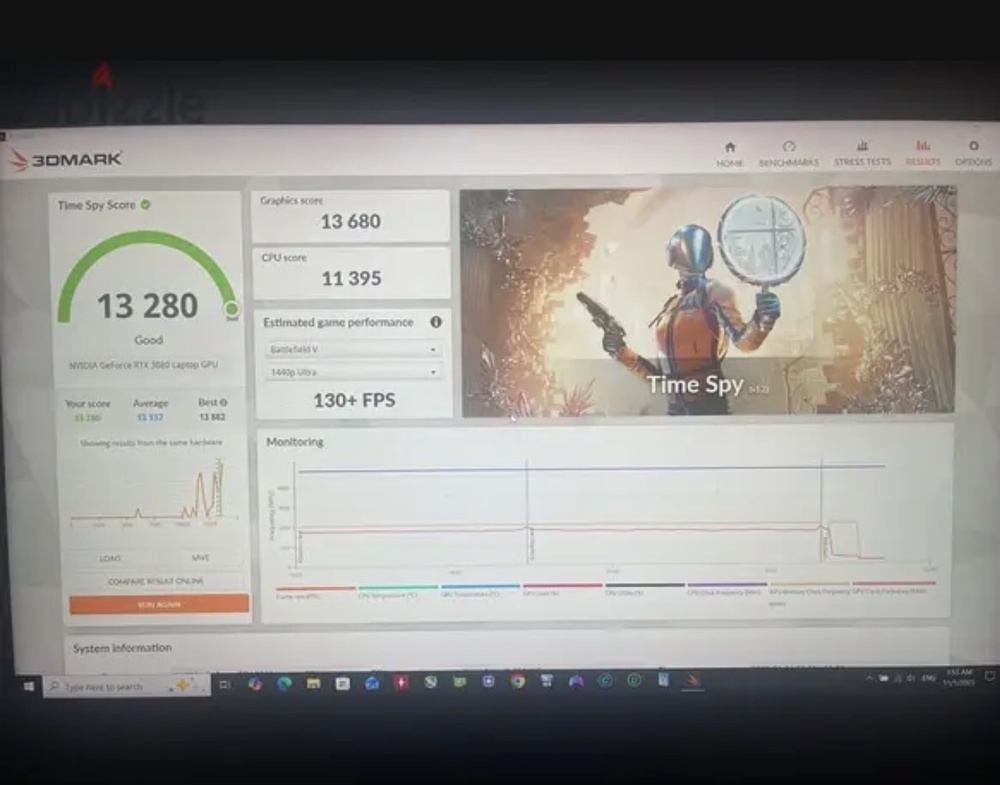
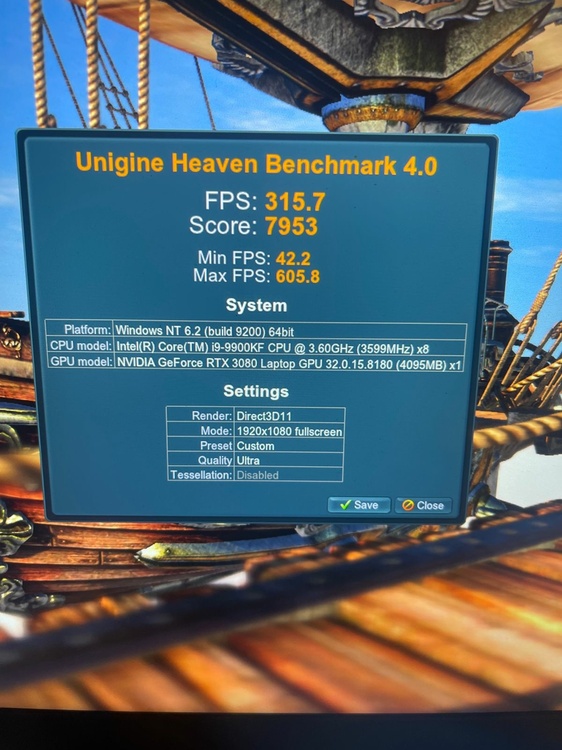
I don’t benchmark all graphics cards by furmark I’m using furmark program only to test the GPU temperature and GPU hotspot for one hour . But for evaluating frame rates, I use 3DMark (Time Spy & Fire Strike) and the Heaven Benchmark
-
Here is my results with new nvidia driver 150w rtx 3080 with two different cpu 8700k & 9900kf with air cooling & UV

-
what is the CPU frequency on all cores ? and how much CPU TDP . with cenabench r23 test ?
-
clevo p870tm/tm1-g Official Clevo P870TM-G Thread
Maro97 replied to ViktorV's topic in Sager & Clevo
What about your modded flexible cable ? -
clevo p870tm/tm1-g Official Clevo P870TM-G Thread
Maro97 replied to ViktorV's topic in Sager & Clevo
Hello everyone… i wonder if anyone in this fourm tested rtx 4090 mxm from ZRT with p870tm laptop ? -