

Jerryzago
-
Posts
195 -
Joined
-
Last visited
Content Type
Profiles
Forums
Events
Everything posted by Jerryzago
-
Hello. I have found the following laptop near me via FB marketplace https://www.facebook.com/marketplace/item/9753413094732809/ Seller says its a M17x and pictures show a 4800MQ cpu and 770m GTX gpu with a 3D screen and Glasses included. Is this laptop Upgradable or is it BGA; Can I upgrade CPU and even throw an RTX 3000 in it and work with the screen in PEG mode?
-
This happened literally the day PNY stopped selling their GPUs. It got me thinking selling my HP since it works fine and already got a modded heatsink for the M18x R2.
-
Yes It might be. I don't have the exact translation. I assume the Greek translation is flawed.
-
Replacing the CMOS battery M17XR4 - rejected?
Jerryzago replied to Naberius's topic in Alienware 17 and M17x
Maybe its a long shot. Try a complete power drain. Put the old battery back. Also the main battery. Connect charger. Power on system. Shut down from OS. Remove main battery. Press power for 30sec. Remove Cmos battery. Press again for 30sec. Place new Cmos battery. Place main battery. Connect charger. Power on and enter bios. Set proper values and power down to check again if settings remain there. If you have any beep, press incert key when you press power button (used work on some old bios). Hope this help you. -
Process seems right. Should work ok
-
You forget to name your GPU when you selected "add hardware support" when running NVclean. Do the whole process again. Rebuilt the driver package again adding name to your GPU
-
I contacted them in English. They also responded in English. I try to find someone I know in France, but he didn't want to help me. So I used shippn. Cost was the same as the GPU itself, but it arrived in two days. I don't get it why they excluded even other EU countries from their listing. I believe they run out of inventory.
-
RTX 5000 was going for 250 euros from PNY. They put the listing hours after I bought my 3000. I wish I have bought that instead!
-
I aloso got a PNY RTX3000 thinking that my HP RTX 3000 failed for my M18xR2. Yes it was a direct fit, no mods, and the heatsink from my AMD 100Watt Gpu keeps the temperatures quite low.
-
I watched the ad when it said '4 items sold'. Almost 10 days later, it wrote '27 items sold' so literally in 4 hours I made a purchase. I might not have bought it, if I didn't had problems at first place.
-
Yep. I see the same PNY gpu that was on ebay for 100 euros shipped, going for 350 in China. Also PNY sold RTX 5000 MXM for 250 euros, and those going for 800 euros on ebay. I mean my HP RTX 3000 is worth 350 also. I belive each seller sees the ongoing prices, and list the item with the same price for an excess profit.
-
It works like a charm. And being an mxm module, intstalling was hassle free. They no logner have the sale. I am looking that some Chinese sellers, sell the same GPUs 3 times more the price!
-
I used a service called shippn and shipped it to Greece. They don't ship it inside EU either
-
Ebay. They have an ad, but only ship to france. Also they sell RTX 5000
-
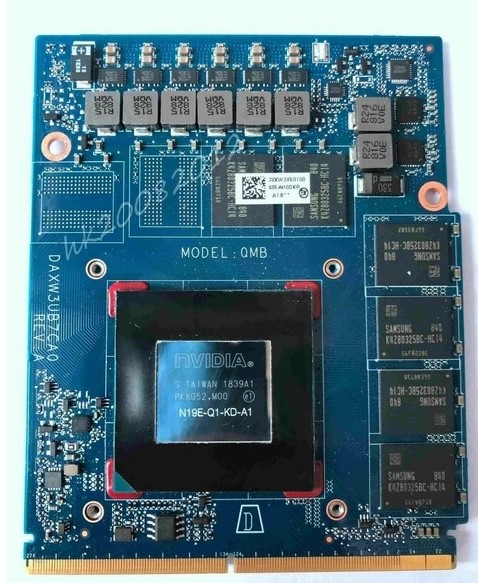
Having looked to the problem and going back and forth, I decided to go for a new GPU. I ordered and got a PNY MXM RTX 3000. Paying 200 euros in total for it. It arrived and I used my AMD 100Watt heatsink. Worked like a charm, exept two mosfets next to the core that also needed cooling. I placed an extra alouminum heatsink with thermal pads and held it doww with the casing. I will try to take a photo of it. I had also installed windoww 11, hoping a fresh OS install might solve the issue, but not. So with windows 11, and drivers from NVinstall, I went ahead to test the GPU. SAME PROBLEM. Error with the dxgmms1.sys. Read the minidump and searched for solutions. Turns out the HP GPU might be OK. Ruled out that maybe a windows update might be the problem. No luck there. I tested my 980m without issues, but in PEG mode. I am using both RTX in SG mode. A post from reddit said to disable the iGPU. I was afraid because disabling the iGPU might result in a black screen and possibly another OS fressh install. Next was a BIOS change. Both BIOS from Techpowerup bricked the GPU. Reverting back to original BIOS, everything works great in windows, except gaming or benchmarking. So I pulled the trigger and disabled the iGPU from the system devices. I didn't get a black screen, nor a crash. I lost brightness control, but nvidia panel took that role. But 3D performance was terrible. Though everything run fine, I literally got half the performace, depsite everything run at full speed. But it was something, I was near the solution. I DDU everything, and grabbed the drivers for the HD 4000 from Dells website. I also intalled the latest 547.17 drivers. Again the same error. Still dxgmms1.sys whenever I fired up a proper 3D appication. After hours of browsing, I came across another post, saying that on a september of 2023, both windows 11 and 10, made an system upgrade, adding (maybe) some GPU settings. I found that page and changed the setting a bit. After a system reboot, everything was working as it should!!! I could not belive that a system setting, got me through all this trouble and wasted money and time. Now I have in my inventory two 980m, an HP RTX 3000 with a modded heatink and a bracket and an PNY/AETINA RTX 3000 currently in my system. Thank God everything works.

-
I put back my 980m and run it in SG mode. Installled drivers and everything is working as it should! Too bad, it seems there might be a problem with the RTX itself.
-
Yes, I haven't flashed any BIOS. I used the one that came with the gpu. It worked though almost a month. Plus when I benchmarked it, I saw the core speed going to 1800mhz! I thought it boosted to 1300mhz MAX!
-
Yes. GPU is showing itself normally on windows. GPUZ is showing it also. With idle clocks, temps and voltages. I want to belive that it isn't a hardware issue!
-
I did a fresh install. Also tried 5xxx and 4xx drivers. Though it did started happening when the latest w10 update. Gpu is shown in bios, gpu is shown in windows, drivers load just fine and the problem occurs when 3D hardware is needed. Even Epic launcher crashes windows if I select it to run. Steam works fine though. Youtube videos also work fine. Stremio crashes on the other hand. I am trying to rule out the hardware problem!
-
Recently I upgraded to an HP RTX 3000. Almost a month of usage for my AW M18x R2 and now when I utilize any 3D application, windows crashing almost immediately with a 'dxgmms1.sys' error. I mod the mainbord mxm slot a bit I installed a dell x-bracket I got an extra heatsing and modded it and secured the GPU to the mainboard, using a custom bracket. Switching to internal graphics, the problem goes away. I did almost everything to rule out the 'software' error. DDU drivers Installled drivers with NVinstall Mod the drivers to rule out any error Even wiped out windows and installed them fresh. (Clean install, no recovery) Lastly, I was always monitoring the GPU hotspot and core temps while gaming and never saw temps above 75 degrees. Any ideas anyone?
-
Ray Tracing on M18xR2 - RTX 3000 MXM Upgrade!
Jerryzago replied to ssj92's topic in Alienware 18 and M18x
Cost is near the cost of the GPU itself. I am trying to find people I know in France to take delivery. -
Ray Tracing on M18xR2 - RTX 3000 MXM Upgrade!
Jerryzago replied to ssj92's topic in Alienware 18 and M18x
I also wanted that. They don't sell outside France -
Ray Tracing on M18xR2 - RTX 3000 MXM Upgrade!
Jerryzago replied to ssj92's topic in Alienware 18 and M18x
It's totally worth it. Having to deal with the scaling problems that SLI has, and the fact trying to figure out the best settings each time, is a win-win upgrade. Plus I no logner need my dual psu mod. -
Ray Tracing on M18xR2 - RTX 3000 MXM Upgrade!
Jerryzago replied to ssj92's topic in Alienware 18 and M18x
I also went ahead and installed an RTX 3000. I got my hands on an HP one. It required a lot of modding, but the result was tottaly worth it. Perfomance was in par with my 980m SLI. I will make a post about the install too. Firestrike Result http://www.3dmark.com/3dm/101435071?key=tDFP6R6-PP4AwmVNPe7T0A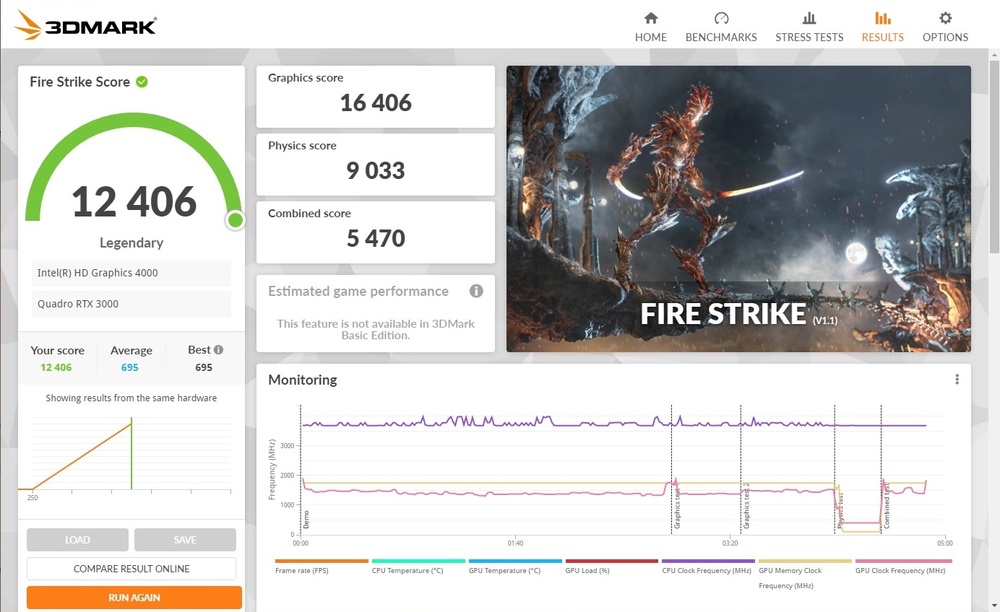
-
Ebay. I have an HP variant and it needs modding to make it work. Look for the ads and maybe one will pop up. I got mine that that way and still trying to make it work for my m18x R2. I have it for sale just to stop myself from messing around 😄