
Jerryzago
-
Posts
195 -
Joined
-
Last visited
Content Type
Profiles
Forums
Events
Everything posted by Jerryzago
-
Allow some time, I will make a full wright up with pictures. It is a DIY job but it needs extensive mods to the heatsink. I got another one so I kept my original one.
-
I have the same one in my M18x R2. Needs modifications to the heatsink, to the MXM slot and an extra brace to hold it to the motherboard. It sure pays off, since it is better than a 980m SLI and need a lot less power. Also runs a bit colder than the PNY one. Lastly it needs an dell x-bracket because the HP one has short pegs
-
My Alienware had also two 7970 so I use those heatsinks for my Nvidia GPUs. I removed the black insulation tape from the heatsink copper core. Leaving a GPU to the secondary slot, doesn't detect it from the system. Transfer it to the primary slot (left). Before doing the teardown, set the system to SG, then disassemble, install the GPU and check if it detects it in the BIOS. If it detects it, go from there to install drivers.
-
Second post, settings seem ok, though you could disable secure boot. Switching to UEFI requires a full windows install sadly. Intel HD drivers should install via windows update. Though I did installed the intel drivers for the dell site my own system. That is a 1060 variant I presume. It is in slot no1? Or do you still have both GPUs inside (7970 in slot 1 and GP106 in slot 2)? If you do have both, try to set PEG mode and install ati drivers first and Nvidia second.
-
Since you already have the unlocked BIOS, you could set from advanced options, video settings the mode SG. That will enable intergated graphics and the GP106 to show up both in BIOS. Make sure you are in full UEFI mode, because legacy is only supported from the 980m and backwards. Can't confirm that it works for later GPUs. Also a member here had issues with the GP106 in his setup. Try not to use the Fn + F7 switch because it can really mess things up now with the unlocked BIOS. Don't change anything you are not familiar with, as it can result into a paper weight if you don't have an external programmer.
-
One left!
-
That's a lot of progress. Don't mod inf. Use NVcleaninstall instead
-
Is it really that offset? I mean it has 2 cm of fins. It should fit since it is an MXM format.
-
Yes. Cut accordingly. Trim some, test fit and trim some more. You need these fins as long as possible
-
Yes, they are the same generation. But keep in mind, 17 may have the 120Hz screen so no SG can be used in that configuration. At least I think it is. I also have a 17 because it's a lot cheaper.
-
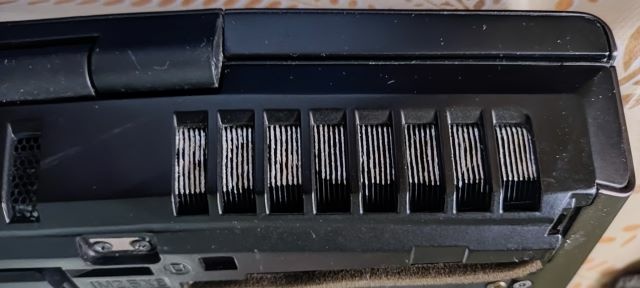
I believe these will not be your problem. Besides they have some adjustability to them. The cooling fins might be your problem. The ones I show in my photo. They are white (or silver) because the black color on them is trimmed away. But you can actually see these modifications, after you have your hands on the GPU and laptop
-
Look at the page above. A12 is the latest for the 18. Instructions are also there, take your time read through them thoroughly. The heatsink fans are flexible, but bending them will restrict airflow. Trimming them will be your best bet. Here is mine, trimmed down to fit inside the chassis. It needed extra time, because HP RTX 3000 has the core offset both horizontally and vertically.
-
Search through the posts here. A list of unlocked BIOS exist along with instructions. Don't know the exact version for the 18, but there is one one available. The screws are only horizontal offset. Better get a 100watt heatsink and trim the fins of. Measure the distance of the offset and remove as needed. A Dremel or any rotary tool will be fine. I managed to do the HP RTX 3000 for the M18x R2 that needed quite a lot of trimming. You will do it, it is simple. Hope this turns out good...
-
Best of luck to you making this GPU work especially in the 18. M18x R2 is more tolerable to changes. I made some changes to the unlocked BIOS of the Alienware 17 and made the RTX 3000 run at full 80watt load without throttling. Make sure you have installed the unlocked BIOS for the 18 and setting SG or iGFX prior to install. Waiting for your results
-
M17x R3 and PG106 card half way, need help.
Jerryzago replied to Lex_Amorph's topic in Alienware 17 and M17x
Isn't there an unlocked BIOS for it? 17 R1 also does not support PEG, but bios unlocked does. -
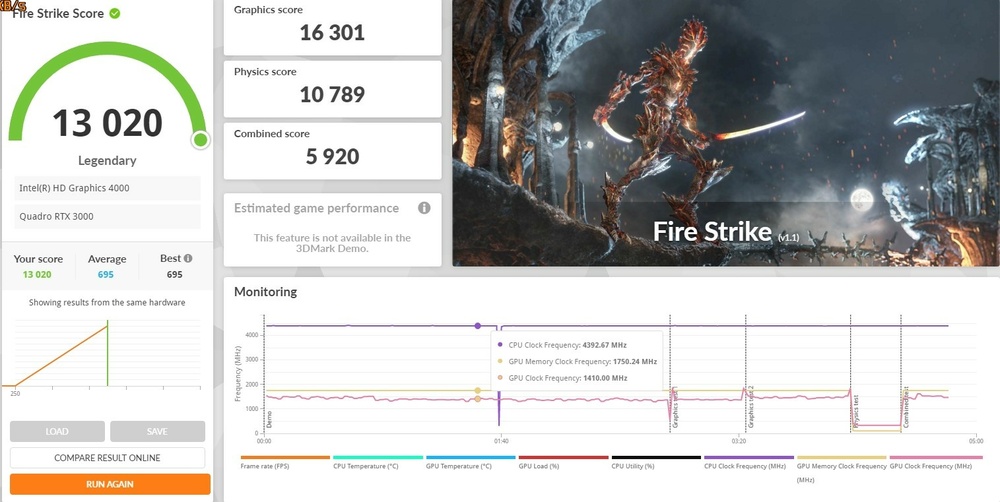
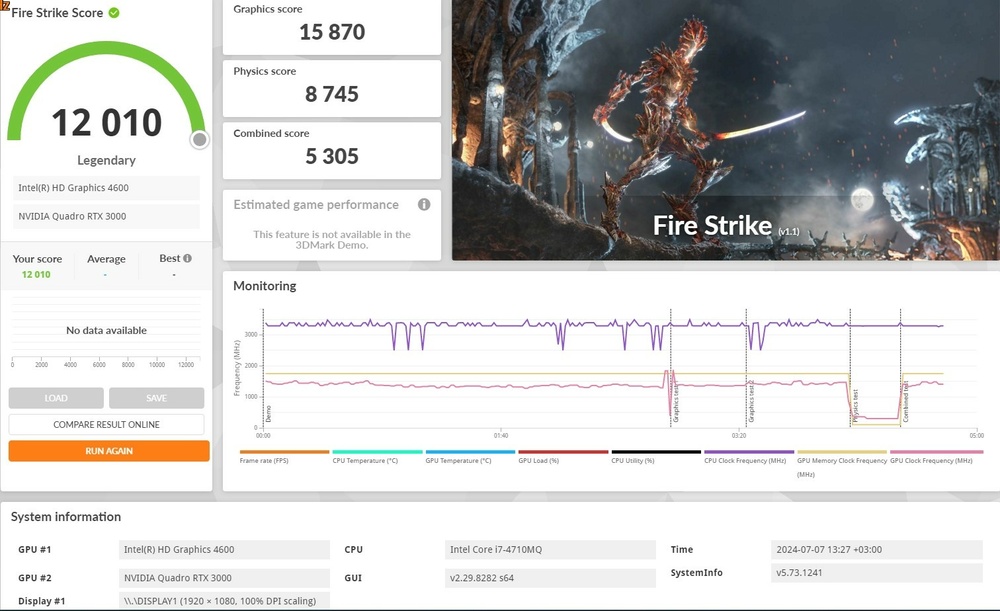
Well after taking advice from this group, I got my hands on some Honeywell thermal pads. Not the easiest thing to apply, but was totally worth it. At firtst my 3940xm barery could keep the stock clocks, reaching 92 degrees on full load with my Artic Silver MX-4. Switched to Honeywell and also put thinner pads to the VRMs cooled by the tripple pipe CPU heatsink and BOOM...... Setting all cores to 4.4GHz via BIOS, sytem barely exceeds 80 degrees. I can hear my fans barely working and even the GPU climbs above 70 degrees. also some firestrike results https://www.3dmark.com/3dm/119616612? I just couldn't belive the difference. Next my Alienware 17 R1 will get a 4930xm to accompany its Quadro RTX 3000
-
Ray Tracing on M18xR2 - RTX 3000 MXM Upgrade!
Jerryzago replied to ssj92's topic in Alienware 18 and M18x
Most of the first set of problems are related to hard drive communications. I say stop using the HDD caddy, get an msata for boot and place an SSD caddy to your Optical drive. There are options to put an 2230 Nvme to the Msata port via an msata to Nvme adapter. I will try it shortly to see results. Also the flickering might be if you installed the 980m and RTX3000 and had set the Video settings to SG. I places in both slots two RTX3000 (HP main slot, PNY secondary). PEG resulted in 8 beeps, SG resulted to flickering. -
Ray Tracing on M18xR2 - RTX 3000 MXM Upgrade!
Jerryzago replied to ssj92's topic in Alienware 18 and M18x
How about going the M18x R1 route. Install 4050 to the secondary slot and a "known to work" GPU in the primary slot (780, 880, 980 with unlocked BIOS) and set the GPU to PEG. If the system detects it, then drivers will be installed and MAYBE it might work? -
Ray Tracing on M18xR2 - RTX 3000 MXM Upgrade!
Jerryzago replied to ssj92's topic in Alienware 18 and M18x
Please do post pictures when you will make the install. I was sceptical about this (fitting an A GPU to a B slot). Though I have a quadro M2000m lying around for testing, I didn't go forward. -
Ray Tracing on M18xR2 - RTX 3000 MXM Upgrade!
Jerryzago replied to ssj92's topic in Alienware 18 and M18x
Isn't the 4050 a MXM type A? M17x R4 works with MXM type B? Maybe it will fit in the slot but you will not be able to screw it in place, and stock heatsink won't fit! -
Thank you for the very helpful info. I will look to overclock my CPU, though there isn't much headroom left, since it reaches at 88 degrees on full Load. I used mx-4 on it and currently looking for a better solution. I want to stay away from liquid metal, as I am afraid of it. The GPU with the stock fan control is quite happy. Never goes above 75 even with prolong gaming. It is an 80watt GPU oppose to the 100+ 980m that was in there. Setting PEG mode with the Quadro is a no go. Results in 8 beeps. Similar situation with every GPU past Maxwell. Can you remember the color of the wire. I am not keen into cutting, so I will remove it from the connector and see results?
-
I am away from home, so I cannot post any images. I have set the trip points a bit lower than default settings. I believe it has 47 degrees. I am not completely sure they work, but fans seem to kick at 50 degrees and previously were at 60. I monitor the temps from HWinfo and RTSS while in game, but fan control from within HWinfo, makes GPU fan stop working, whatever I set as speed value. Speed is 4600rpm for CPU and 3600 for GPU. Do try and test them.
-
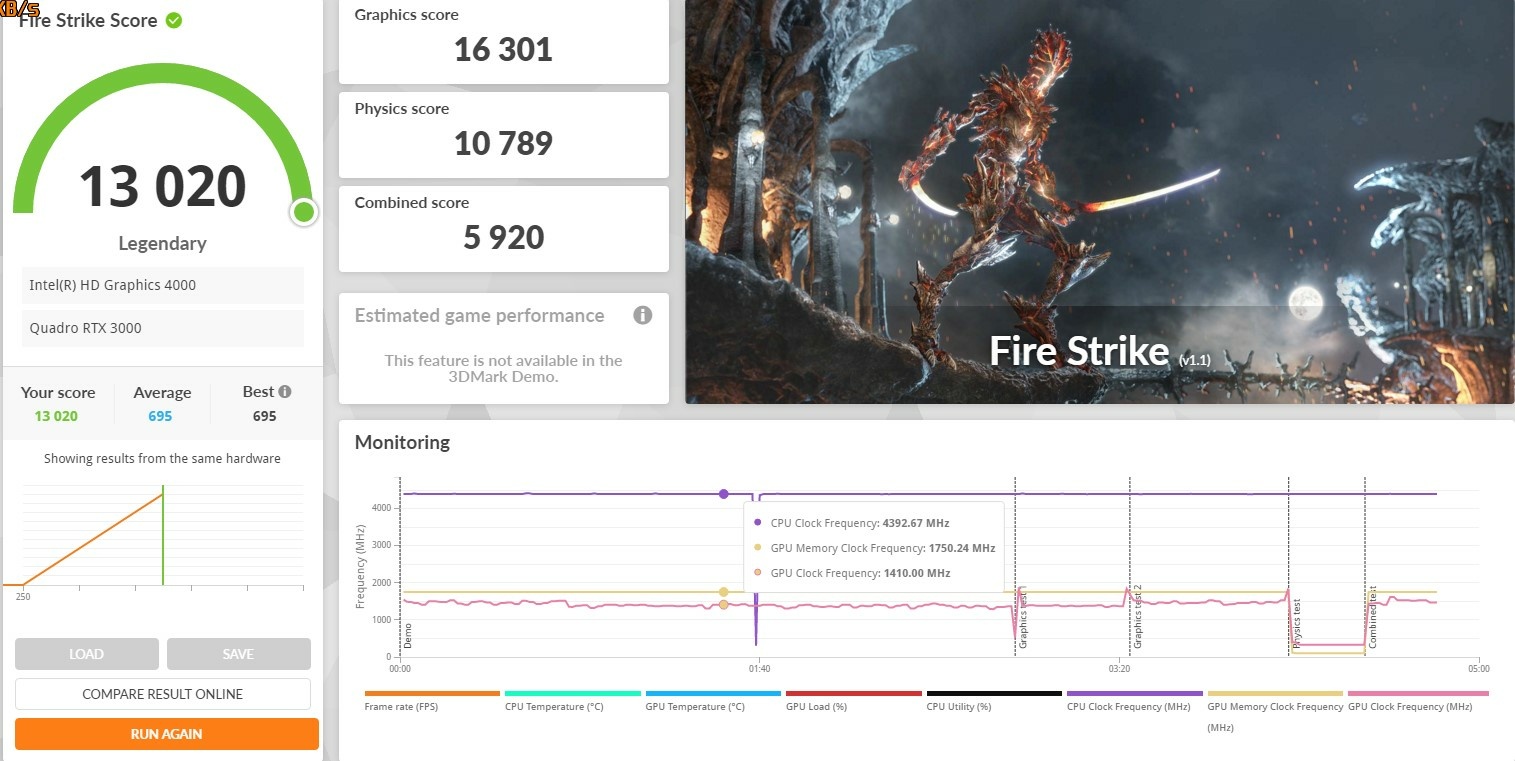
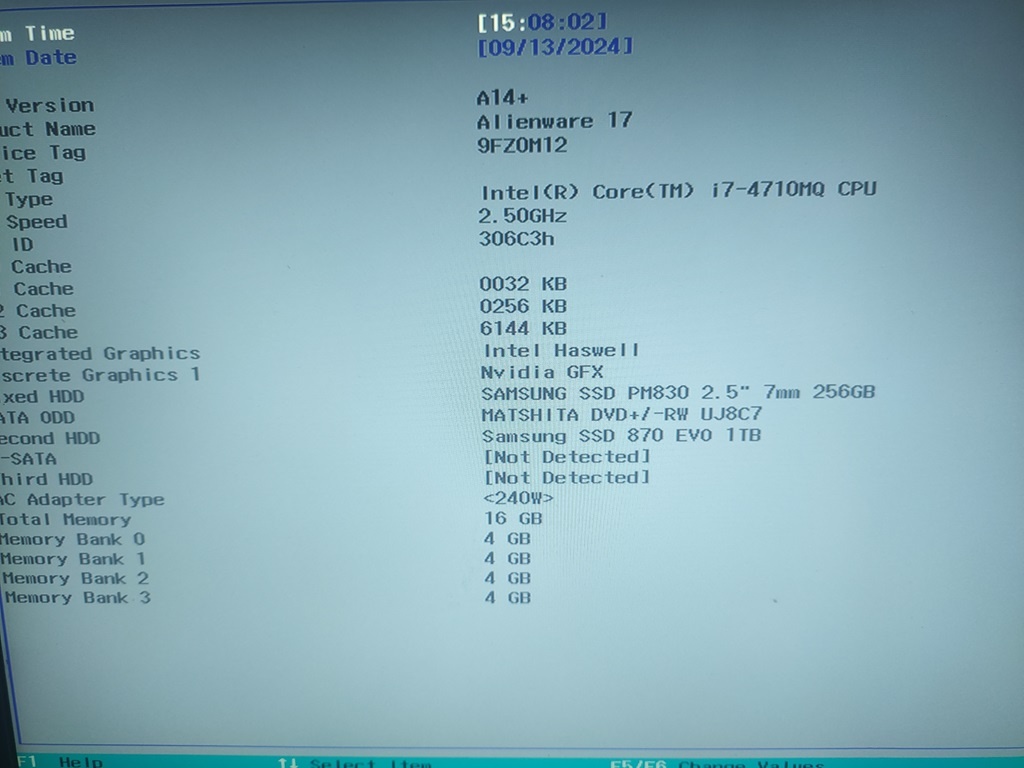
The unlock process is here in this forum. Do make a search and you will find the necessary steps and files. I used the A14+ BIOS. It was a difficult procedure, regarding I had to clear NVRAM after upgrade, and also edit BIOS beforehand to enter my Service tag (it is also explained here). Flashing was easy and since you already have a 4940mx, probably you will not have to clear NVRAM. The settings the BIOS will have, are for that CPU, and because I have a 4710MQ, it failed to post and needed to load setup defaults. After getting it done, I left my Video Settings to iGFX but I could still see the Nvidia GPU both in Bios and Windows. I installed Drivers and it was working without any throttling. I was having fan control issues. HWinfo stops GPU fan from working and only operates CPU fan. I can say that now I run the stock fan curve, and keeps the GPU below 75 degrees (80 for hotspot). I couldn't recreate the throttling issue, untill I found out this menu. Also setting SG mode, resulted in 8 beeps upon restart, and I don't have the 120hz display. PEG also gives 8 beeps (naturally). Messing around with settings, I recreated the throttling issue by doing what I describe in my previous post. Having so low physics score is because of my stock speeds of the 4710MQ. Base clock is 2,5GHz and turbo is 3,5ish..... GPU runs happy though so now that I have narrow it down, I might get an MX but the temps are my concern. My 3940MX hits 100 when clocked to 3,7 at all cores. I believe that 4940MX will have the same behavior. I will take the shot in the near future though.
-
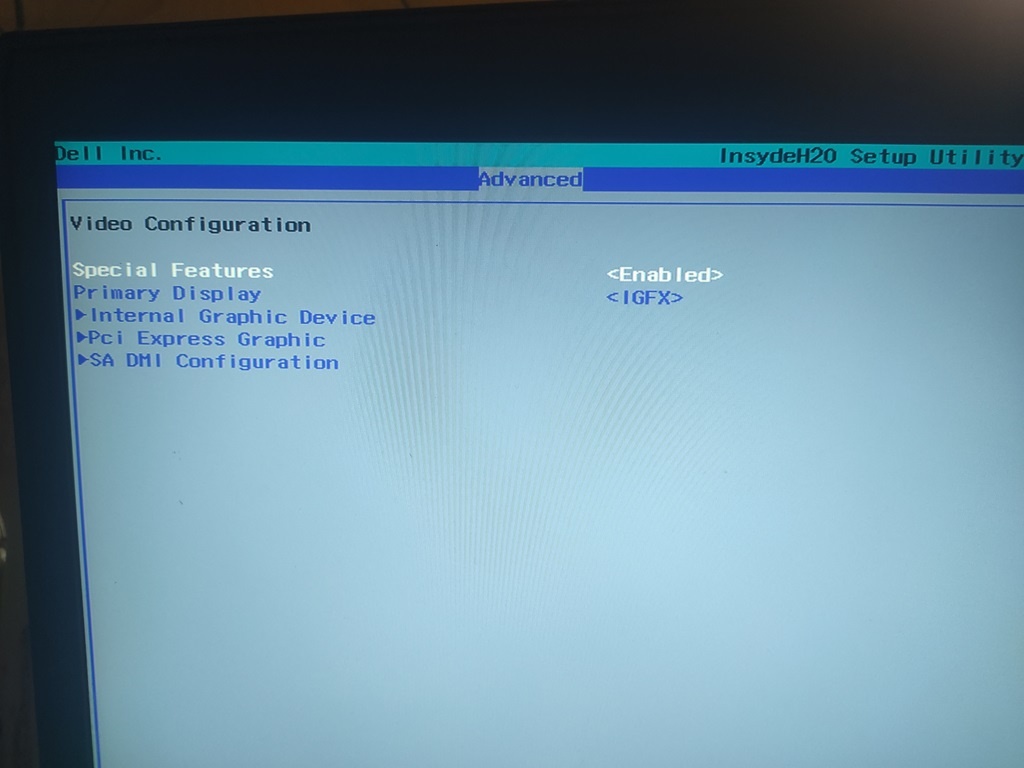
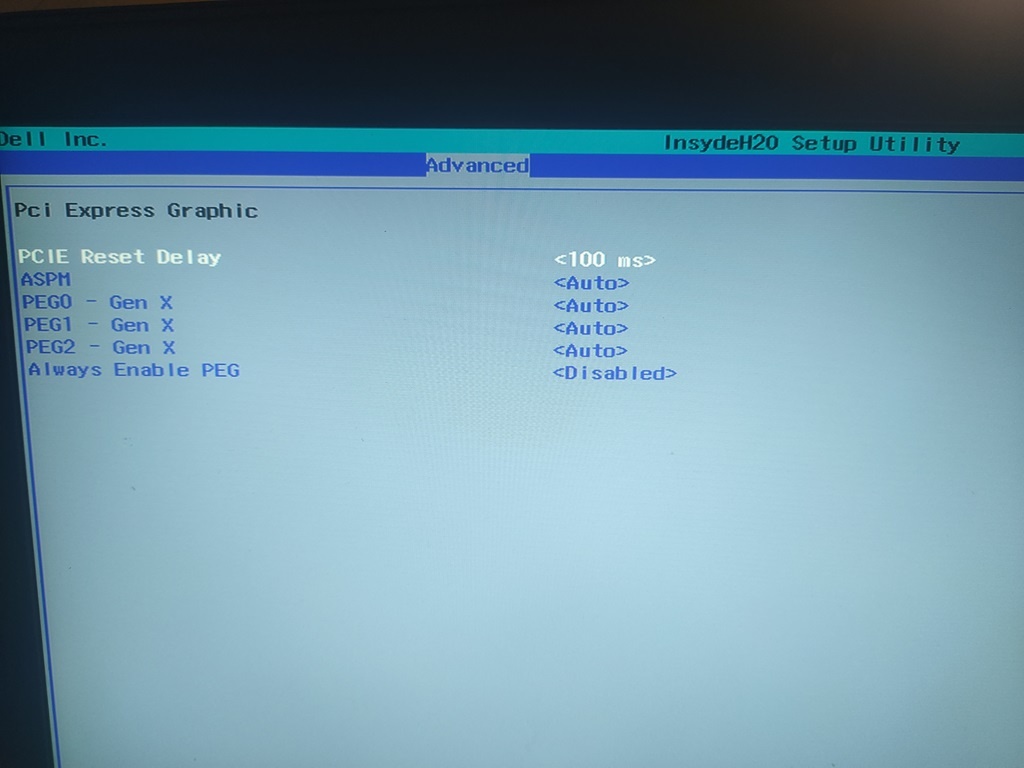
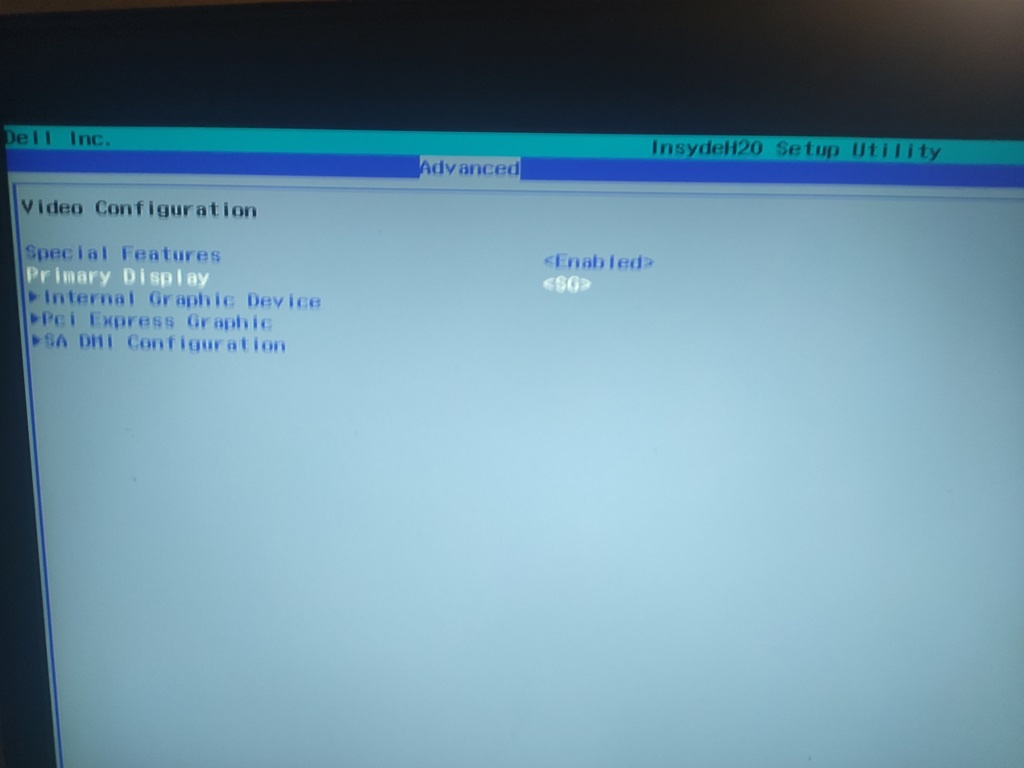
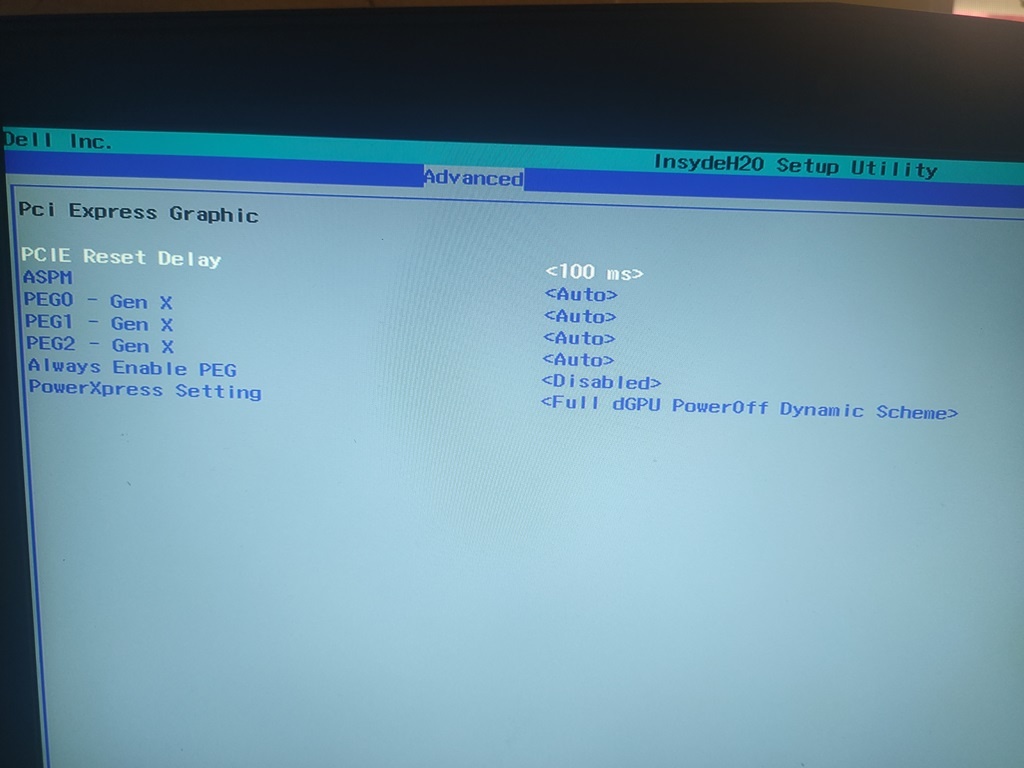
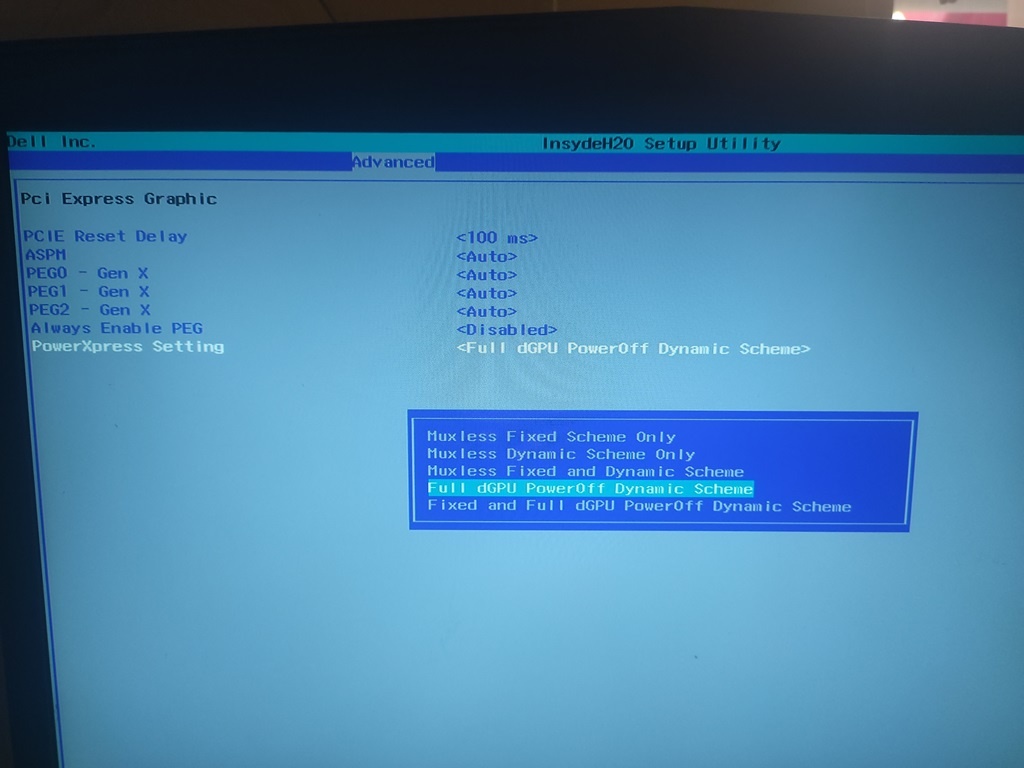
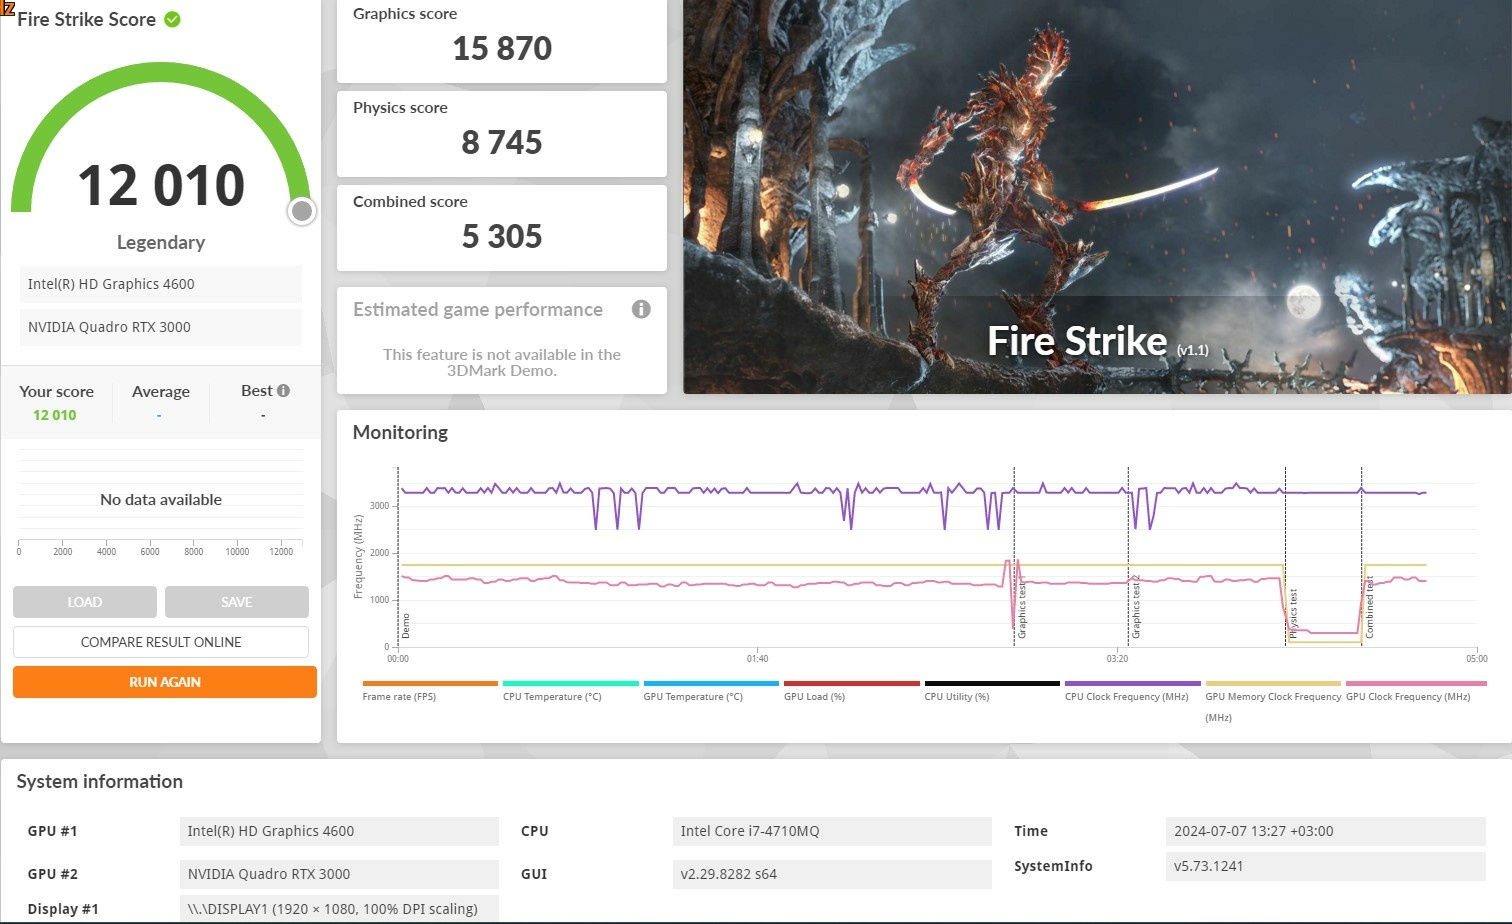
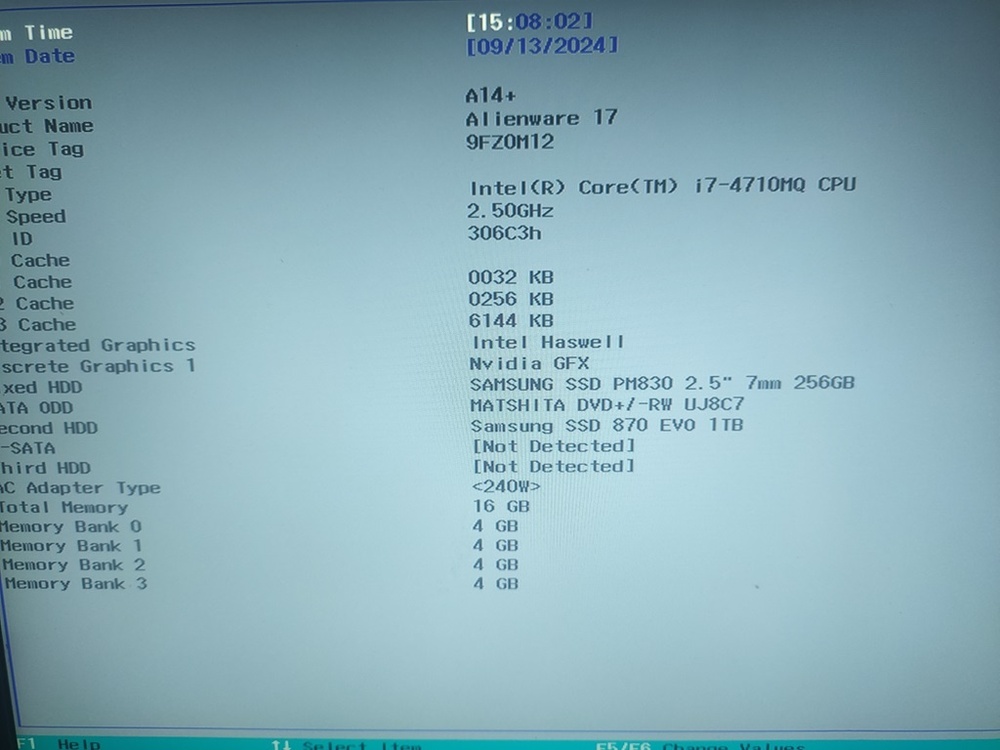
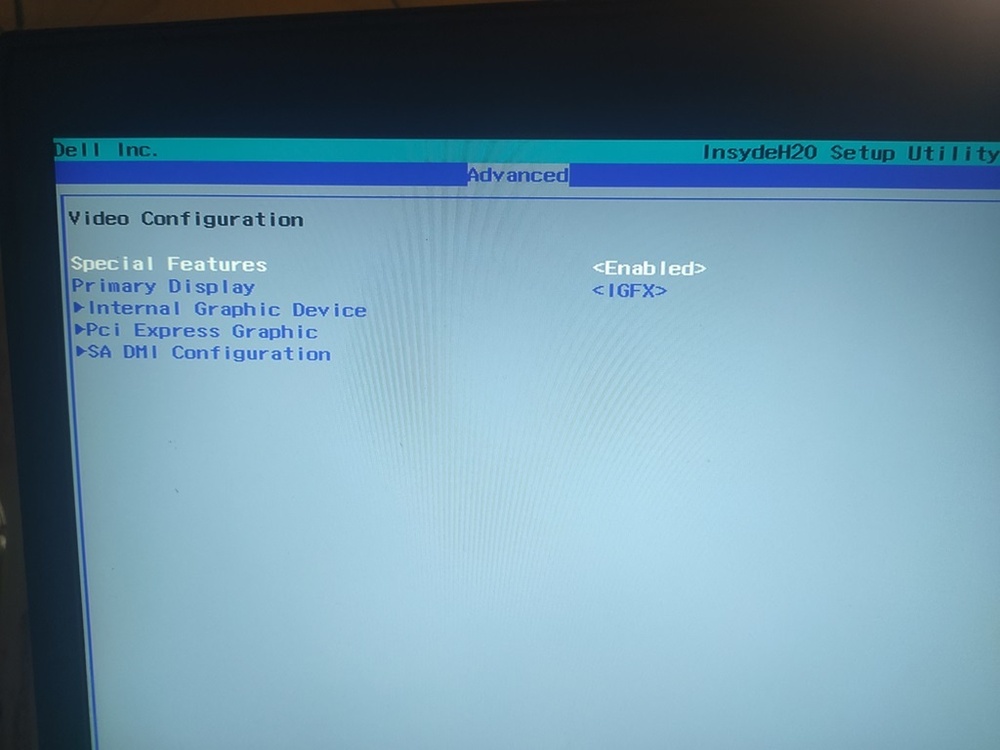
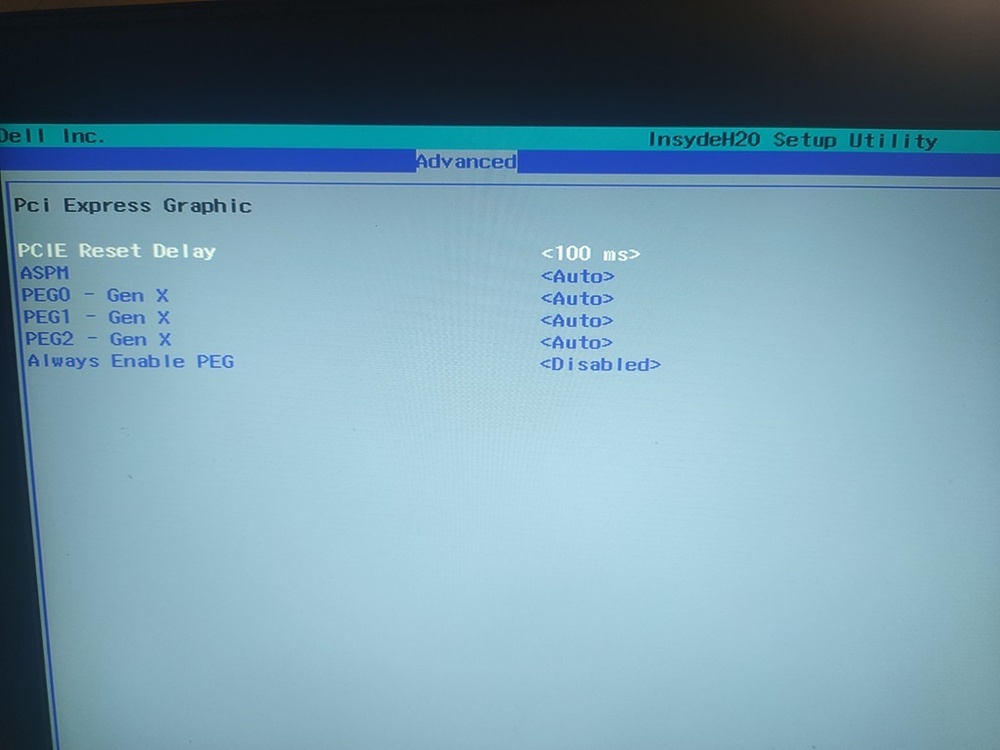
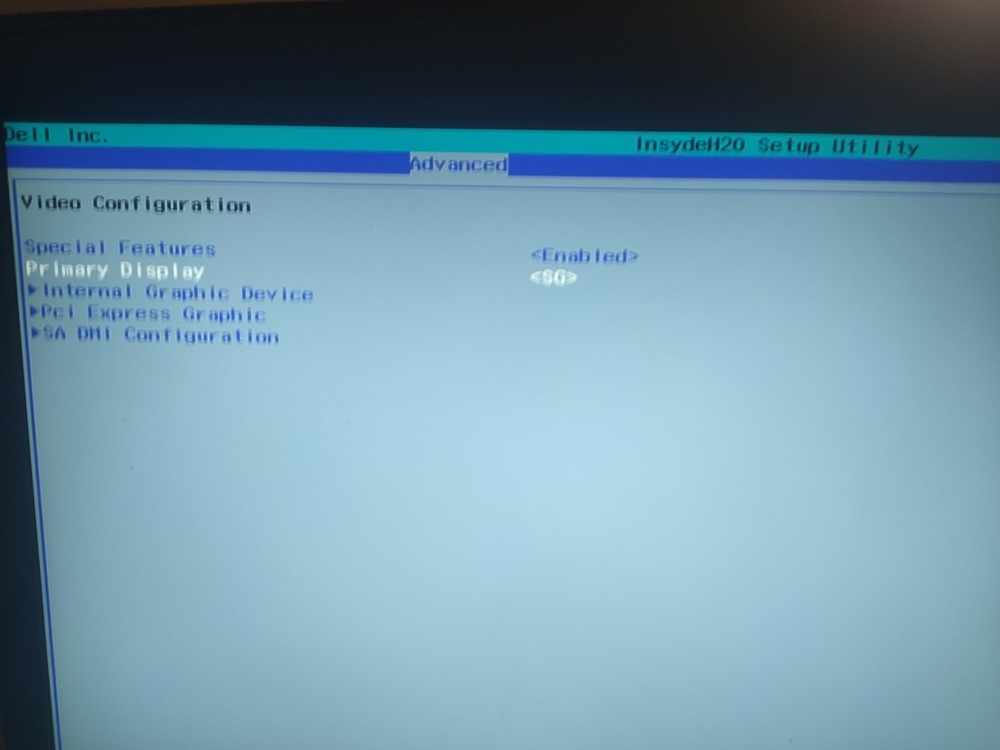
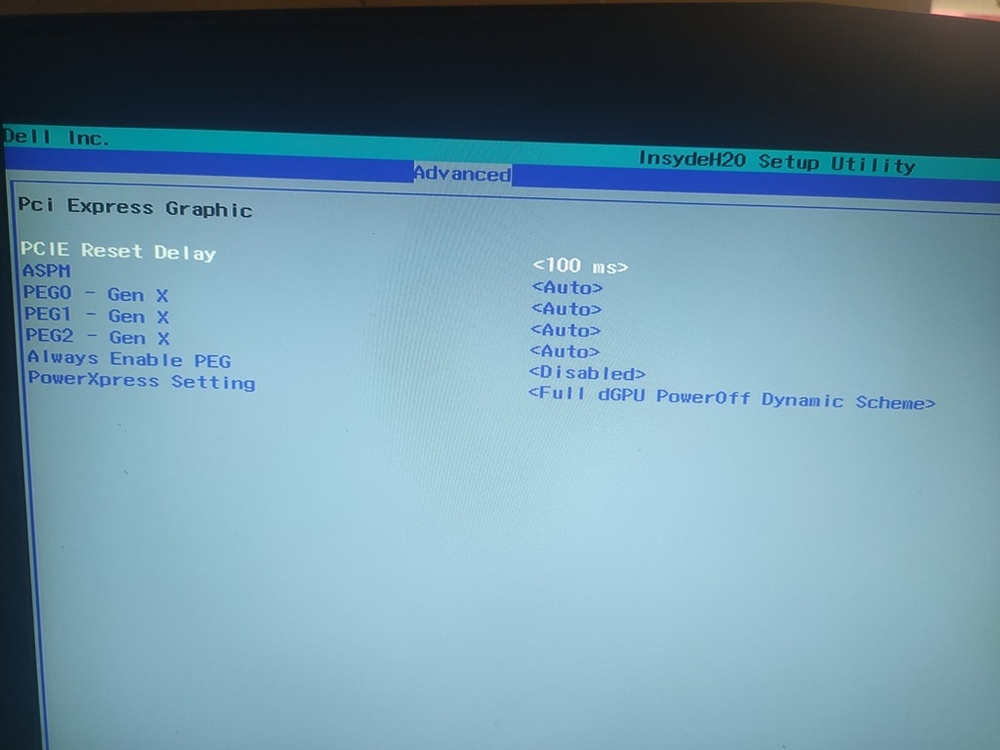
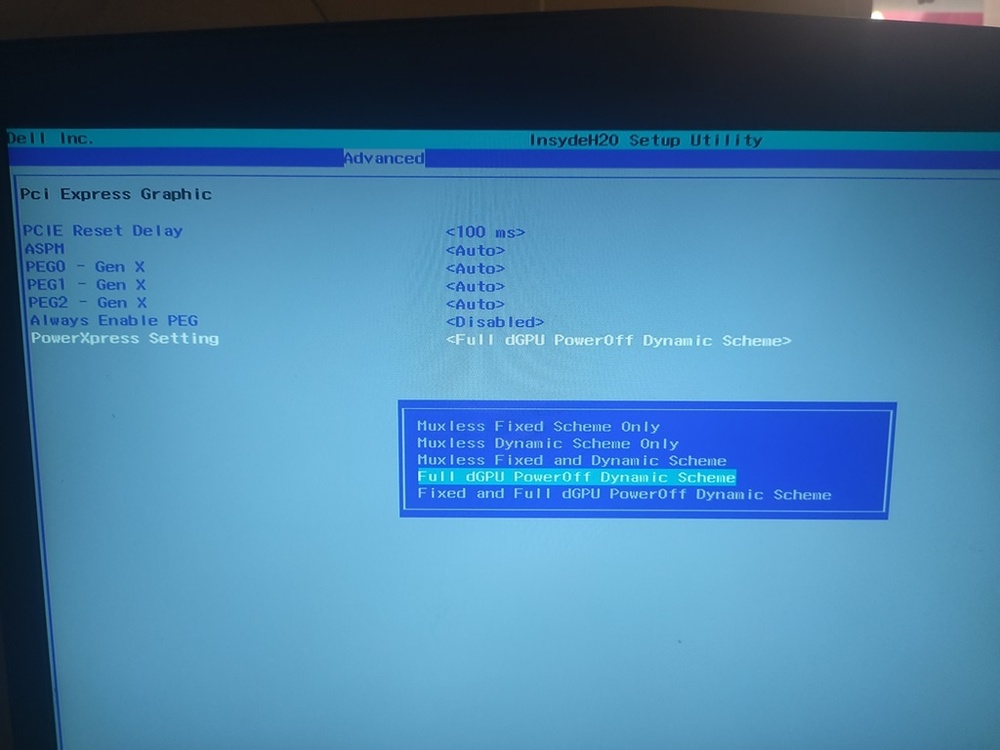
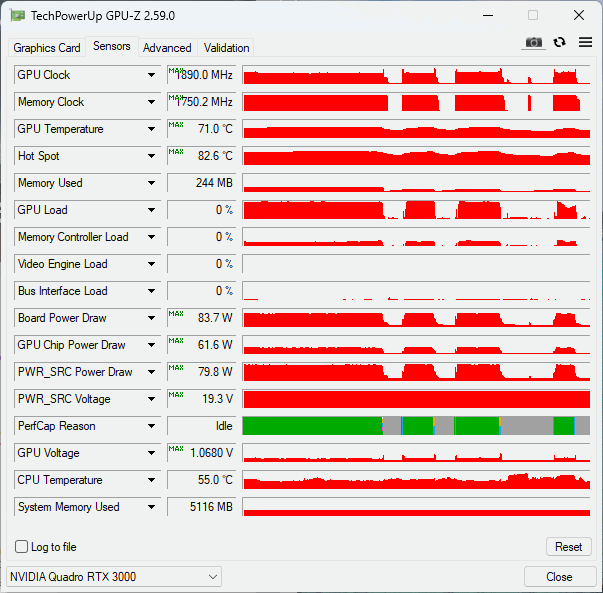
After many setings and reasearch I am propably able to find out why the 17 doesn't like the PNY RTX 3000. It is unlocked BIOS setings. So I hope my notes will help those with the 40Watt limit. First I have set the video settings to iGFX. It shows both GPUs in Bios and Windows and everything works as it should. Setting iGFX and entering the PCI Express Graphic menu, you can see the next settings Going Back and Setting SG mode, You can see some extra settings Leaving Full dGPU PowerOff Dynamic Scheme and rebooting with SG selected, results in 8 Beeps and GPU has to be removed to post Again. These are the options for that menu Trying everithing (except the last one) everything works, but running a Firestrike, power draw drops to 40watts and Ram Clocks to 200Mhz. So here is what I did. Enter Bios Set Video configuration to SG Enter Pci Express Graphics Memu Select Full dGPU PowerOff Dynamic Scheme Go Back one menu Set Video Configuration to iGFX Save and Reboot Enter BIOS again to Verify from the first menu that iGPU and dGPU is present Enter windows and run a benchmark to verify results. Here are mine. Though core voltage is below 1,0V, power draw is constant at 79watss and clocks don't clock down. Cap reason is Pwr. Do try these settings and post results. Asumming that maybe Alienware 18 has the same settings, maybe this will work for that too. My m18x R2 doesn't have any of the above settings and the GPU doesn't throttle.
-
Ray Tracing on M18xR2 - RTX 3000 MXM Upgrade!
Jerryzago replied to ssj92's topic in Alienware 18 and M18x
Do a complete driver uninstall using DDU and selecting NVIDIA GPU. Use NVCleaninstall for driver installation. Select not the latest version of drivers from the drop down list, add your hardware ID and select the proper Quadro RTX 3000 from the top down menu with the same hardware ID. Select the built package method and then do the driver install. I am also on windows 11 with my M18x R2 and I had to disable the GPU scheduling from advanced graphics settings to stop the constant BSOD all the time