srs2236
-
Posts
275 -
Joined
-
Last visited
-
Days Won
1
Content Type
Profiles
Forums
Events
Everything posted by srs2236
-
The heatsink is unified, if CPU temps get higher it impacts the GPU temps aswell. It is to be expected in your scenario I believe.
-
Can confirm upgradeyourlaptop is legit and safe. Bought my RTX 3080 from them arrived very nicely packaged, no import fees (atleast in UK) and it was brand new unopened.
-
Shouldn't be an EC issue as I had before older EC version while having latest BIOS and fans ran perfectly fine. Maybe something to do with the dsanke BIOS. What's special about the dsanke BIOS anyways? Mine is just on unlocked default clevo BIOS. Am I missing out on something?
-
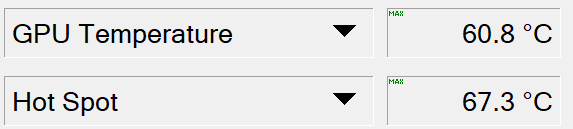
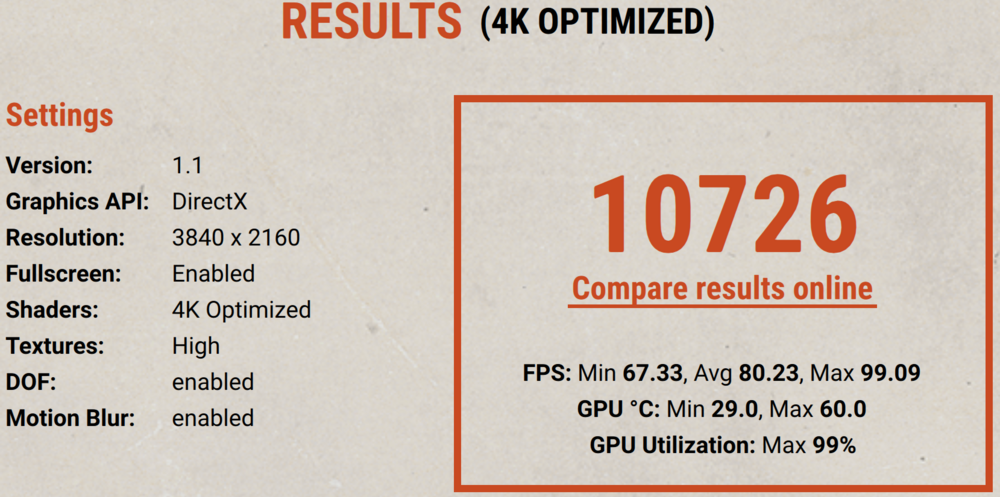
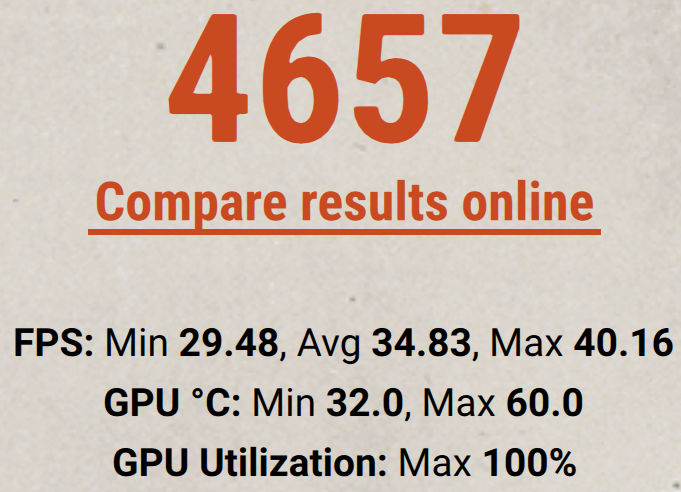
Tests ran at max fan speed, because that's how I have it always when I benchmark it or play games. Used same benchmark as you mentioned. GPU core is +90, Mem is at 2000MHz (instead of original 1750MHz). At Idle the difference between hotspot and core is usually 5-6c for me. But I noticed this behaviour across the board, it's always like 5-6C most of the time. this is at 4k optimized: 8k optimized: Maybe I have misunderstood something? Why does yours run so hot? Don't you run them at full fan speeds? I can redo them if they need to be done in a specific way.

-
Damn, okay, I will redo it when I have time. Thanks for the feedback though.
-
nope, logged off and logged back in - same error: well then for now it stays like this, on desktop it works properly (atleast for me, altough takes some time to load the images, using Firefox). as for mobile, well unfortunately you have to click on every single individual link and the image will show up (atleast for me on my s20+, android 12 using Firefox) for now this is the best I can do. EDIT AGAIN XD: so for me it actually works even on mobile, its just very slow as it is loading all of them at once and it is like close if not 100MB total so depending on where you are in the world it might be even more slower as the servers for that particular cloud storage is in Latvia in the Baltic states so, USA for example is loooooooooooooooooooooooooooooong distance away from it so yeah.... but thats it for me, hopefully somebody can atleast see them idk.

-
oh my dayss... for me it is working, slow but working... anyyyyyywayyyyyyyys, I will try to log off, log back in and upload individual files as the links will expire after 2 months anyways. off I go again.. but thanks for the input I appreciate it Edit: just checked, yeah they are broken on mobile version, on desktop version is just fine. oh well, will try to fix
-
I just used the external link option in the end... hopefully the pictures made it a bit more understandable idk...
-
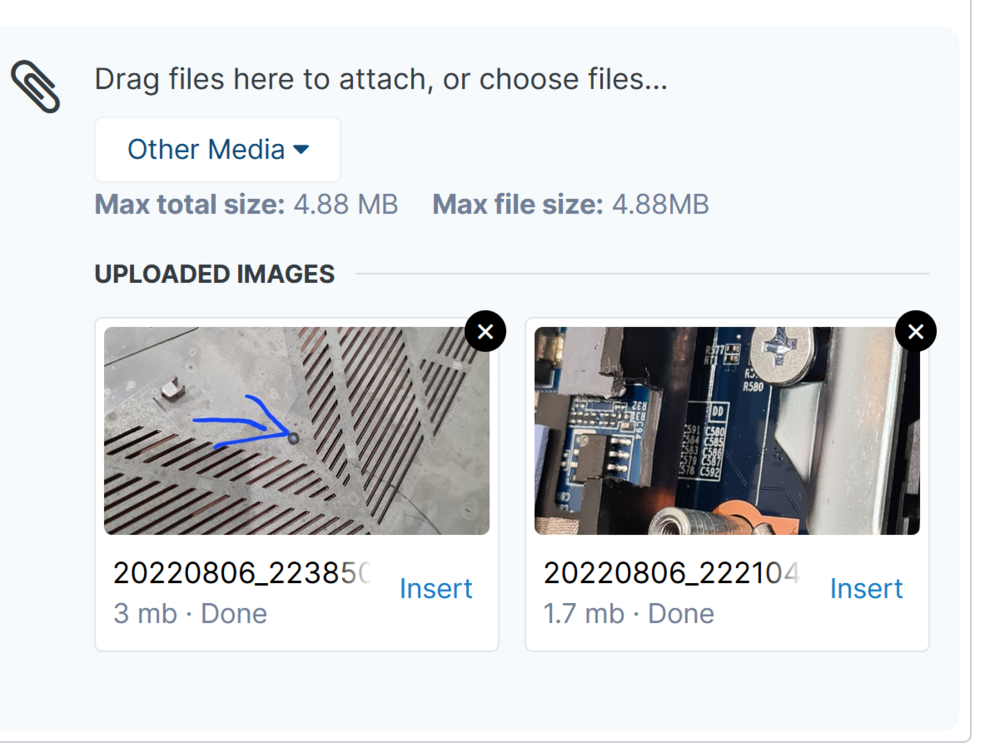
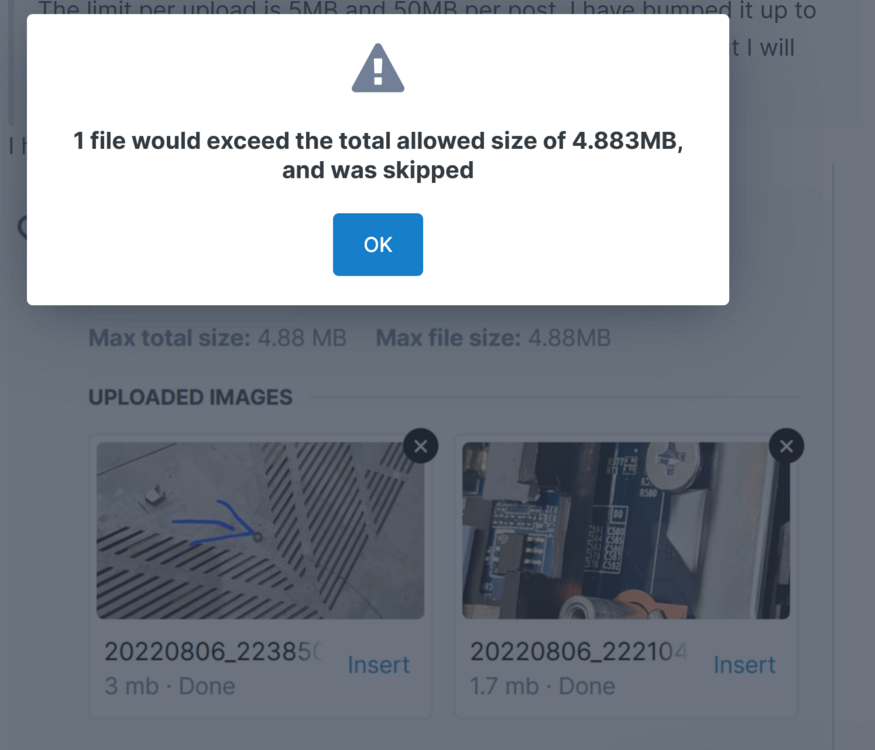
I have put only two pictures at the moment: And, when I try to add third one there, which is 1.63MB of size it shows this error: Tried it again with Edit and shows this: I see there is an option to use image from URL so I will do that for the time being.

-
this is a big issue as the total of pictures were 200MB. or is it just simply not true? because if not I will try to edit it atleast with the pictures EDIT: i mean I dont have to upload all 90 pictures but like 1 picture is around 2-3MB so seeing this I didnt even bother? EDIT2: Okay, I now understand it could be for a single file but it is still a bit misleading if you actually can upload more. Currently downloading from the files.fm and will try to make it atleast with pictures so its more easier to read through and understand. EDIT3: I noticed the adult language removal. Will make sure to never do that again. sorry

-
Also, I forgot to mention but my heatsink came with bent copper fins that I had to unbend, so be aware of that aswell. After unbending them: You get the idea... Just let you know what to expect when it arrives if someone is interested in the same heatsink. Here is all 92 Pictures for those interested: https://files.fm/u/sjj9hyjue So more on the thermal pads: The pad under the GPU is same 4MM, I used both the new pad that came with the aliexpress heatsink + I cut up the old one and used it aswell for additional support because i know from my old RTX 2080 it REALLY likes to bend the card down in this area a lot over time. And another update on the plastics, there is actually one more place where you need to cut plastic in order for the GPU to sit in the slot because the notch on the RTX 2080 and RTX 3080 is different so just as is it wont even fit in the MXM slot. Its not hard to just cut off the plastic notch entirely as it is not needed ans is just a sneaky and bad attempt from Clevo to try and hold people off from doing an upgrade like this I would assume. And about the foams, well the 2mm ones went on the sides I am sure, and the 1mm ones went on top and bottom, anyways just do the same as it was on the RTX 2080 and you will be good. ALSO, another HUGE bummer in my opinion is that now the 2nd screw for the keyboard cant be screwed back in as the heatsink blocks it now. I mean you can screw it back in, but every time you need to reflash BIOS or change keyboard or change WIFI card, be ready to remove the whole heatsink which IS SO BAD in my opinion so the screw (where the big cuts are) is not screwed in for me because I tend to brick my BIOS way too much lol XD and cant afford to mess around with my copper shims and K5 pro all the time... but its a bit sad but yeah that is it I guess, hopefully it is useful info for someone who wishes to do something similiar. No BIOS mods or VBIOS mods were otherwise necessary, it worked right out of the box. The only thing needed was a INF mod but I can upload it for your pleasure (just it will also be called RTX 3080 instead of RTX 3080 Laptop GPU because I hate the fact that unlike using the same die as desktop variant as it was with 2080 they now use a RTX 3070 dekstop type die in the 3080 laptop...) which is just sadge. Just replace this INF file with the one in the extracted drivers folder and disable driver enforcment in Windows. Any questions feel free to ask. nvcvig.inf
-
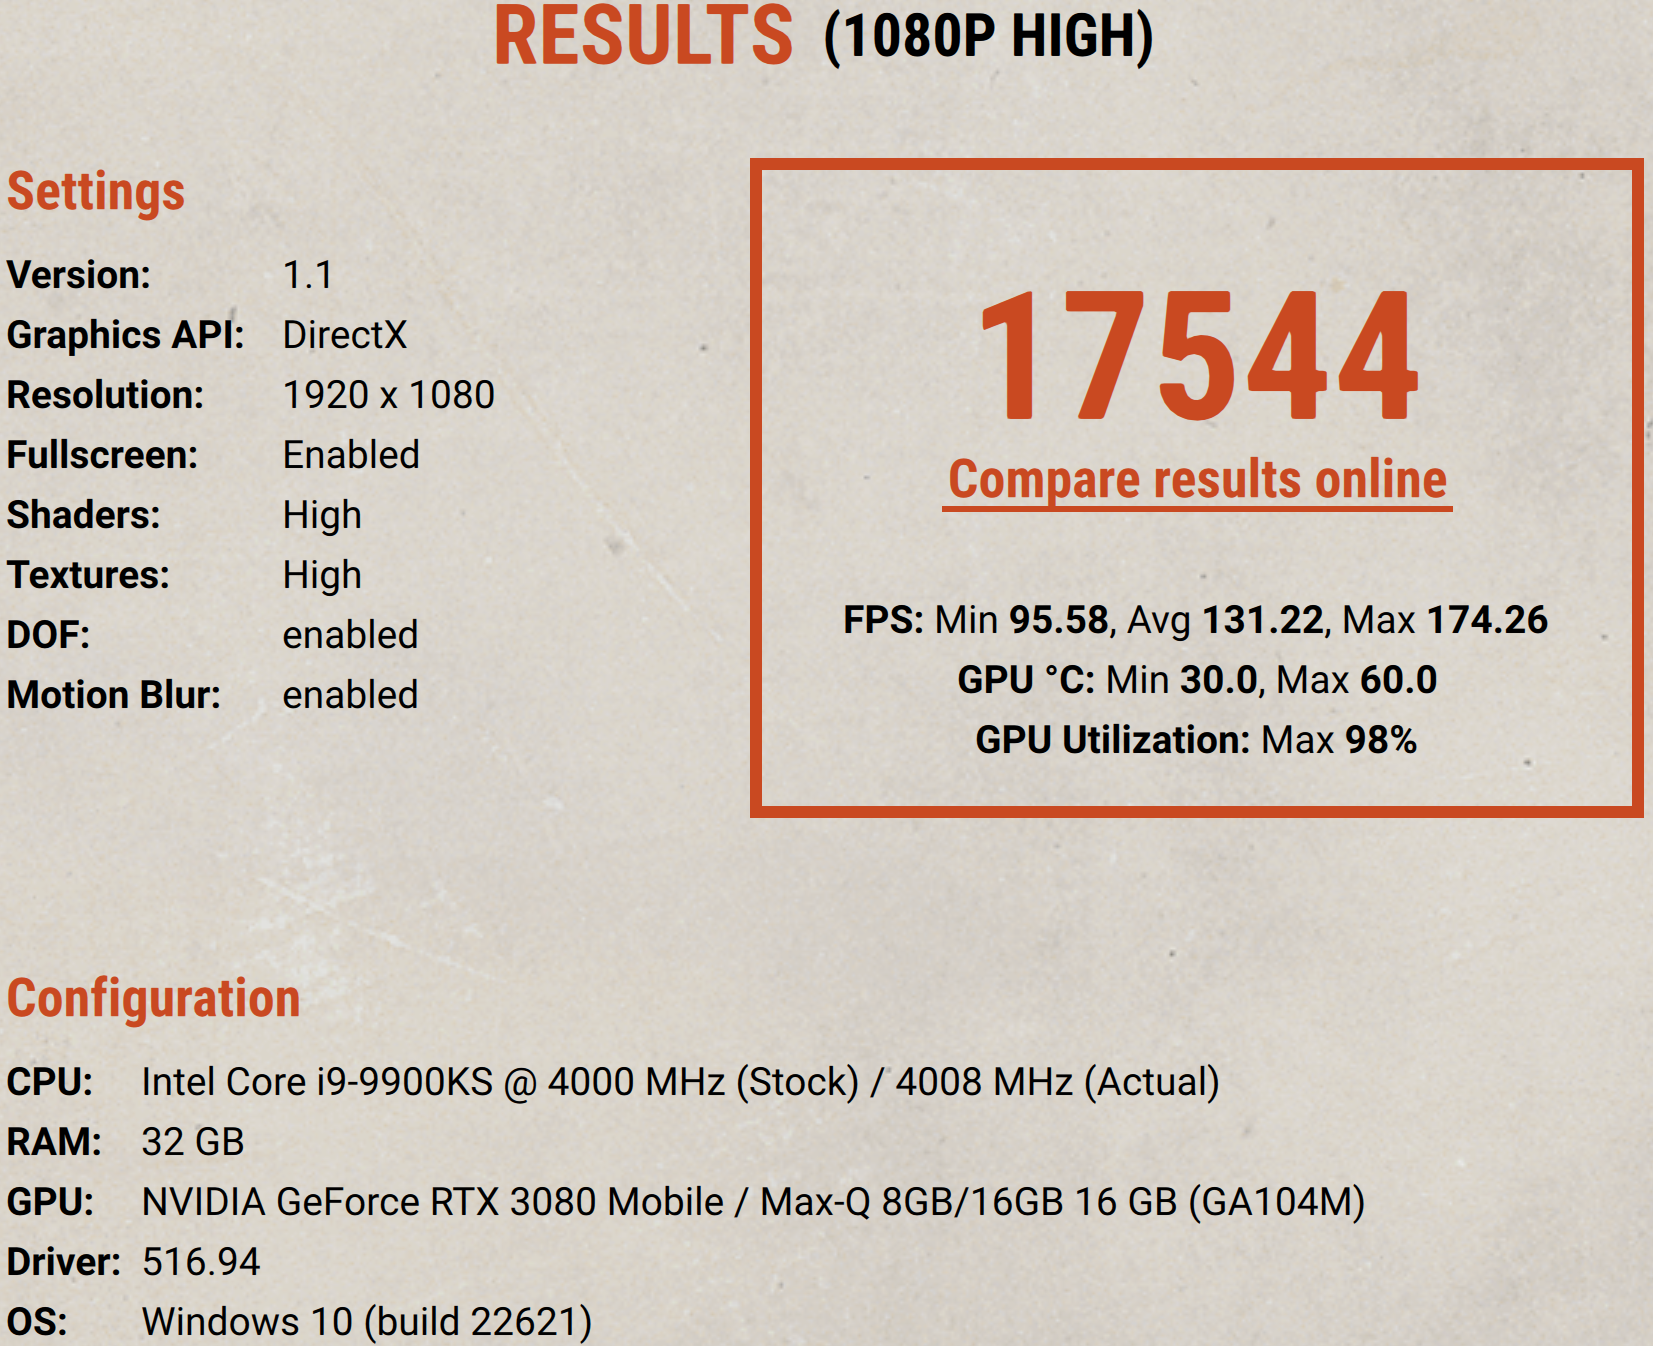
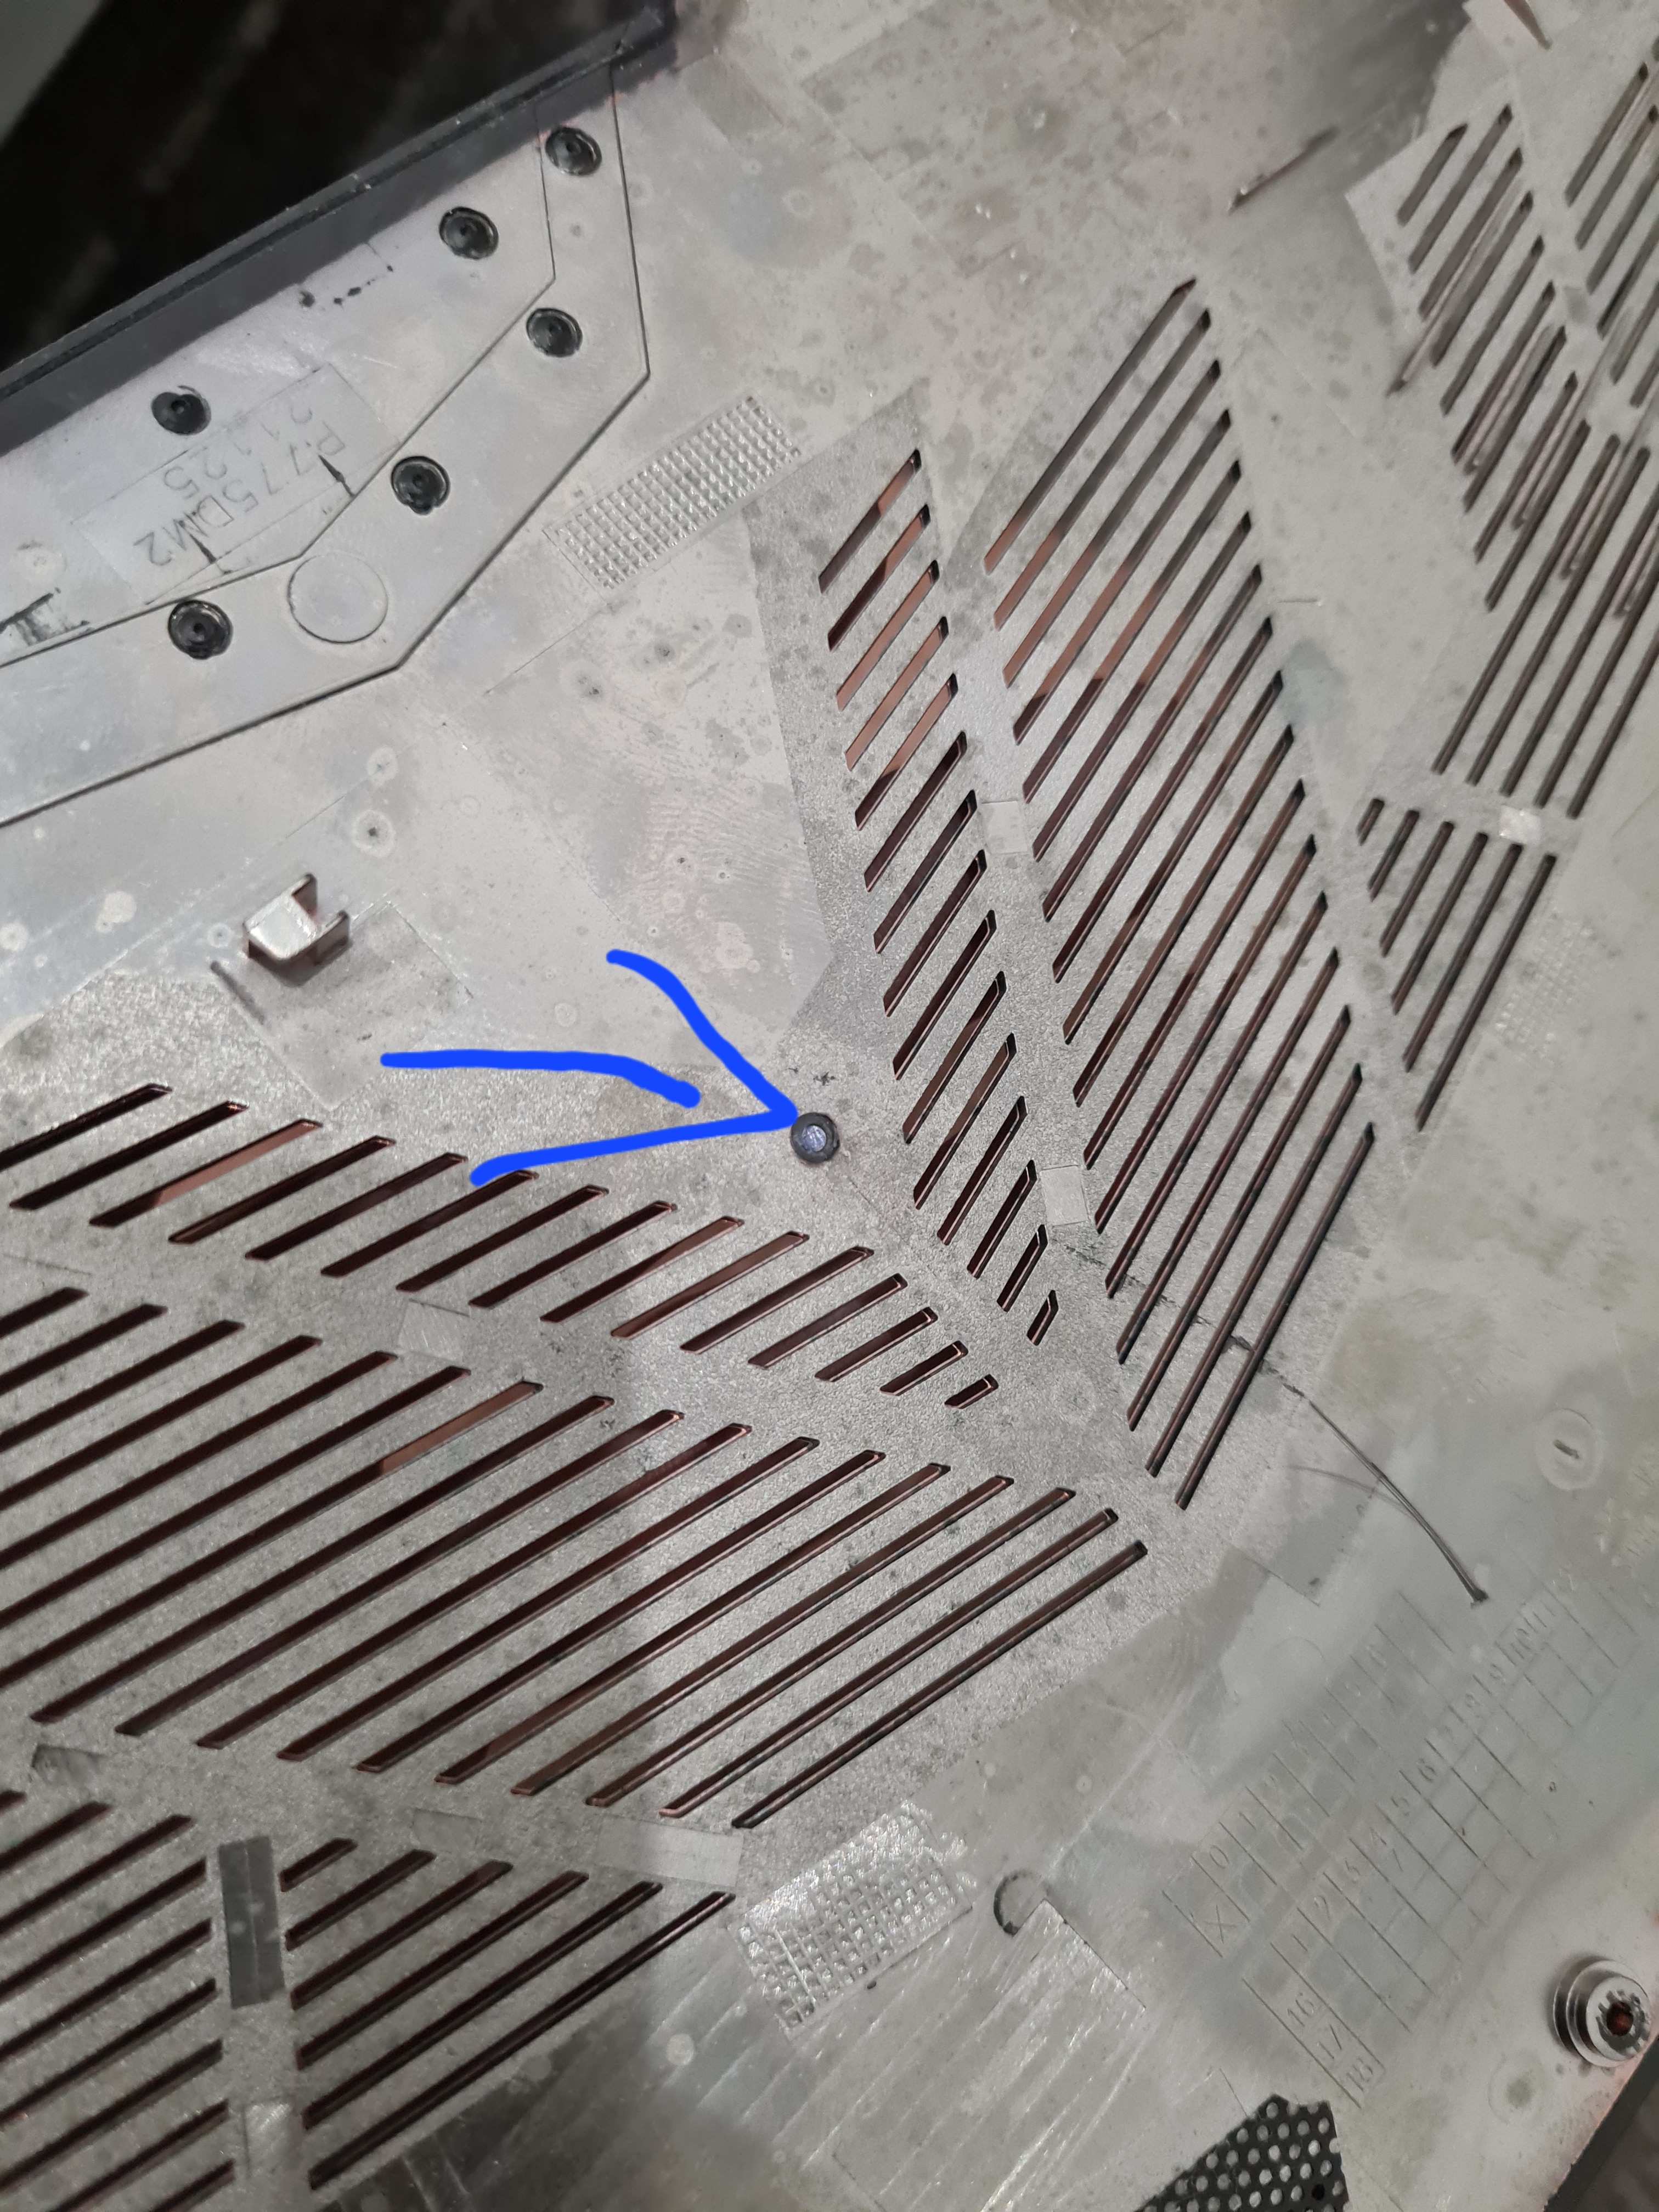
Okay, I think I am a very bad writer but I will try my best. Overall this mod is a success. Success because first of all it works and second of all there is noticable performance increase. Heatsink is a massive improvement. For the most part the CPU runs very well even with Current limits removed completely (255A). It does thermal throttle a bit depening on the Game or the load put on it, but it averages very close to 5GHz most of the time if it does throttle. And this is huge because before it would thermal throttle even with current limitations at maybe 100ish Amps. Max power it could barely keep from big thermal throttle was around 70W load on the CPU. In contrast now it can withstand pretty much nonstop 100W on the CPU, and for the most part even does the 150W turbo and 120W turbo for the short time without issues. For example before timespy couldnt even run the full test without thermal throttling massively, now it does time spy at constant 5GHz throughout it all. Don't know if thats good or bad but the improvement for me was huge. For reference all the testing is done with max fan speeds at all times and I use thermal grizzly kryonaut as the thermal interface between the CPU/GPU and the heatsink. Now for the bad parts: The heatsink arrives with no instructions whatsoever, also no instructions on the aliexpress listing (atleast at the time of purchase). There are several mods necessary to the case, the heatsink itself and thermal pad placement and thicknesses are completely different for the most part. !!!BUT the most critical part is that without proper treatment beforehand to the heatsink I am convinced that you can actually completely destroy the GPU die if you get a particularly bad batch (I will explain later with pictures). I will start with the mods needed for the case. A piece of plastic needs to be cut from the back cover here: Another piece of plastic needs to be cut here: For this particular cut I used nail clippers to clip it and a paper knife to make the cuts nice, no need for power tools or anything but you have to be extremely careful of course. Then when thats done the heatsink will finally fit, but you want to prepare the heatsink ideally to first of all look nice but also that it has all the previous foam supports. And yes it does not come with any of the foam supports that the original heatsink has. So you have to purchase (optionally but i believe crucial) 1mm foam (forgot the exact name) and 2mm foam. This is how it looks with the foams applied: Then, it is actually crucial to put back the paper handles because it is actually very heavy (300g heavier than the original one if not mistaken) and the fit is far from perfect so I had a situation happen where i was trying to put it on and it wouldnt fit nicely but then all of a suddent drop in place. You can only imagine what could happen to the gpu die if there is not a lot thermal compound or thermal pads between them... Both for the paper handles and foam I used basic double sided tape. and the other foam support thingy i just ripped off the old RTX 2080 heatsink and put on the new one, actually same was for the paper handles, but I suppose if necessary one could make them from something else. NOW FOR THE WORST PART OF THE HEATSINK. It is actually very VERY crucial that you polish both the CPU and the GPU contact area for the heatsink. I dont know if it was just my particular heatsink or what but if you dont do it and put it straight on the laptop as is you might notice damage both on the CPU and the GPU as it happened in my case. The gpu was brand new without a single scratch on it, but this is how it looked after i removed the heatsink without polishing the surfaces: As you can see the GPU die (in my opinion) has been damaged for no reason like crazy, It has small chips, a lot of scratches and one even deep scratch just from applying the heatsink. This drove me nuts but luckily no damage has been done to the gpu silicon itself an it is operating fine. But imagine if your heatsink comes with even worse surface on the heatsink... Im sure in a very worse case scenario it could even crack the die. So I polished both the GPU and CPU surface area with the following tools in the pictures and this was the end result: The before on GPU: And the after on the GPU: As you can clearly see there were imperfections sticking outwards on the heatsink surface before that was the cause of the small chips on the GPU die, if you look closely they align up. You should be careful not to overdo it, because I might have overdone it and made an uneven surface which could have lead to hotspots on the GPU die, but for me in the end the difference between the GPU temperature and hotspot temperature was approx 5 degrees C so its not that bad. I wrapped the very soft microfibre cloth (used for glasses etc) around my finger and then: 1) Used the pink stuff compound to polish it initially as it is a bit more harsh 2) Then cleaned it off and polished again using this compound which is like a car scratch remover followed by another clean and a different more fine polishing compound used for restoring car headlight plastics: 3) Cleaned it all off with a window cleaner.. lol there are probably better ways but oh well And I repeated the same process for the CPU aswell, but the CPU not as much as even thought there were tiny dots on the CPU clearly damaged by the heatsink, it is not as bad as the damage that might happen to a bare die so I didnt bother with the Scratch removal just the pink stuff and after the polishing compound. Also as I said before I dont really want to make the surface uneven which can lead to hotspots. Here u can see the tiny indents made by the heatsink in the cpu indicating even more that the surface straight from aliexpress cant be trusted without polishing it yourself: Now for the thermal pad thicknesses: The VRMS on gpu must have 2.5mm thermal pads instead of the original 1.5mm, The VRAM must have 2mm thermal pads instead of the original 1mm (I cut 1mm copper shims and used K5 Pro on both sides) The Coils if not mistaken use 1.5mm thermal pads, same as the original heatsink except for the whole row right under the VRMs, those use 2mm thermal pads. And on the cpu side nothing has changed as far as I can remember. But the way I have it set up is on the VRMS is 3MM copper shim an K5 Pro on both sides and the smaller one for the 2 separate VRMS is 0.5mm GP-Ultimate thermal pad and 3mm or 2mm copper shim cant remember and k5 Pro on top. And the Coils have either 2mm or 2.5mm thermal pad cant remember on the top of my head. And for reference, the White-Grey thermal pad is 2.5mm the more Dark-Grey thermal pads is 1.5mm Also i forgot to mention but the GPU thermals is absolutely superb. I think the combination of a much better heatsink and the fact that the die size is smaller that for the RTX 2080 the temparatures are absolutely wonderful with absolutely 0 thermal throttle under every circumstance and even with my +90 on core and +250Mhz on memory overclocks. Also dynamic boost is not working and I lost g-sync support for the internal display, those are the negatives on GPU side. Also a positive thing is that before, with I9-9900KS and RTX 2080 and 1.45v on RAM + 2NVME ssds and 1HDD the machine wouldnt boot from battery even with a -115mv undervolt on the CPU. The battery just couldnt handle the power on boot and would shut off immediately on boot. Now with the 3080 that has changed. Im not sure if the 3080 is more power efficient or what but now it boots always from battery which is a nice thing. And I know this is a total power consumption thing because with the 3080 and the normal 9900K this was not an issue before. Speaking of battery, running this beast with my specs from battery like playing a game actually makes the battery overheat to such an extent, I would call it a potential battery hazard. Its insane how much the battery heats up. After 1 hour or so of usage in the bus, casually surfing the web and playing need for speed heat, the computer would thermal throttle the GPU even though it had 50C both on GPU and CPU and I couldnt understand how is that possible. Well after it ran out i took out the battery AND I COULD BARELY HOLD IT IN MY HANDS it was that hot. So yeah off topic but something to keep in mind. At this point I will just add pictures and leave it at that. I know this post is cancer but I really dont have the brain power to make it nice. IF i missed something someone wants to know or something, some specific graph or additional details or whatever, let me know and I will try to post them. Thanks for all the previous support.


-
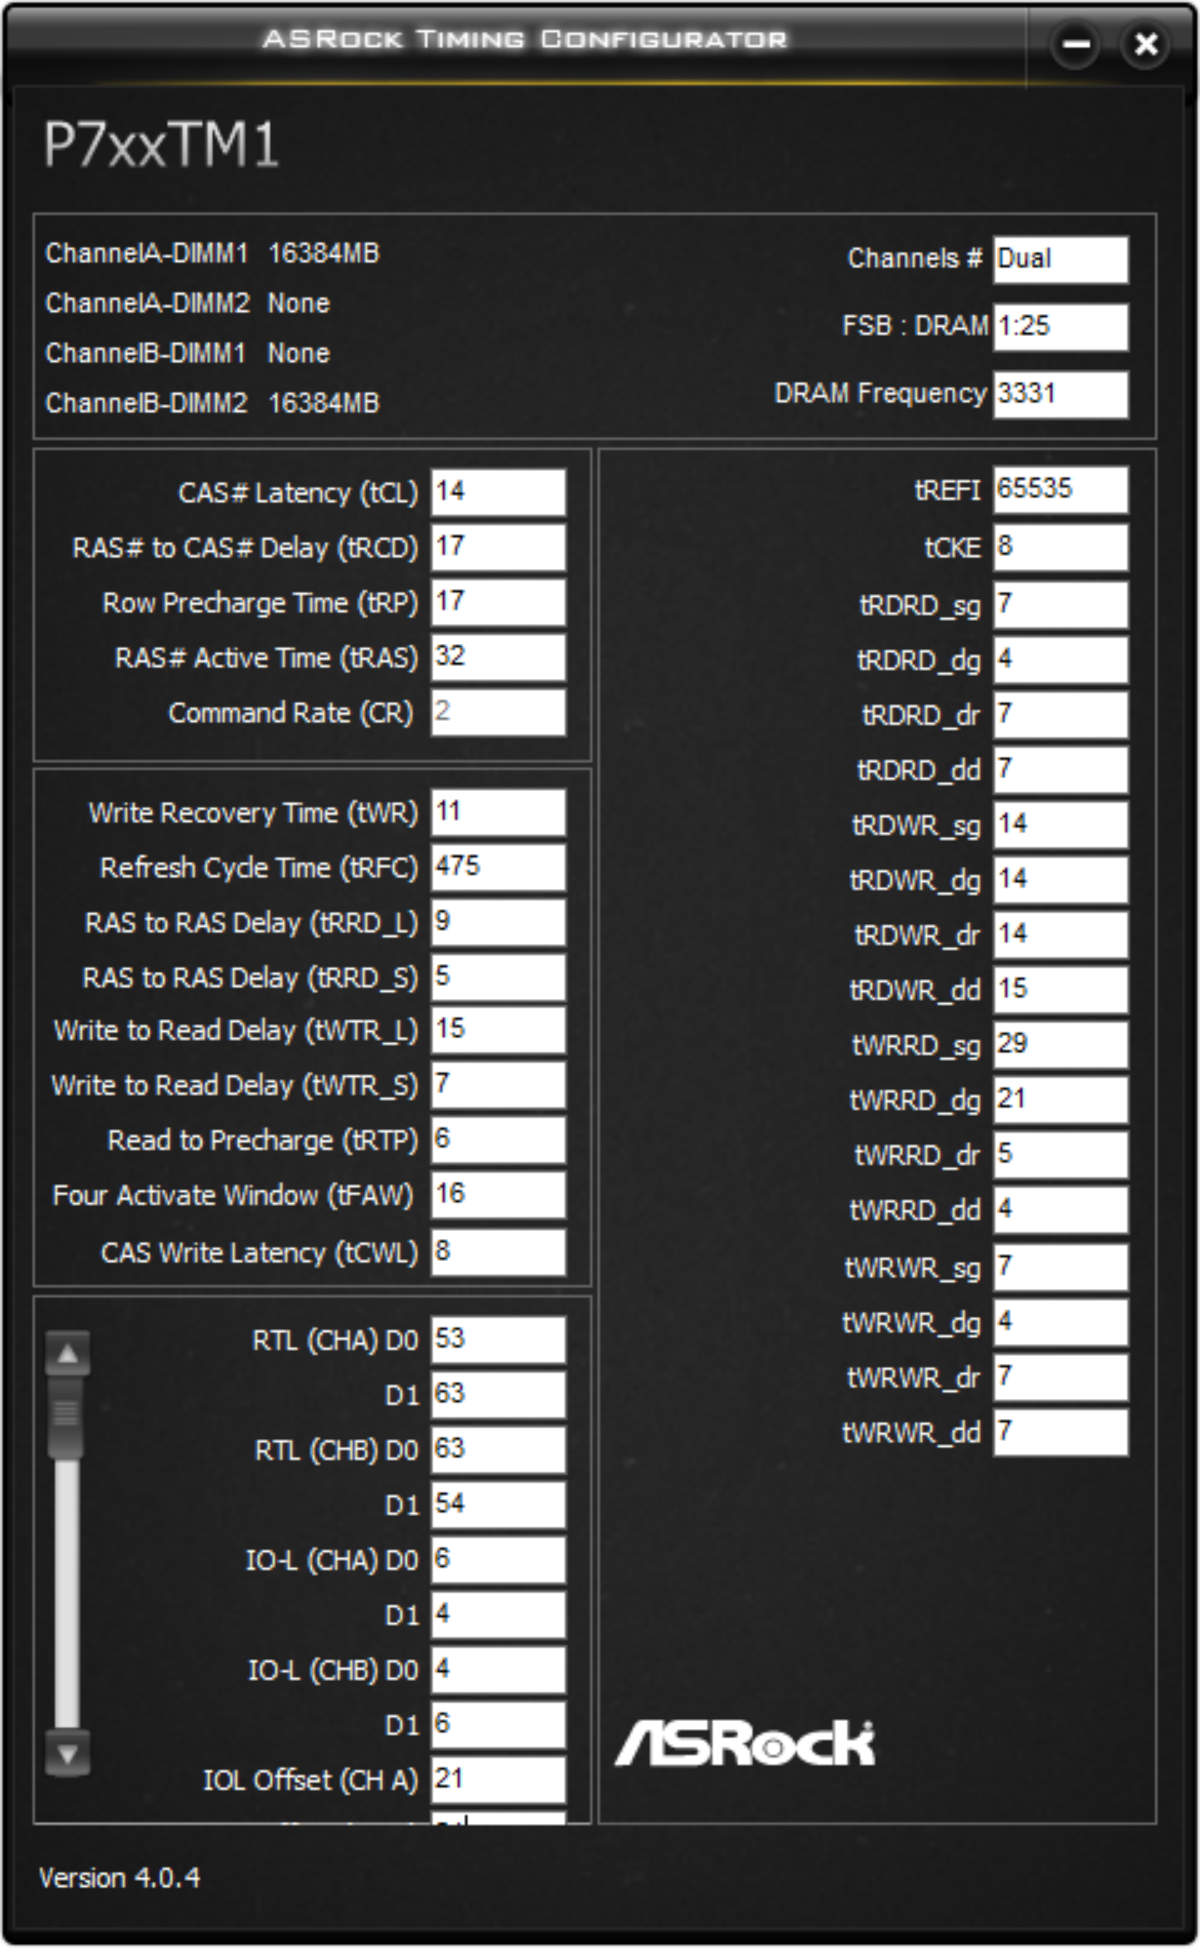
Hi! The RAM itself definately can go more than 3333MHz easily, but my Clevo unfortunately can't be stable above 3333. And in terms of timings everything is as far as it will let me push it. I can get it even better with XTU, but I have stopped bothering as I have to do it on every boot. I was even trying to bin this Crucial Ballistix ram sticks but out of 3 kits I bought the very first one I bought (and have now in my PC) was the best one in terms of OC and timings. I wish I could change the Tertiary Timings in BIOS but they dont apply on boot and I have no idea why. So I am stuck with whatever the memory controller decides during training.

-
Update on performance: This was without current limit on the CPU. However I am sure that in a game it will thermal throttle. I saw it is pushing like 150W in the CPU there is no chance it can sustain this for long time. But I can say the new heatsink is doing a way better job at keeping the CPU and GPU cool. However, there are some things to watch out with that heatsink. I will try to add pictures and explain why.

-
There is nothing complicated going on.. I just had 0 heatsink coverage on the VRM's (no thermal pads). I was scared that they will overheat so I current limited the cpu to something funny like 25A or something 😂 That's why the CPU is going crazy. When I sort out my cooler, I will redo benchmarks. That was just a quick baseline for the GPU.
-
I am very confused how to use it properly. Last time I tried to use it I got worse performance than before. Do you have a good tutorial that I could watch?
-
Forgot to mention, but I noticed that Resizable BAR is enabled. Not sure if that is true or not but NVIDIA Control Panel says the same. Also changed the name to RTX 3080 only in the inf file while at it. I like to dream and fool myself that it is an actual GA102 die and not the 3070's GA104 die xD

-
I am wondering if the motherboard is handling PCI-E 4.0 well. This is a very wild guess but do you know if you can switch the GPU PCI-E to 3.0 mode and see if it still is crashing?
-
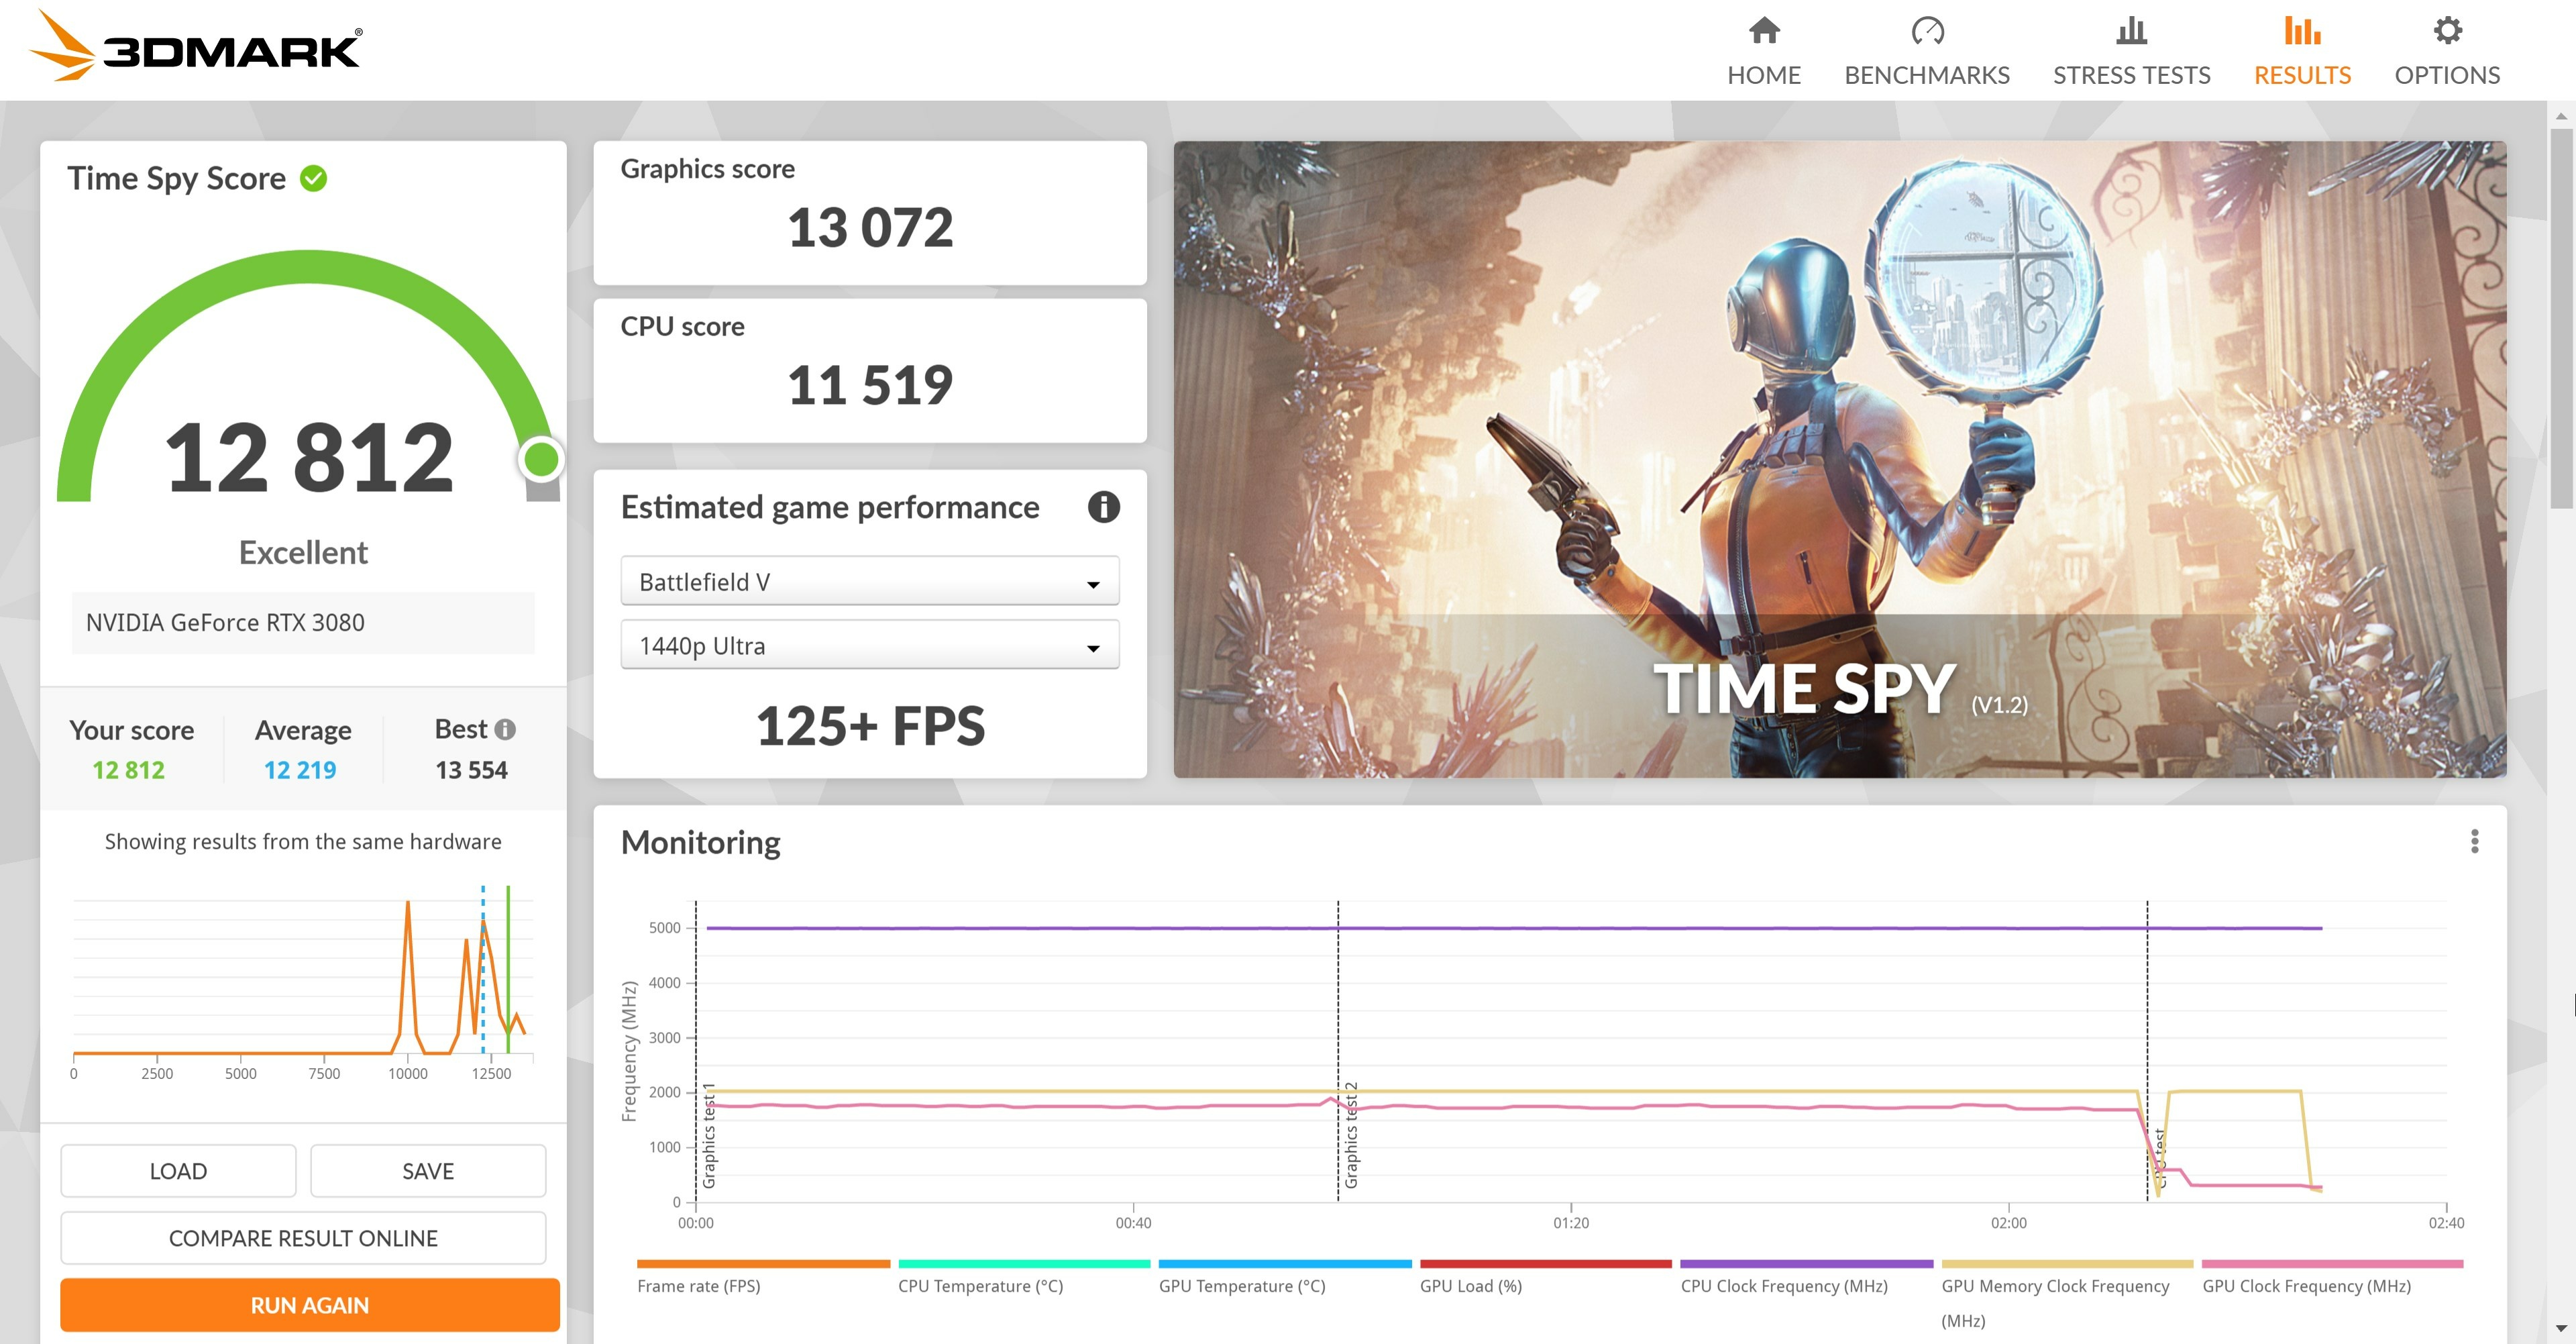
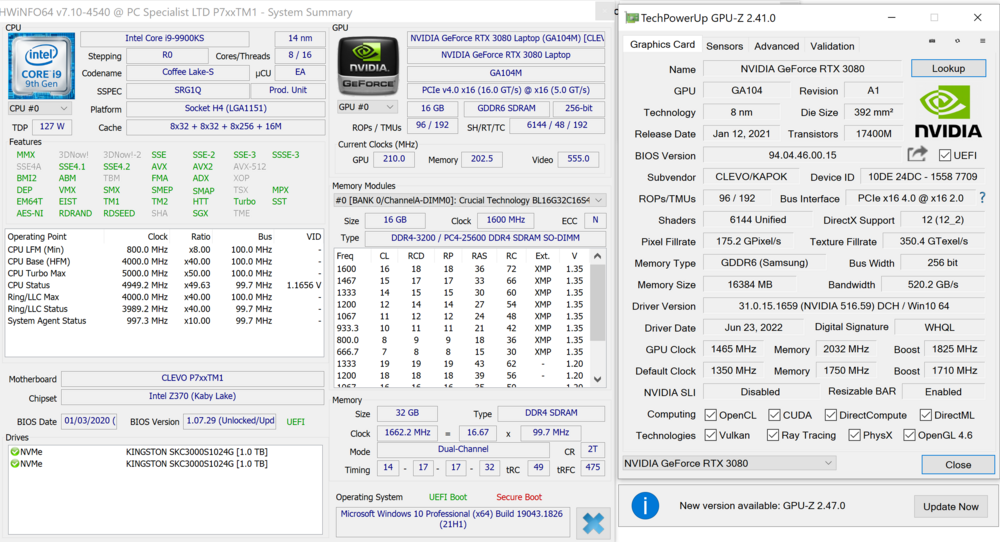
Hi! At the moment I'm waiting for some Kryonaut to arrive at my place. Should be here tomorrow. I can post pictures no problem. After I'm completely done with it I will try to post some pictures of the most important things I found out that could help someone else. Regarding to thermal pads. To be fair, I think almost all of them are same, except maybe VRAM. I will recheck this and then will post an update. Anyways, I will use a mixture of things - thermal paste, thermal putty and copper shims to put it all together. The Heatsink I ordered was a non watercooled one. I took some weight measurements and the stock heatsink is 500grams of copper+some other material and the new AliExpress one is 800grams all copper. Because the RTX 3080 has a smaller die and I have more copper mass now I am expecting better cooling once all is set and done. Also I tried overclocking the card and I was so suprised by how well the VRAM overclocks. My RTX 2080 would artifact even with the slightest VRAM overclock so I wasn't expecting much. But I was blown away - this card can do 2032MHz on Memory and that wasn't even the limit, I just didn't bother to go even more because I think this is already overkill for the card. That allowed me to achieve 520GB/s bandwidth. I saw someone else achieve 2063MHz on an MSI 3080 so thought that I will be good with my result. As for core overclocking, well I already going in to it knew that my 2080 will be hard to beat (had absolute doggo VRAM, but core did +150MHz!), but I was satisfied to see it can do 115MHz+ on Core. This gave me a score of 12943 in time spy for graphics. Previously my best was 10300 something with 2080. This is not a final score though as I hadn't put thermal pads on CPU VRMS so i had massively throttled the CPU so that they dont overheat. The score might or may not change after the cooling is properly sorted. What else, well I checked the baseline numbers for 3080 in timespy and somebody had gotten more than 13000 on timespy but I guess thats because they have the +15W dynamic boost advantage that unfortunately does not work in my computer. I'm limited to 150w. For now...🤪 I will be looking in to a shunt mod for this card to try and run it closer to 200W. I will definately post pictures and other stuff I just need a bit more time and I have been feeling off lately so yeah. And all the display outputs work just fine, G-Sync is working over DP. The only thing that was broken was G-Sync support for internal display. Not sure at the moment if there is something I can do about it.
-
Yes, once I have fixed all the thermal pad issues and will be happy with the heatsink I will do some proper testing. I have installed drivers using inf mod and all is well so far. There is a driver issue (Code 31) for "NVIDIA Platform Controllers and Framework" which seems to be related to Dynamic Boost 2.0. Indeed, after checking NVIDIA Control Panel Dynamic Boost is not supported. I guess that means that I will not be able to take advantage of the extra 15W and will only be able to run the card 150W max. Not too worried about this. It seems that I have also lost G-Sync support for my internal laptop display. To me this is not an issue. Now I will test all the display outputs and more importantly if G-Sync will work over DP port as that is very important to me. Will update again at some point.
-
It is confirmed to work in my P775TM1-G. After 2 hours or so of physical mods to the case to fit both the GPU and the new heatsink (both won't fit straight away), I am booted in Windows and currently downloading drivers. BIOS shows Unknown GPU but shows the corresponding BIOS build and date. Will probably have to do the Inf mod but I will see about that in a moment and will update you guys with pictures and the cuts you have to make in the plastic to make them both fit. It's a little bit frustrating because the heatsink comes without instructions but there is one big cut you have to make and one more on the sliding shell to make it fit. And even then its a bit bent on CPU side that makes me a bit worried if its fitting freely. Hopefully thats just human error from assembly in China. But the case is back on and temps are fine so should be fine... But after this I will have to figure out the thermal pad thickness which will be a nightmare... Also, I want to let you guys know that I will be selling my old RTX 2080 for probably around 400£ if anyone is interested please let me know I am open to reasonable offers aswell, but more on that later aswell. Time for me to test it more 😃
-
I am not sure, but I think for VRAM is 1mm. I think I used 1mm anyway.
-
Thanks! That is really golden advice for me as I had no idea about this especially after hearing that CH431A is good for VBIOS flashing. Will definately make sure to get myself this adaptor at some point just in case I ever need to flash some low voltage chips. And a little update on my GPU: The MXM card itself should have been with me tomorrow but I had to reschedule as I'm working next three days. So GPU will be with me 1st of August. Problem is, heatsink will only be with me 10th of August and that is if AliExpress delivery estimate is not lying to me again... I hope I will be patient and wait for the heatsink to arrive and only then change it. But to be honest, seeing @Meakerith a 3070 in his P870TM1, which is a machine from same time as P775TM1 makes me hopeful that it will work. So for now I'm chilling. Thanks for all the replies btw! Really apprieciate it.
-

What is the fastest RAM speed you have achieved on a Clevo? (DDR4)
srs2236 replied to srs2236's topic in Sager & Clevo
Seems like P870TM1 motherboard traces for RAM are more suitable for RAM OC. 3466 stable and even for an occasional boot 3600 sounds pretty incredible to me. Is that something normal for P870TM1 or you consider yourself lucky? Is there really a noticable difference between different same model motherboards? Hmm, that is interesting as usually memory overclockers and memory manufacturers themselves are trying to push for more frequency? Or am I wrong here... Can you explain why you prefer tighter timings over frequency? I would be grateful. I know that more bandwidth can be very beneficial for example in high refresh rate games where you are CPU bottlenecked. I am not so much aware of the impact of timings. Also isn't it true that with a frequency increase latency lowers aswell? Like 3200MHz CL14 should have same latency as 3300MHz CL15, however the 3300MHz has more bandwidth over the 3200MHz one. So in terms of latency, 3466MHz CL16 should be very similiar to 3200MHz CL14 while offering way more bandwidth. Please correct me if I am wrong and thanks to everyone who spent their time to reply to my post! -
It is basically the same version as the water cooling one, but just without the watercooling. Hopefully it will have a bit more copper mass but otherwise its completely identical to the water one. I assume so anyways. And yes, very and I mean VERY unified😂 definately can't run my CPU on 99c as it will straight away go to GPU aswell. Which of course is a big nono.