StripeySnake
-
Posts
98 -
Joined
-
Last visited
-
Days Won
1
Content Type
Profiles
Forums
Events
Everything posted by StripeySnake
-
 Yesterday my AW 14 started randomly freezing for several seconds, and repeating the same chunk of sound, as though it was hard crashing. However, it would recover within 10 or so seconds. This was really worrying me till I learned my friend's M17x R4 started having the same issue at the same time! Long story short, Dell just released an update to SupportAssist on Jun 23 that is unstable, at least on older machines. Here's how to fix it: 1: Open task scheduler 2: Locate SupportAssist task 3: Disable it Next, open Services 1: Scroll down to the Dell Services 2: Right click on all the services beginning with "Dell" and click disable, one by one. Restart your computer, and it should work fine again! EDIT: I've now done this with four machines, 2 have been fixed, one still has less bad issues, and one reinstalled supportassist. I'm going to try and fix the last too, I'll get back to you if I find a way to fix that. Known affected models: M17x R4 M17x R5 15 R3 14 R1
 -
[M17x R4] How to update NVIDIA driver for the GTX 980M
StripeySnake replied to a topic in Alienware 17 and M17x
P4000 is a great card, only pulls 65 watts in furmark and still outperforms some 1060s. If you look up quadro p4000 mxm on ebay, sort by price and shipping, you should find it. Seller is the chipstore remarket, and I can vouch I bought a p4000 from them two years ago and haven't had a single issue with it. P4000 should also fit your heatsink if you have an m17x r4, as long as you lay out your thermal pads right. -
Janktop IV Sneak Peek (open source MINI ITX Laptop)
StripeySnake replied to StripeySnake's topic in Custom Builds
Small update: after a decent chunk of work, I've made several major modifications to the design. Firstly, that large slit under the hinge mounts is now gone, as it does nothing to make the chassis work, and wrecks the structural integrity of the hinges. That should kill the already negligible hinge flex pretty much completely. Additionally, rather than hand drilling, all of the screw holes are now included in the palmrest STL, which should make the case fit together much better, and cut several hours off of build time. Plus, much less risk of human error. I've also enlarged and streamlined the hinge holes into the chassis, in order to make room for easier management of the display, antennae, and potentially RGB cables. I've also made small improvements to tolerances around the chassis for easier assembly. Known issues I still have left to resolve include: Moving the GPU slot a few mm out and down to properly accommodate larger cards with backplates. Implementing the bolting system I used to connect several two segment parts to every single gap between the 3d printed pieces, which should have a massive impact on strength. Redesigning the keyboard slot to fit the m17x r5 ranger keyboard with much less difficulty. There are also basic strength adjustments to be made, and finally, I have some sort of modular cable management system to help with the tight chassis. That's where I am now, progress is being made! 🙂 -
I'd suggest M17x R2. Cpu can go up to 940XM, which means turbo and hyperthreading. It also can have a very pretty RGBLED display, and GPU can be upgraded to 770m with expresscard sound card. Additionally, I'm looking at putting together a guide for p4000 installation, which after a bit of testing I did, may very well work.
-
M17x R2 audio issues with GTX 770m
StripeySnake replied to StripeySnake's topic in Alienware 17 and M17x
UPDATE: I figured out exactly what causes the issue, the 7-800 series cards use a wierd "hybrid vbios" That causes them to take up extra/different pcie lanes. Unfortunately, the sound card occupies one of those pcie lanes, so if both components are running at the same time they CAN NOT coexist. However, a cheap express card sound card I got on Ebay for $30 USD allows sound to be restored, while driving the 770m, which is also cooled properly in the R2 chassis without a shim. -
Janktop IV Sneak Peek (open source MINI ITX Laptop)
StripeySnake replied to StripeySnake's topic in Custom Builds
I'm looking at releasing the Janktop 4.0 Design fairly soon, then designing a 4.5 by next year that uses a fully custom display assembly rather than m17x display. I'm just starting summer, so I'm finally getting time to continue the project again. -
introduction M17x R2 PASCAL UPGRADE
StripeySnake replied to StripeySnake's topic in Alienware 17 and M17x
considering the exact same date, and bios model, and the way it cuts off abruptly, I think the vbios may have been victim of a failed flash, as the card seems functional in every way exept it does not connect with the laptop's bios. -
introduction M17x R2 PASCAL UPGRADE
StripeySnake replied to StripeySnake's topic in Alienware 17 and M17x
Sure, I gotchu. Original Vbios.binManufacturer VBIOS.rom -
introduction M17x R2 PASCAL UPGRADE
StripeySnake replied to StripeySnake's topic in Alienware 17 and M17x
I know this is about the previous topic, but that 1080 I was talking about? I just got my hands on an eeprom programmer, and decided to check the VBIOS side by side with the manufacturer one. Both start out with the same manufacturer date, version, and everything is identical to the T. 3/4 of the way through the one that was on there however, the bios file peters out into FFFF values, and becomes empty space, whereas the manufacturer one continues much further and looks a lot more functional. Considering the mismatch in files, and yet matching versions and dates, I think I may have just found the issue. I don't have the m17x with me right now, but I'll be testing it once I do. If the 1080 works out, then I will finally be trying the p4000 in the M17x R2 long term. 🙂 -
Working more on the M17x R2, I recently attempted a GPU upgrade from 660m > 770m. The 770 is much stronger and actually fits the heatsink. It cools itself well and native fan curve seem so to work. However, unless I disable HD audio in bios, the laptop screen ends up locked at one color immediately after windows boot. While disabling audio completely fixes this, I need the audio to work. Anyone have any ideas? I've considered a USB audio card, but I only want to try one If I know I can't get the internal one running, as well as I know that that will actually work.
-
Janktop IV Sneak Peek (open source MINI ITX Laptop)
StripeySnake replied to StripeySnake's topic in Custom Builds
If you're willing to wait a month or two, I'm getting pretty close to being able to work out copyright/patent, and drop all the CAD files. The only reason I'm not doing it now is because the parts still need some fine tuning, and adjustments I haven't had the chance to make yet. Once I'm confident it will all go together smoothly, I'll drop the files and a tutorial, and you can put one together yourself if you want. So long as you can get your hands on the printed parts, the build should actually be fairly easy, just a simple matter of screwing everything into place, and a LOT of cable management. -
Janktop IV Sneak Peek (open source MINI ITX Laptop)
StripeySnake replied to StripeySnake's topic in Custom Builds
It's update Tiiiime! Today I ripped the Janktop apart, removed the PSU, GPU, and cooling loop and made some big changes. Firstly, I soldered 3 of the 6 fans in parallel, and they appear to be still working properly. I'll do the other 3 then next time I do a big teardown. Next, I upgraded to a 500w PSU with much thinner and nicer cables, as well as no external on off switch. Cable managing is getting a lot more possible, although still difficult of course. Finally, I upgraded the GPU from the old 1060 3gb to a 5700 xt! The difference is night and day. Not only is it a lot more powerful, but damn the drivers work so much better. I was having constant issues with NVIDIA control panel before, as well as display issues caused by my bad HDMI cable. With the amd card, the drivers have run flawlessly, I've actually been able to calibrate my display, and it even somehow found a way to compensate for my failing HDMI cable, as the obnoxious green dots that kept appearing on screen now go away if i just tweak a couple of settings in the radeon software. truly amazing. I also put a couple of bits of thick tape over key bend points in the CPU loop, to prevent them from getting kinked as badly, which should be good for durability and water flow. Someday I may have to go hardline so that I don't have to deal with kinks at all. P.S. I calculated the volume of the Janktop case - the display, and it comes in at around 9.1 L, making it small, but a bit larger than some of the smallest ITX cases out there, which is pretty good considering the cooling and unusual shape.) -
Janktop IV Sneak Peek (open source MINI ITX Laptop)
StripeySnake replied to StripeySnake's topic in Custom Builds
Standard MINI-ITX has a hard cap at around 40mm, and I'm not willing to follow the trend of ditching major important features just for the sake of thinness. It should also be said that my current prototype barely has enough room for all of it's components, and a 15 inch 40mm version would definitely be much, much worse in that regard. Also frankly, removing the keyboard and screen would COMPLETELY defeat the purpose of this whole concept. If you need to carry a keyboard and screen with it, it's not actually portable. period. -
Janktop IV Sneak Peek (open source MINI ITX Laptop)
StripeySnake replied to StripeySnake's topic in Custom Builds
If you're interested in a smaller version, I have been considering designing a 15 inch version based off of a 40mm internal thickness rather than 50mm, but this design would have major constraints. For cable manageing and thickness reasons, you would have to use a 1u waterblock and pump, which means the watercooling loop would likely be a LOT of money. Additionally, the GPU would also have to be part of the cooling loop, meaning part threshold would be kind of low. I might work on it some day, but i'll be finishing this one right now. -
Janktop IV Sneak Peek (open source MINI ITX Laptop)
StripeySnake replied to StripeySnake's topic in Custom Builds
I've thought about it, but keep in mind this thing is already massive, and also pretty powerful. Current max spec is a 3070 + 5950x or so, which will match any laptop in terms of gpu performance, and far exceed in terms of CPU. Additionally, the ability to upgrade to similar specs even in a year or two will allow it to leave anything from 2022 far behind when upgraded to 2024 standards, and so on and so forth. MY current priority is to get the design finished so I can publish it and probably get an open source patent. -
Janktop IV Sneak Peek (open source MINI ITX Laptop)
StripeySnake replied to StripeySnake's topic in Custom Builds
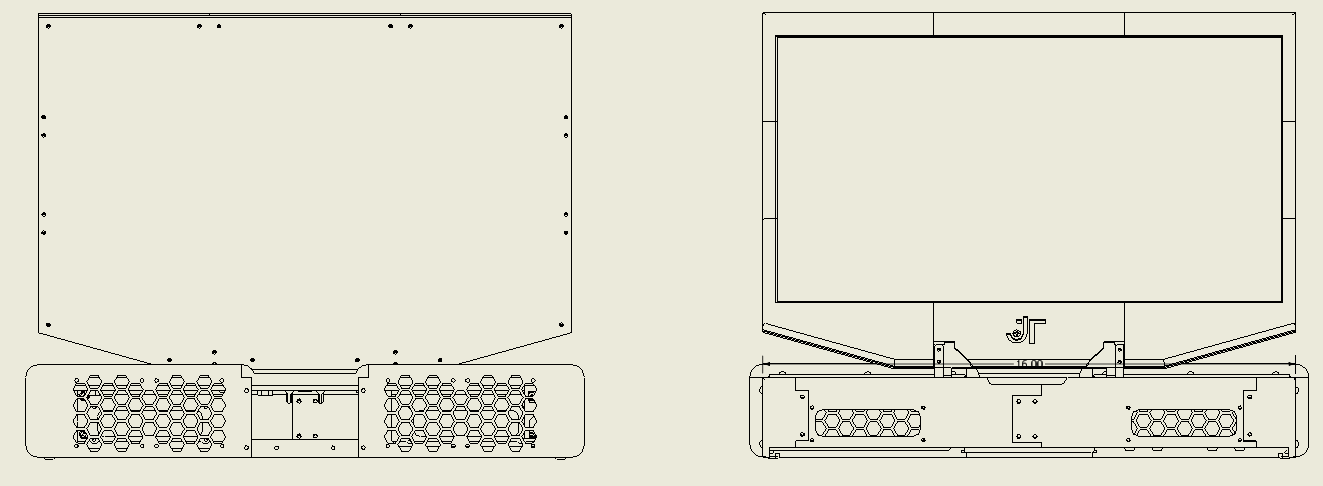
I thought I'd share some more progress with y'all, here's the current schematic for all of the custom components of the build, not counting stuff such as the motherboard, GPU, display, keyboard, etc. Janktop IV-BluePrint.pdf -
Janktop IV Sneak Peek (open source MINI ITX Laptop)
StripeySnake replied to StripeySnake's topic in Custom Builds
I've seen the eblaztr, and honestly while I like the concept, I think it's pretty overrated. The main reason is that max CPU cooling is still just mediocre low profile coolers, which limit you to a 5-series processor with bad temps, if I remember right. It's a cool concept, but kind of the inverse of what I'm doing, with a heavy focus on a large screen, big GPUs and ease of assembly. The janktop is designed to be much less intuitive and large, with a bare minimum GPU threshold, but much more stable CPU cooling, and better portability. I also personally like to have my laptop several feet away from me while using it, on an angled desk, so spills aren't a concern. I've used my m17x that way for years and never spilled anything on it, despite having eaten countless bowls of soup right in front of it. -
Janktop IV Sneak Peek (open source MINI ITX Laptop)
StripeySnake replied to StripeySnake's topic in Custom Builds
To answer all of your questions: The hinge flex is almost nonexistent now. The polycarb does flex a bit, but it seems far from doing any damage, and has no effect on anything around it. I don't even notice it anymore. Thermally, I haven't stress tested the GPU yet, but running Generation 0 with the VRAM completely saturated, I saw a max temp of 79 C. This is however with the stock fan curve that doesn't hit 100% till like 80 or 90, and substantially more chassis obstruction then there will be once I get a PSU with thinner cables, and minimize the fan cables using soldering. Additionally, the bottom cover should help streamline airflow when it's done. I expect to be able to get the GPU to low 70s or high 60s with these tweaks. As for the CPU, that's where it really shines. The water acts as in impressively powerful buffer, stopping wattage spikes from majorly affecting temperature. Because of this, most games run in the 40-50s on the CPU, which is just insane for a "laptop" build. If it gets pushed to the max (110 watts) for an extended period of time, it will slowly rise, and eventually settle at 69 C with the fan curve I have set up. I appreciate the suggestion, but no I will not be watercooling the GPU as well. It is an intended feature of the case that you CAN watercool the GPU, but I'm going to be upgrading both GPU and CPU eventually for a target build of 5700 xt and eventually r9 5950x. While the loop handles 110 watts well, if I had both of those parts in the loop it would be more like almost 400 watts to cool, and I simply don't see that working out well. Additionally, there is a potential modification I could make to the chassis to help the GPU evacuate hot air better, which could further boost GPU cooling, and prevent the GPU backwash from affecting the CPU rads. Finally, @FredSRichardson, yes there are secondary intakes on the palmrest. I will be making an alternate palmrest file without them, as they do pose a massive hazard if liquid is spilled on the chassis, but they enable the NVME drive on the back of the motherboard, and the GPU backplate to get a small but substantial amount of airflow, for the sake of performance and longevity. -
Janktop IV Sneak Peek (open source MINI ITX Laptop)
StripeySnake replied to StripeySnake's topic in Custom Builds
It's finally running and it is a amazing so far. I still have a lot to work out and fix, but finally getting everything put together was very nice. I'm having a few gremlin type issues with my motherboard ram and GPU, but all of them are issues with the hardware, not my case. CPU cooling is amazing, rarely ever breaching 60 under normal use, and maxing around 75 c running cinebench r23. The GPU is a bit worse for now, getting as hot as 79 once playing a heavy game for a long time, but usually does a lot better. The inside is currently extremely cluttered due to cables, but that will soon be reduced massively by getting a PSU with much thinner cables, and cutting up and soldering the fan cables together rather than using a bajillion adapters. I also need to mount the keyboard better and finish the bottom cover. So far I haven't gotten all of the air out of the loop, but thankfully it tends to build up in the edge of the pump and mainly in the radiators, so judging by pump sound, everything is running normally. Pretty soon i'll crack it open and bleed out that last bit of air and it will be pretty darn full then. More info is coming, and this isn't project completion, but here's where it is now. -
Janktop IV Sneak Peek (open source MINI ITX Laptop)
StripeySnake replied to StripeySnake's topic in Custom Builds
Yeah, it definitely is. I think the one thing that's really helped me get this together is the fact that I'm coming from a background of laptop work almost exclusively rather than desktop. So this feels more like building a really big, undercomplex laptop, rather than trying to minimize a desktop. Sorry this is taking so long by the way, but I am definitely back on track and it should really be done soon. The part I was printing stopped feeding on the last millimeter, but it's structural, so I should still be able to use it. P.S. This was typed on the 17 r1 keyboard running through the teensy. -
Janktop IV Sneak Peek (open source MINI ITX Laptop)
StripeySnake replied to StripeySnake's topic in Custom Builds
I've worked out all of the snags. Printer is up and running for the last couple parts, and the 17 r1 keyboard I ordered has arrived and works. It should be operational within the week and the grand reveal will be done within two weeks. -
Janktop IV Sneak Peek (open source MINI ITX Laptop)
StripeySnake replied to StripeySnake's topic in Custom Builds
I think i'll make a post there when it's finished. -
Janktop IV Sneak Peek (open source MINI ITX Laptop)
StripeySnake replied to StripeySnake's topic in Custom Builds
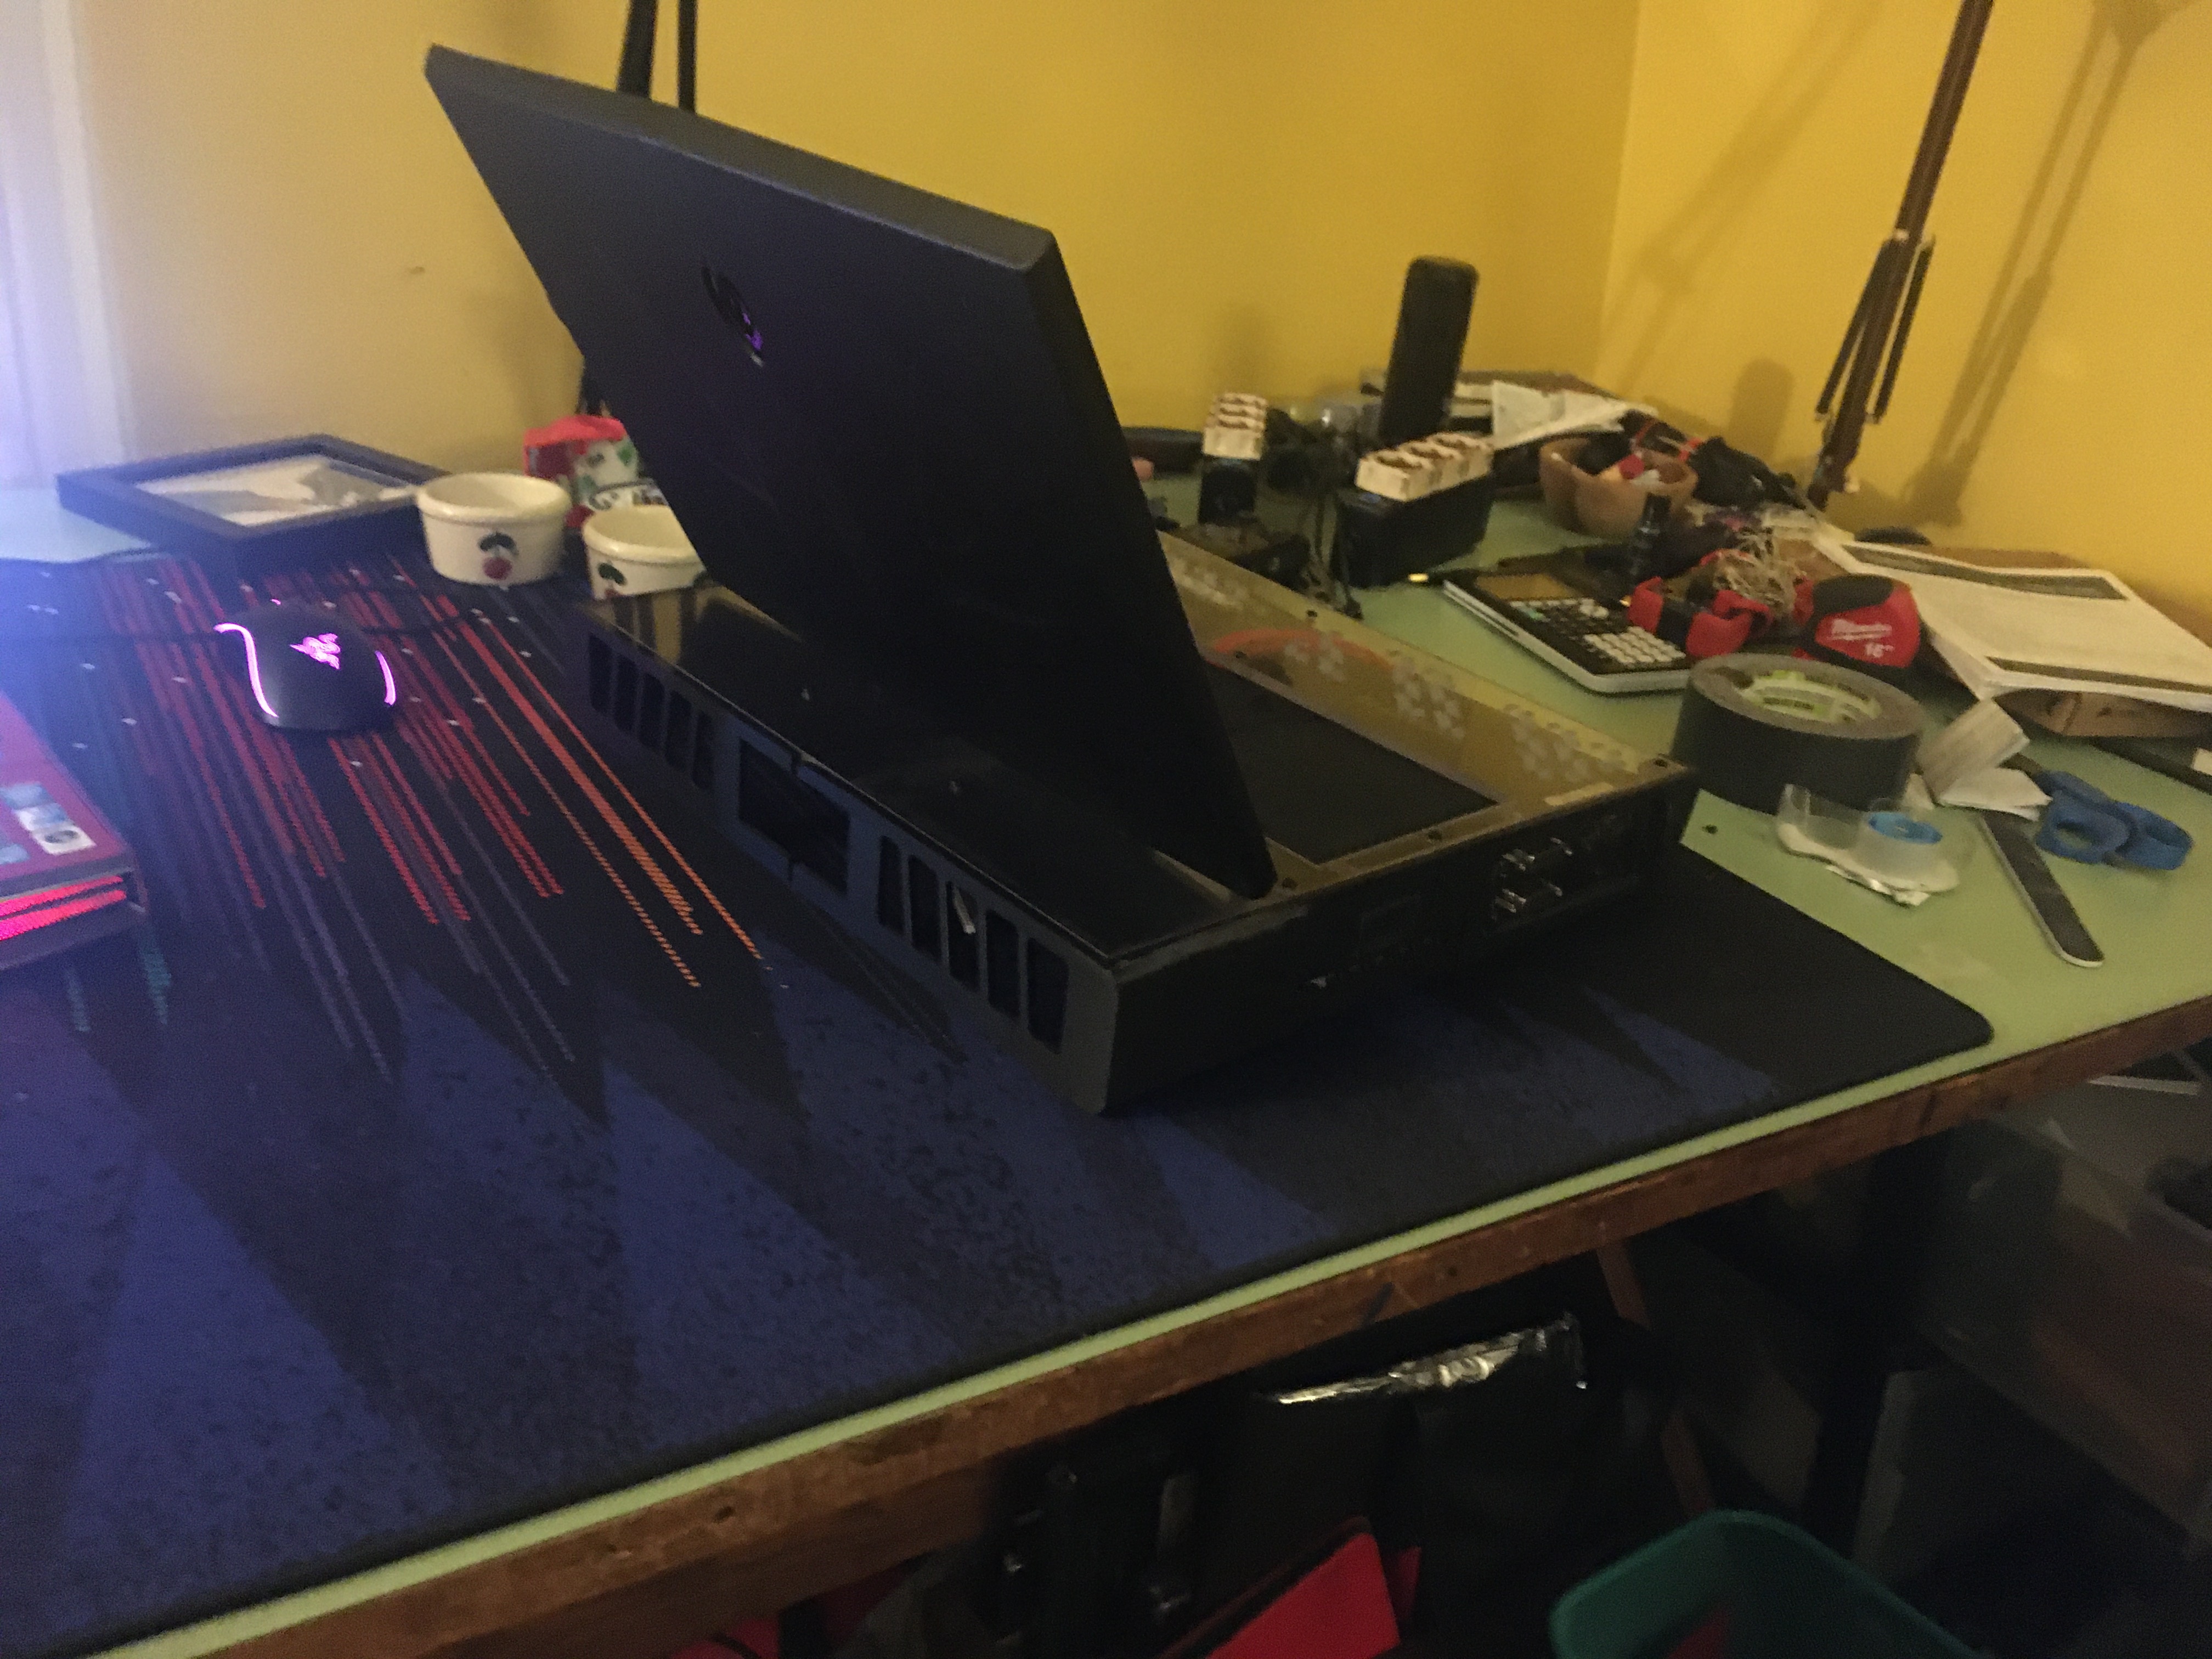
Here's where it is as of now. I got the internal display running on the chassis, and found the issue with the keyboard, although it seems to be the keyboard itself, so I'm going to buy a 17 r1 keyboard and see if I can get that to work. That said, I have conformation my keyboard controller does work and thus this is plausible. unfortunately the printer broke down with 3 parts to go, so I'm outsourcing the last few prints to a local college. Additionally, I have been offered a 5700 xt for a very good price, so I will be getting anew PSU and GPU for the final build. In order to finish the build now, all I need is the bottom panel, 3 printed parts, and the new keyboard. Everything else is done.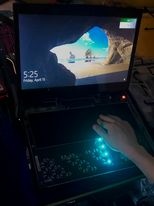
-
Janktop IV Sneak Peek (open source MINI ITX Laptop)
StripeySnake replied to StripeySnake's topic in Custom Builds
The polycarbonate is 6.35mm thick, and very light. The main weight comes from the radiators, water block and GPU -
Janktop IV Sneak Peek (open source MINI ITX Laptop)
StripeySnake replied to StripeySnake's topic in Custom Builds
Actually, I grossly overestimated how bad the hinge flex was. I can already open the screen normally as it is, and simply removing an unneeded slit from the design behind the hinges would greatly improve that flex as well. Honestly, I don't think it's a problem anymore. As for the build, I now have all core components properly mounted, and am working now on the basic case exterior and screen and keyboard. Unfortunately the controller board I'm using has a really short cable, and the longer ones take a month to ship or more, so I'm getting an FPC extension instead on eBay. it should come by Saturday. I need to do 3 more prints (roughly 1 per day), and then the printing is done as a whole. I won't be setting up the watercooling completely though till I am completely satisfied with the look and feel of the case, as it is difficult to disassemble. Have a picture of the current progress!