
Jerryzago
-
Posts
192 -
Joined
-
Last visited
Content Type
Profiles
Forums
Events
Everything posted by Jerryzago
-
Is this the incorrect 980m card for my M17xR4?
Jerryzago replied to JJ90's topic in Alienware 17 and M17x
For the M18x R2 I could remove the plate, because the fan was underneath and kept cool those memory chips. I believe the M17x has the same design. The fan is below the GPU and has a hole to blow through. For the 8 Beeps, there is a custom Bios for the M17x R4 that also unlocks the advanced menu. If you don't want to mess with this, you must set your laptop to full UEFI mode in Bios. First set UEFI boot and then install the GPU. If it boots, just install OS again and custom drivers. If it still gives you 8 Beeps, then probably you have the g-sync model. VBios is not to important. I had success with dell, clevo and HP Vbios and GPU booted just fine. -
This is an insulating tape. Most heatsinks have copper for the core. The core has some electronic parts around it that they might come in contact with the copper heatsink and short or even destroy the GPU itself. Leave it as is. For the record 980m used to have problems with the vrms, not the GPU core.
-
Is this the incorrect 980m card for my M17xR4?
Jerryzago replied to JJ90's topic in Alienware 17 and M17x
This heatsink comes from clevo laptops. You can unscrew the four screws and uncover the xbracket. I used this one for my RTX3000 for my AW17 R1. Needed some trimming to make it work. I doubt if it can work inside the M17x R4. You will have to remove it. -
Does these black chips require thermal pads? GTX980M
Jerryzago replied to Sebastian Ramirez's topic in Alienware 18 and M18x
When I had mine, Yes I had thermal pads on them. -
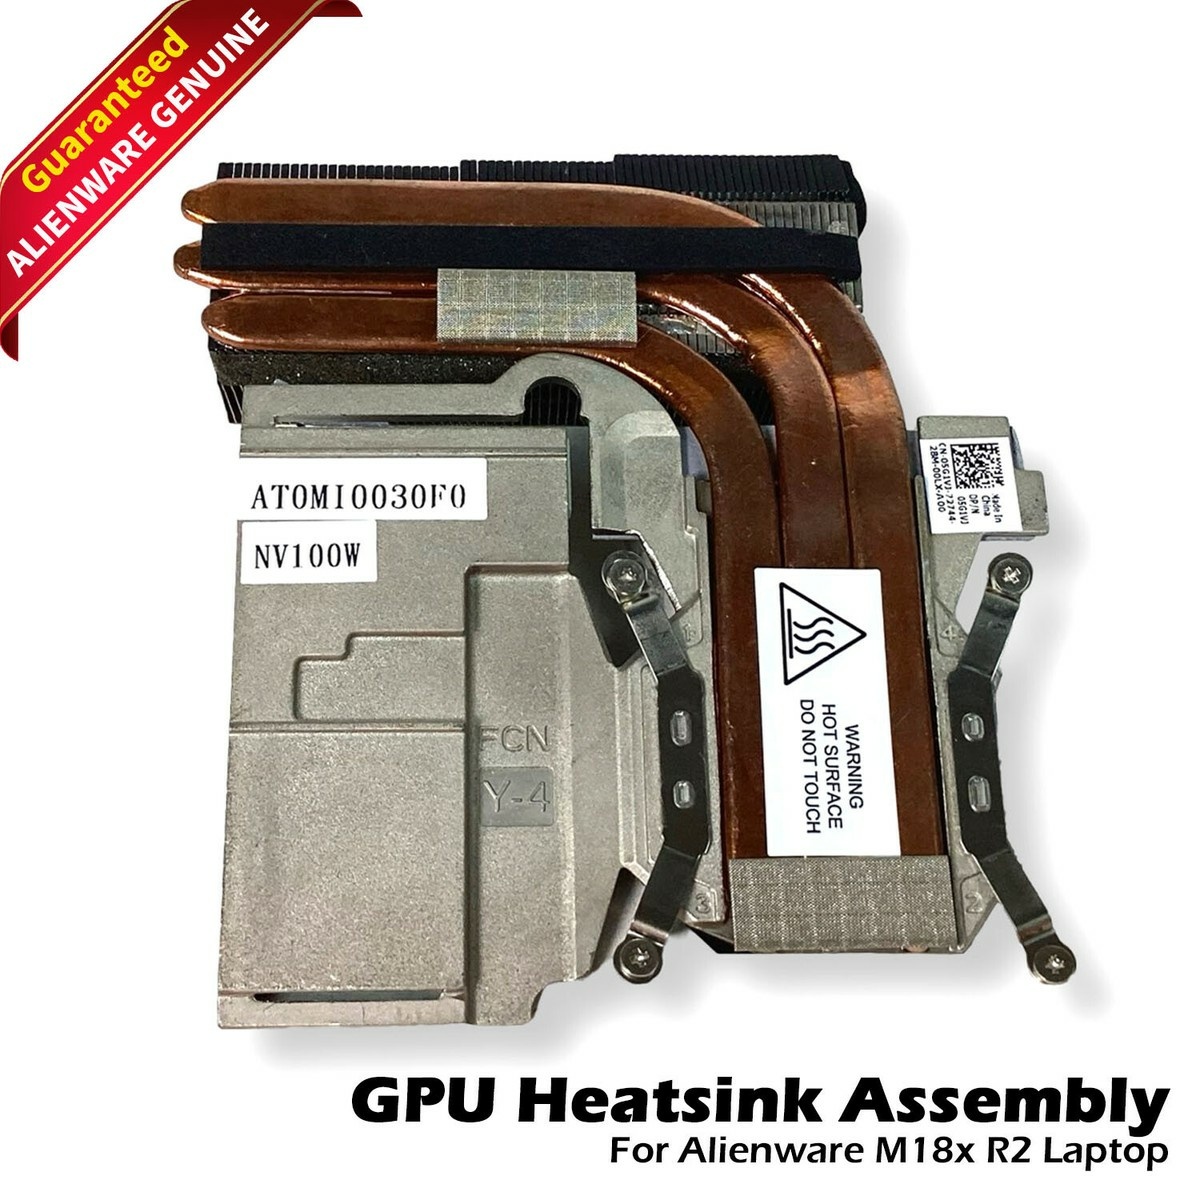
I can assume by your experience, the GPU hits it's thermal limit and shuts of. It stops sending power to the core, leaving you with the internal GPU, thus you have 0 degrees showing at HWinfo. Meaning the GPU is absent from the system. I am not sure, but since you had a 980m, the heatsink is the 100watt one?
-
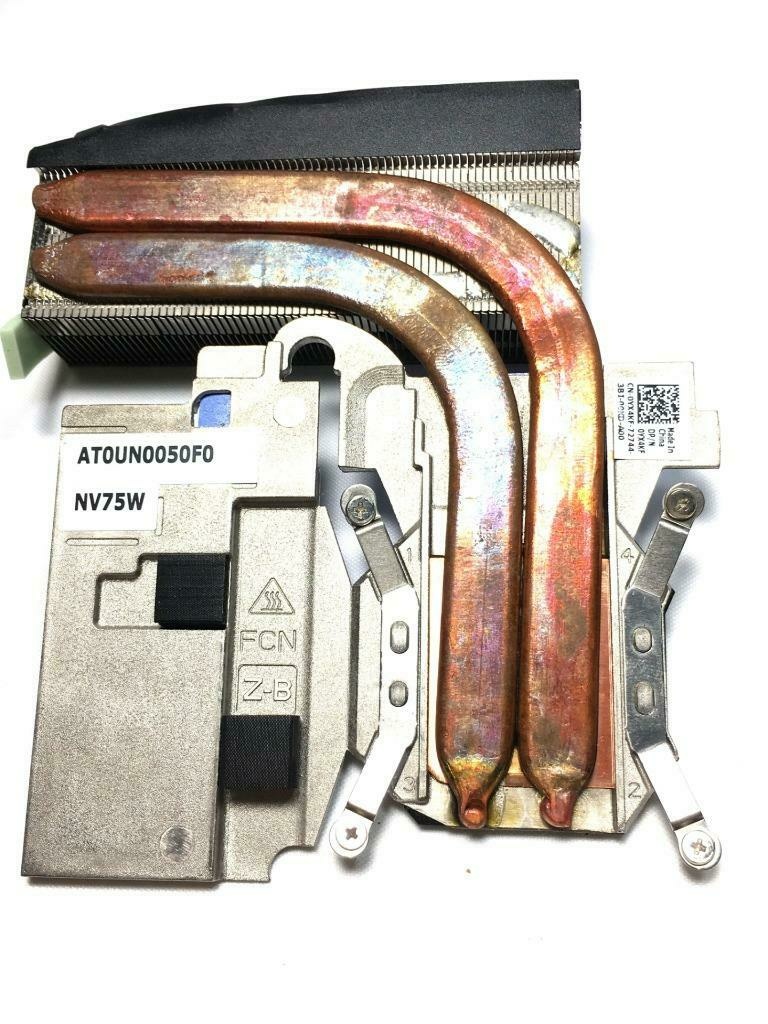
Look at the photos below. One if for 75watt GPUs and the other is for 100watt GPUs. I believe the 980m needs the three heatpipe one. I had my R2 with dual 980m with the amd variants


-
Does NV75W OEM heatsink work well with an GTX980M
Jerryzago replied to Sebastian Ramirez's topic in Alienware 18 and M18x
I believe those 75watt heatsinks have 2 heatpipes and 100watt equivalents have 3 heatpipes. So maybe they will fit the GPU, but cooling will be a problem -
Very nice upgrade. I believe MX-4 is an outdated thermal paste. I have an RTX3000 and with MX-4 and PK-3 temps were a problem. I switched to PTM 7950. Now the gpu tops at 75 degress with the hotspot getting to 84. I have an AW 17 so it uses the stock fun curve.
-
New MXM cards finally work in EDP only laptops
Jerryzago replied to sliderfra's topic in Alienware 18 and M18x
I have mine for almost a year. I had to change the screen cable and saw the two connectors at the board. My screen is LVDS. -
Can you share a photo of the heatsink? 4060 is an MXM-A right? Heatsink is the stock AW 17 R4 one? Is it custom made ?
-
Yeah, AW 18 seems to not work with my settings.
-
I have a post in the custom builts section with a gallery of BIOS settings. I have the unlocked A14+ and the Video Settings are set to iGFX. Both GPUs are visible in windows and no throttling. Power draw tops out at 80watts for me.
-
Mine is a PNY RTX3000 and doesn't throttle in my Alienware 17.
-
Finally the new RTX MXM cards will work in our laptops!
Jerryzago replied to SuperMG's topic in Components & Upgrades
I am tempted to replace the screen and cable to my AW 17 with the 120hz one and the edp cable......I will make the RTX 3000 work in PEG mode then! -
M18x R2 with MSI 970m 6gb, not installing newest drivers.
Jerryzago replied to Signex's topic in Alienware 18 and M18x
Yes. Nvcleanstall is our friend since we mainly have not supported GPUs in our systems. I think natively, the 970m was supported for the AW 18, not the M18x R2 -
New MXM cards finally work in EDP only laptops
Jerryzago replied to sliderfra's topic in Alienware 18 and M18x
That is a major brakethrough and a big win for the mxm mainboards. Sadly this won't work for the AW18 or M18x R1/2 because they have LVDS displays, right? Maybe for the M17x R4 and 17 R1 with the 3D screens? -
Alienware 17 R1 (Ranger) with 4930mx and PNY Quadro RTX 3000
Jerryzago replied to Jerryzago's topic in Custom Builds
Thanks. I am running Windows 11 -
upgrade Alienware 17 R1 Refurbishment/Upgrade
Jerryzago replied to AtomSnakes343's topic in Custom Builds
Thank you for the info. I will try this in my Alienware 17 and see results. -
upgrade Alienware 17 R1 Refurbishment/Upgrade
Jerryzago replied to AtomSnakes343's topic in Custom Builds
Yes. I meant GPU heatsinks. Here is an ad from him on ebay. Contact him from there. https://ebay.us/m/snDk9W Yes, he also sells the 5 heatpipe one for 1070s that has 100watt rating. My RTX 3000 is looking fine with the stock heatsink and fan. For the speakers, I source them from AliExpress. You can measure the speaker casings, lookup their characteristics (wattage, Omh, etc) and either swap the stock ones, print maybe new ones or DIY a solution. There is a post here in the Alienware 18 that a user swaps the stock speakers to higher quality ones. -
upgrade Alienware 17 R1 Refurbishment/Upgrade
Jerryzago replied to AtomSnakes343's topic in Custom Builds
Hello and welcome to the forum. I use daily an Alienware 17 R1 for my day to day work. It sure is a Beast, even by today standards, as long you upgrade its original parts. Mine came with 16GB with 1600MHz speed, an I7 4710MQ CPU and an 880M GTX GPU. Also it has the LVDS 60Hz Full HD panel and very slow SHDD that took almost 3 minutes to boot to OS. Mine is now upgraded to an I7 4930MX @ 4.0GHz on all cores, unlocked BIOS a14+, a PNY Quadro RTX 3000 (equivalent to 2070) and two samsung SSDs. I will try to help you as much as I can. About your plans. 1) You could dismantle the whole laptop and clean it with isopropl alchohol. The chassis could be wiped with a microfiber cloth also. 2) Changing the CMOS can only be done with the motherboard out. Do that beacuse the battery will surely be depleted. 3) You can install higher speed memmory, but it is unsure that the system can actually run it. I am also in the market for some G.Skill Ripjaws at 1866MHz. 4) The mSata port is using SATA II transfer speeds and is a pain in the ass to remove it, so i stayed away from that. You can install two SSDs into the main slots, and maybe remove the optical drive and put a third one in there. 5) You can go for either 4930mx or 4940mx. The performace gain is marginal. 6) I have no info about this GPU. I went with a PNY one, that doesn't require any modification at all. Bolts right up to the stock cooler. 7) No info on that, sorry. 8 ) If you are comfortable with liquid metal, do go ahead. Though CPU and GPU will require a barrier when the laptop is placed into a bag or tilted onto a cooling pad, because it tends to leak. I prefered PTM 7950 for this matter and is excellent. Undervolting the CPU isn't an option even from the advanced BIOS meny. GPU undervolting will requre a modded vBIOS witch is also unoptainable. Each GPU needs to be modifided specificly for undervolting. E.X. I had an undervolted BIOS for my 980m and it never worked. 9) There was a 17 model with 3D capabilities that had a Full HD 120Hz panel. That also had a diffenet connector to the board. But GPU choises were limited (at that time) because you couldn't upgrade it past a 960M. Even a 980M wouldn't display anything. With the 120Hz panel the PEG GPU needs to drive the sceen. 10) I have installed an AX210 WiFi card to the mPcie port and works like a charm. No adapters are needed. 11) I have no knowedge that other keyboards or palmrests will fit or work. 12) A GPU higher than 980M will need UEFI bios to post. Secure boot is not needed, and since you will need modifided Gpu drivers, avoid secure boot. 13) OEM batterys are not to be found anywhare. Mine also doesn't have a battery. Though my expirience with aftermarket batteries, BMS is the first to die, rather than the cells themselfs. I also use a 330watt PSU. I have two, since I used two for my Alienware M18x R2 with the 3920xm and Dual 980M Sli. It needed 600Watt at full load with my dual PSU mod. About your questions. 1) No info in undervolting. If you succed doing it so, it is a trial and error procedure. 2) Answered above. 3) Answered above 4) Everytime you need to update the frivers, modded ones will be needed. NVinstall app will be your best friend. 5) Almost avery GPU higher than 1070 will requre modifications. With the exception of PNY Quadro RTX 3000. You can order a custom GPU from ebay. A guy in china sells custom ones with superb quality. 6) No info on the keyboard. I repaired mine by replacing the missing keys. I have is as a desktop replacement with an external keyboard and mouse. 7) Clean your fans and test them. If they are able to cool your laptop, then leave them be. 8 ) like I mentioned, the faster Ram will boot, but the extra speed will not be able to be used by the system. I will test it myself and see if I have better results. 9) You can install custom speakers to the stock casing ones. I am trying to do it for my M18x R2 because the stock ones keeps tearing the membrane and sound like crap. 10) We are all open to ideas! Hope I helped you.- 5 replies
-
- 1
-

-
- alienware
- alienware 17
- (and 2 more)
-
HP EliteBook 8570W – Still Worth It? Upgrade Advice
Jerryzago replied to dhoni4455's topic in Custom Builds
My wife is using an HP8570W CPU is I7 3840QM GPU is a Quadro K2000M Changes the 6505 WiFi card to an AC7260 The screen is the top of the range Still usable to this date. -
Hello. This is my built. It is an Alienware 17 R1 with the 60Hz screen. Initially it had a 4710mq and GTX 880m with 16 Gigs of 1600MHz Ram. Cpu has been upgraded to a 4930mx @ 4,0GHz on all Cores, running throttle free GPU has been upgraded to PNY Quadro RTX 3000, pulling 80watts constanty Ram will be upgraded to 32GB with Ripjaws 1866MHz speed. Bios is A14+ unlocked Fan control is working natively. I have HWinfo and RTSS running an OSD while gaming just to look at temps. No control is needed. Here is a Firestrike result https://www.3dmark.com/3dm/142194166? Here is a photo album with BIOS settings. Strange enough, system runs in iGFX mode and both Intell HD and RTX 3000 are present in the system. https://photos.app.goo.gl/qgvUHAMnNTbnqgqJ6
-
Need Help Flashing & Obtaining Unlocked Bios AW M18X R2
Jerryzago replied to nicholas1020's topic in Alienware 18 and M18x
First of all, grab the A11 BIOS from this post I think M18x R2 doesn't like the sleep method for the BIOS flashing. Also you are on a later version (A14) so it will possibly cause boot issues. I will describe the process with the correct steps. It is a long way, but it will surely be error free. For good measure if your GPU is a newer than an 880m, it should be removed from the system. 1) Blind flash and BIOS downgrade to A03 Download the original Alienware unmodded A03 bios from Dell at Drivers and Downloads | Dell [united States] The file is named "M18R2A03WIN" Extract the contents of M18R2A03WIN to a new folder named "Alienware recovery" anywhere on your useable computer. In there you should have a bunch of files. (9 in total) Look for the one called QBR10EC.fd Rename this file to M18R2.hdr Place the file M18R2.hdr on a formatted fat32 usb stick on its own. Thats it. Blind created Recovery process: To do the recovery process you need to remove your m18x r2 battery. Unplug the back power cord as well Plug the usb stick with the file M18R2.hdr in the M18X's e-sata port Now hold down the END key (located above the numbers key pad) at the same time while your holding the END key plug in the power cord only, you will hear the fans turn on full bolt. Release the end key and wait After a few seconds once the file is read from the USB stick you will hear 20 or 30 beeps (sounds like a garbage truck reversing) After the beeps stop the m18x will shut down and reboot itself. ( 1 or 2 times depending) Once reboot all will be back to normal A03 bios. Connect the battery back if you wish after successful boot If you successfully boot, enter BIOS and check version 2) Upgrade to official A11 Just download the official A11 and flash it through windows. 3) Download the unlocked A11 from the post above and flash it with the instructions provided. Use a flash drive to create a boot disk into dos Unzip ALL files into the root of the flash drive (flash.bat, r2final.bin, fpt.exe, flash.bat, prr2.exe, fparts.txt,m18r2.hdr, m18r2.hdr.bin, readmefirst.txt) BOOT INTO DOS – Note, that when you set the bios to legacy in order to boot into dos, you MAY have to reinstall OS! (Just be prepared to reinstall no matter what) Once you boot into dos, run the file flash.bat It will unlock your bios (THANKS TO SVL7’s BIOS UNLOCKING TOOL – ALL CREDIT TO HIM FOR THIS TOOL!) Let it flash… Reboot your pc, and enjoy the MASSIVE updates! -
Need Help Flashing & Obtaining Unlocked Bios AW M18X R2
Jerryzago replied to nicholas1020's topic in Alienware 18 and M18x
Clarify first: You want to unlock the M18x R2 with the 3rd gen I7 CPU Or The Alienware 18 with the 4th gen I7 CPU; Both have different ways to unlock the BIOS. -
I used the BIOS from this post I hope you both are not referring to AW 18 R1?