win32asmguy
-
Posts
676 -
Joined
-
Last visited
-
Days Won
3
Content Type
Profiles
Forums
Events
Everything posted by win32asmguy
-
It was a refurbished model from Lenovo Outlet: https://www.lenovo.com/us/outletus/en/p/laptops/thinkpad/thinkpadp/thinkpad-p16-gen-2-16-inch-intel/21fbx03500 It was not actively marketed as an option available as I think Lenovo (or Nvidia) wanted to steer purchasers to the Legion series. Same situation as the Precision 7680/7780. If you contact a sales rep they could probably setup a CTO quote with it. Pricing is likely around what they charge for the Ada4000 option.
-
Another one you might look into is a P16v Gen 1. It is similar to the P16 but has an AMD 7840HS chip which in theory should be more energy efficient / silent than an Intel HX chip especially if you select a model without a dGPU and are willing to repaste with PTM7950.
-
I have a P16 G2 configured with 13950HX and 4090 mobile. It is pretty quiet running in the default balanced mode under load where the fans max out at 45dB and more importantly have no high pitched whine to them or fan duty pulsing. It can also benefit from replacing the paste on the CPU and GPU with PTM7950. I will also note that with the P16 G2 if you want a heatsink with a CPU side vapor chamber you have to choose atleast an Ada3500 GPU.
-
*Official Benchmark Thread* - Post it here or it didn't happen :D
win32asmguy replied to Mr. Fox's topic in Desktop Hardware
Speaking of desktop flexibility what are your thoughts on 7800x3d vs 7950x, primarily for gaming with world of Warcraft. I also run encoding jobs on this machine so I would like to have the 16 core chip if it does not hurt gaming much. This is a choice you pretty much cannot easily change on any laptop these days. -
*Official Benchmark Thread* - Post it here or it didn't happen :D
win32asmguy replied to Mr. Fox's topic in Desktop Hardware
Yeah I looked at a few 7900 options and this one stood out as it was essentially the same performance level as the 4090 mobile which I have used but just more consistent. I was also looking at the Asus 4080 Super with Noctua cooling but it seemed more expensive and harder to find. I was able to get my Cosair kit to work at 6000 30-39-39-79 based on what HWInfo64 says its XMP profile would have supported at 6000 speed. It seems stable as they only issue I had was initially turning on XMP at 6400 which I guess does not work with the AMD chips. The hard part about this will be detoxing myself from thinking I need a high end laptop for gaming. I will have to be content with mid-grade performance with reduced settings as the high end stuff is just too noisy and hot with they way they are building them these days. Not to mention things just being locked down left and right. I thought I could get around that with an open source bios but there are still things I simply cannot configure because Nvidia or Intel has an NDA on low level specification documents. -
*Official Benchmark Thread* - Post it here or it didn't happen :D
win32asmguy replied to Mr. Fox's topic in Desktop Hardware
I am interested to hear the results! I recently got fed up with trying to get consistent gaming performance out of my newer laptop so ended up upgrading my desktop and transitioning to it for gaming for a while. Got these parts for it: 7800X3D using my old NH-D15S MSI MAG X670E Tomahawk Corsair 2x16GB DDR5-6400 CL32 (at 6000 CL32 for now) XFX 7900 GRE I kind of wondered if I would be better off with a 7800X3D or 7950X. I will want to run encoding jobs on this machine but it is probably not a big deal if they take longer if the 7800X3D is better suited for gaming. The 7800X3D definitely seems to be running cooler than the 12900KS in games while offering better FPS. I am happy to not be going with Intel and Nvidia with this build. -
Yes it works with any Intel motherboard. Yes, usually the vendors do slightly customize their BIOS from Clevo. If you do switch to the XMG BIOS you might be able to get your kits working. You may also need to pick up the OEM Samsung memory that they qualified for that BIOS as well. 128GB is honestly finicky to get working in any system especially without being able to apply extra VCCSA or other tricks usually used on enthusiast desktop boards. You may even find that one CPU may run the memory more stable than another, just simple because it has a better binned memory controller.
-
You can use Intel FPTW to backup the BIOS. It needs to be the correct version corresponding to your Intel ME version. It can usually be obtained from the Win-Raid forums or bios packages provided by XMG (part of the ME update folders if I recall). I believe the EC can also be backed up via the same ITE command line tool that is used to update. There is a good writeup about backing up the BIOS here: https://brendangreenley.com/undervolting-2020-dell-laptops-like-the-vostro-7500-and-more-tips-to-improve-thermals-battery-life-and-speed/#cpu-undervolt
-
They started selling the camm to sodimm interposer on their website so you can at least get to 96 GB for a good price.
-
From what I can tell Superbuy will ship to the EU. This is the store listing in Taobao where they can be obtained so you have Superbuy pull up that URL and process a purchase. When I bought them first they received them in China, unpacked and took photos for approval. Then you have to pay the forward shipping fee from China to your address. The whole process took about three weeks from initial purchase. Be sure and watch the Superbuy site everyday because it seems like they need approvals / fees paid without sending email notifications. https://www.taobao.com/list/item/642056230536.htm
-
You could try GSkill F4-3200C18D-32GRS which is rated at CL18 without needing XMP. I was not able to get it stable in my X170SM with a 10900K but you may have more luck. Be sure to choose a kit that is dual rank and has decent tRFC.
-
Clevo x170sm Bios modding RTX 3080 support
win32asmguy replied to Pfudaniel's topic in Sager & Clevo
After some testing I determined that I was wrong on my initial assumption. The subsystem ID has to be overridden here instead specifically for the dGPU: https://github.com/system76/coreboot/blob/f1caea884c49bebd657631bcbf8859ad9aac740b/src/drivers/system76/dgpu/ramstage.c#L36 Everywhere else it should remain 0x7714 except for the GPU and the GPU audio device. With that changed it allows the unmodded drivers without an issue. -
Clevo x170sm Bios modding RTX 3080 support
win32asmguy replied to Pfudaniel's topic in Sager & Clevo
Oh, if you want to test the System76 firmware on your X170SM I can help with attempting to get it setup! -
Clevo x170sm Bios modding RTX 3080 support
win32asmguy replied to Pfudaniel's topic in Sager & Clevo
I think I found the cookie in my coreboot variant of the X170SM that associates it with the device whitelist in the Nvidia installer: https://github.com/system76/coreboot/blob/6e1a07ca56bf6cfb3b0969971a886a59bb18a3e2/src/mainboard/system76/bonw14/devicetree.cb#L58 In theory changing that to the X170KM identifier should allow stock drivers to install. I have not tested that but will soon. Just to catch up on the other feature support of the 3080 with this bios here is where it is at: Suspend / Resume works but takes 30 seconds to resume (may be the same case with the 2080 super as I think their ACPI resume routines wait longer in each stage of powering the GPU back on to ensure the process succeeds) No support for Nvidia PCF / Dynamic Boost as it did not exist until much later when they added support for 3080 mobile model refreshes but it may be possible to backport it No support for GSync as I believe it was not supported on the 2080 super on this bios. Either they did not have time to add the feature or did not get necessary information from Nvidia to add it (more likely) Video Output support - I have only tested the TB3 port on the back side to confirm it works. I did not test mDP or HDMI. I do know that the X170KM has a different port layout (TB4 is dual port on side) so the VBIOS for the 3080 may be configured differently than the 2080 Super. There is an ACPI table defining the port/pipe configuration for the Nvidia GPU but it seems to use a propritary format so we would need to dump ACPI from an X170KM to compare. -
Sadly the community doesn't put much emphasis on the other part of the problem, poor quality locked down firmware. I want to explore that more and I have a newer system that despite being BGA, has an open source BIOS and EC which I can freely modify. It really makes a system be very close to how many would run a desktop - without proprietary control software. It isn't exactly a very cost effective system as I believe Clevo charges over $500 more to get an equivalent motherboard without Intel Boot Guard, which requires a signed bios using their keys in order to boot up. There is also the cost of porting Coreboot to new hardware which is a very hard sell to anyone who expects open source firmware to cost the same as proprietary firmware.
-
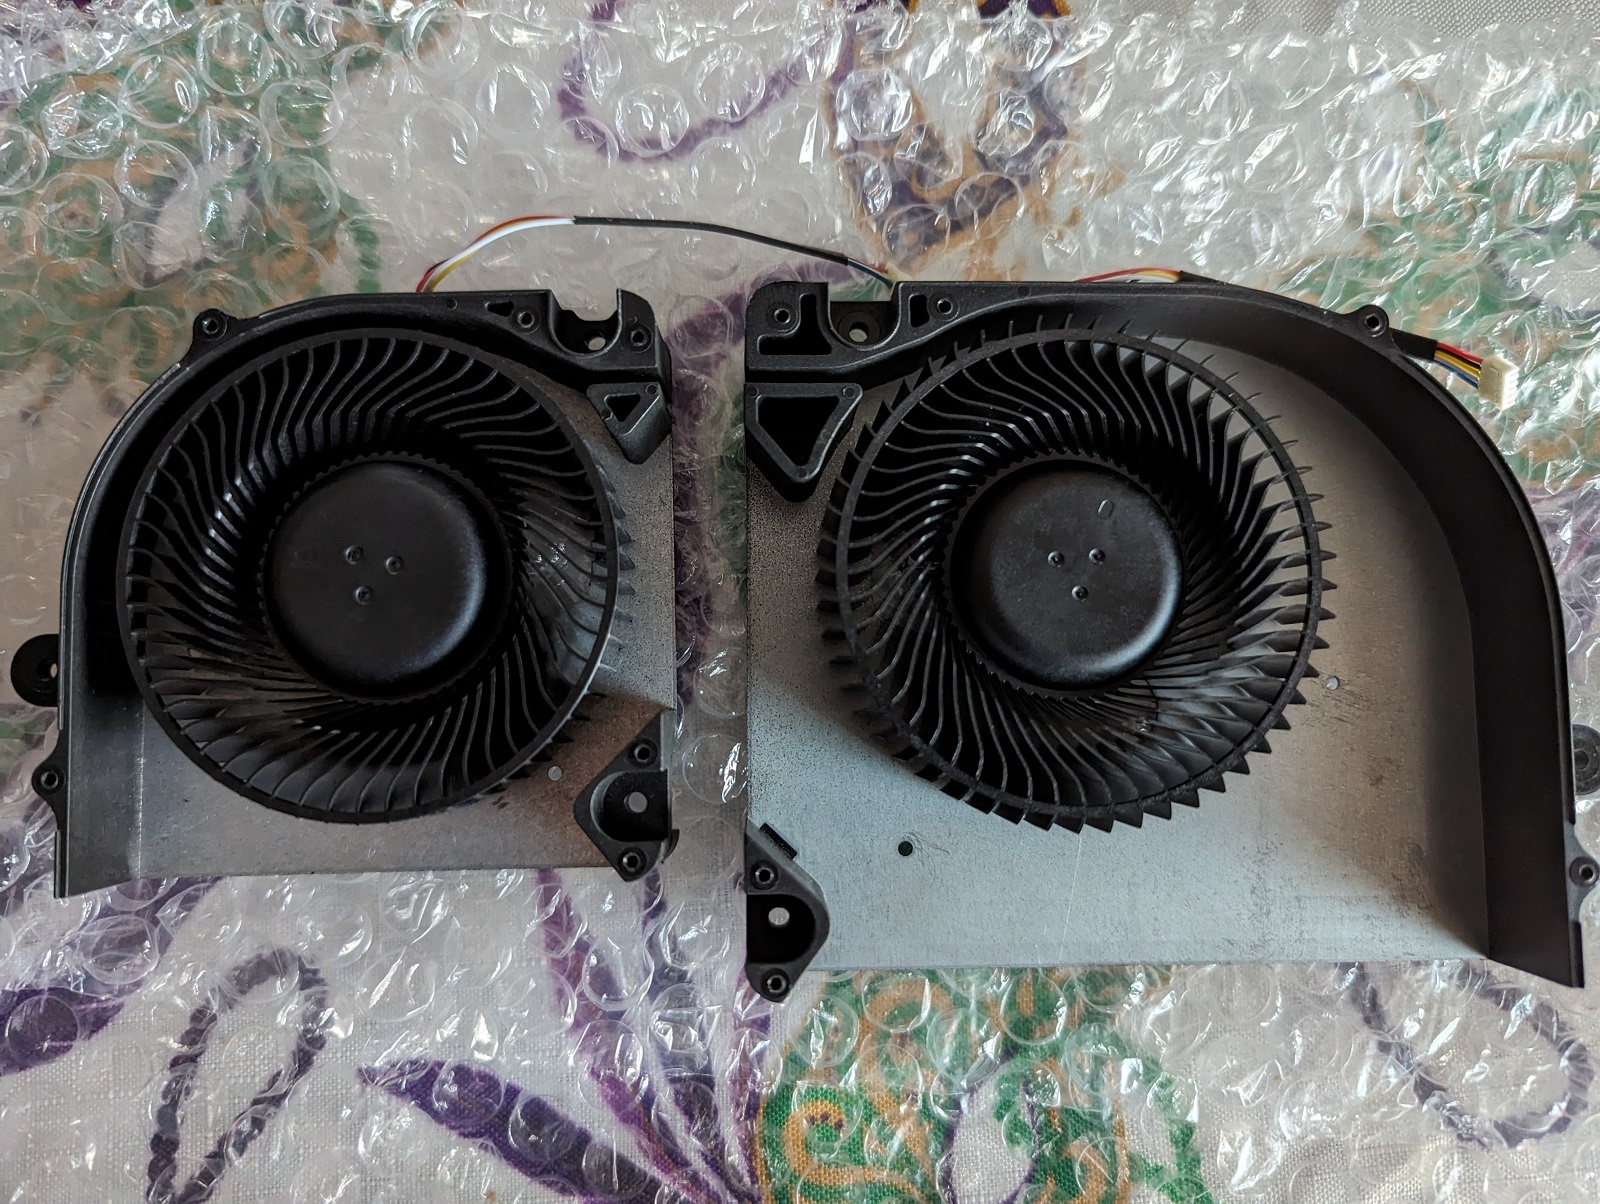
Right. And the price is too low as well. The real ones are 350 yuan each because they harvested the fans from Alienware 51m r2 and adapted them to the x170 housing with the proper header.
-
The taobao fans from thermalsabre are different. Where did you order yours? I used superbuy as my agent and then sent photos of the fans before forwarding them to the USA.

-
You have to remove the screen lid to get to that plastic cover. Then break a chunk out of it so you can easily clip to the chip in the future:

-
The Titan 18 also has a full magnesium alloy palm rest (not a metal backplate like the Raider 18) which to me is more notable as it gets the build quality closer to a mobile workstation. What really hurts the Titan and Raider is that they should offer four models of each, 4080+QHD, 4080+UHD, 4090+QHD, 4090+UHD. That way anyone can purchase whatever screen and GPU they want depending on the use. All of those should come with 32GB of memory and 2TB of storage, let resellers do value added upgrades beyond that. I would have had the vapor chamber come with all Raider 18 / Titan 18 with 4080 and 4090. I like the design of the Raider 18. It is better than the Asus Strix 18 for sure. It does not have coil whine issues either. I do believe the front RGB light bar can be safely unplugged but would need to test. The lid logo RGB is integrated into the LCD cable so it cannot be disabled the same way.
-
Yeah I was also interested in the Titan 18 but the only QHD config listed in the USA isn't available and it will likely be priced well over 4000usd. Honestly the haptic touchpad is an overpriced gimmick feature and should be optional. The Raider 18 I purchased is sold by Costco online only. You do have to purchase/have a Costco membership but they also include an additional year of warranty and even more if you use their credit card. MSI doesn't even list them as a reseller.
-
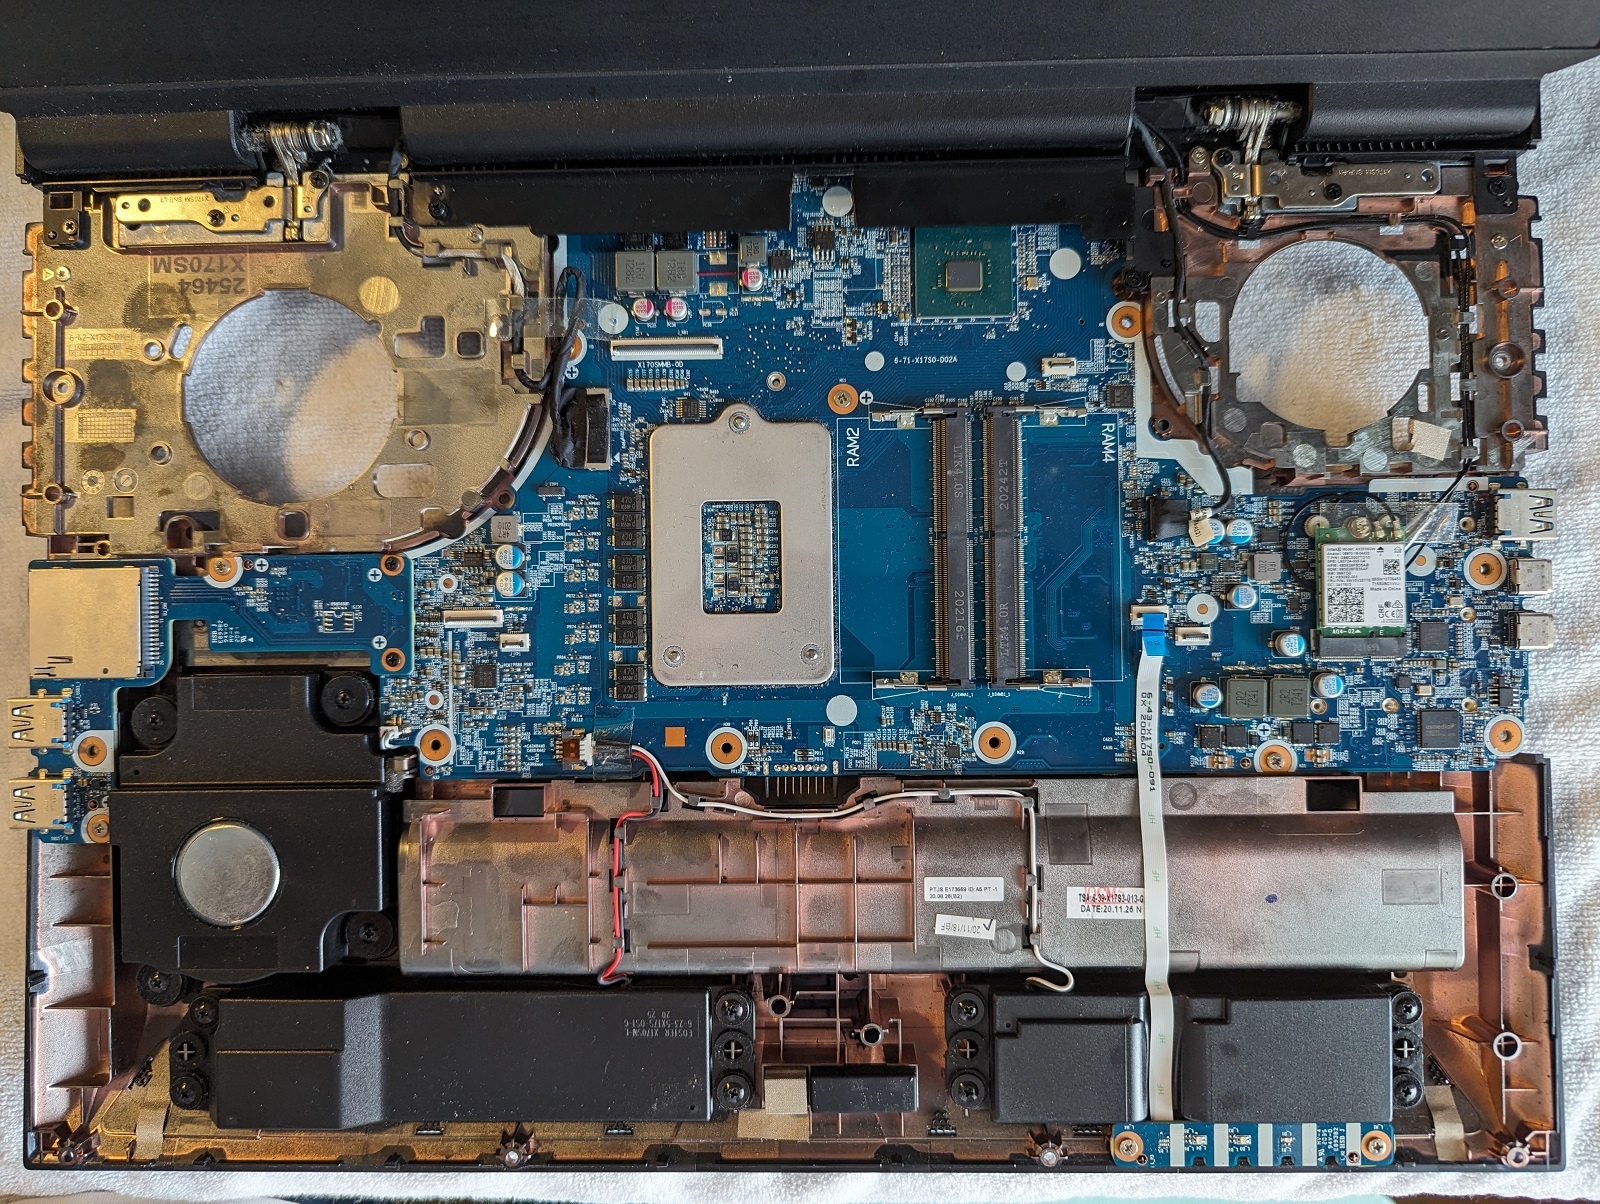
This model is new for 2024 and is a lower cost alternative to the Titan 18. Specs of my configuration: 14900HX 32GB (2x16GB) DDR5-5600 SK Hynix OEM memory by default at DDR5-4000 but operates at DDR5-5600 CL46 by changing bios options 1TB Samsung PM9A1 Gen4 SSD RTX 4080 mobile 175W 18 inch 2560x1600 240hz IPS display Membrane RGB keyboard with full numberpad Clickpad Fingerprint Reader 2 Years of warranty through Costco As configured 3000usd Build Quality The chassis has a metal lid, plastic palm rest and plastic bottom cover. The hinge area appears to be magnesium alloy just like the Titan 18. The keyboard and trackpad area has a metal plate backing. The chassis feel solid without any creaking noises or keyboard flex. Performance The 14900HX performs well out of the box, approximately 32k in CBR23 pulling up to 180W with fans in default mode and no undervolting. The 4080 mobile got about 18,500 in Timespy. Timespy - https://www.3dmark.com/spy/47763507 Steel Nomad - https://www.3dmark.com/sn/48023 This system ships with a 330W brick but according to the manual 400W is supported. It may be worthwhile to get one of those and test it! OS Support Windows 10 installs and is fully supported including Nahemic for audio, MSI Center for fan and feature control, and Steelseries GG for RGB control. I have not tested out Linux yet. Fan Noise / Cooling Pretty pleasant. Minimal high pitched whine and with MSI Center they can be set to not be annoying loud under load. This model uses a heatpipe system instead of a vapor chamber like the Titan 18. It does use properly spaced mounting posts on the CPU side so core deltas appear to be good. The motherboard appears to support the vapor chamber from the Titan but would need the backplates installed for GPU and potentially the CPU which require motherboard removal along with sourcing the parts. The fans appear to be the same brand and model that the Titan 18 uses. Good Things Great QHD display with no bloom issues present from the miniLED option. It has a MSI Center option to enable/disable display overdrive The trackpad has defined edges The palm rest has small top speaker grills on each side which might make it sound better than the Titan 18 Bad Things RGB is enabled by default with a rainbow effect on cold boot which is only disabled when Steelseries GG loads The trackpad feels spongy and is plastic. It also has a poor adjustment to the button and has 1-2mm play before it actuates which really makes it not pleasant to use! MUX Control option is disabled even in the advanced bios furthering the need for MSI Center App auto updates have to be disabled in Steelseries GG, MSI Center and the Microsoft Store as these control apps have already pushed updates that break features for 14th Gen models! No USB-C/USB-A on back side for a clean docked setup More info to come. Feel free to ask questions!
-
It seemed like the Insyde bios for the NH55 had support for additional e-core clusters present in 13th Gen and newer. I guess integrating updated microcode was not enough as I am sure Prema tried it. I am going to make a thread about the MSI Raider 18 which I have been testing for a couple of weeks now. It has been the best 18 inch laptop I have used so far and worth some discussion.
-
I would enjoy attempting to port Coreboot to the NH55 but I believe all of the chassis were sold with Intel Boot Guard enabled requiring signed bios images with Clevo's keys. To me the NH55 never got a fair shot at being a good seller as Sager and XMG did not offer it. It was also overshadowed by 12th Gen HX being released a few months later which magically filled the gap in Intel's lineup where the NH55 and a LGA based X170 successor could have thrived. Now we just have a bunch of competitors which mostly have barely adequate cooling, locked down firmware, tasteless RGB, inferior repairability compared to past designs and much higher prices.
-
It can fit. Get it around that obstruction initially then the rest can pop down into place.
-
*Official Benchmark Thread* - Post it here or it didn't happen :D
win32asmguy replied to Mr. Fox's topic in Desktop Hardware
If you happen to go the Linux-friendly laptop route I would suggest the System76 Oryx Pro 12. It is a Clevo PE60 chassis which is their only model with a vapor chamber. The firmware (both BIOS and EC) can be customized so it is closer to a desktop mainboard in that regard. I have the X370 myself but it has an inferior cooling system unfortunately so it has trouble with maintaining high combined loads. It is sad that the X170 has such a better cooling system than the X370. They literally cut the z-height in half from one generation to the next which was completely unnecessary for a "flagship" model.