

JadeRover
-
Posts
183 -
Joined
-
Last visited
-
Days Won
2
Content Type
Profiles
Forums
Events
Everything posted by JadeRover
-
It's the only Coffe lake + MXM laptop that has a 2.5inch drive bay + Optical disc drive 🤪 I'll have to try an EDID mod, I will soon (1 month) get my hands on a zbook 15 g3 + T1000 MXM, since the zbook has eDP on DP_C and T1000 has it on DP_D, it will be useful to try this out.
-
Ah, my bad I confused DP redriver/retimer with DP demuxer 😅 Nice example with that (zbook 17 g5 ?) schematic, what I mean't to say previously is that I have never seen a demuxer output fed into the eDP connector on the motherboard. So you are saying that the redriver might be interfering with the EDID i2c communication ? It seems that the one you found is listening to the GPU communication and then adapting it's signal filtering & gain based on the DP signal speed, the rest is probably passthrough between the LCD EDID and the GPU aux wires. EDIT : here is the awesome post that has useful links for EDID hacking that I used on my DC m6700 to get 10bit color depth to work :
-
This is very interesting. I had never thought of modifying the EDID of the panel to ensure compatibility but this is a good idea. Aren't these used to split a DP+/DP++ signal into DP and HDMi or DP and DP ? On all schematics I have seen, DP redrivers are never used for eDP connections, only mux switches between CPU eDP and GPU eDP. A good test would be to flash the EDID of the internal LCD with a standard DP display instead of eDP. I had done such a modification to the EDID of my Dream Color display inside my M6700 to enable 10 bit color depth, without this mod, the display couldn't be set to 10 bit color depth.
-
Yes, that is why a backlight mod will work, eDP = DP + backlight pins + firmware to control the backlight signals Did you manage to repair the M17x r3 motherboard ? It looks to have a lot of liquid damage, nothing impossible to fix, I assume you are already well based in SMD motherboard repairs. Usually water damage kills resistors and it can disable power stages by messing up pull up/down signals which is annoying to diagnose.
-

Finally the new RTX MXM cards will work in our laptops!
JadeRover replied to SuperMG's topic in Components & Upgrades
There shouldn't be any other problems, the usual nvidia driver modification must be done on windows to use the GPU and you will be all set. If it's okay with you can you tell us the price for the A2000 and pro 2000 ? It would be nice to know. -
Finally the new RTX MXM cards will work in our laptops!
JadeRover replied to SuperMG's topic in Components & Upgrades
I would say yes, if the MXM interface of these cards is the standard one. You might need to watch out for the heatsink screw holes + these cards probably have a beefy VRM on the right side of the card (m2X00m) cards have only 2 inductors, these might have 4 or 5 so heatsink modification might be required. Just like the RTX4000 MXM-A series of cards that X-vision sells Here is an M2200 : and here is the 4070 MXM Also what is nice is that you can use a 4K or 4K dreamcolor LCD with the zbook 15 g3 and still keep the integrated graphics to drive the LCD. Might be worth the upgrade to utilize the extra GPU power since the 6th gen CPU you have will limit FPS regardless of display resolution.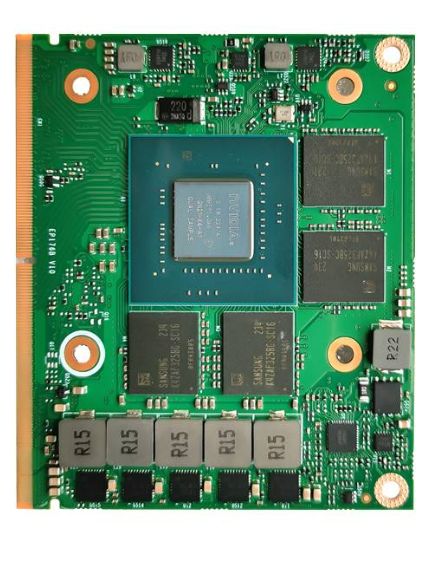
-
Hello, I am interested in buying out broken MXM laptops. I have good knowledge of motherboard repairs so I can attempt repairs. Either in complete or incomplete state Price to be discussed based on the system + the state + the components Currently I am interested in Dell precision M4800 and M6800 Also interested in precision 7520/7720, zbook 17 G4 zbook 17 g5 and zbook 17 g6. I am in France/EU so EU shipping is the most worth while. Also any other broken workstation/powerfull laptops without an MXM slot I am interested in buying. Thanks, have a good one.
-
HP Elitebook 8570W - is it still good ? Hardware modifications
JadeRover replied to GuitarG's topic in Custom Builds
They do not, that was the case on 8570 and 8770 G5 and G6 (probably G4 too) have eDP on DP_D position of MXM slot, G1, G2 and G3 have eDP on DP_C so either a custom vbios is required to get picture on screen or a backlight cable mod. All zbooks have only eDP display connections. 17 g1 and 17 g2 have an eDP to LVDS converter on the display cable because they used LVDS displays, the GPU will read the display as eDP however. -
HP Elitebook 8570W - is it still good ? Hardware modifications
JadeRover replied to GuitarG's topic in Custom Builds
The RTX 5000 MXM from HP has different mounting holes for the heatstink + screw standoffs to attach the card to the motherboard, this is compared to the standard MXM cards. If you want to fit a P5200 in the 17 G6 you will need the heatsink from the 17 G5, and vice versa if you want the RTX 5000 in the 17 G5. You will also have to grind down the screw standoffs on the 17 G6 motherboard and either : - stick some thick rubber pad and screw the card down on that. - stick some thick thermal pad so that the card "sticks" to the motherboard via the pad + cools down a little bit (especially the extra VRAM chips on the bottom of the card) Hope this helps ! -
Precision M6800 questions and upgrades
JadeRover replied to Jers6410's topic in Pro Max & Precision Mobile Workstation
Yes, you can use linux to flash the stock ES vbios. Overclocked ES vbios requires a hardware flasher. External keyboard is recommended yes. -
Precision M6800 questions and upgrades
JadeRover replied to Jers6410's topic in Pro Max & Precision Mobile Workstation
https://github.com/JadeRover/Nvidia-vBIOS-Clock-Power-Tweaker/releases It is pretty self explanatory, if you have any questions don't hesitate. you need CH341a bios programmer with 1.8v add-on module ! Also I recommend you half assemble the laptop (leave the keyboard + keyboard deck removed) to have easy access to the MXM gpu during flashing and testing, making sure the custom vbios works before assembling the laptop entirely. -
Precision M6800 questions and upgrades
JadeRover replied to Jers6410's topic in Pro Max & Precision Mobile Workstation
Yes this one will work, it had eDP on port DP_D. So in the dell bios -> Video, chosing switchable graphics enable or not will result with you getting an image on the internal display. With switchable graphics OFF you will get an FPS boost. Also feel free to overclock the engineering vbios with my utility, I can guide you through the procedure 😉 -
ADLINK RTX 3000 MXM suddenly died?
JadeRover replied to Hussain Alhadher's topic in Alienware 17 and M17x
Seing as your charger shut's off immediately, it is safe to assume that the main power rail (+19v) of your MXM gpu is shorted. The charger supplies the MXM slot directly, making it cut out with GPU installed = the MXM card is main power rail shorted. This is either due to a capacitor that shorted itself or a high side mosfet short, the high side mosdfet are driving a secondary power rail (+VCC_CORE, +VCC_VRAM, +VCC_PEX, +VCC_1.8v) Best case is a capactitor as it can't damage anything else, mosfet is more problematic as the secondary power rails I mentionned are all at <2v and they suddenly received +19v for a few milliseconds, this is enough to internally destroy the core or the vram chips. I would highly recommend you get a multimeter, even at your local hardware store it will be less than <10$ and very useful for future projects/life. With the multimeter you can trace down the short and then you will need a controlled power source, such as a lab bench PSU to inject a small voltage of 1v @ 2-3 Amps so that the shorted components warms up. Then the component must be replaced (this is more complicated) You can also go to a repair shop and tell them you think it is main power rail short because of charger cutting out immediately, if they do actual motherboard level repairs (not a given) they should be able to confirm it and tell you if the card is fixable. -
Nvidia-vBIOS-Clock-Power-Tweaker - PASCAL TESTING NEEDED !
JadeRover replied to JadeRover's topic in Components & Upgrades
Hello, Sorry I am a bit busy with stuff that is not CPR lately. Can you send me your vbios ? I can have a look in the program + with HEX editor to understand what is going on. -
That's just the MXM standard of 10A, they copied it from their reference sheet probably. These arae the ones with the external power connector ? The connector is the same as the one in the XM and KM ? Yes I would agree with this, the simplest way to find out is to use a multimeter and touch one of the big pads while the computer is on, there isn't much risk as the pads are big and an accidental short to ground is unlikely. If this is the case, that it is not connected, the fix would be to solder a wire from the main power rail (19v when the charger is plugged in, 12v when the battery is), the other voltages, 5 volts and 3.3v are probably connected as they don't have an "NC" marker.
-
Nvidia-vBIOS-Clock-Power-Tweaker - PASCAL TESTING NEEDED !
JadeRover replied to JadeRover's topic in Components & Upgrades
Hello, I need to test that out, I still haven't figured out what inside the vbios is responsible for the boost to 1911Mhz vs 1708Mhz -
Nvidia-vBIOS-Clock-Power-Tweaker - PASCAL TESTING NEEDED !
JadeRover replied to JadeRover's topic in Components & Upgrades
This stock HP VR backpack bios worked to make the card post and get the core to 1911Mhz, I am trying to reverse engineer it to find where the 1911M hz limit is VS the 1708Mhz limit in the dell vbios. P5200_HP_ZVRG1.bin -
Nvidia-vBIOS-Clock-Power-Tweaker - PASCAL TESTING NEEDED !
JadeRover replied to JadeRover's topic in Components & Upgrades
Yes I though of that as well, I am also thinking of looking into the voltage table that should exist? I found some info of it for Pascal on the internet, that might be a way to unlock clocks or undervolting for these cards. -
Nvidia-vBIOS-Clock-Power-Tweaker - PASCAL TESTING NEEDED !
JadeRover replied to JadeRover's topic in Components & Upgrades
OK, so you set 4004mhz on vram and that allowed the card to oc the ram? I've done more testing on the downclocking of the card and I noticed that setting lower clocks just on the core clock list results in downclock + only downclocking on the limit clocks found in the vp profiles also results in downclock (both are independent). So that means that card reads both core clock list + vp profiles to set it's clock value. On my p4000 if I left the limit clock untouched and OC core clocks in the clock list, card would not OC, I also had to raise vp profile limits clocks. My program does both but it appears that this isn't enough for p5200, there must be another hidden "max" limit clock value, in our case 1708mhz. Now I will attempt to replace the p5200 vp section with the sections of GTX cards and p4000 to see if that resolves the issue. EDIT : Well I am starting to fear that the 1708Mhz is baked in deeper into the vbios or the driver as even when using a GTX Virtual P state table or parts of VP table of the MSI P5200 vbios I still hit the 1708Mhz wall... I still have some hope as I am pretty sure the MSI vbios does make the card boost to 1911Mhz (userbenchmark scores) as well as the HP zvr backpack vbios. + Some guy in china managed to boost the P3200 & P4200 to 1900Mhz & 9Ghz vram : P3200 : Search & P4200 : Search The MSI vbios flat out refuses to boot on my system. Pasting parts from the performance section into the working "dell" vbios results in no boot as well -
Nvidia-vBIOS-Clock-Power-Tweaker - PASCAL TESTING NEEDED !
JadeRover replied to JadeRover's topic in Components & Upgrades
I've done some testing on my P5200, my utility can downclock the core no problem + GPU-z shows the correct base and boost clocks of my utility, so it is editing the correct core clock values. -
Nvidia-vBIOS-Clock-Power-Tweaker - PASCAL TESTING NEEDED !
JadeRover replied to JadeRover's topic in Components & Upgrades
Can you post the vbios that works with the 8ghz OC and the one that doesn't ? What vbios did you use as a base to test these OCs ? I can take a look at the differences -
Nvidia-vBIOS-Clock-Power-Tweaker - PASCAL TESTING NEEDED !
JadeRover replied to JadeRover's topic in Components & Upgrades
I experienced something similar with my p4000: Base memory was 6ghz. If I put any value >6ghz it would lock to 7ghz. And then it only applied 9ghz (4504mhz in my tool). Thus it appears quadros skip the 2nd memory oc? On my p4000 : 6ghz -> 7ghz -> 8ghz (skipped) ->9ghz On the p5200 : 7.2ghz -> 8ghz -> 9ghz (skipped) -> 10ghz (maybe)? You can try 10ghz if you are feeling lucky 😉 Also you said modifying core clocks ruins the memory oc? I'll get moving on shucking my p5200 and testing on it -
Nvidia-vBIOS-Clock-Power-Tweaker - PASCAL TESTING NEEDED !
JadeRover replied to JadeRover's topic in Components & Upgrades
Yes that is because out of the 3 places where the clock values are saved, only one needs to be modified for the Px200 cards (at least that's what worked) You can see this in the VP table tab of my app, only the VP profile memory clock is at 4004 mhz. The clock in the VP footer is 3607mhz, same as in the clock table (main tab). Can you tell me what is written at the bottom of the gpu z main window? For the GPU clock, memory and boost? You said that for vbios 1 it did show the ram overclock, what vbios is it? Also in the coming days I'll probably shuck the p5200 out of my zbook 17 g5, solder a vbios chip, and put it on my mxm test bench so I can test multiple different vbios mods quickly. -
Nvidia-vBIOS-Clock-Power-Tweaker - PASCAL TESTING NEEDED !
JadeRover replied to JadeRover's topic in Components & Upgrades
Here are some vbios I made : Both at max 160w - MSI is your dell vbios that has had it's VP table swapped for the one in the MSI vbios -> 1911Mhz on core under load - MEM is your dell vbios that has had it's memory clock values (inside VP table) swapped for an imac one. The value should be 4004 Mhz. p5200_dell_OC_MEM.binp5200_dell_OC_MSI.bin -
Nvidia-vBIOS-Clock-Power-Tweaker - PASCAL TESTING NEEDED !
JadeRover replied to JadeRover's topic in Components & Upgrades
What does the GPU-z windows show ? Normally the edits from the program to base and boost clocks should be visible there.